Environment and DLP Policy management
Watch a walk-through of how the environment and DLP request process works.
Process description
Problem statement: When a development project requires a new Environment, and non-admins are restricted from creating Environments, the only way for non-admins to access new Environments is for admins to provision the Environment and grant permissions to users. Admins can become the bottleneck of development if volume of demand for environments is high because multiple steps are involved. New environments may also require new connectors or DLP policies.
Solution: The below process can be used by non-admins to request new environments and changes to DLP policies for their environments.
Developers (non-admins) can:
- Submit requests for new environments.
- Submit requests for DLP policies to be applied to their environments.
Admins can:
- Provision new environments for developers using the app.
- See how new environments will be affected by data loss prevention policies.
- Approve or reject DLP policy requests.
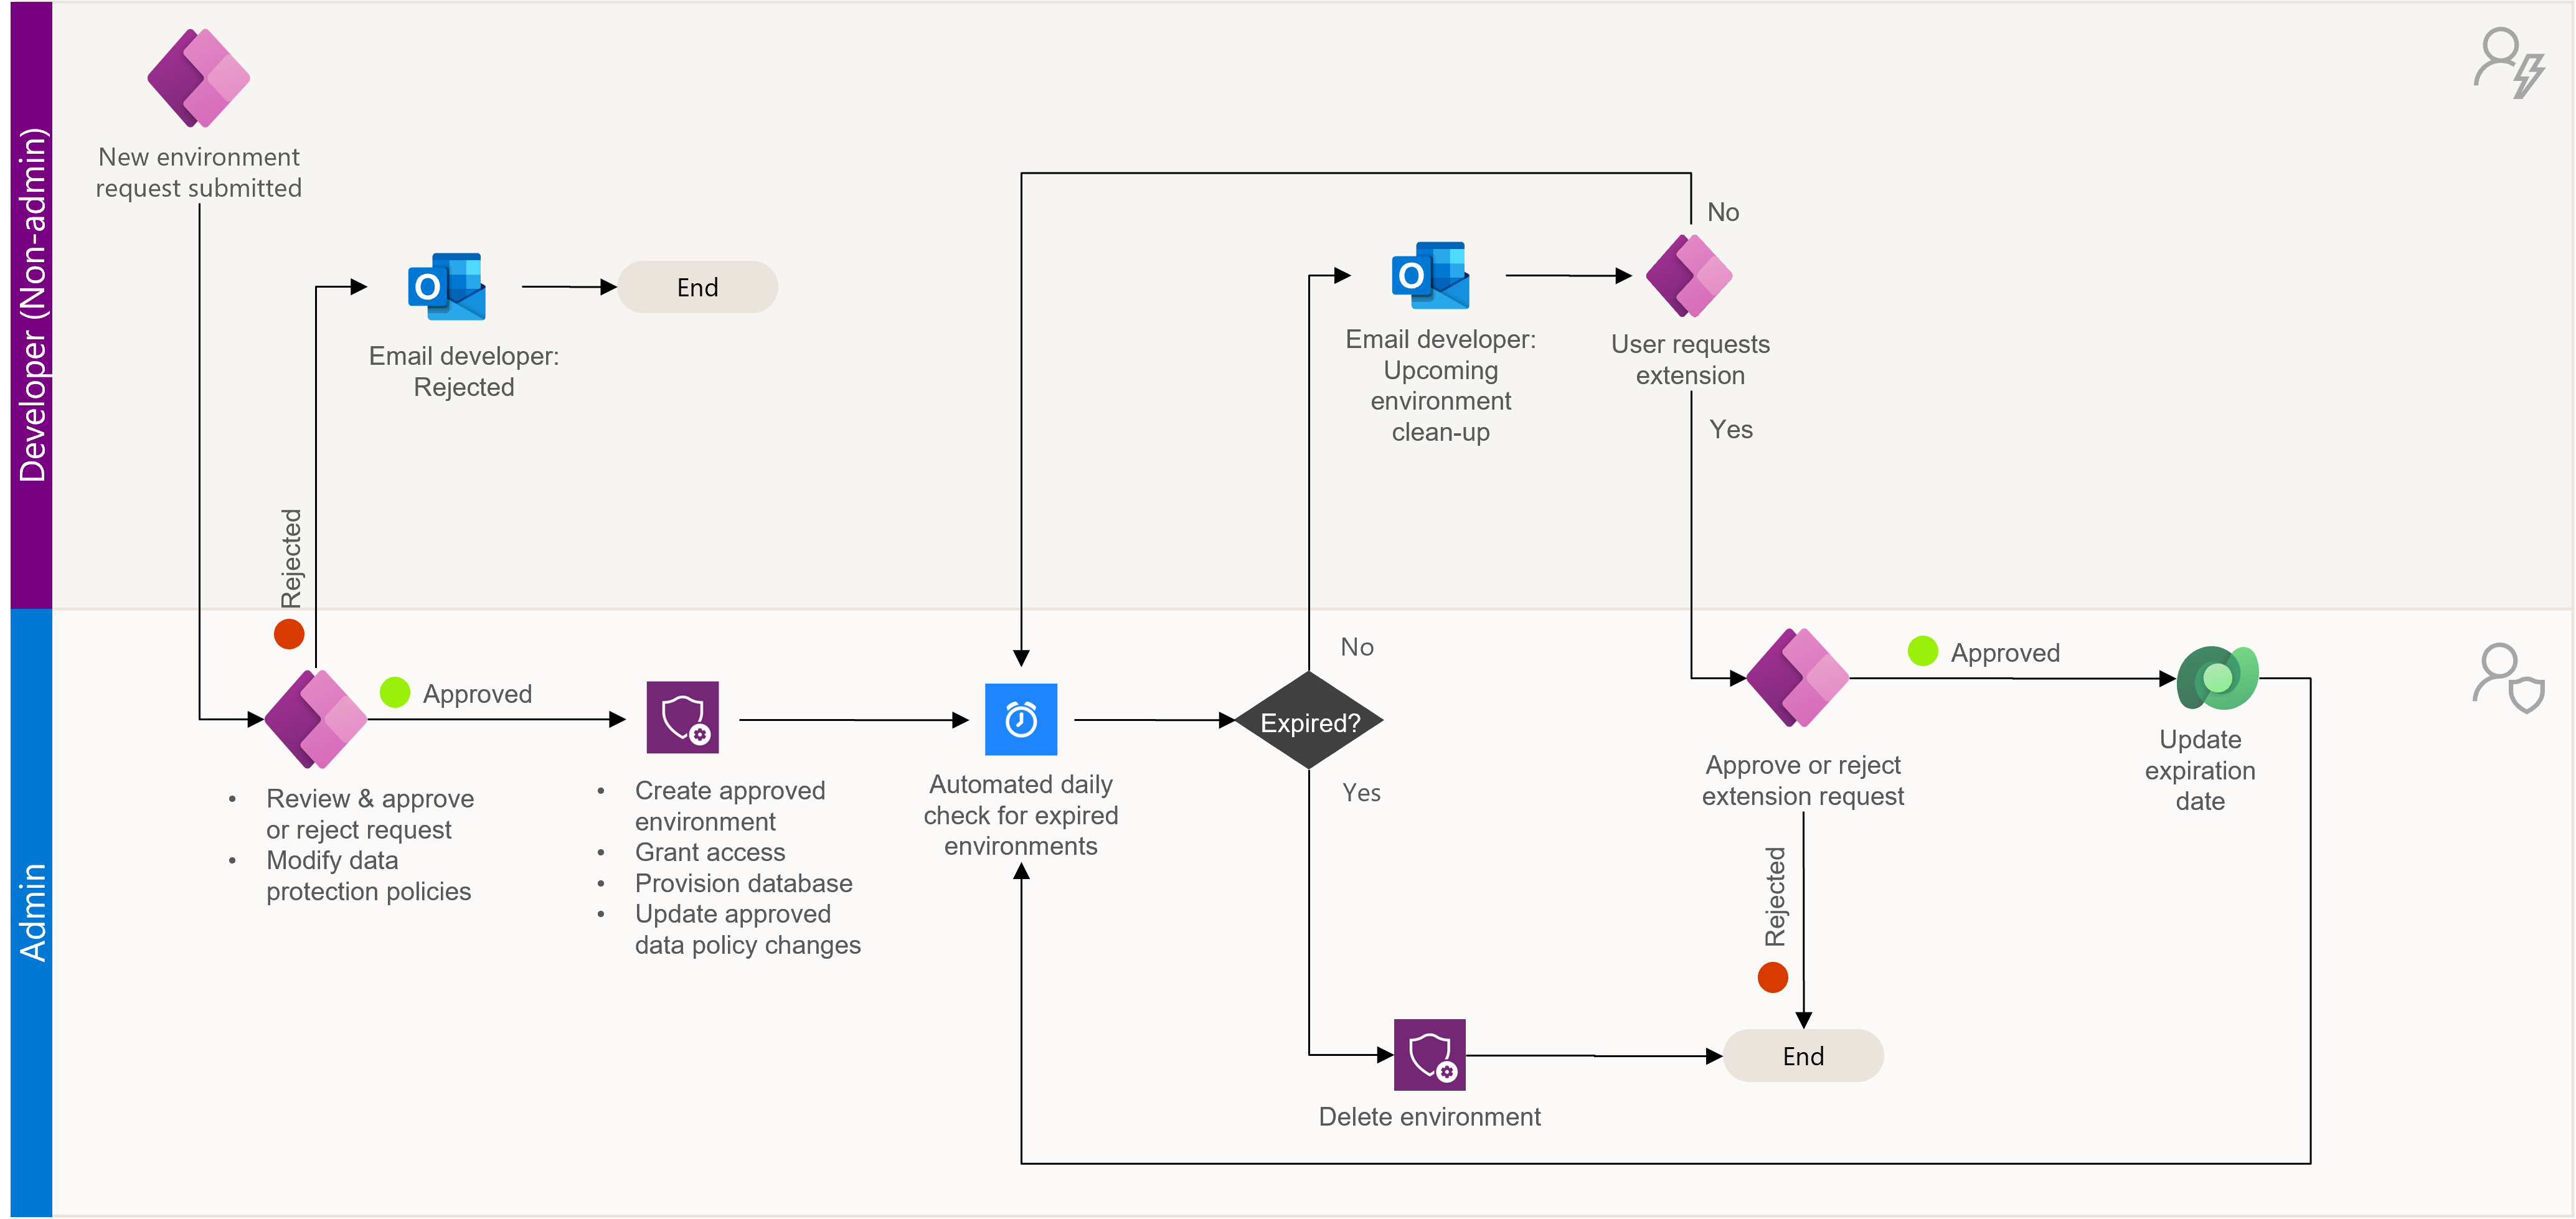
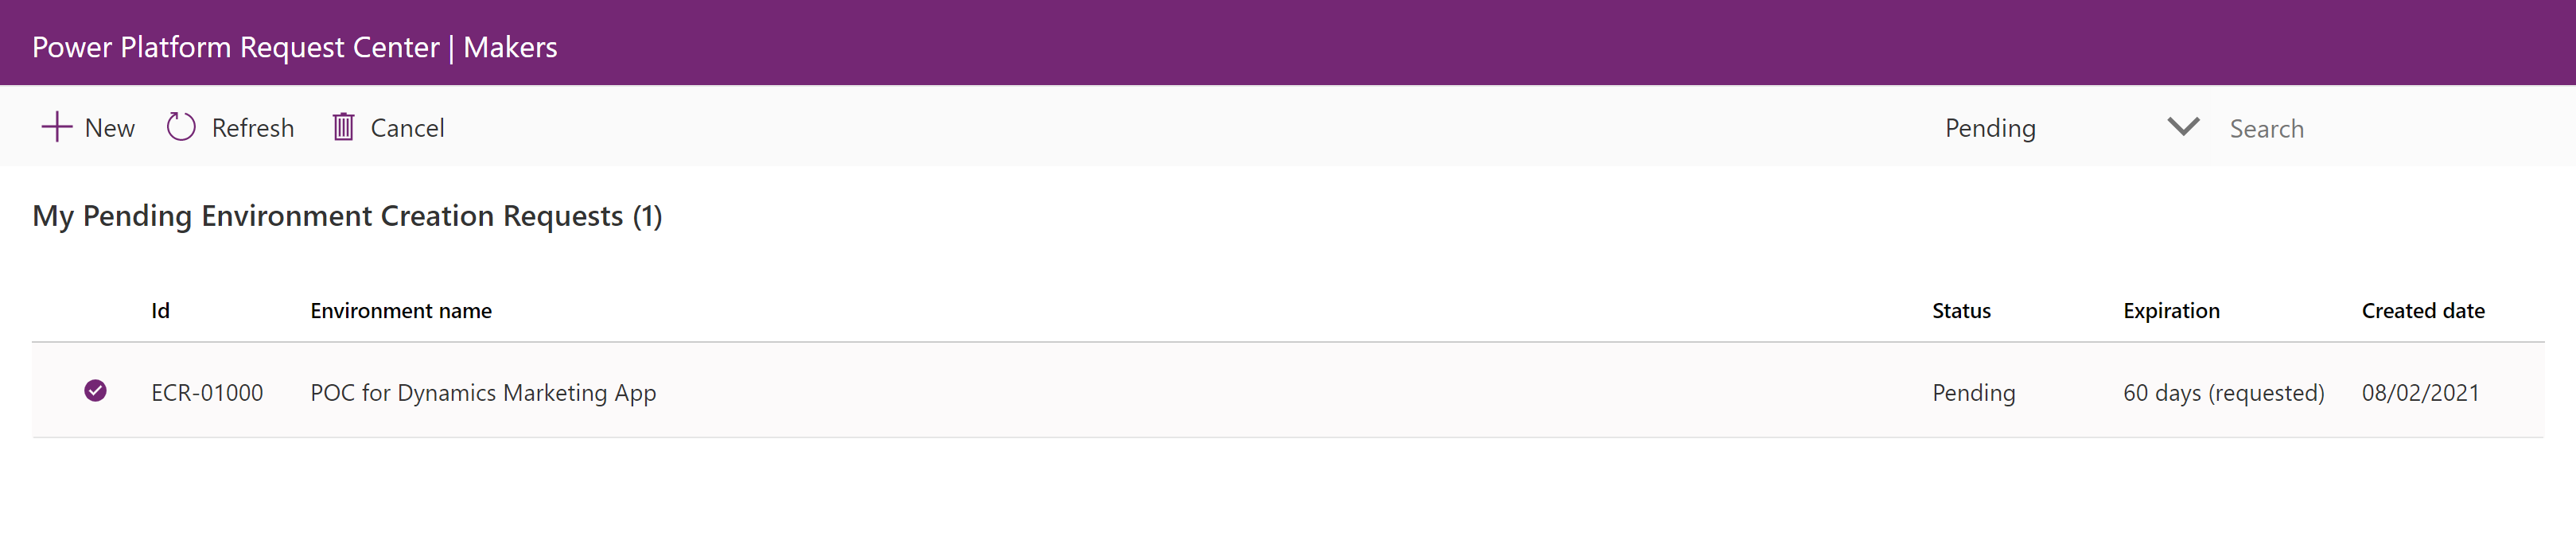
Developer: Request an environment
Developers (non-admins) can request new environments for their admin to triage.
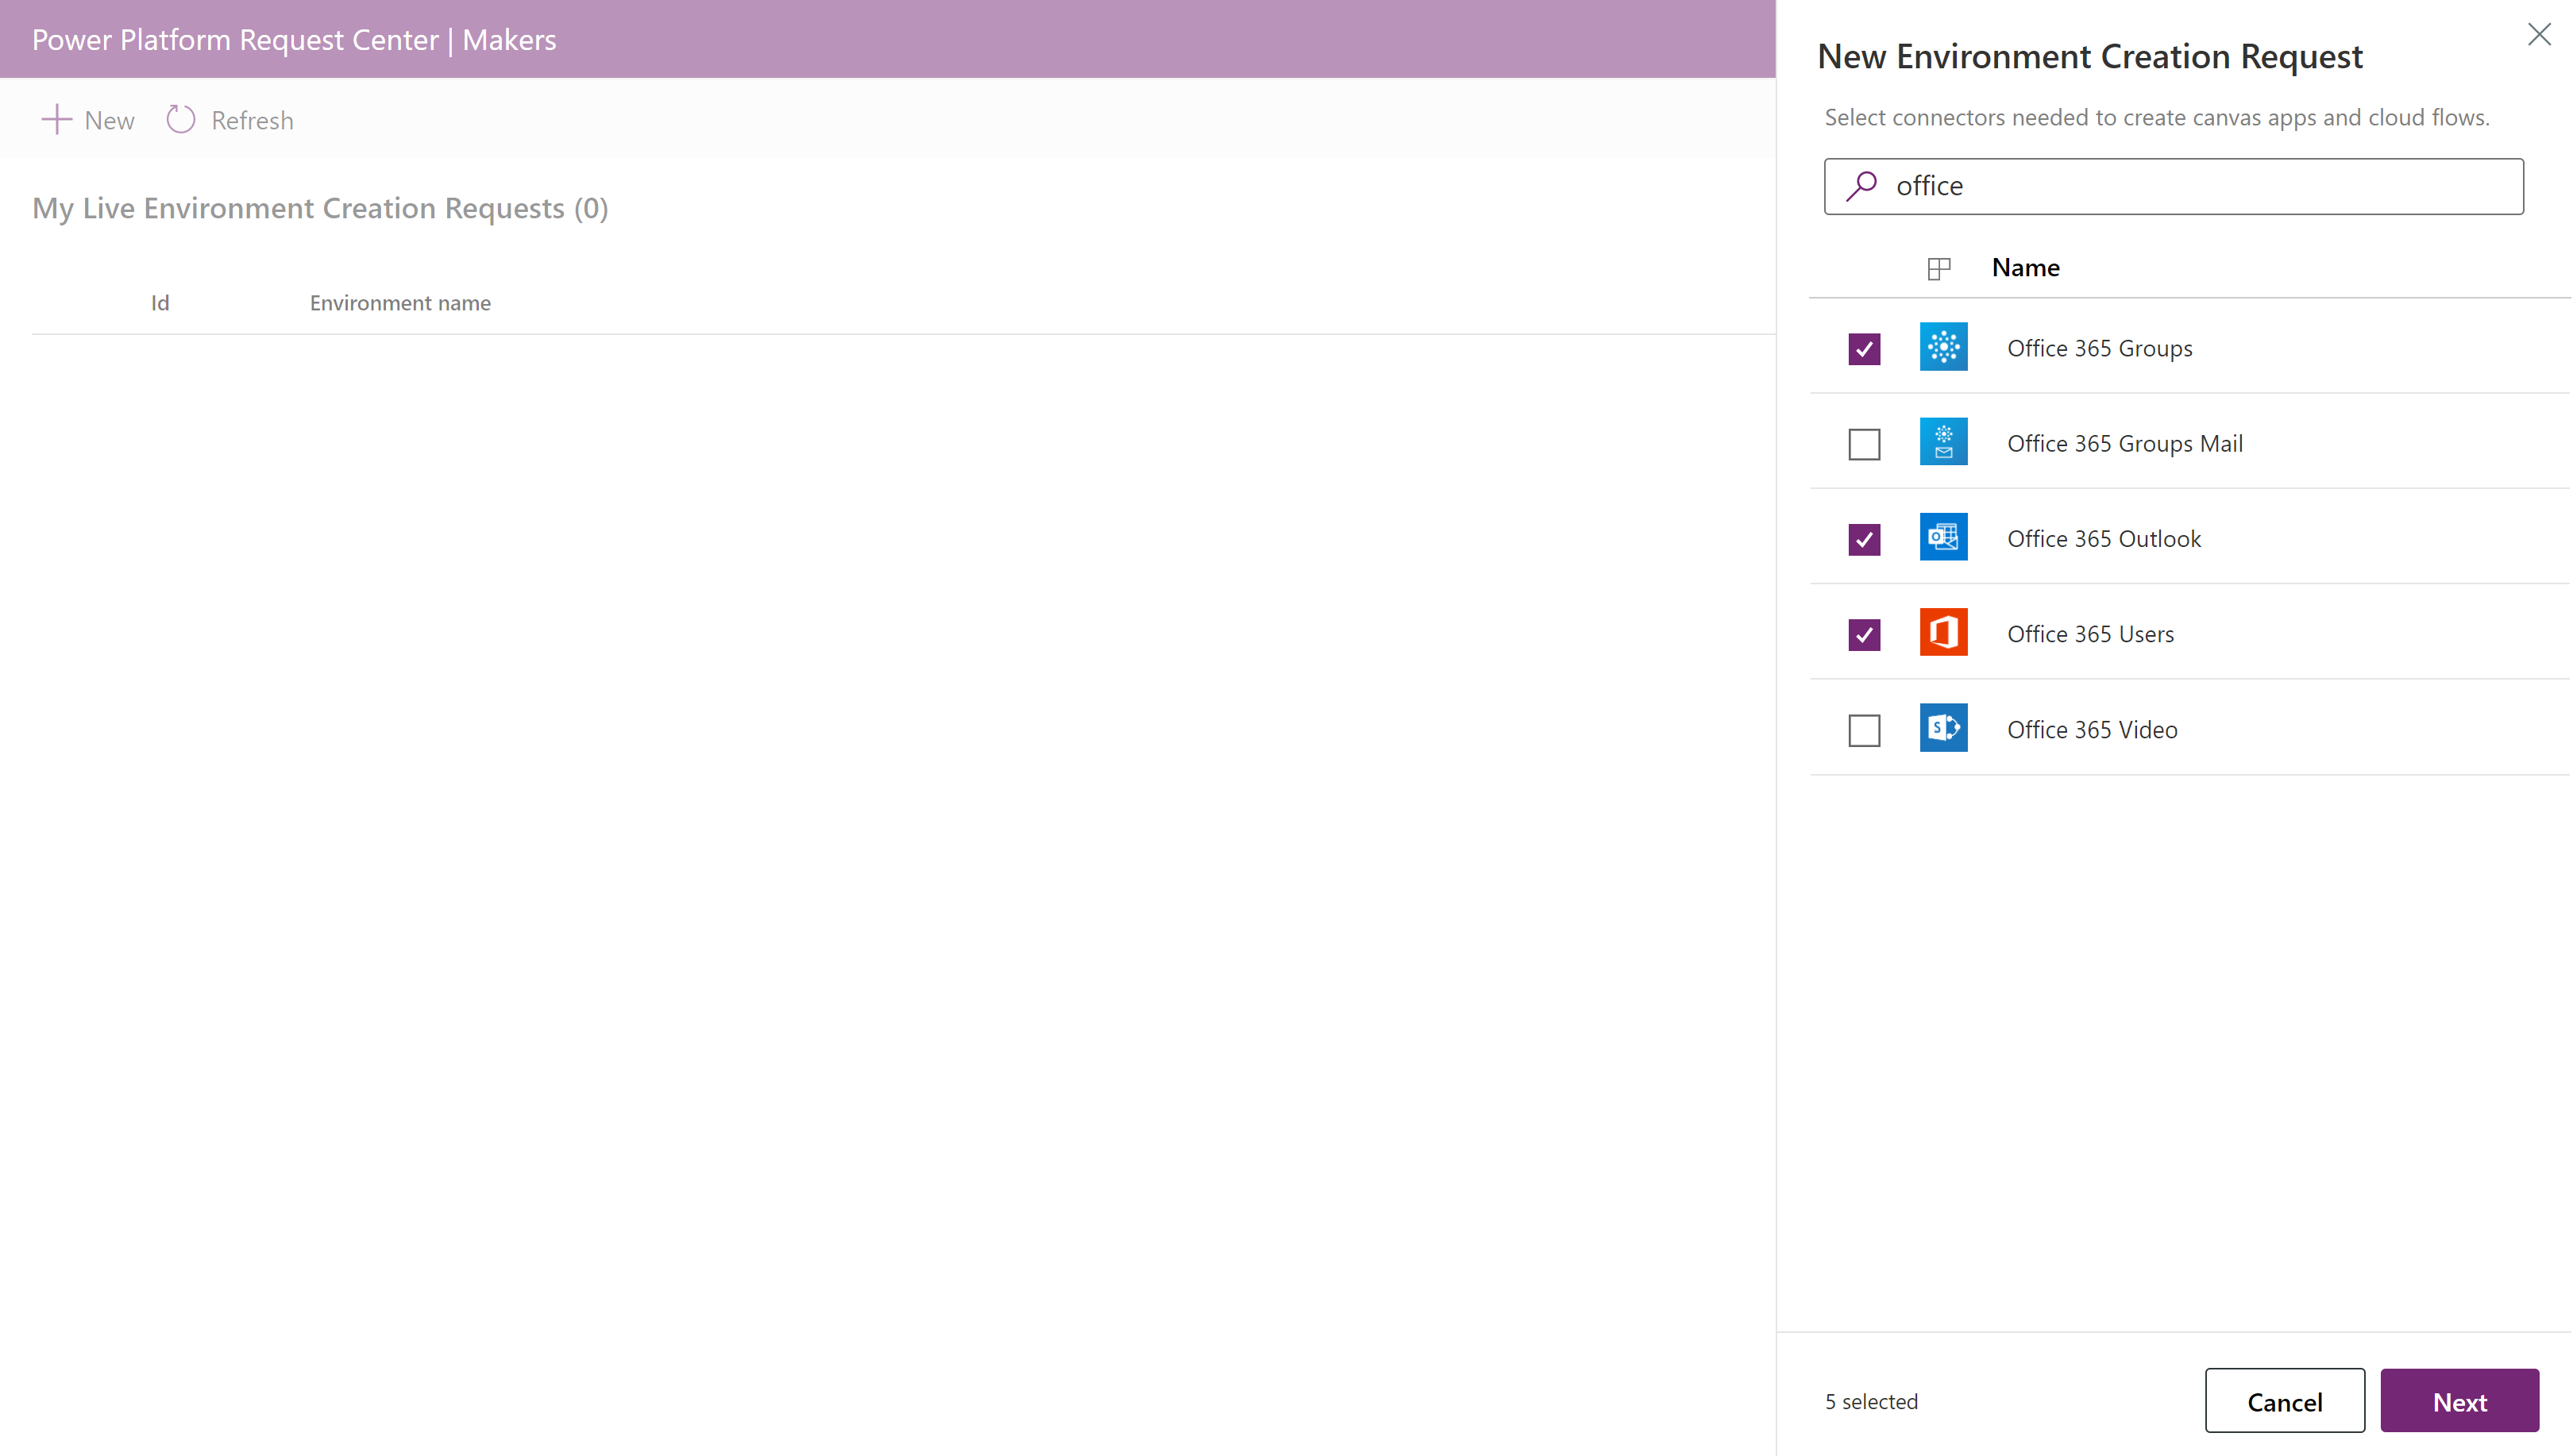
Open Maker – Environment Request app.
Select + New
In the fly-out menu, choose the desired connectors that will be needed in the new environment. Then select Next.
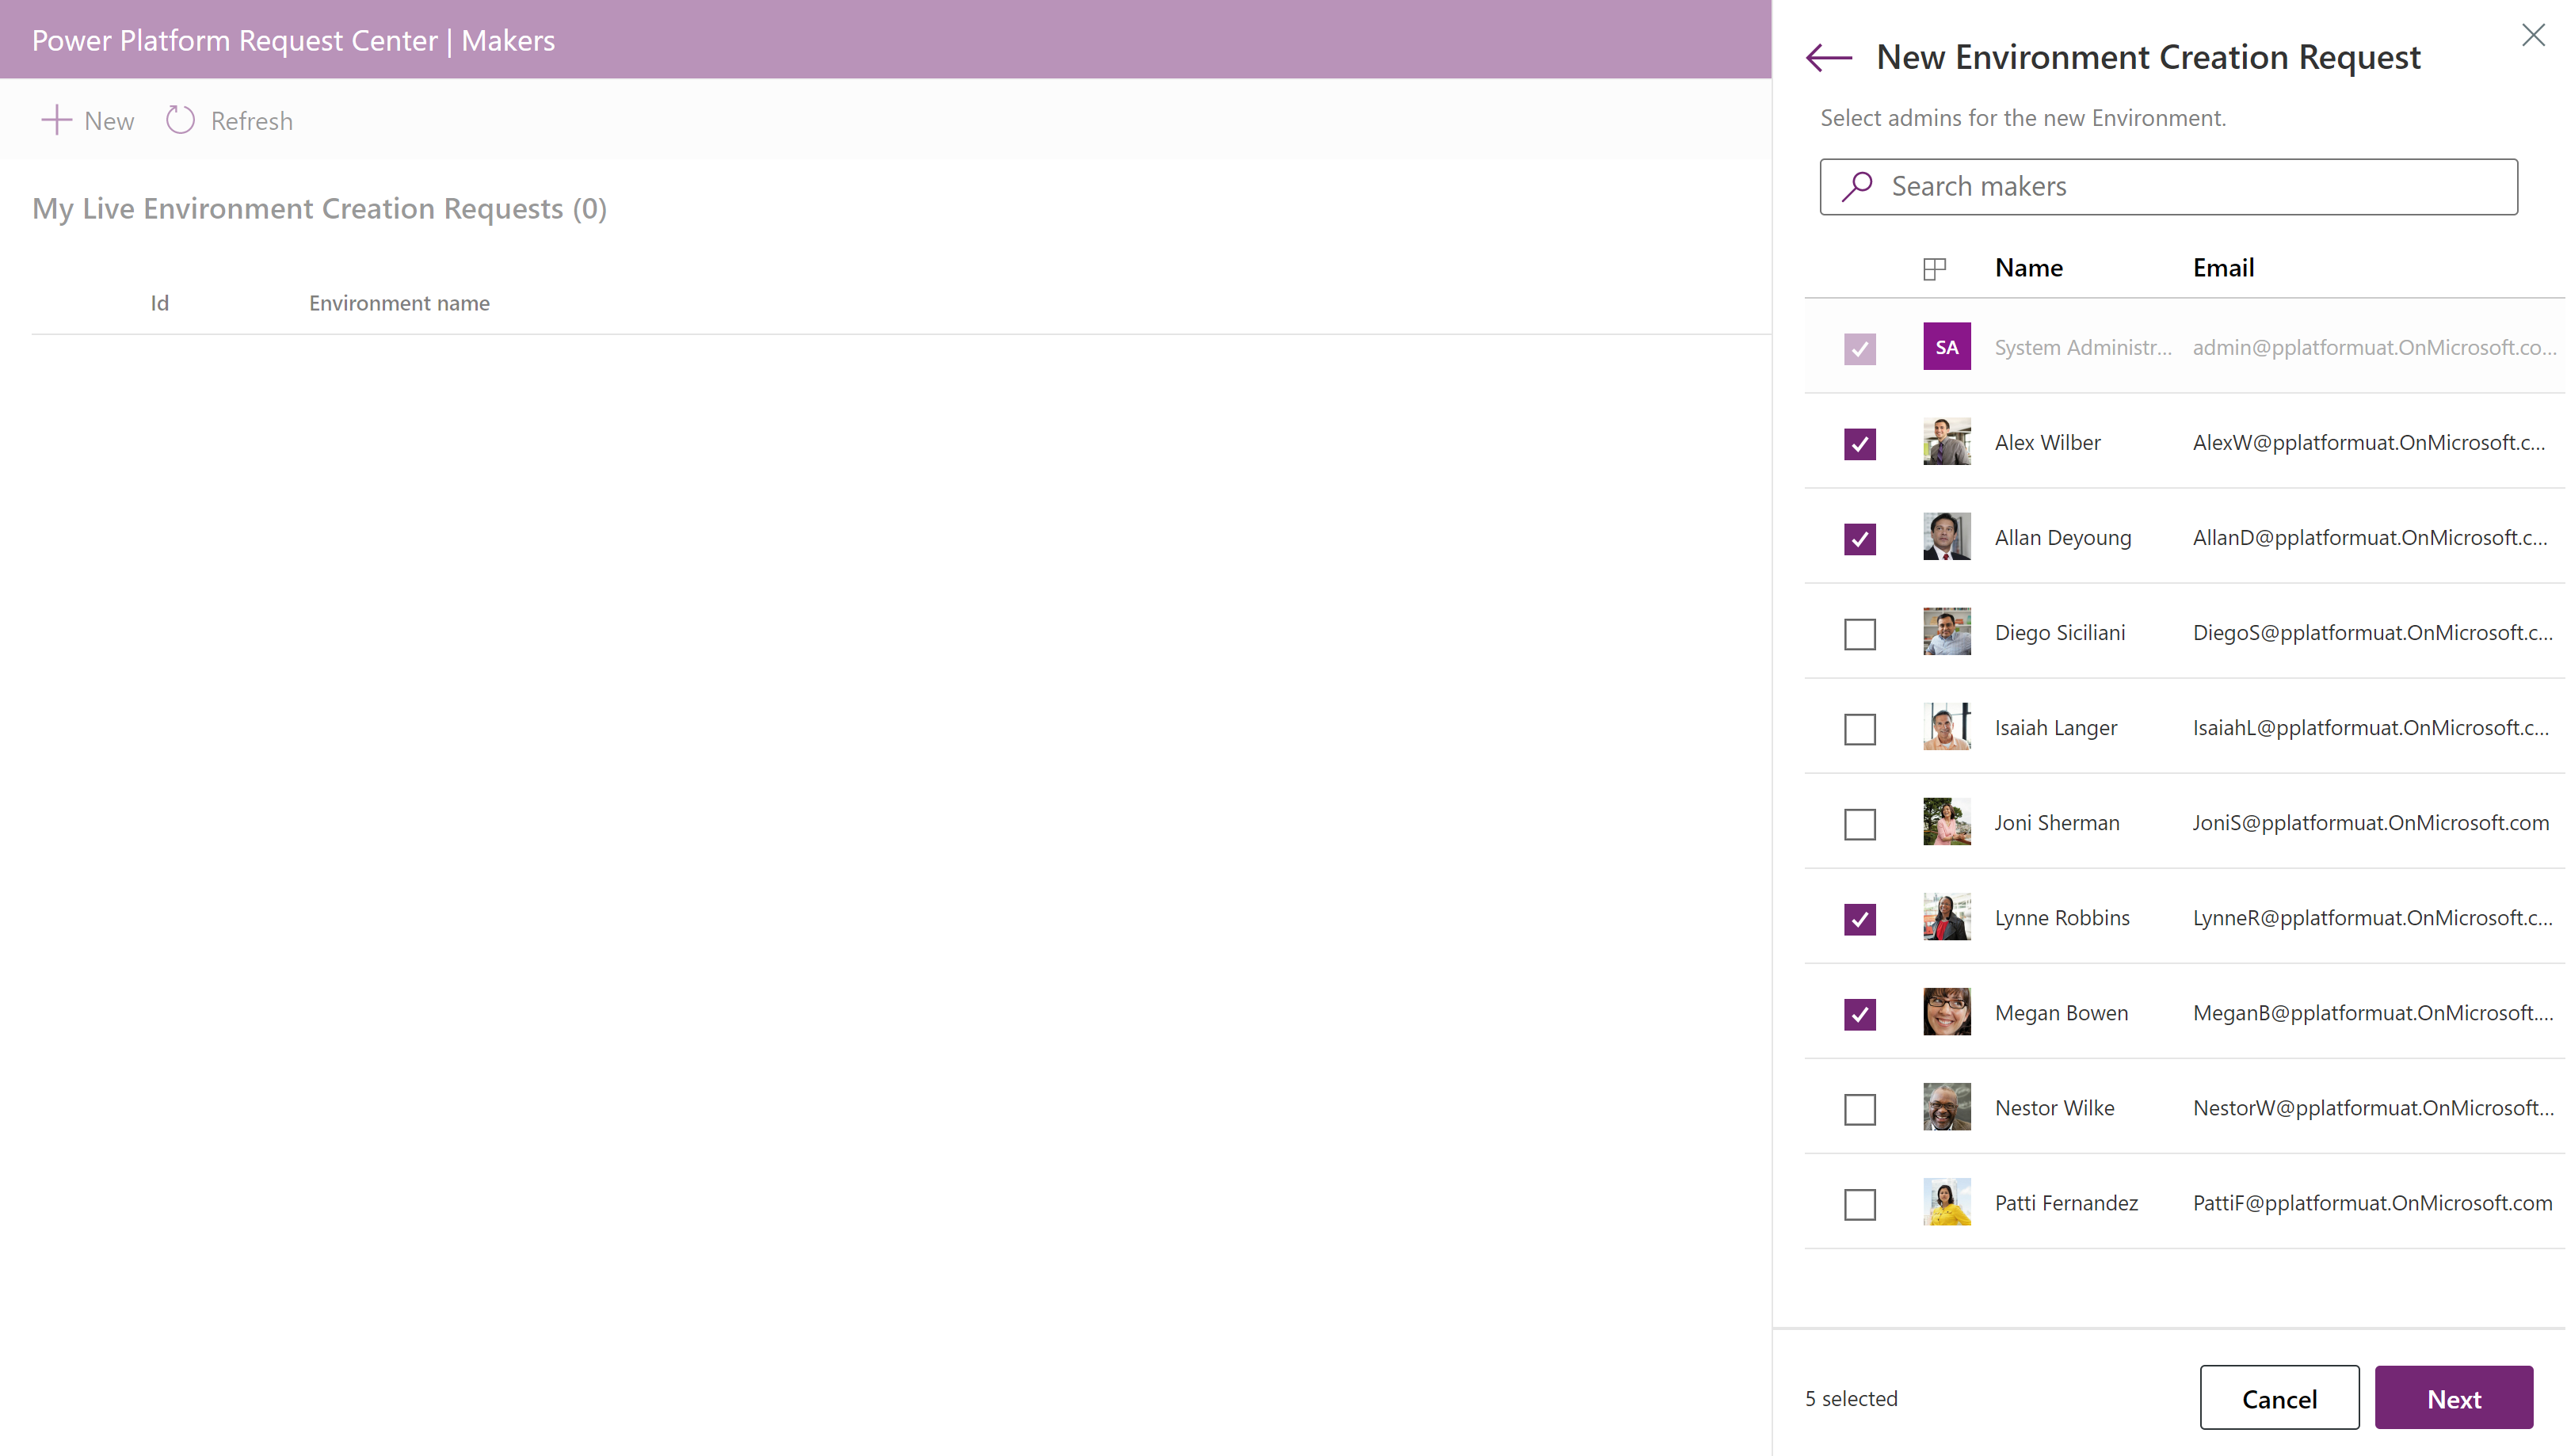
Choose the user accounts who will need environment administrator access.
Provide basic details about the desired environment, including the display name, region, type, purpose.
Indicate if the environment can be automatically cleaned up after a certain period of time.
- If yes, then provide a duration (in days) from the dropdown that appears. Do this if you only need the environment for a short term project.
- If no, the environment will not be deleted automatically. Do this if you need to keep the environment for a long time.
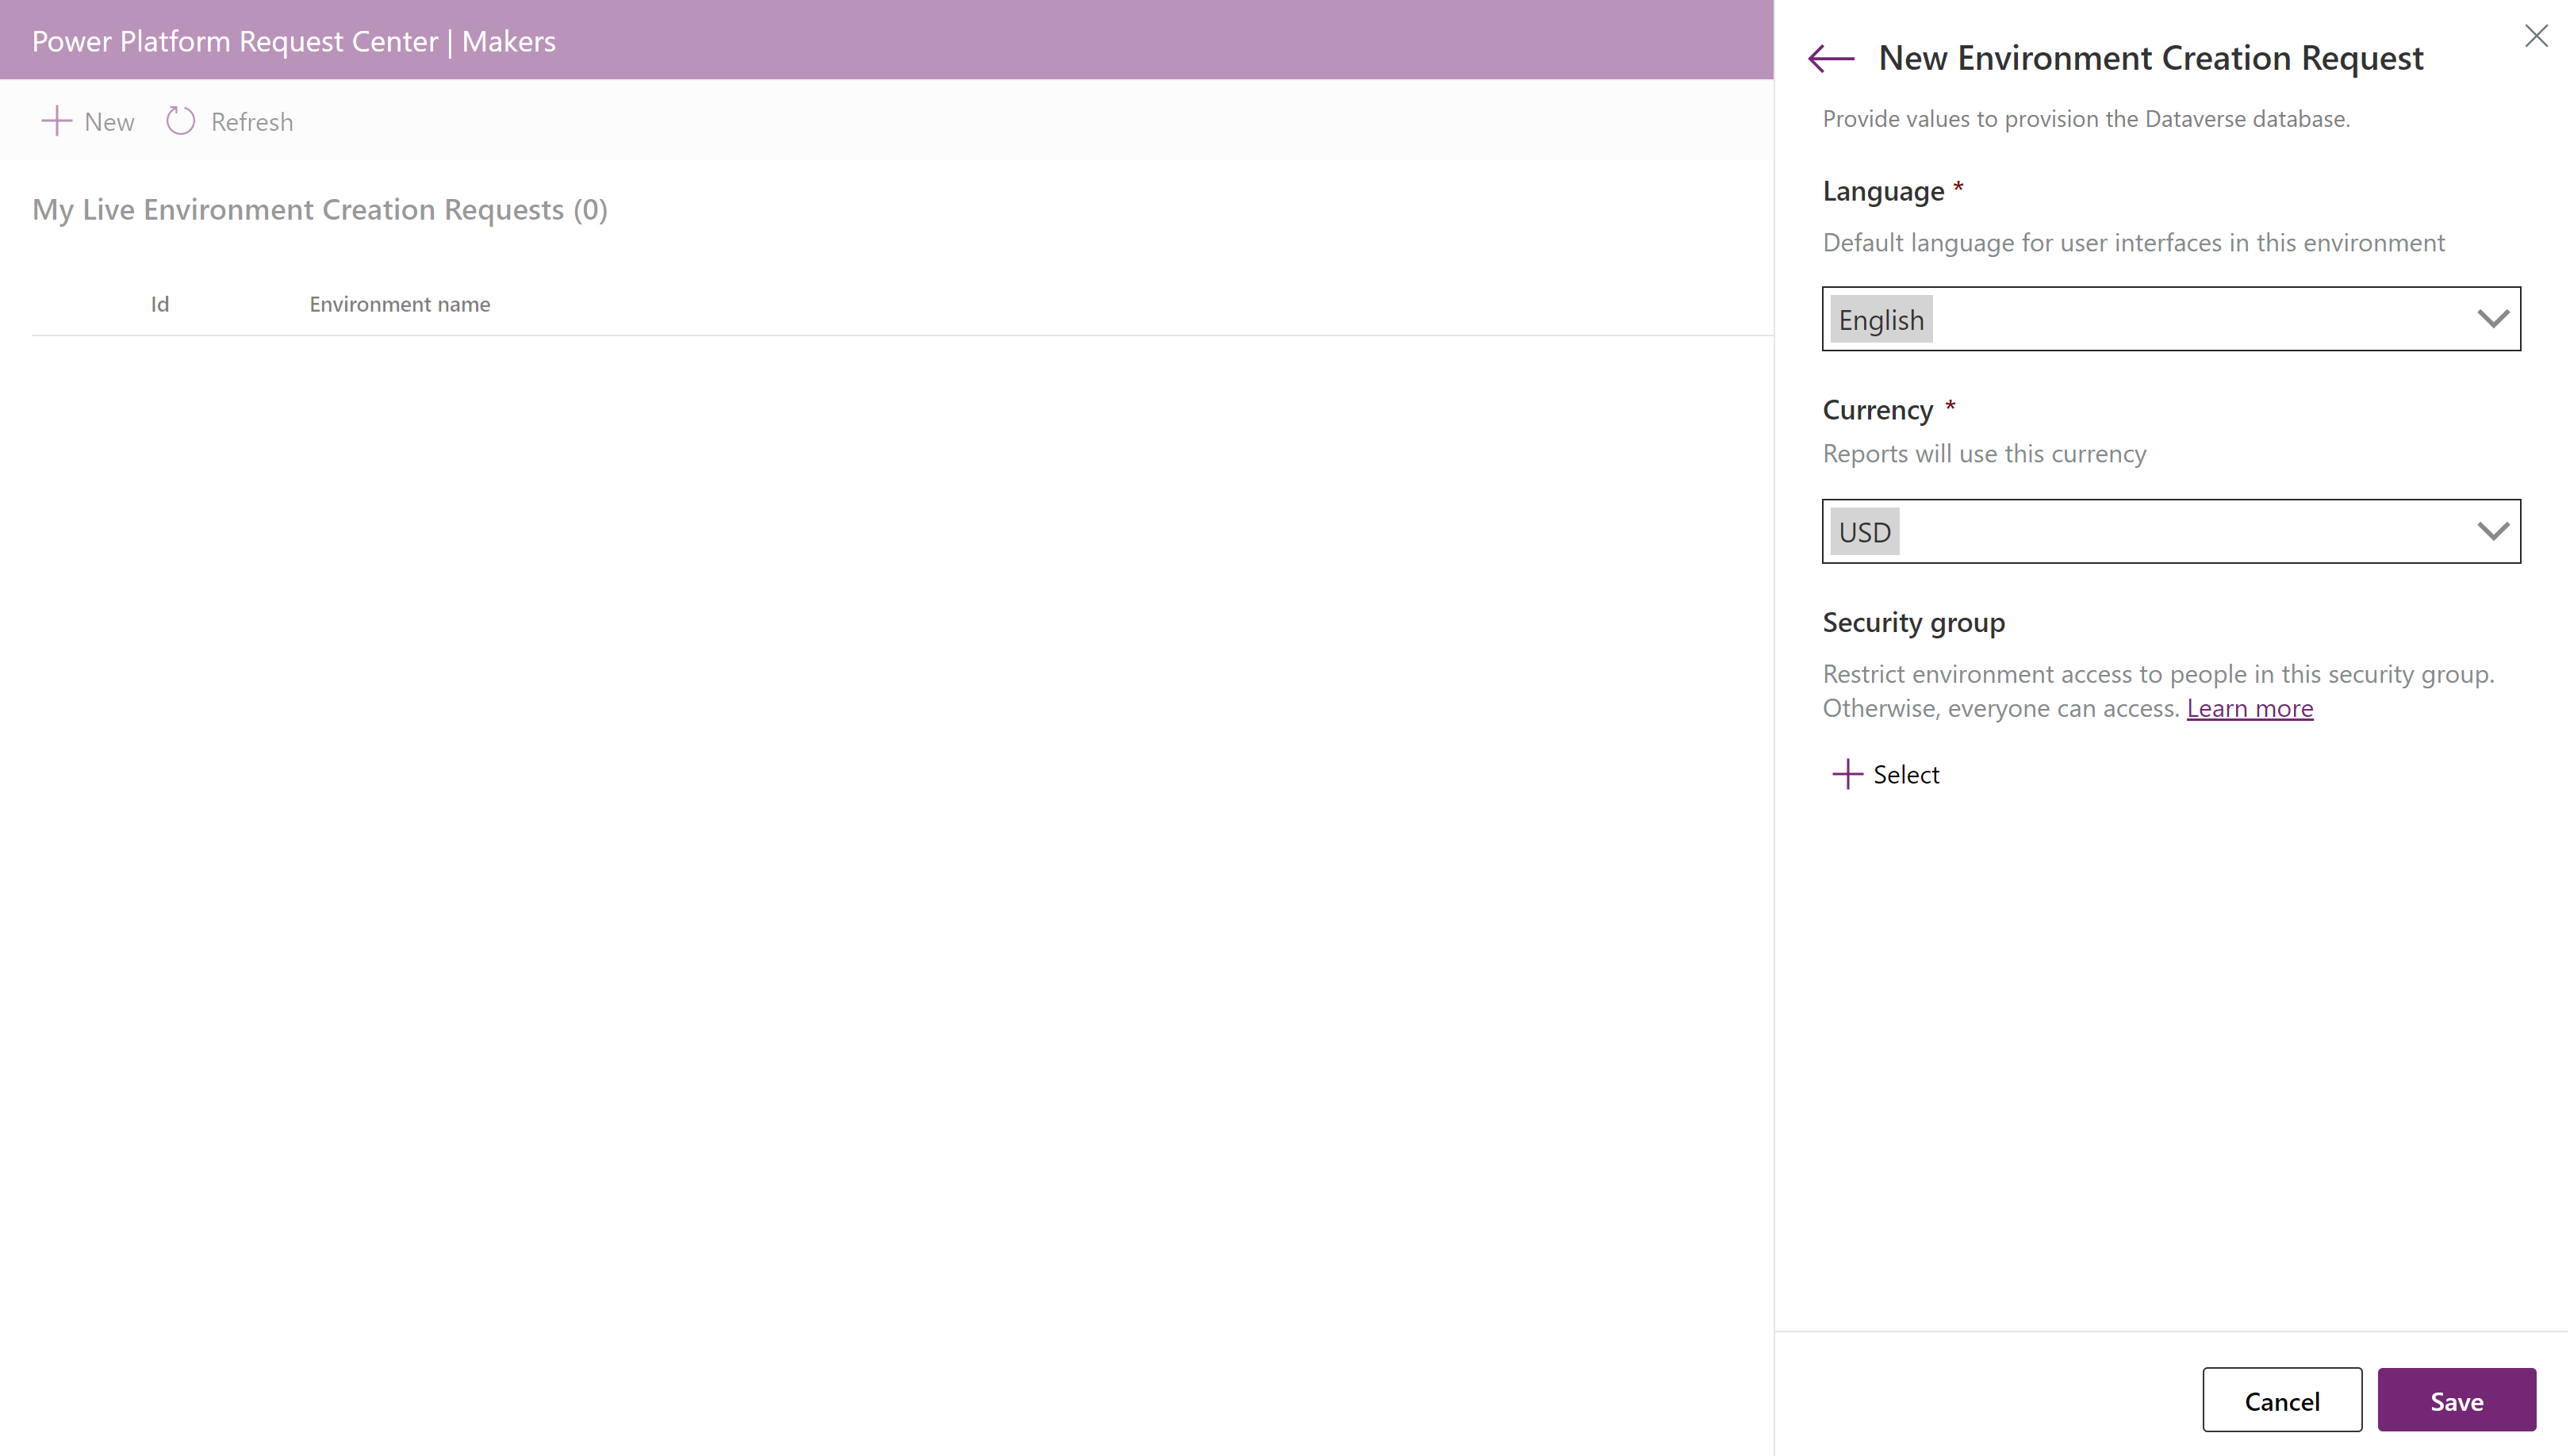
Indicate whether to provision a Dataverse database.

If a database is needed (toggle=yes), provide the required language and currency values. Optionally provide a security group to restrict access to the environment.
Submit the form when done by clicking the Save button.
📧 An email will be sent to notify the CoE Starter Kit admins to review the new request.
View any of your submitted requests in the canvas app.
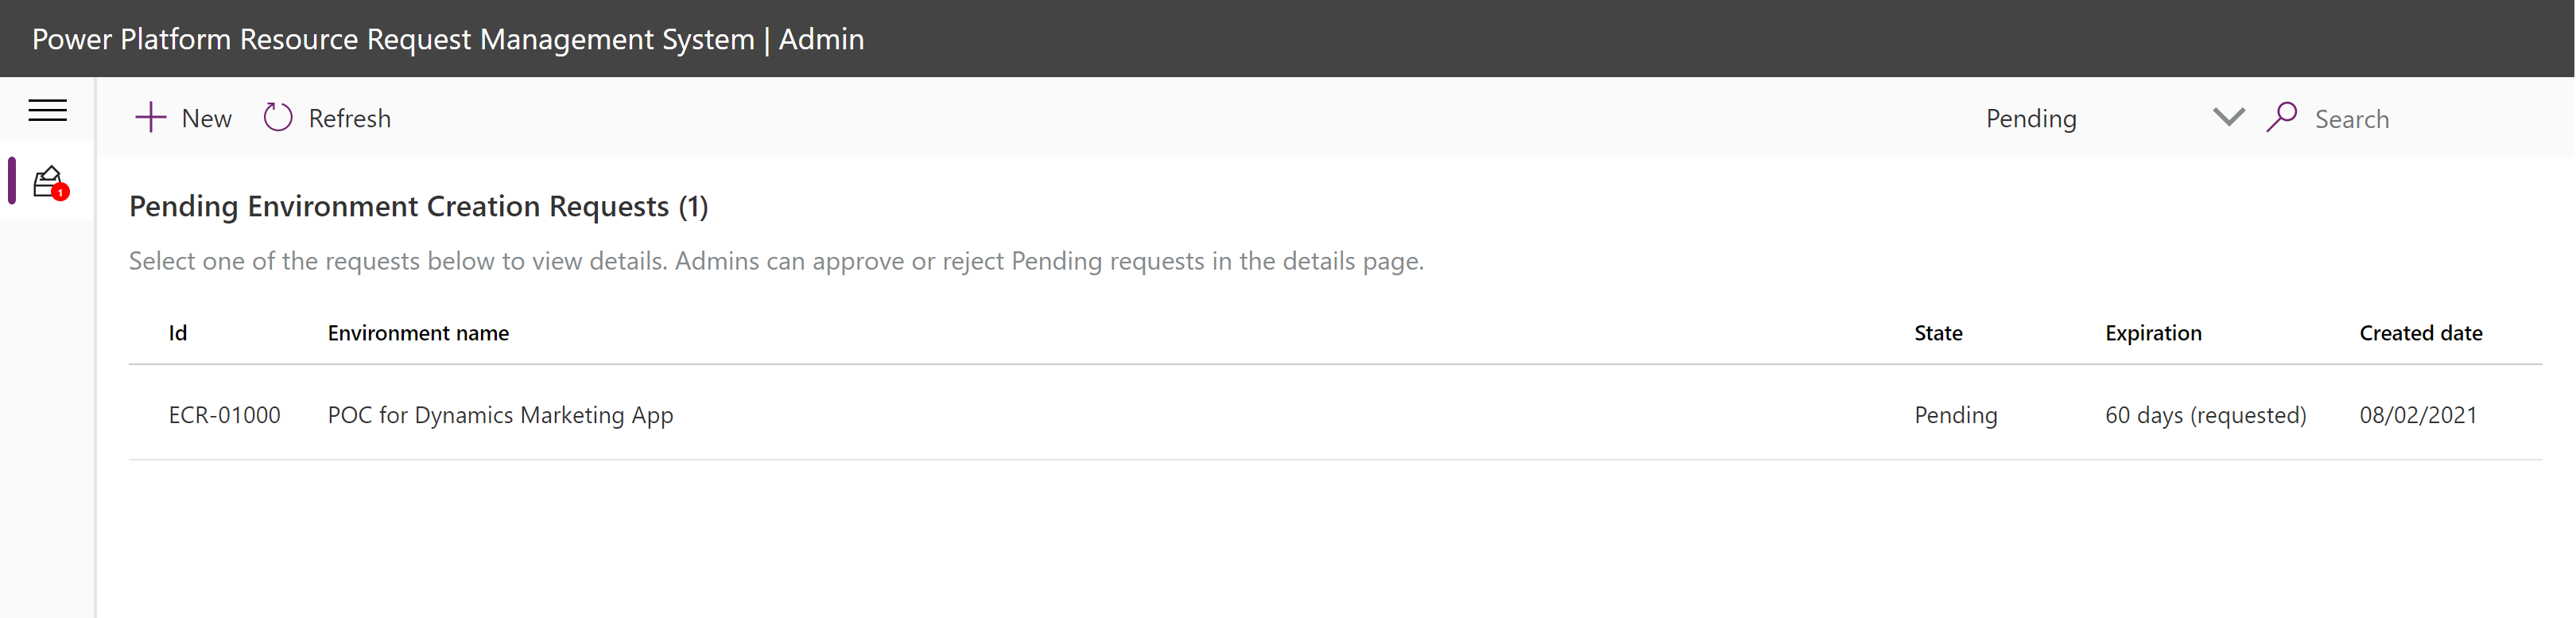
Admin: Approve or deny an environment request
As the admin, you can view and triage requests for new environments.
Open the canvas app called Admin - Environment Request.
View the pending environment creation requests in the home screen.
Note
By default, pending requests are displayed first. Change the request state filter using the dropdown in the right side of the ribbon.
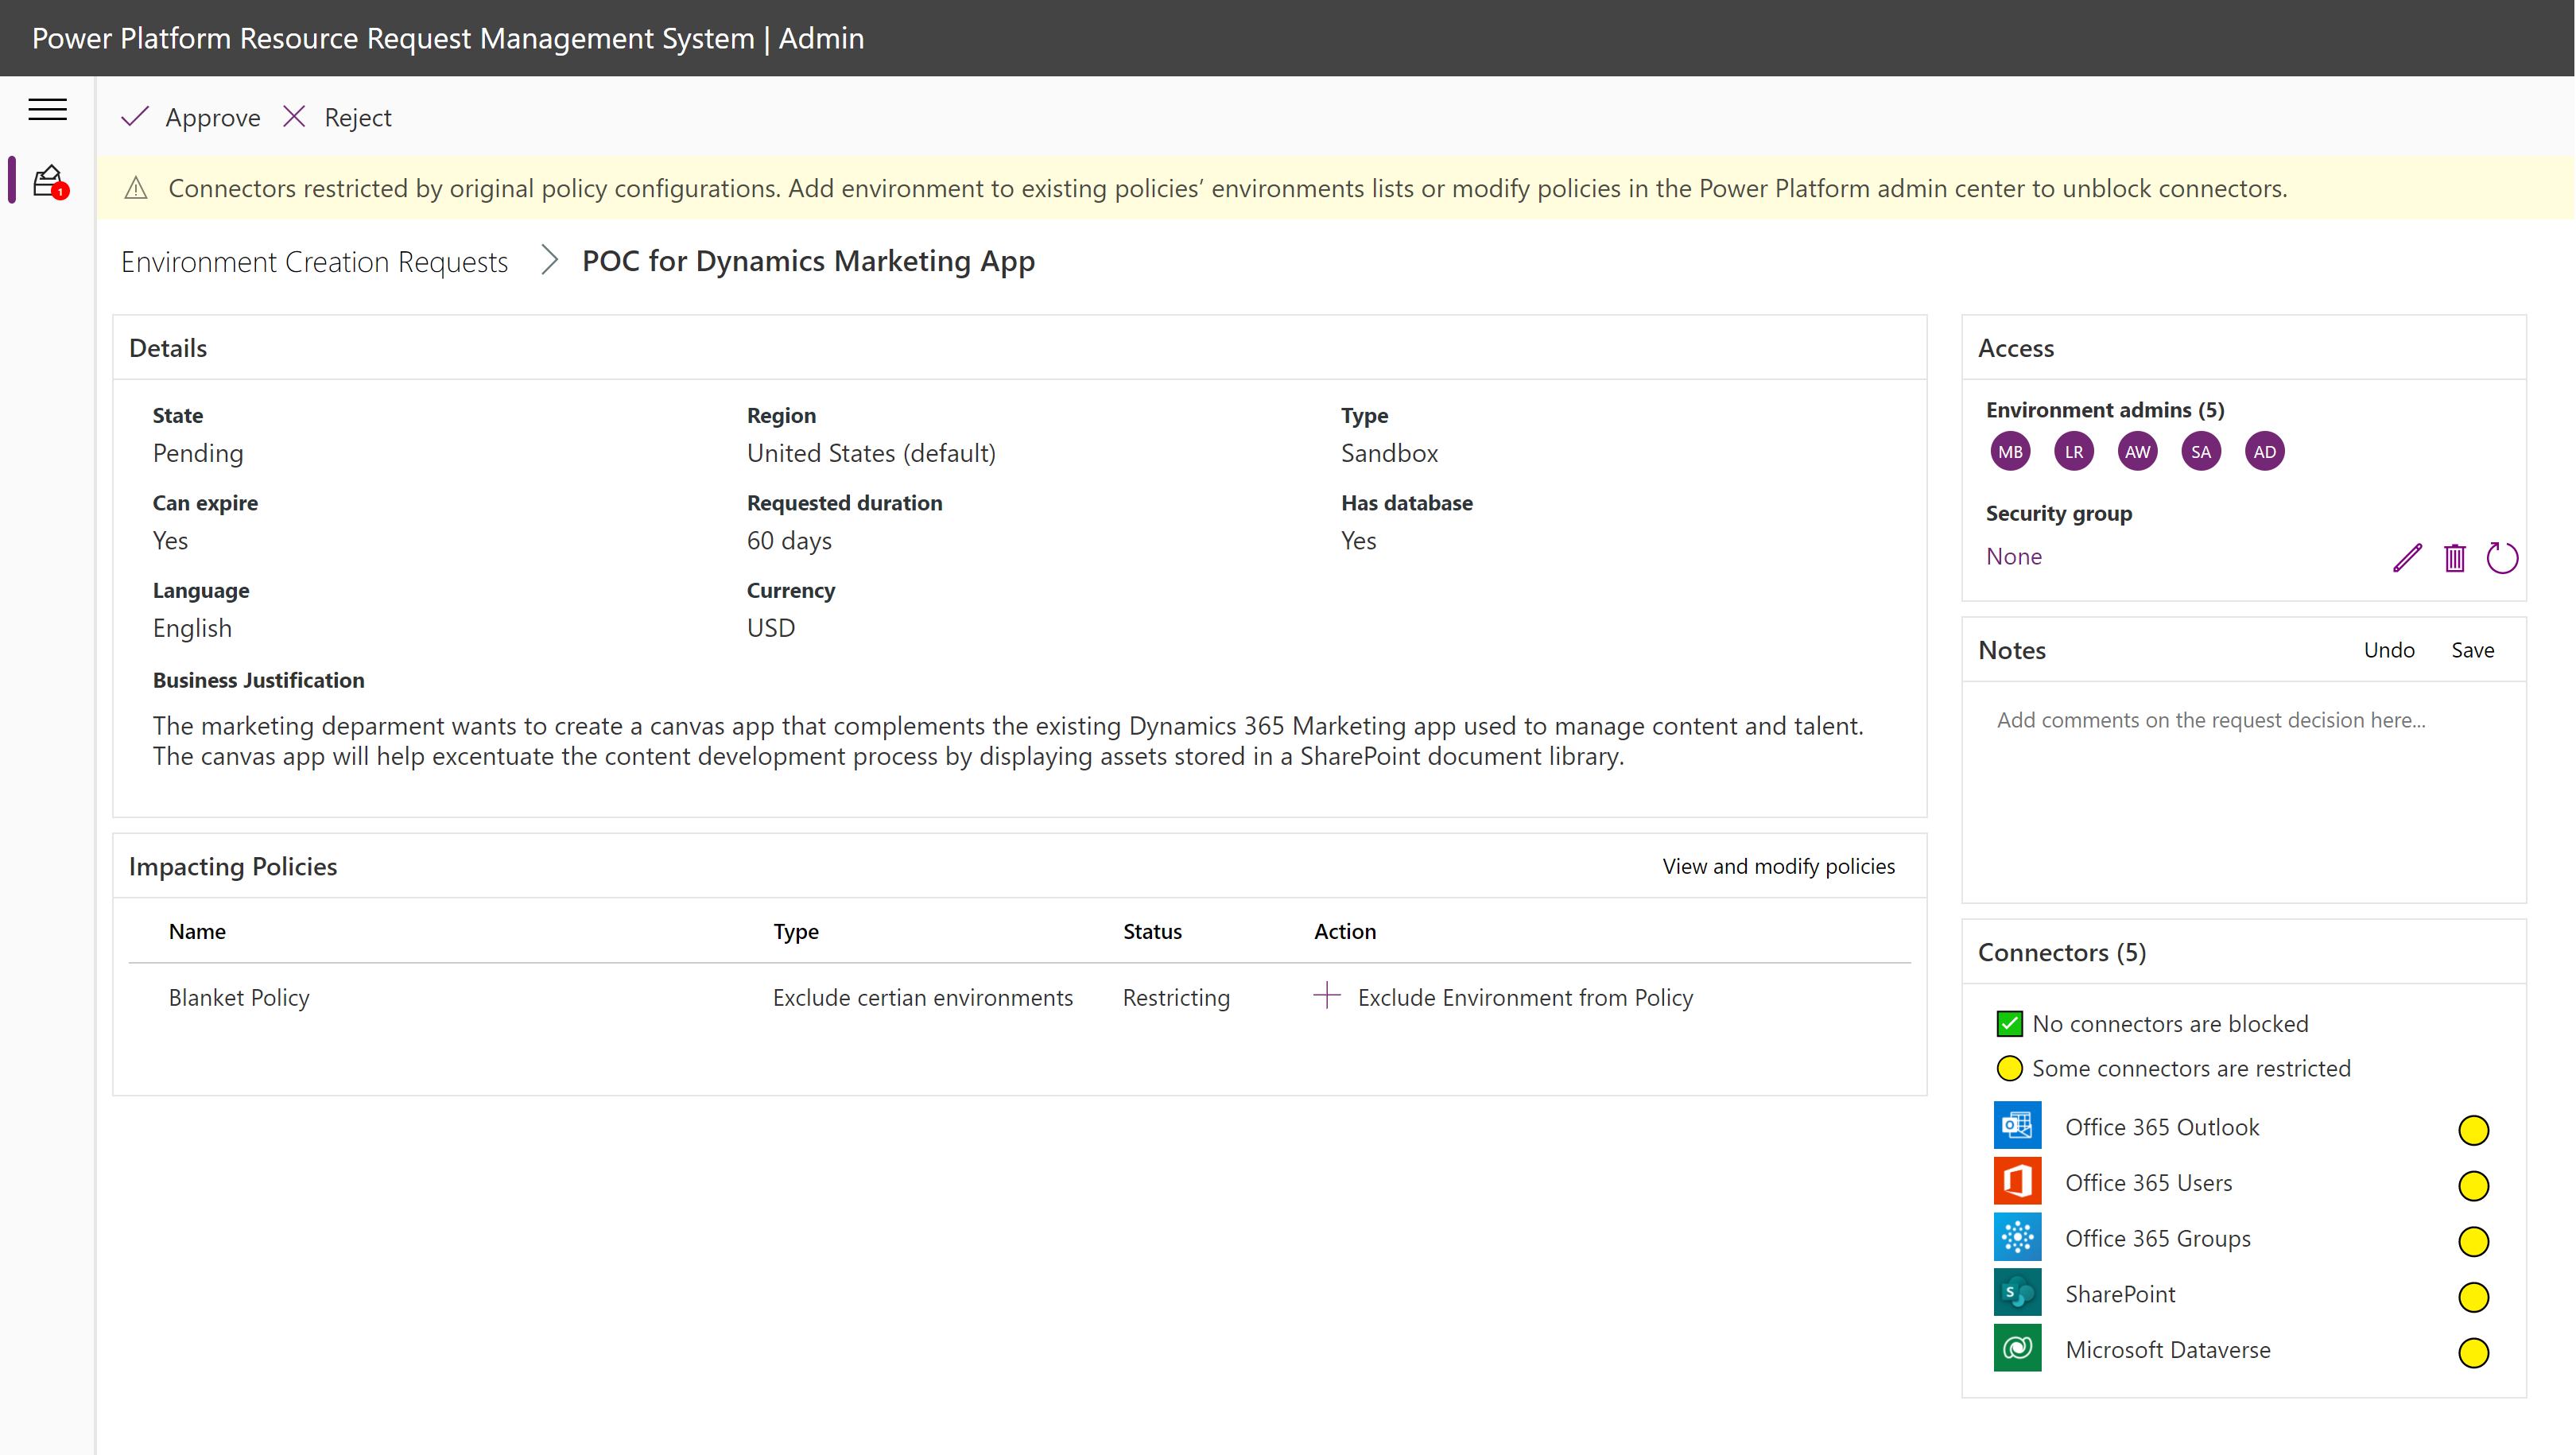
Select a request in the table to view more detail.
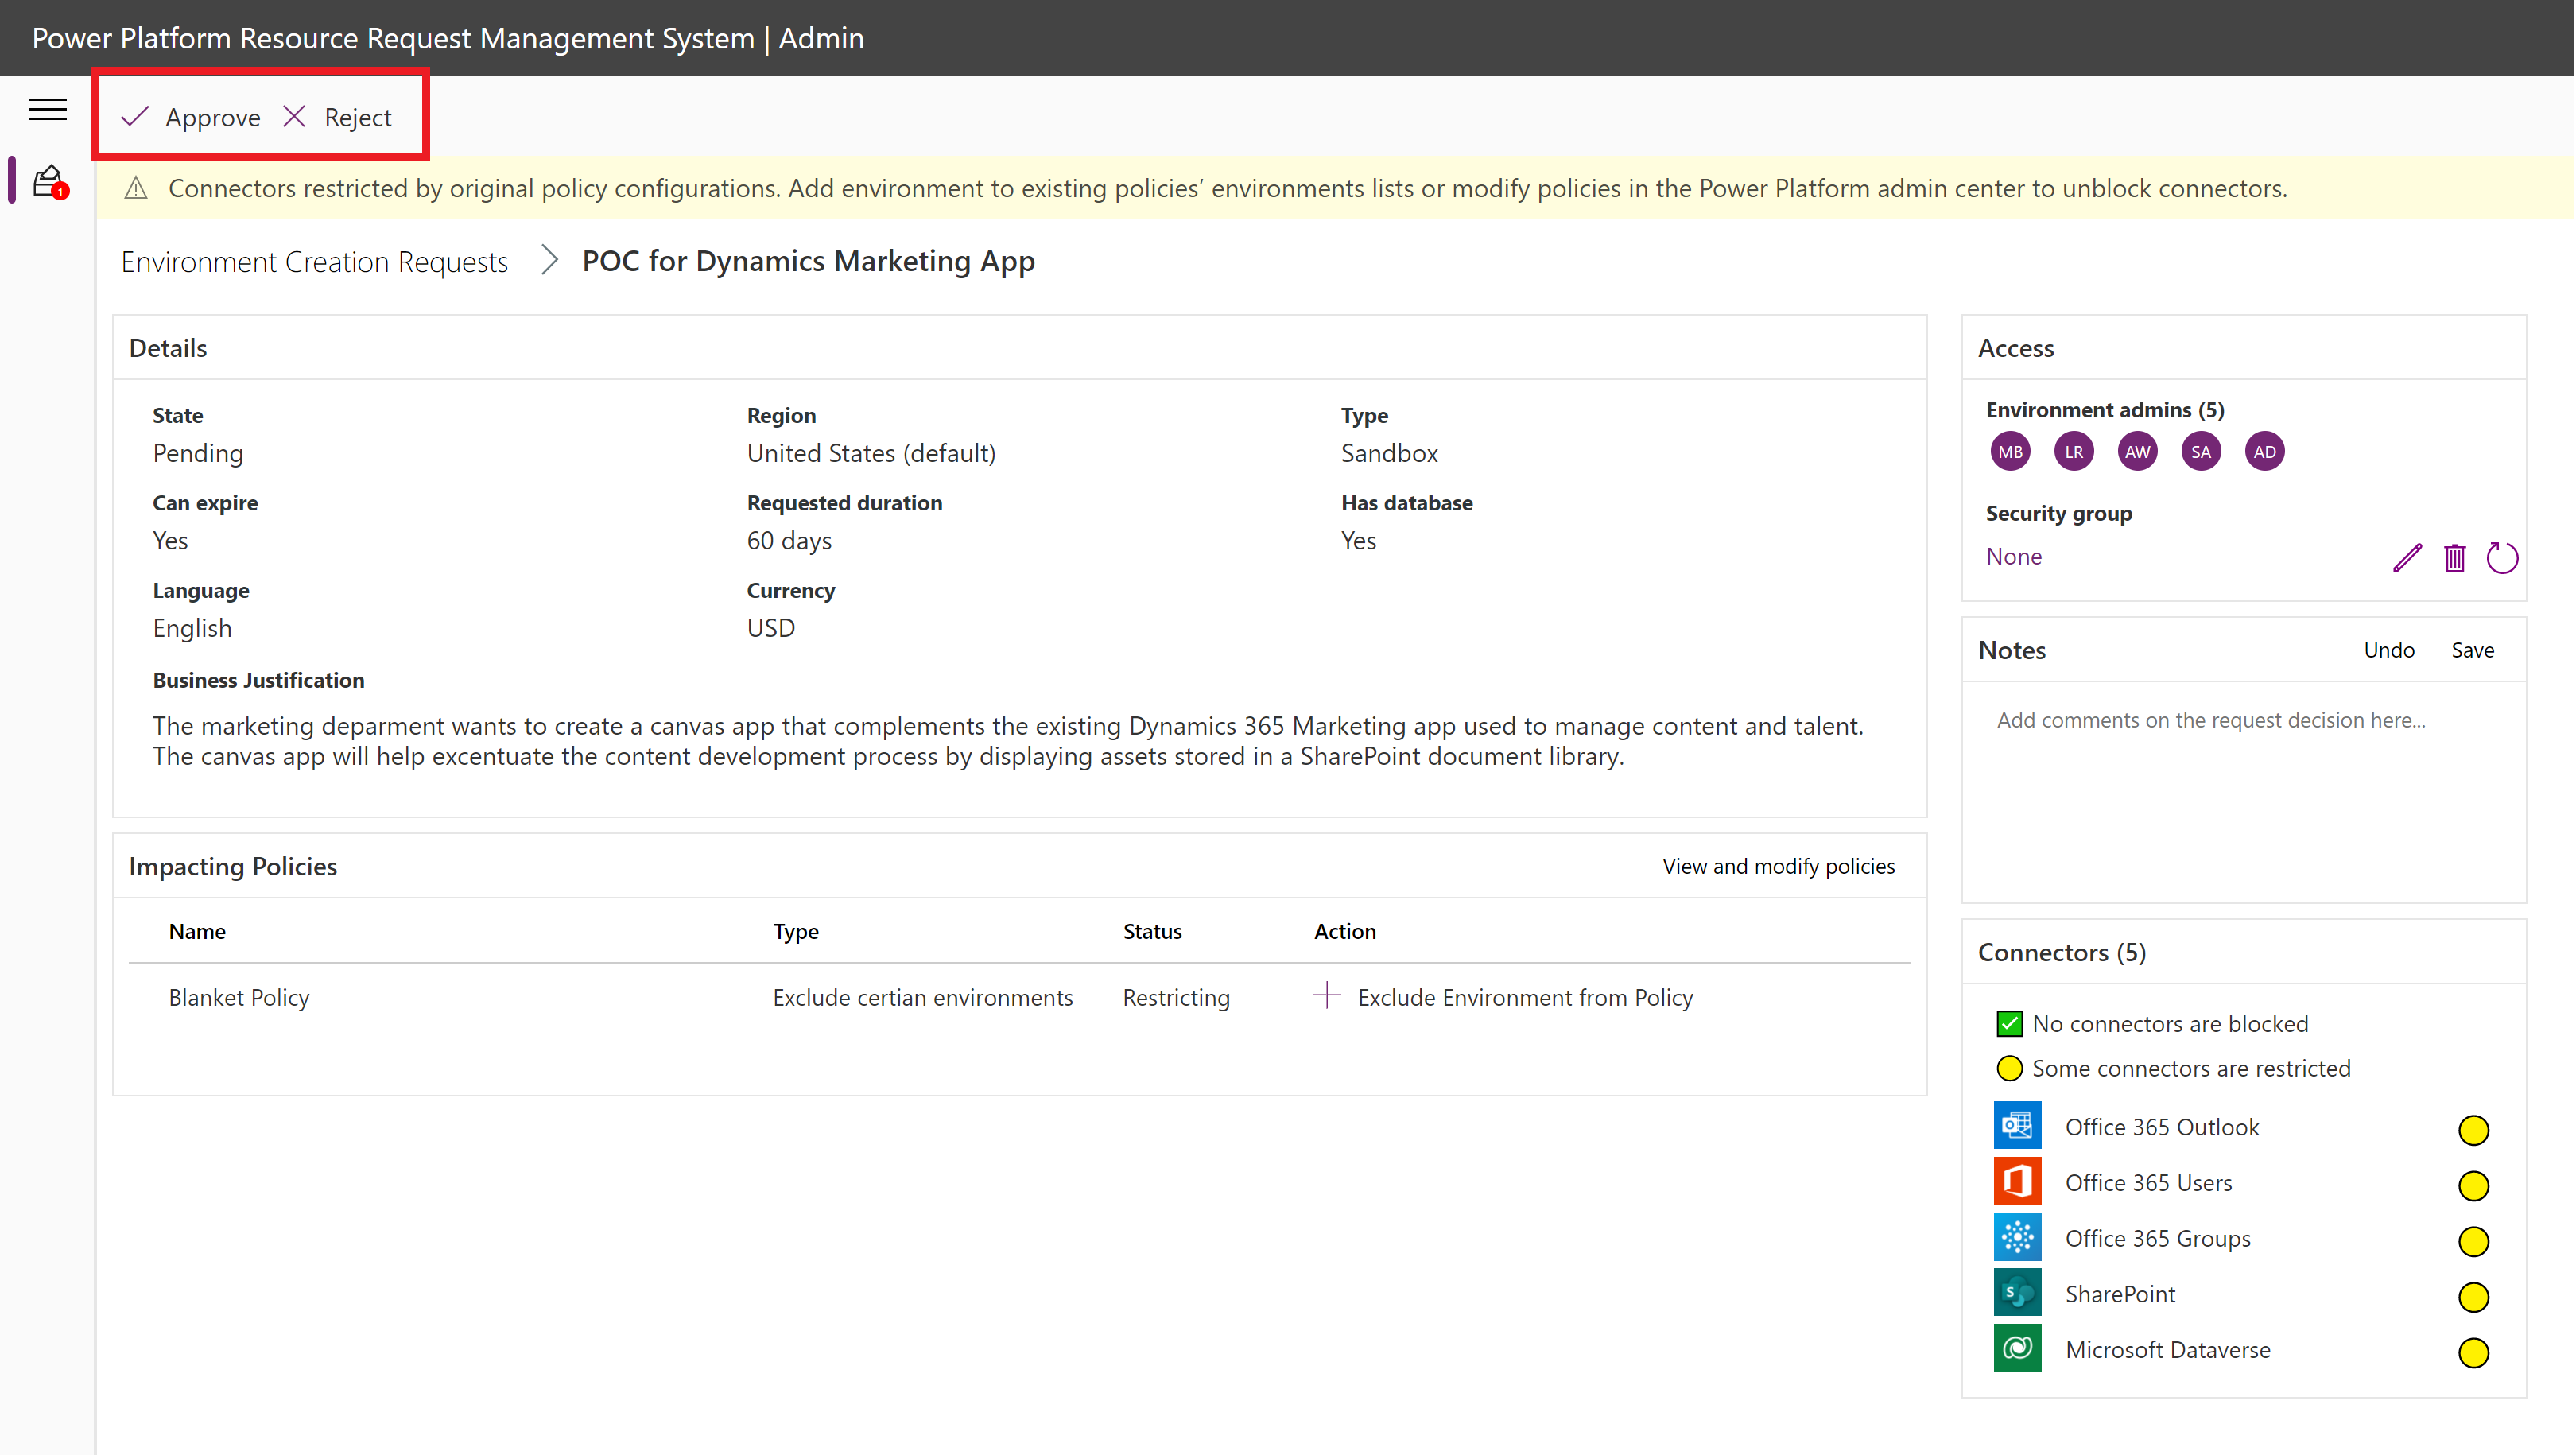
Read details requested for the new environment:
Environment information, justification.
Admins requested.
View the requested security group, or add one if none was selected.
Connectors.
Impacting policies.
Add comments about the decision in the Notes panel.
Note
A banner on the top of the page indicates how the new environment will be impacted based on the existing policies in the tenant. The impact analysis will change when policies are modified.
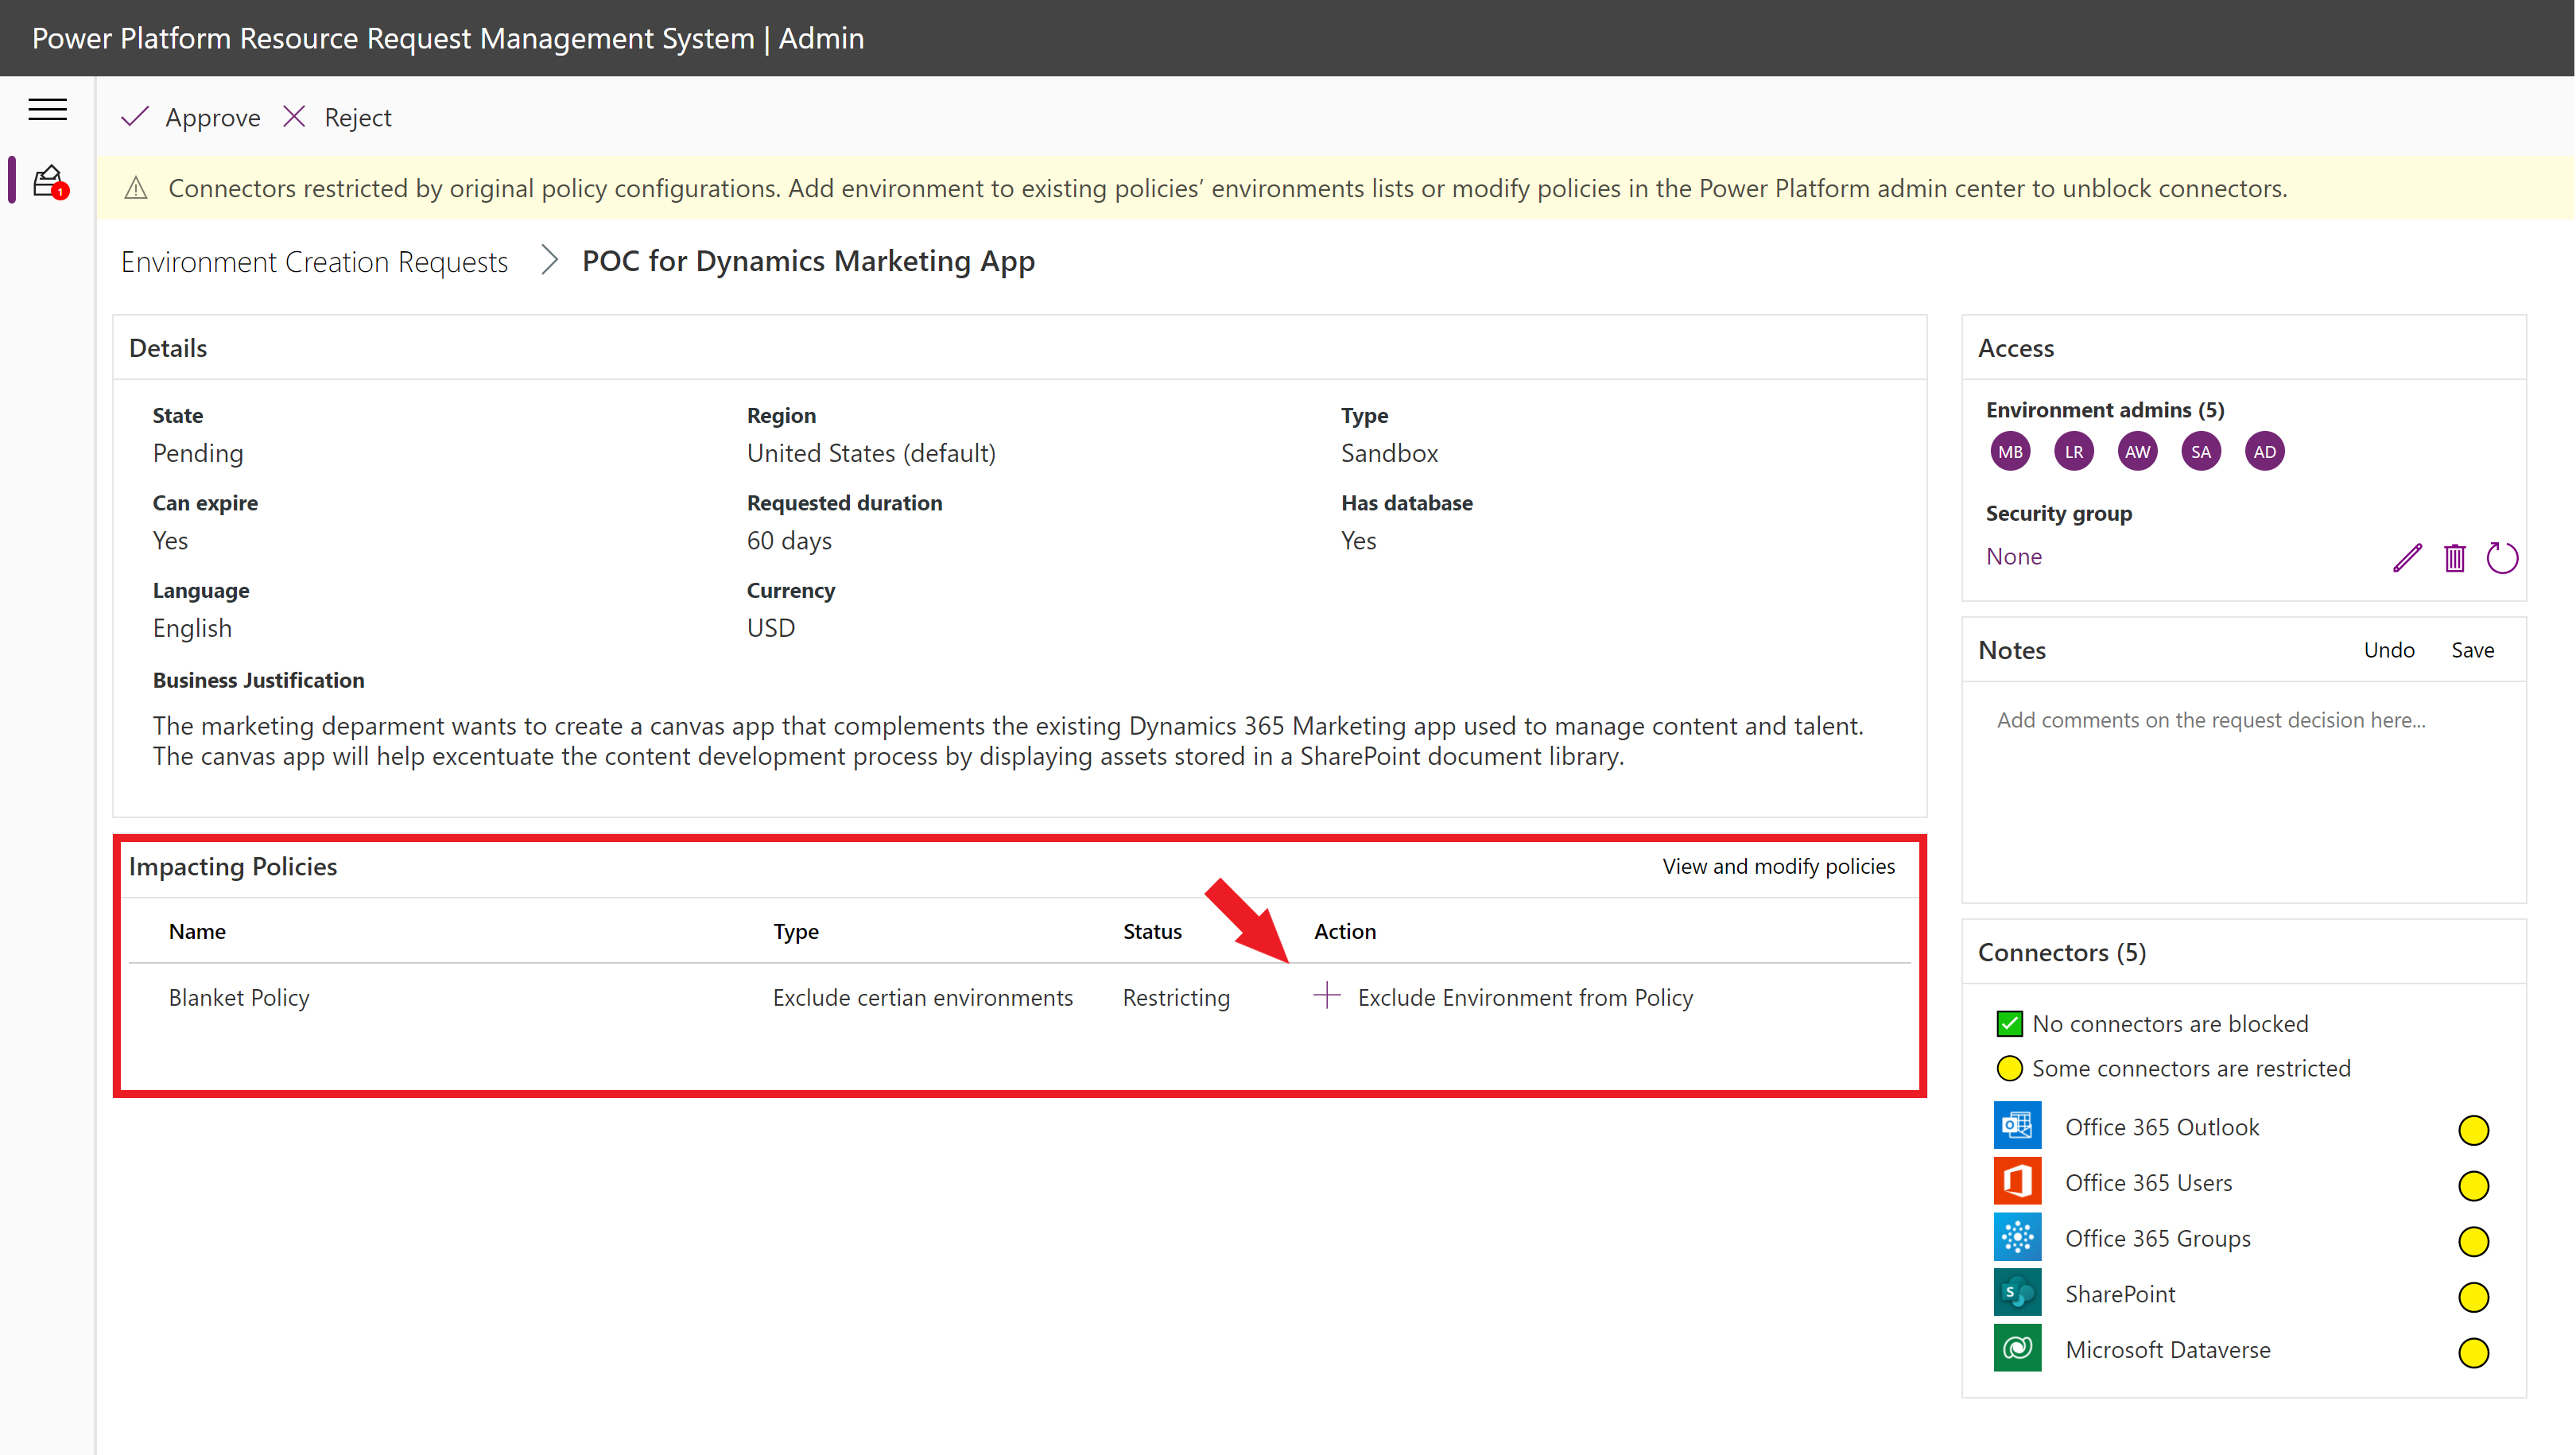
Modify data loss prevention policies in the Impacted Policies table by clicking on the suggested actions (if any are available).
Warning
Only certain types of policies can be added (Organization-level environments that are not "All Environments" type policies).
Select "View and modify policies" to see all policies and their impact on the requested connectors. You can add or remove policies to the modify list that will be changed upon approval by selecting a policy and choosing the actions that appear in the ribbon.
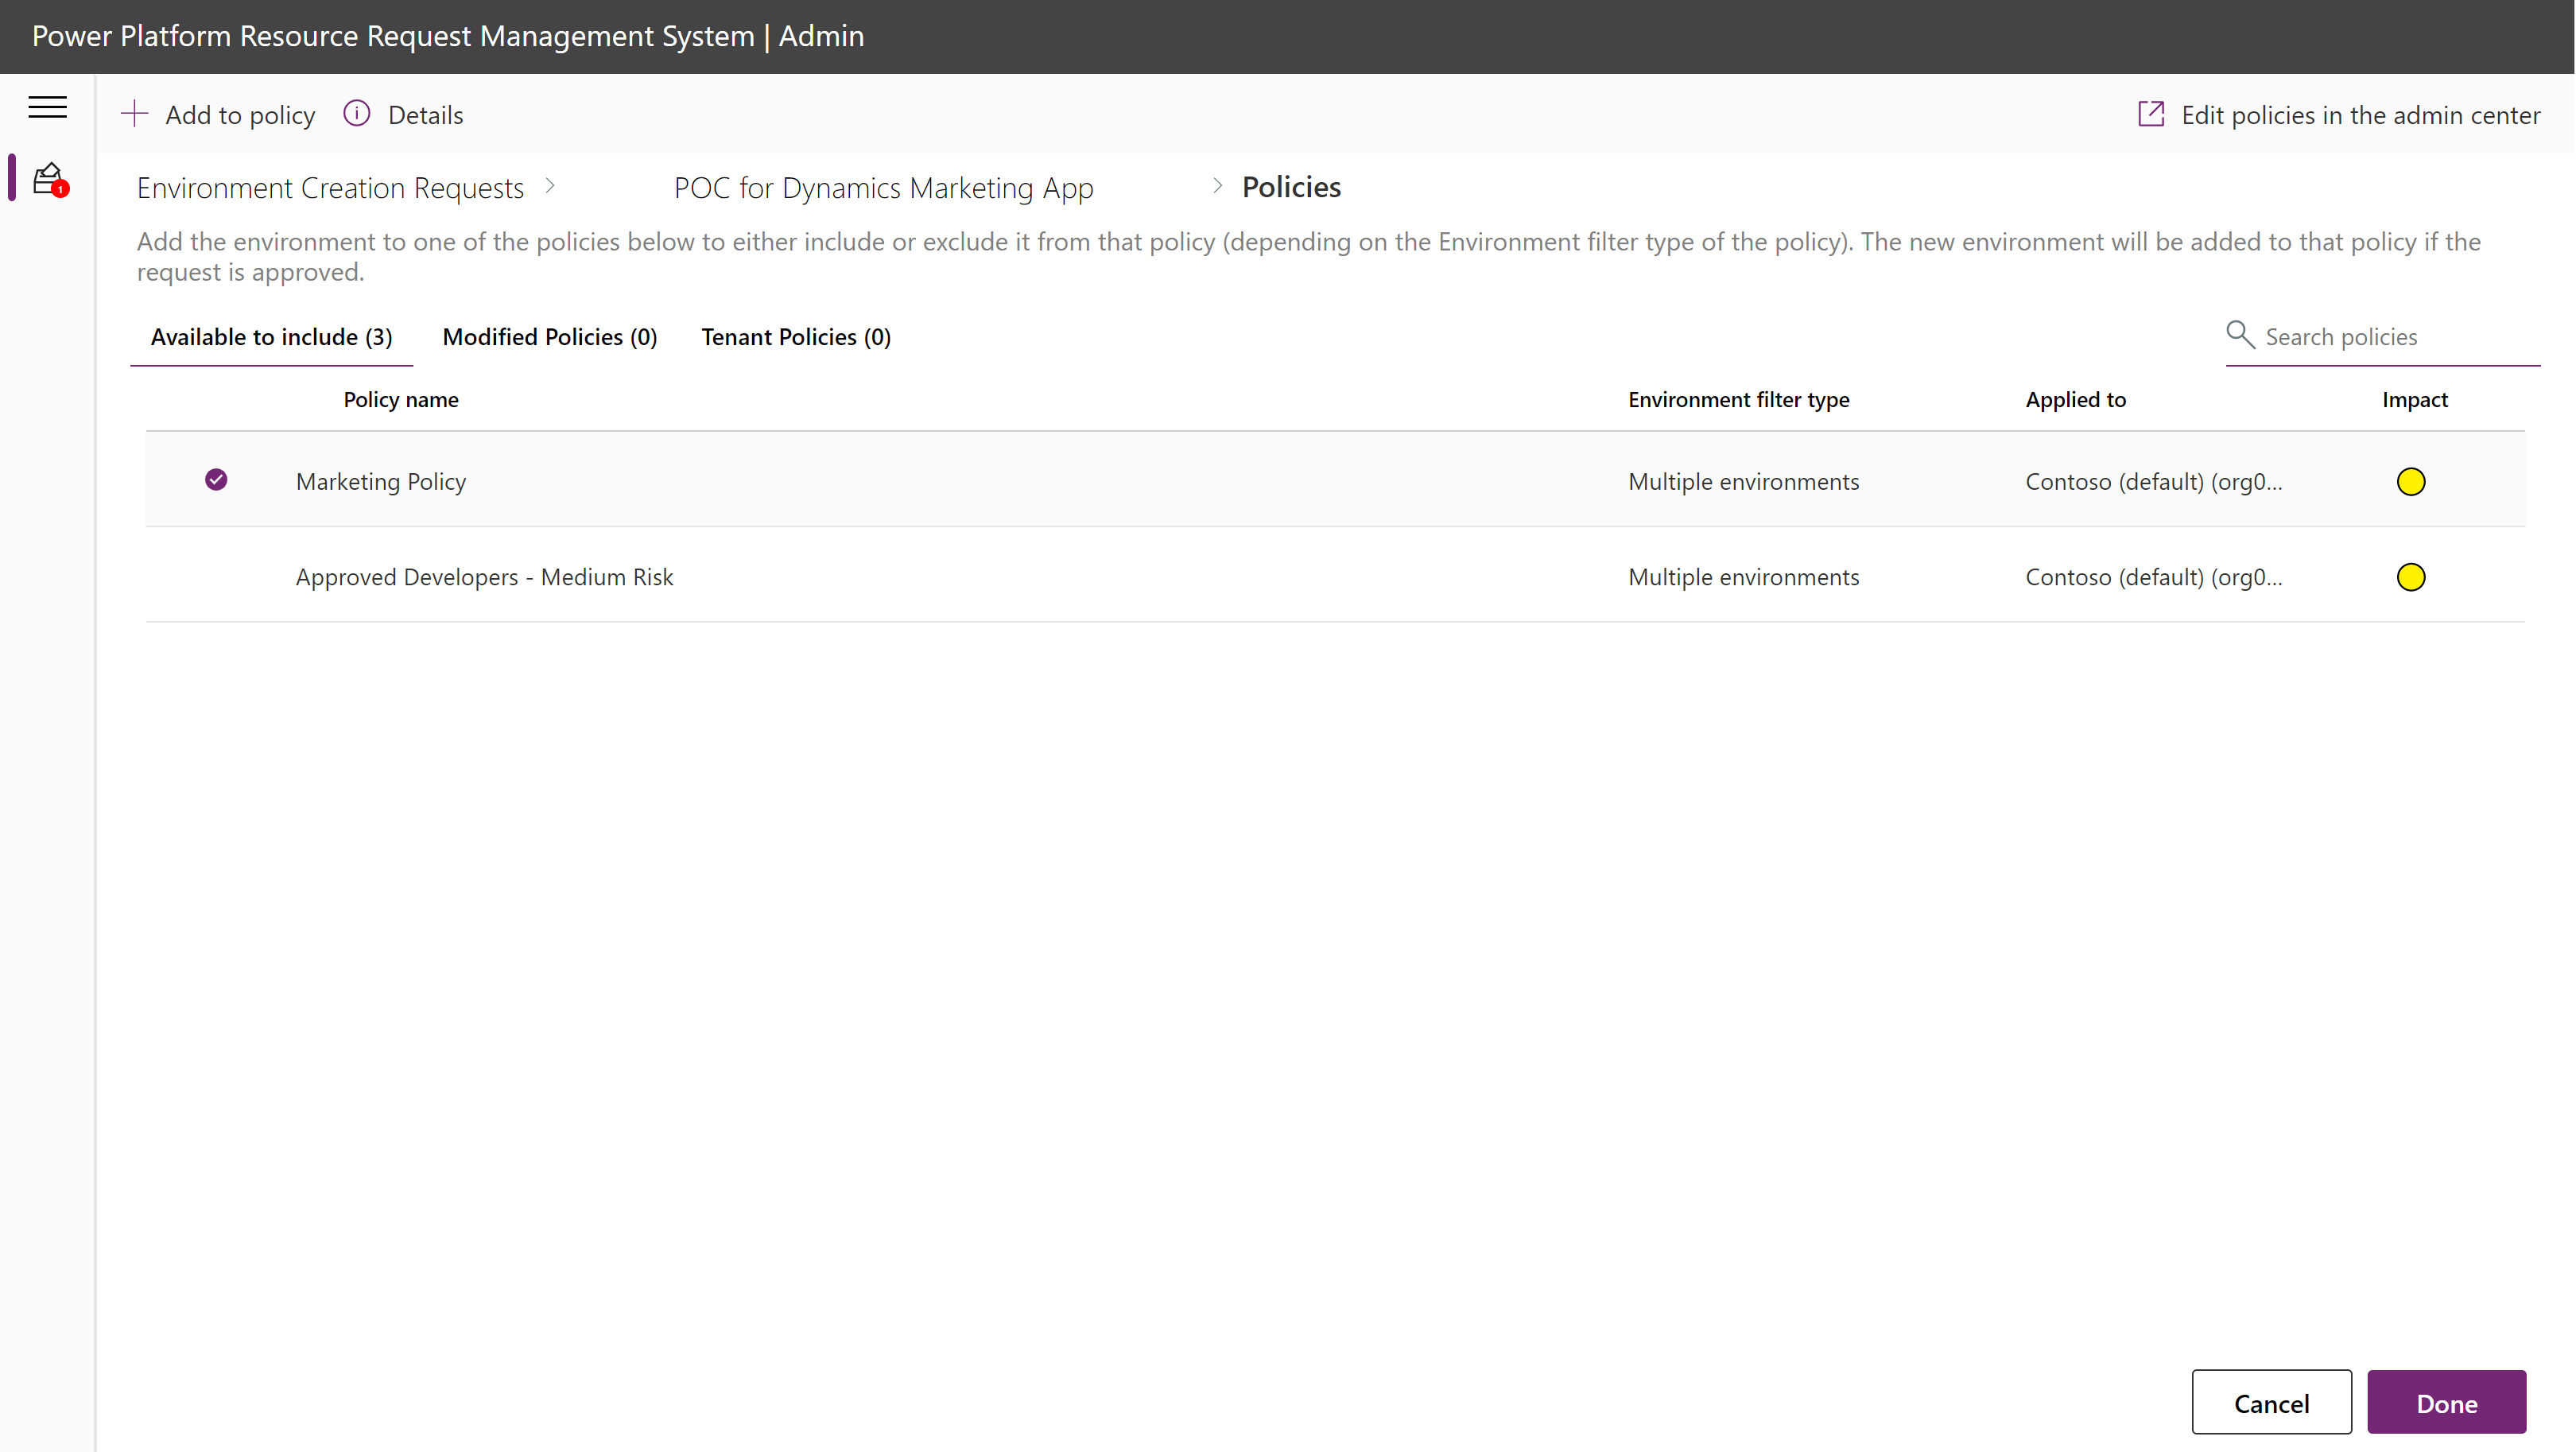
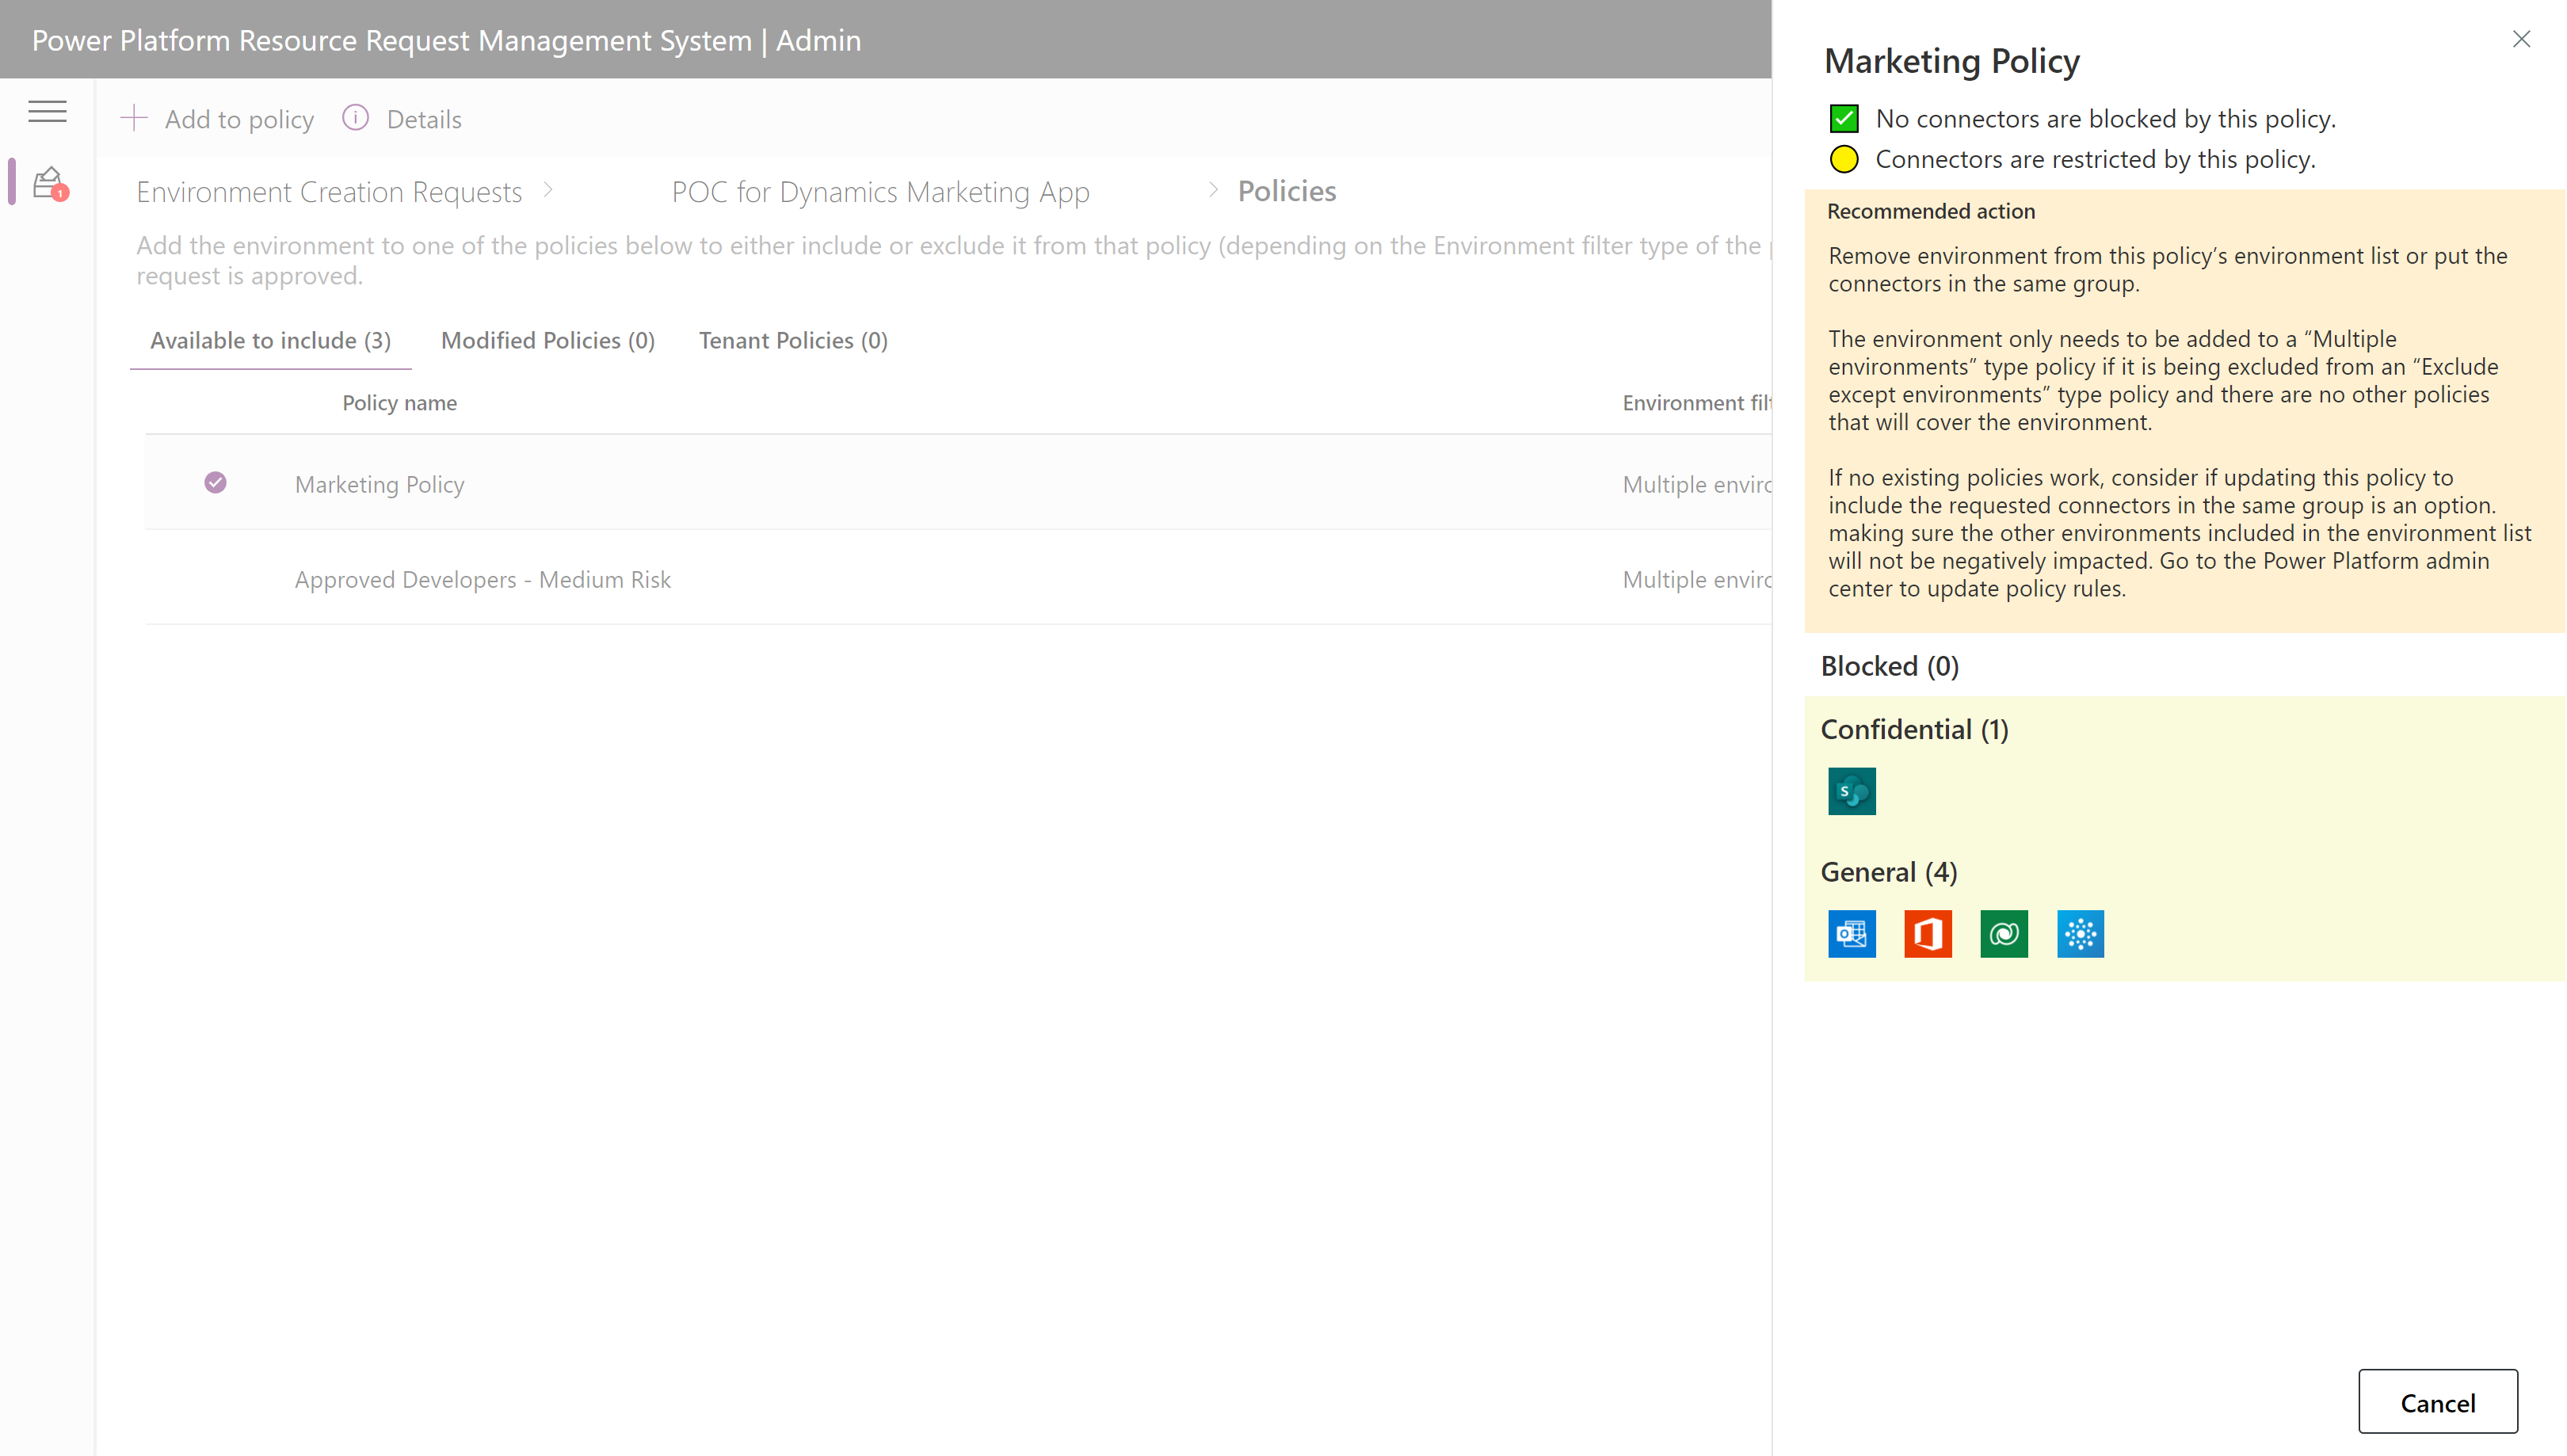
Select a policy and click on the Details action in the ribbon to view the impact on connectors.
Approve or reject the request in the top left ribbon.
Approved path
Once the request is approved, the environment will be created with the requested configurations. The users are granted environment admin access.
⏳ Expiration
If the environment has an expiration date, it will be automatically deleted after the duration indicated. Warning emails are sent out weekly to the admins to remind them to save work in source control or other locations outside of the environment.
If no expiration is set the environment will never be cleaned up automatically. The environment must be deleted manually in the Power Platform admin center.
DLP recommendation logic
The admin app uses the below logic to provide guidance on how to configure the DLP policies to allow requested connectors.
Decision matrix: Warning banner
This is the banner displayed in the admin app when viewing the request's details page.
| Condition | No policies apply to the environment | Existing policies apply to the environment without including it in any policy’s environment list | Environment will be added to policies upon approval |
|---|---|---|---|
| Unblocked | 🟡 Connectors not blocked or restricted, but no policies will protect the environment. Add environment to at least one policy to prevent data loss. | 🟢 Connectors are not blocked or restricted and the environment is covered by at least one existing policy. | 🟢 Connectors are not blocked and environment will be added to selected policies on approval of request. |
| Blocked | -- | ⛔ Connectors blocked by original policy configurations. Add environment to existing policy environment lists or modify policies in the Power Platform admin center to unblock connectors. | ⛔ Connectors blocked by current policy configurations. Add environment to different policies or modify policies in the Power Platform admin center to unblock connectors. |
| Restricted | -- | 🟡 Connectors restricted by original policy configurations. Add environment to existing policies’ environments lists or modify policies in the Power Platform admin center to unblock connectors. | 🟡 Connectors restricted by current policy configurations. Add environment to different policies or modify policies in the Power Platform admin center to unblock connectors. |
Decision matrix: Policy-level recommended actions
Matrix for recommended action based on the policy and the requested connectors. Horizontal columns show each policy type, and vertical rows of the matrix show the impact that policy has on the requested connectors based on its rules.
| Impact | All environments | Exclude certain environments | Include multiple environments |
|---|---|---|---|
| Not blocked or restricted | No action needed. Requested connectors are not blocked by this policy. This type of policy will cover this new environment once created, so no action is needed. |
Add policy if the new environment it not covered. If it is covered, no action needed. | Requested connectors would not be blocked by this policy if added to its environment list. Add to this policy’s list if this environment will be added to another "Exclude certain environments" policy list that is affecting the requested connectors. |
| Blocked | Unblock allowed connectors in the policy’s definition in the Power Platform Admin Center. ⚠CAUTION: changing policies that affect "All environments" can potentially impact any canvas app and cloud flow in the tenant. Confirm impact in the DLP Editor tool. If this policy's connector rules cannot be changed, you can make an exception for this new environment by changing this policy to an "Exclude certain environments" type policy in the Power Platform Admin Center. Find or create a "Multiple environments" type policy that allows the requested connectors to add the environment to. Come back to this Environment Request Admin App record and add this to the environments list of both policies. |
Add to this policy or unblock the blocked connectors. If there are no other policies covering the environment, add it to another existing or new "Multiple environments" policy that will not block the requested connectors. |
Do not add the new environment to this policy. The environment only needs to be added to a "Multiple environments" type policy if it is not covered by other policies. For example, if there are no "All environment policies" and the environment is being excluded from all "Exclude except environments" type policies, no policies are covering the environment. If there are no better policies to add this environment to, consider updating this policy's connector groups, or create a new policy in the Power Platform Admin Center. |
| Restricted | Put the restricted connectors in the same group in the policy’s definition in the Power Platform Admin Center. ⚠CAUTION: changing "All environments" type policies can potentially impact any canvas app and cloud flow in the tenant. If this policy’s connector rules cannot be changed, you can make an exception for this new environment by changing this policy to an "Exclude certain environments" type policy in the Power Platform Admin Center. Find or create a "Multiple environments" type policy that has the requested connectors in the same group. Come back to this Environment Creation Request Admin App record and add this to the environments list of both policies. |
Add the environment to this policy’s exception list. If this is added to the exception list and there are no other policies covering the environment, add it to another "Multiple environments" policy that will not restrict the acceptable requested connector(s), or create another policy to cover the most critical security requirements. Consider if acceptable requested connectors can be unrestricted by updating this policy in the Power Platform admin center. Caution: Make sure other environments excluded from this policy will not be negatively impacted by this change. |
Do not add the new environment to this policy. The environment only needs to be added to a "Multiple environments" type policy if it is being excluded from an "Exclude except environments" type policy and there are no other policies that will cover the environment. If no existing policies work, consider if updating this policy to include the requested connectors in the same group is an option. making sure the other environments included in the environment list will not be negatively impacted. Go to the Power Platform admin center to update policy rules. |
Developer: Request a DLP Policy Change
Makers can use the DLP Policy Change Request system to modify the DLP Policy applied to environments where they are the administrator. If approved, this will enable the connectors you need in the environments you work in.
- Open Maker – Environment Request app.
- Navigate to the Data Policy Change Requests page using the left navigation.
- Select + New
- In the "Action Requested" field, choose the "Apply Policy to Environment" option.
- In the "Policy" field, select the desired policy.
- Confirm if the connectors required by your environment are in the policy by clicking the information icon next to the field header.

- Confirm if the connectors required by your environment are in the policy by clicking the information icon next to the field header.
- Choose the environment to apply this policy to. You will only be select environments you are an administrator of.
- If you do not see any environments in the drop-down, then you do not have an environment administrator role to any environments.
- Provide a reason for the request. For example, it helps to specify your project details and the connectors you require.
- Select Save to submit the request.
- If the administrator approves the request, the policy will be applied to the environment.
Admin: Approve or deny a DLP policy change request
Important
If a DLP Policy Change request is approved in this system, it will update the status to Approved, which will trigger a flow that automatically applies the selected policy to the indicated environment. It will also remove the environment from all other policies that have an “include” environment scope, and add the environment to all policies with an “exclude” environment scope. Before using the DLP policy request tooling, ensure this process fits with your setup.
Configure Shared Policies
Configure data policies in the Power Platform Admin Center.
Note
Follow our best practices to create a DLP strategy.
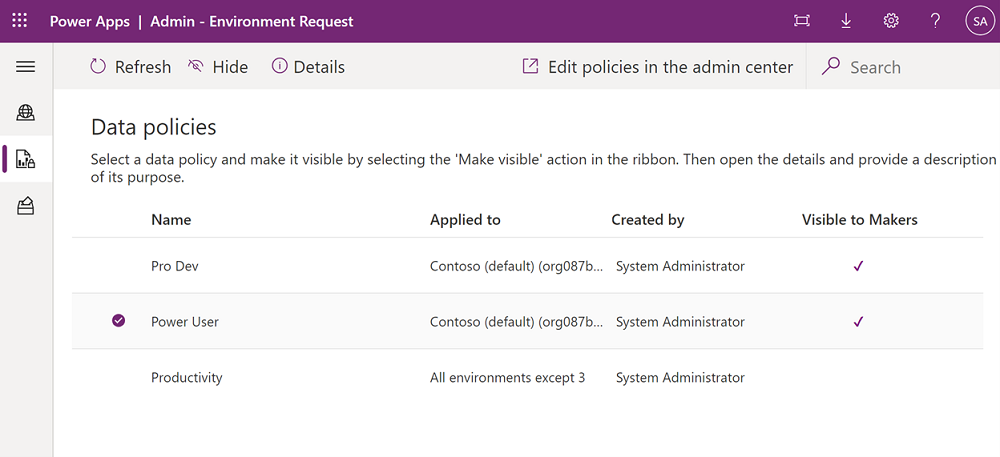
Example set of shared DLP Policies that can address different levels of groups:
- Productivity (Apply to all environments except) – This policy is intended to cover the Default environment, trial environments, and all other environments that are not covered by the other environments. It has the most restrictive rules.
- Power User (Apply to multiple environments) – Available for individual environments with slightly less restrictive rules than Productivity.
- Pro Dev (Apply to multiple environments) – Available for individual environments with access to most connectors compared to Power User and is intended for users who are well trained and agree to company data security policies that should be defined with an acknowledgement of liability for use.
Sync shared Policies
Since makers cannot see all data policies, the request system makes it easy to display that information to the makers via Dataverse. The system syncs the indicated policies from the Power Platform service to a Dataverse table, and makers can see the policies an admin allow them to view. Makers can then request to apply those shared policies to their environments.
To make a Shared DLP Policy visible to makers, the policy needs to be created as a record in Dataverse.
- Open the Admin – Environment Request app.
- Navigate to the Data policies page in the left navigation.
- Select the policy you want to make visible to makers, then select the Make visible option in the ribbon
Share app and instructions with makers
- Grant your makers access to the Maker – Environment Request canvas app and assign them the Power Platform Maker SR security role. Use a Microsoft Entra group to make assignment easier.
- Provide users with instructions on how to use the request system.
Approve or Reject requests
Once users have access and begin making requests, admins can see those requests in the Admin – Environment Request canvas app.
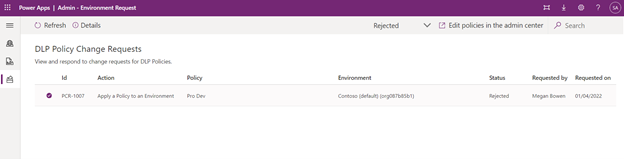
To view and respond to the DLP Policy Change requests:
- Open the Admin – Environment Request app.
- Navigate to the Policy Change Requests page using the left navigation.
- View the list of requests. You can filter the request by status using the status filter in the right side of the ribbon.

- To view the request in more detail, select one of the requests and click the Details action in the ribbon.
- To approve or deny a request, filter the status to “Pending” and select one of the requests. Only requests with pending status can be responded to in the app.
- Once a request is selected, you can choose to “approve” or “reject” the request using the actions in the ribbon.
- If a request is approved, it will update the status to “Approved”, which will trigger a flow that automatically applies the selected policy to the indicated environment. It will also remove the environment from all other policies that have an “include” environment scope and add the environment to all policies with an “exclude” environment scope. Make sure this behavior fits with your company’s security requirements before continuing. Once the automation completes, the request status is set to “Fulfilled” and the record is deactivated.
- If the request is rejected, the status is set to “Rejected” and the record is deactivated.
Feedback
Coming soon: Throughout 2024 we will be phasing out GitHub Issues as the feedback mechanism for content and replacing it with a new feedback system. For more information see: https://aka.ms/ContentUserFeedback.
Submit and view feedback for