Install and set up the Employee Kudos template
Enterprise templates for Power Platform are enterprise-ready solutions designed to be installed, customized, deployed, and managed by a centralized team at your organization to support common governance and security practices.
Establish a centralized team that consists of key stakeholders, product owners, and Power Platform administrators and developers. Be sure to review Power Platform best-practices and administration resource links and to develop plans that suit your organization's needs.
More information:
- Power Platform adoption best practices
- Administer Microsoft Power Platform
- Working with enterprise systems
As a Microsoft Power Platform admin, follow the steps outlined in this article to install and set up the Employee Kudos template.
Step 1: Review prerequisites
Review the requirements, identify opportunities and develop a plan of action that suits your organization's needs.
Confirm licensing
Confirm your organization has the necessary licensing to use enterprise templates. You need:
One of the following Power Apps plans:
- Power Apps Premium
- Power Apps per app
- Power Apps per app pay-as-you-go-meter
- Power Apps use rights included with Dynamics 365 licenses
Note
Power Apps use rights included with Microsoft 365 and Office 365 licenses will not suffice to install the template.
More license details are available in the Microsoft Power Platform Licensing Guide
Tip
A free Developer Plan is a great way to install the template for evaluation purposes. More information: Power Apps Developer Plan
Set up environments and data policies
It's important to have a cohesive environment and data policy strategy for enterprise templates. To successfully install and manage the Employee Kudos template, confirm these resources and practices are in place.
Administrators - Be sure admins with the necessary privileges are available to coordinate to assign licensing and create environments.
- Microsoft Entra ID Global or tenant User Administrator to assign Power Apps or Power BI licensing
- Power Platform Administrator to create environments
More information: Microsoft Power Platform admin
Environments - Follow application lifecycle management (ALM) best practices in creating and managing environments. Also consider:
- A Power Platform environment is set up with a Dataverse database
- Environment maker security role privileges, at a minimum, are assigned to the user who installs the solutions in that environment.
More information: Environments overview
Data loss prevention policies - Ensure the environment has access to the connectors used by the Employee Kudos template:
More information: Data loss prevention policies
Step 2: Create connections
Cloud flows need specific connection references to work correctly. Connection references are included in the solution, but connectors often need to be manually set up.
The installation requires you to set up three new connections. It's best to create the connections before importing the solution to make the import smoother. If you create the connections during import, you have to jump back and forth between browser windows.
To create the connections in advance, take these steps:
- Go to Power Apps
- Go to Connections and select + New Connection to create new connections with each of these connectors:
More information: Manage connections in canvas apps
Step 3: Install solution files
There are two solution installation options available for you to consider:
- You can select the Get it now button on the template's AppSource offer page and it automatically takes you to an install window in the Power Platform admin center.
- You can download either a managed or an unmanaged version of the solution files and manually import them into your environment according to your organization's requirements.
Tip
Go to the Templates-for-Power-Platform GitHub project site to log your questions or issues and get support for the Employee Kudos template.
Install from AppSource
You can easily access and install the Employee Kudos template from AppSource, a Microsoft digital storefront. Take these steps to go through the AppSource install process:
- Go to the Employee Kudos template in AppSource and select Get it now. This takes you to the Install Employees Kudos Template window in the Power Platform admin center.
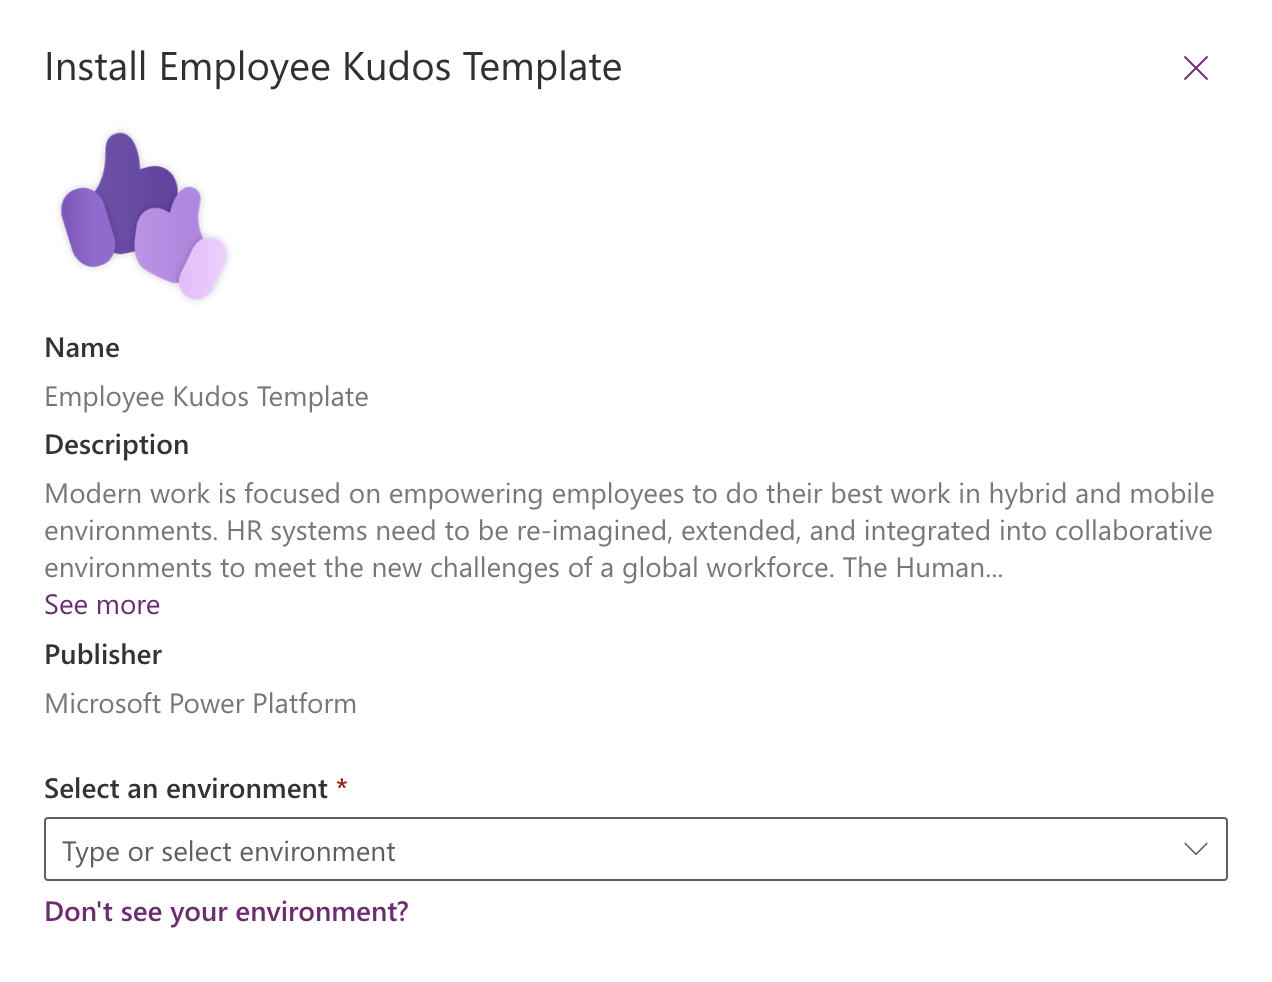
- Select the environment that you prepared for the template.
- Agree to the Terms and Privacy statements by selecting the boxes.
- Select Install. You're taken to a screen where you can view the installation status. Once the installation is complete, the status shows as Installed.
Important
Two solutions are always installed in your environment:
- Employee Experience Base. Contains common foundational components that all human resource (HR) solutions use. For now, this is limited to components that enable localization capabilities. By sharing this across solutions, common strings can be localized once in the base solution and all dependent solutions get the benefit.
- Employee Kudos. Contains all the components needed to enable the implementation of the Employee Kudos program within an organization.
Download and manually install solution files
You also have the option to download managed or unmanaged solution files to manually install into your prepared environment according to your organization's requirements:
Download the following managed or unmanaged solution files:
Go to Power Apps and select the environment you prepared for the solution.
Select Solutions on the left pane.
Select Import solution.
Browse for and select either the managed or unmanaged version of the mpa_EmployeeExperienceBase file downloaded in previous step.
Select Next.
Select Import. This starts the import process of the Employee Experience Base solution.
Select Import to start the import process of the Employee Experience Base solution. Once the import is complete, you're notified with a Success message.
Browse for and select either the managed or unmanaged version of the mpa_Kudos file downloaded in previous step.
Select Next and Next again.
For each of the connections listed, select the existing connection that was created in the previous step.
Select Next.
Ignore entering values for the environment variables as that will be completed in an additional step later. Since the apps have not been imported into the environment yet, we are unable to capture what their URL values are at the moment.
Select Import to start the import process of the Employee Kudos solution. Once the import is complete, you're notified with a Success message.
More information: Solution concepts
Step 4: Create an access team
Create an access team called Kudos-ReadAccessTeam.
Access teams aren't, technically, security roles as defined in Power Platform, but they play an important part in securing access rights to a Kudos. Kudos records are owned by the recipient but should be readable by the sender's manager and the recipient's manager. The access team enables this by dynamically assigning the sender's manager and recipient's manager read access to that Kudos through a Power Automate flow.
More information: Use access teams and owner teams to collaborate and share information
This application requires an access team on the Kudos table to operate properly. This access team shares each Kudos record with the sender of the Kudos and the recipient's manager. That way, these three users have access to the record:
- Recipient: Gets access to the record by owning it.
- Sender: Gets access to the record by being part of the access team.
- Recipient's manager: Gets access to the record by being part of the access team.
If another user needs access to a particular Kudos, an admin must add that user to the access team to get access automatically.
To create the access team:
Go to the admin center
Select the Environment tab and then select the environment where the solution was installed.
Select Settings.
Select Templates > Access team templates.
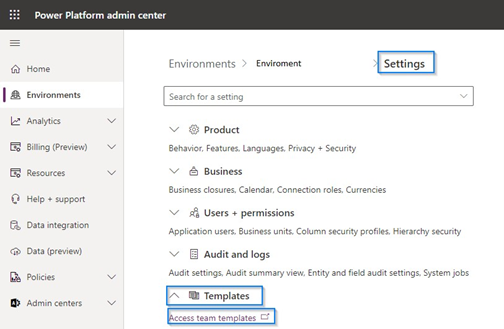
You'll be redirected to the All Team Templated view.
Select New on the ribbon.
Create a new record with the following information. Use the same name that the Power Automate flow uses to look up and use the access team.
- Name: Kudos-ReadAccessTeam - Use this as the name that the Power Automate flow uses. You can change the name, but if you do, you must also edit the flow.
- Entity: Kudo
- Description: The team to share with the sender of Kudos and the Kudos recipient's manager.
Set Access Rights to Read.
Select Save and close this window.
Step 5: Assign security roles to users
The solution includes three new security roles:
- Kudos – Program Admin
- A program admin can see all Kudos.
- Users in this role act as the administrator of the Kudos program. This security role grants access to the canvas app as a regular user and access to the model-driven app where an admin can view all Kudos, create new Kudos Types, add users to the Opt-out User list, and delete and deactivate Kudos and Opt-out User records.
- Assign this role to users who manage the Kudos program in your organization.
- Kudos – Manager
- A manager can see their own Kudos, and the Kudos their direct reports receive.
- This security role grants access to the canvas app, where users can see their own sent and received Kudos, send new Kudos, and see the Kudos received by employees they manage. This security role doesn't grant delete or deactivate access.
- Assign this role to users who manage employees.
- Kudos – Employee
- An employee can see the Kudos they have sent and received.
- This security role grants access to the canvas app, where users can see their own sent and received Kudos and send new ones.
- Assign this role to regular users who need access to send and receive Kudos.
Roles can be assigned from the Power Platform admin center.
- Go to Power Platform admin center
- Select Environment on the left pane and then select the environment where the solution was installed.
- Select Users > See all.
- Select the user(s).
- Select Manage security roles, and then select the appropriate roles.
- Select Save.
Important
All users must also be assigned the Basic User security role in addition to other Kudos-specific roles.
Step 6: Assign run-only access to flows
Set up a new or use an existing security group that represents all users of the Kudos app so that the flows can run for them all.
There are two cloud flows that require configuration of run-only access:
- Kudos App – Share Kudos with Sender, Assign to Recipient
- Kudos App – Notification Email
Follow these steps for each flow:
Go to the Kudos solution and open the flow.
In the lower-right, in a section called Run only users, select Edit. The Manage run-only permissions screen pops up:
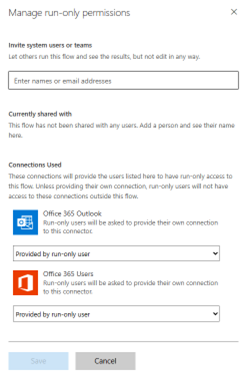
In the top box labeled Invite system users or teams, enter the security group you want to use that contains all Kudos users.
Select Save.
Step 7: Set flow connections
In Power Apps Studio, select Solutions on the left pane.
Select Kudos from your list of solutions.
Select Cloud Flows. Two cloud flows require editing:
- Kudo app: Share Kudos with sender, assign to recipient
- Kudos app: Notification email
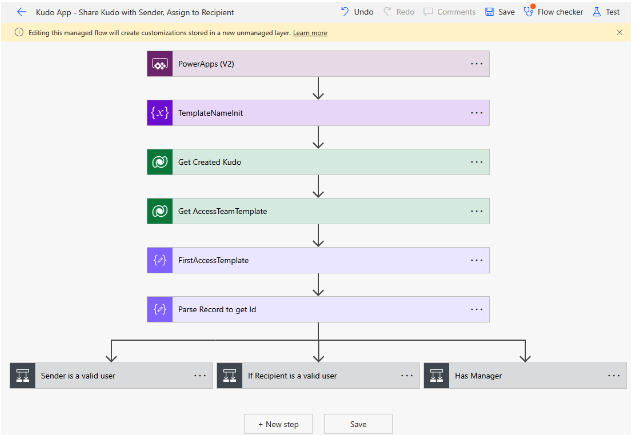
Edit the Kudo app - Share Kudo with Sender, Assign to Recipient by taking these steps:
In the Kudos solution, select Cloud Flows on the left pane.
Select the flow to open the flow's overview screen.
On the flow overview screen, select Edit on the command bar to connect the to the Microsoft Dataverse connector.
Select Continue.
Select Save.
Edit the Kudos app - Notification Email by taking these steps:
In the Kudos solution, select Cloud Flows on the left pane.
Select the flow to open the flow's overview screen.
Select Edit on the command bar.
Select the first flows step with a warning on it.
Select + New connection reference or if pre-existing connections are listed, you can select one of those to reuse it. After you do that, the warning should resolve and you'll see the flow step without the warning. Note: after selecting, it may take a few seconds for everything to resolve.
Select the next flow step with a warning on it.
Select + New connection reference or if pre-existing connections are listed, you can select one of those to reuse it. After you do that, the warning should resolve and you'll see the flow step without the warning. It may take a few seconds for everything to resolve.
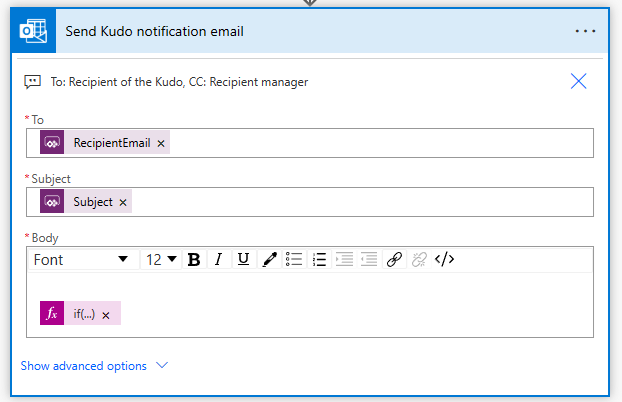
Select Save at the bottom of the screen or on the command bar.
Step 8: Set cloud flows to On
Open the newly installed Kudos solution and verify that the four cloud flows are set to the on status. If they aren't, turn them on.
-
- Select Solutions on left pane.
- Select the Kudos solution from the list.
- Select Cloud flows (4) on the left pane.
- Select each of the four flows in the list to verify that each one is turned on.
- Select Turn on on the command bar if the flow is not already set to on.
Step 9: Install sample data (optional)
Sample data along with installation instructions are available on GitHub at this link: Kudos Sample Data
To create your own badges, refer to Create Custom Badges.
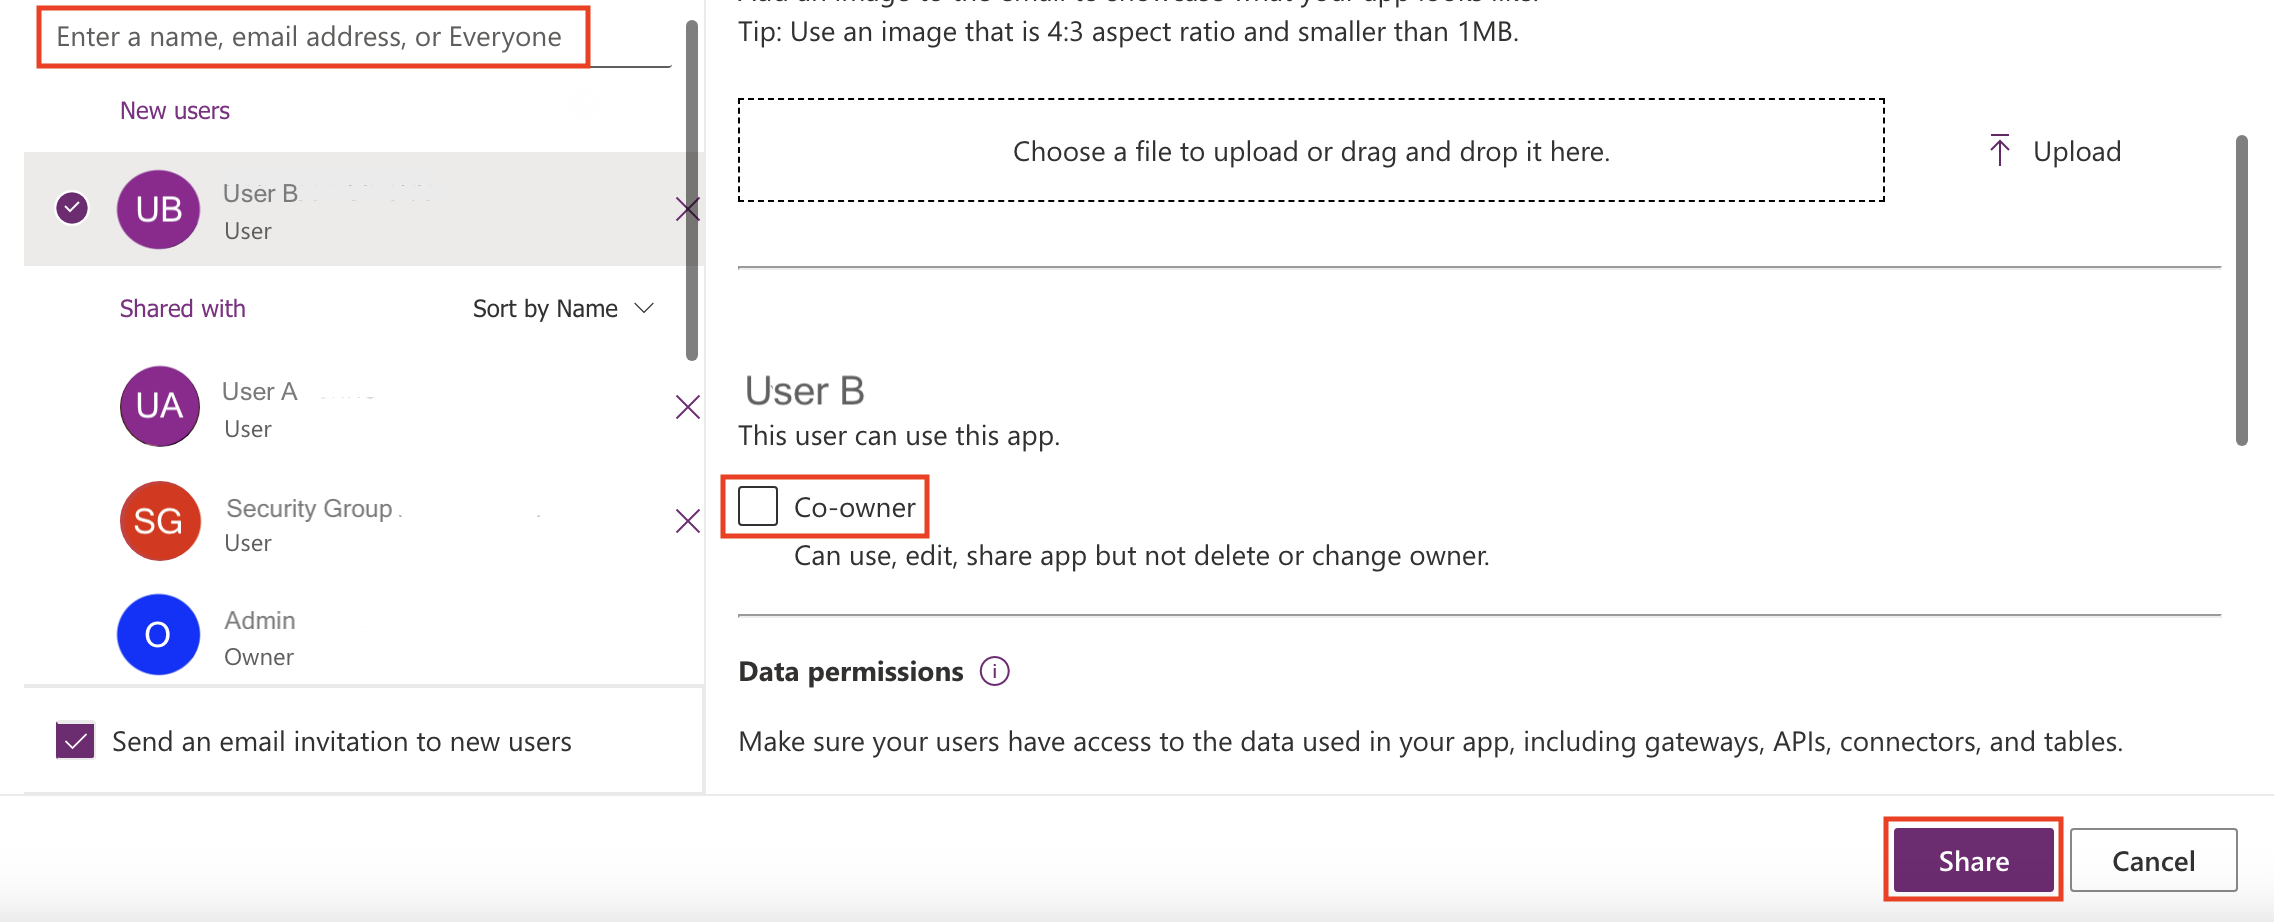
Step 10: Share the App
- Go to Power Apps and select the environment that contains the solution.
- Select Solutions on the left pane and select the Kudos solution from the list.
- Select Apps on the left pane.
- Go to the Kudos canvas app and select the three dots to the right to see a list of actions.
- Select Share.
- Search for and add the users with whom you want to share the app.
- For users who should be able to edit the app, select the Co-owner box.
- For regular users of the app, leave that checkbox empty.
- If everyone in a security group needs to be an app user, select Everyone in the Enter a name box.
- In the Data permission area, you can select roles from a dropdown list. It's next to the Microsoft Dataverse tables that the Kudos app uses. Be sure to select the correct Kudos role (Employee, Manager, Program Admin) along with Basic User.
- Add an optional email message.
- Select Share.
 More information: Share a canvas app with your organization
Note
If Employee Kudos apps aren't shared with you and you cannot access them directly from Power Apps, please contact your admin.
Step 11: Turn on auditing (optional)
While this isn't required, we recommend enabling the audit setting on the system, so it's easy to see who created or updated records.
To do this:
Go to the Power Platform admin center.
Select the Environment tab, select the environment where the solution is installed, and then select Audit settings.
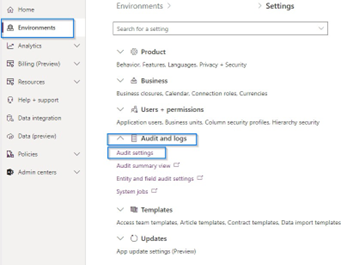
Select Start auditing.
Next step
Feedback
Coming soon: Throughout 2024 we will be phasing out GitHub Issues as the feedback mechanism for content and replacing it with a new feedback system. For more information see: https://aka.ms/ContentUserFeedback.
Submit and view feedback for