WF Scenarios Guidance: SharePoint and Workflow
May 2008
Michele Leroux Bustamante, IDesign
Windows Workflow Foundation (WF or Workflow) is Microsoft’s technology platform for building workflow-enabled applications. The platform includes a set of tools for designing and managing workflows, a programming model for implementing workflow logic, a rules engine, and a workflow runtime execution engine. Workflow technology can be employed in a wide range of application scenarios, the most common of which are listed in Table 1.
1: Common production application scenarios for Workflow.
Scenario |
Description |
SharePoint 2007 and Workflow |
SharePoint 2007 relies on Workflow technology for its packaged workflows, and for custom workflows created with SharePoint Designer 2007 or Visual Studio 2008. |
Workflow provides the underlying tools to support both human and system interaction according to business rules. |
|
Seamless integration between Workflow and WCF enables workflows to be exposed as services and to coordinate calls to WCF services. |
|
Both Windows and web applications can leverage workflows to drive presentation flow. |
|
Applications can host the Workflow Designer to provide a fully customized design experience for developers or business users. |
This whitepaper summarizes the value proposition for scenarios that involve SharePoint 2007 and Workflow.
One of the most common scenarios where Workflow is employed today is in conjunction with SharePoint 2007 applications. SharePoint facilitates collaboration between people, documents, and other information within an Internet or intranet portal site; includes task management and notification features; and provides document lifecycle and content management features including role-based access and version control. Workflow is a natural fit to coordinate interaction between users and SharePoint assets for these and other platform features that involve human and system workflow.
Businesses can deploy SharePoint 2007 applications to Windows Server 2003 or Windows Server 2008 machines. SharePoint applications with limited functionality can be hosted with Windows SharePoint Server (WSS) 3.0, a free runtime host for SharePoint applications that also hosts the Workflow runtime. Microsoft Office SharePoint Server (MOSS) 2007 is a more comprehensive offering with that builds upon the WSS core platform. It provides additional features for SharePoint applications including forms-driven processes and integration with Microsoft Office applications for a more complete, collaborative experience.
MOSS 2007 includes several packaged workflows for the most common scenarios working with SharePoint assets. SharePoint Designer 2007 can be used by non-developers to design and deploy new workflows to run in SharePoint; and developers can use Visual Studio 2008 to design workflows specifically for SharePoint using supplied templates and tools for this purpose. The sections that follow will first explain the relationship between SharePoint and the Workflow runtime and then describe relevant uses cases for SharePoint and Workflow.
The deployment requirements for a SharePoint 2007 application depend largely on the features required by that application. WSS supports a core set of SharePoint features including Workflow hosting, and MOSS adds value to WSS with support for additional SharePoint features including rich forms-based collaboration scenarios that involve workflow. WSS is the SharePoint platform that hosts the Workflow runtime engine, which means that developer intervention is not required to initialize workflows in a SharePoint application, unlike with custom applications where developers provide hosting logic.
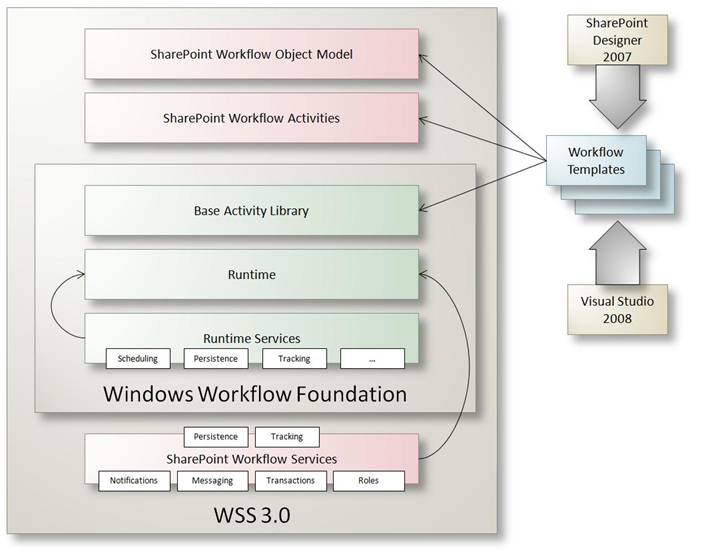
Figure 1 provides an architectural view of the relationship between SharePoint and Workflow. WSS hosts the Workflow runtime, which includes activity libraries and other runtime services. WSS then extends the environment with activities and services specific to SharePoint. By default, the Workflow runtime provides runtime services for scheduling, persistence, and tracking – and supports custom runtime services. WSS installs customized versions of persistence and tracking services, and then adds several new Workflow services for notifications, messaging, transactions, and roles.
1: WSS and the Workflow runtime
SharePoint workflows leverage core Workflow activities but also rely on custom SharePoint activities that encapsulate interactions with SharePoint assets. These custom activities are the foundation of packaged SharePoint workflows and of workflows created with SharePoint Designer 2007. Developers can also make extensive use of these activities directly when they build SharePoint workflows from Visual Studio 2008.
Beyond hosting the Workflow runtime, WSS also exposes a workflow object model for developers to programmatically interact with the SharePoint object model and related workflow features. This is useful to developers who design custom pages for a SharePoint application that will present information about workflows, or allow users to interact with workflow instances.
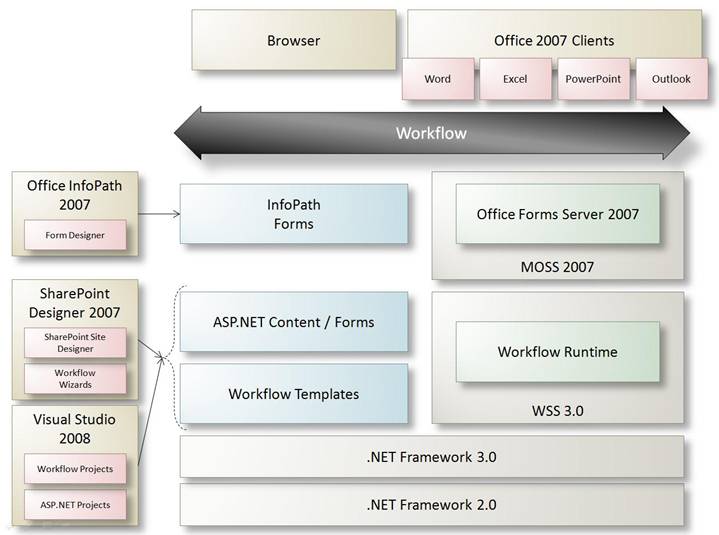
WSS provides core functionality to all SharePoint 2007 solutions. Figure 2 illustrates the architecture of a SharePoint application that relies on WSS features, without requiring MOSS. SharePoint site content such as pages, web parts, web services, and other related functionality are built with ASP.NET 2.0 and depend on .NET Framework 2.0. Workflow support in WSS relies on .NET Framework 3.0. Web designers can use SharePoint Designer 2007 to manage SharePoint site content, build workflows, and deploy related updates without development skills. Developers can use Visual Studio to create and customize ASP.NET content for a SharePoint site, and to create custom SharePoint workflows. In this case, extra steps are required to manage updates to the SharePoint site.
2: SharePoint applications and WSS

SharePoint workflows are all based on Workflow technology; thus, the Workflow runtime manages all interactions with workflows hosted with WSS. WSS handles loading the Workflow runtime and making requests to initialize workflow instances and otherwise interact with the Workflow object model. Workflow lifecycle management in WSS is transparent to SharePoint web designers and users.
MOSS 2007 adds value to workflow and collaboration features by providing support for forms-driven business processes that leverage InfoPath forms. Figure 3 illustrates the architecture for a SharePoint application that relies on MOSS as well as well as WSS. MOSS includes Office Forms Server 2007, which has an execution engine that renders InfoPath forms created with Office InfoPath 2007 as HTML, allowing any user with a web browser to interact with the InfoPath form. In addition, MOSS provides collaborative features for Office 2007 client applications such as Word, Excel, and PowerPoint, allowing users to interact with SharePoint metadata and workflows from within the Office application user experience.
3: MOSS 2007 architecture
Integration with Office 2007 client applications can significantly improve business efficiency and provide a better overall experience since users can interact with different stages of a workflow using applications they are already familiar with.
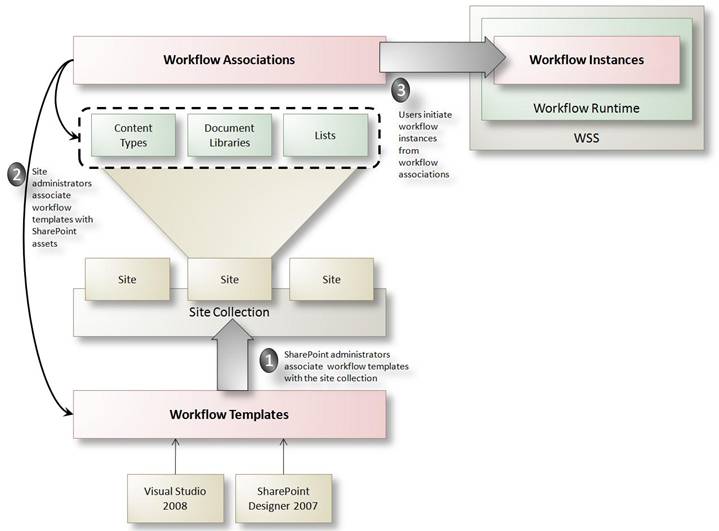
There are three core workflow concepts relevant to SharePoint 2007:
- Workflow Templates: SharePoint workflow templates describe the semantics of a workflow including any necessary code to run the workflow. Templates are not used directly; users must first create workflow associations with SharePoint assets.
- Workflow Associations: Before a workflow template can be used in a SharePoint site, the template must be associated with a content type, list, or document library. When site administrators create the association, they provide details for workflow initialization, including task list, history list, default participants, and possibly other custom information required by the association form. This information is used when a workflow instance is created.
- Workflow Instances: Workflow instances are created from workflow associations and rely on the information provided by the association to initialize the workflow. Depending on how the workflow is initialized, users may also have the opportunity to provide information to the workflow instance through an initialization form.
The relationship between workflow templates, associations, and instances is illustrated in Figure 4. Workflow templates include packaged workflows supplied by SharePoint, and custom workflows created with SharePoint Designer 2007 or Visual Studio 2008. The first step is to install the template to the SharePoint application, and then associate it with a site collection (1). After this installation step, site administrators can create workflow associations so that users can initialize workflows for specific document libraries and lists (2). Workflow instances may be created automatically from a trigger, or initialized by users explicitly (3).
4: Relationship between workflow concepts
While the workflow instance is running, it will interact with a particular list or document library, with a task list, with a history list, and with users (see Figure 5).
5: Workflow instance interaction with users and SharePoint assets
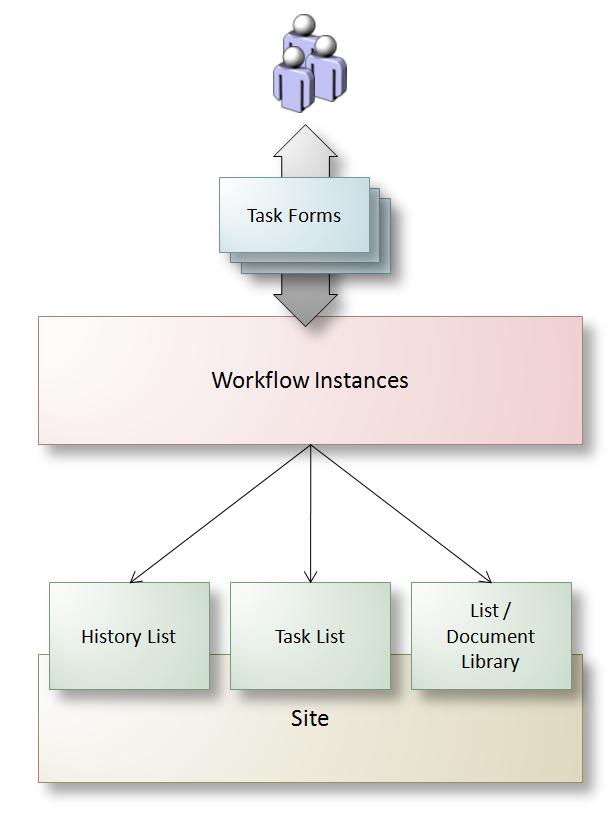
The specific list, document library, task list, and history list are inferred from the workflow association. The task list is important because this facilitates interaction with users (human workflow) to collect information and advance the state of the workflow. Workflows typically assign tasks to users or groups and gather input from users through task forms.
The history list is used to provide visibility into a workflow instance. Workflow templates define when history logs are written and what content the log includes. Workflow associations enable users to specify which history log they prefer to use for workflow instances.
Q. Can I use Workflow with earlier versions of SharePoint?
Only SharePoint 2007 supports Windows Workflow Foundation. Prior versions of SharePoint provided a custom rules engine and supported limited collaboration scenarios. SharePoint 2007 both simplifies these scenarios with Workflow and provides more capabilities.
SharePoint supplies several useful packaged workflows that applications can leverage to facilitate approval processes, feedback and signature collection, management of document retention, and the translation process for documents translated to other languages. These packaged workflows address a large percentage of typical business processing needs of a content management system. They are also extremely easy to set up and interact with through the wizard-driven interfaces of SharePoint. This section will discuss the purpose of each packaged workflow, and then explain how to leverage them in a SharePoint site.
SharePoint includes these core packaged workflows:
Approval: This workflow is used to route documents for approval by one or more users. Users can be assigned the approval task in sequence or in parallel. Each user can approve or reject the document or possibly reassign the task to another user. Workflow settings determine how many approvals are necessary to complete the workflow successfully.
Collect Feedback: This workflow is used to route documents for review by one or more users. Users who are assigned the review task are asked to provide feedback comments through the SharePoint site, or directly from within an Office 2007 client application if it supports the document type. All feedback is collected and sent to the document owner when the workflow is successfully completed.
Collect Signatures: This workflow can be started only from within Office 2007 client applications that have at least one signature line, which limits applications to Word or Excel. The task of signing must also take place from within the client application. The workflow then gathers signatures submitted by all users who are assigned the task, as they complete it.
Disposition Approval: This workflow is used in conjunction with document expiration and retention policies for a SharePoint site. The workflow can be started manually, or automatically based on expiration rules set for a document or item. Only users with the rights to the disposition task are able to complete the workflow.
Translation Management: This workflow is used with a Translation Management Library within a SharePoint application to manage translated documents. A list of languages and translators is selected for the workflow, and these users will be assigned a task to translate new and versioned documents added to the library. A copy of the document is created for each translator, who has the responsibility to translate and mark their translation task as complete when they are done. A relationship is also maintained between the originating document and the translated versions of the document.
All of these packaged workflows are based on Workflow technology, but this is completely transparent to SharePoint users since wizards are provided to configure them. There are wizards and forms to create workflow associations, to initialize workflow instances, and to interact with workflow tasks assigned to users. The following sections provide an overview of the key steps in setting up packaged SharePoint workflows.
Before a workflow template can be used, it must be associated with a list, a library, or a specific content type. This task is usually handled by the site administrator. Once this association is made, workflows will either be automatically initiated based on rules, or can be manually initiated if that option is available. Choosing the appropriate association depends on the desired scope of the workflow:
List Association: Workflows associated with a specific list can be initiated only for items in that list.
Library Association: Workflows associated with a library can be initiated only for items in that library.
Content Type Association: Workflows associated with a specific content type for the entire site can be initiated for that content type across all lists and libraries. If associated with a content type for a specific list or library, usage is once again limited to that scope for the type.
Users can set Workflow Settings at the desired hierarchy level to associate a new workflow, or modify existing workflow properties for the desired scope. Figure 6 through Figure 9 illustrate how the Add a Workflow wizard simplifies setting up workflows in SharePoint for an Approval workflow.
Figure 6 shows the first step to associate an Approval workflow template to a list within a SharePoint site. For this example, the list is titled “Invoices.” Documents added to the list will be routed for approval using an Approval workflow. This first page in the wizard enables users to select the workflow type, assign a name, and make decisions regarding the associated task list, history list, and start options. The list of workflow templates includes all but the Translation Management template since the list is not a Translation Management Library; in this case, the Approval template is selected. Custom workflows created with SharePoint Designer 2007 or Visual Studio 2008 can also be added to this list.
Users can opt to use the default task list and history list, or create new lists for this specific workflow. The default task list can be useful for users to see all of their tasks in one place, for all workflows. However, if there are many potential workflows and tasks, this can become confusing, and if tasks are sensitive in nature it may be preferable to associate them with a separate list. For the history list, which logs interaction with the workflow at each stage, it is usually preferable to use a separate list for manageability.
The start options for the workflow indicate whether workflows are initiated manually, or initiated automatically when items are created or changed or a major version is uploaded (if the library supports document versioning). Automatic workflow initiation is a compelling feature since it streamlines user interaction with SharePoint assets and related business processing requirements.
6: Associating a new workflow with the Invoices list

On the second page of the wizard, users indicate how the workflow task assignment will be handled, specify any default values, determine how the workflow will complete or terminate, and provide post-completion instructions relevant to the template. Figure 7 shows the first section where users indicate whether workflow participants process their task in parallel or one after another. In some cases, users may also need to reassign the task to another user, or make changes to the document or item associated with the task, before the task can be officially completed.
7: Specifying rules for task assignments in the Add a Workflow wizard.

Some properties of the workflow can also have default values, and these can be set in the wizard as shown in Figure 8. In this section the user can specify a fixed set of approvers, a message, and a fixed due date or time period to complete the task. Other users can also be notified via e-mail when the workflow is started. These options are used when workflows are triggered automatically, but the user can control these options when the workflow is initialized manually.
8: Specifying default values for a workflow in the Add a Workflow wizard

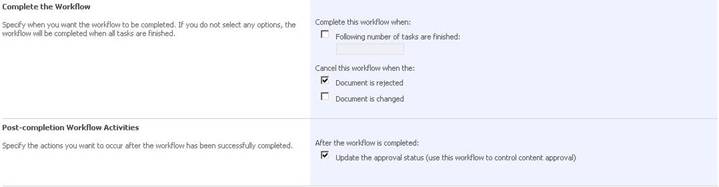
In the final section of the wizard, shown in Figure 9, users can specify rules for completing or cancelling the workflow, in addition to actions that can be taken after the workflow is completed.
9: Specifying workflow completion and post-completion activities in the Add a Workflow wizard
These wizard pages collect settings specific to the Approval workflow. Many of these settings are shared among the packaged workflows, but can vary slightly based on the selected workflow or the type of SharePoint asset it will be associated with. These association forms will also differ for other custom SharePoint workflows. The point is to collect the information necessary to govern how workflow instances are initialized. At the end of this association, process workflows can be run for the list, library, or content type according to the settings provided.
In this example, when an invoice is uploaded to the Invoices list, an instance of the Approval workflow will be initialized for the document. From there the workflow assigns a task to each participant and handles interactions with those participants according to the settings provided.
SharePoint workflows can be initialized in two ways:
Automatically: Workflows can be automatically initiated when items are created, changed, or versioned, or when a notification such as one for document expiration triggers it.
Manually: Workflows can be manually initiated for a specific item by selecting the Workflows menu item which then walks the user through a wizard to provide workflow initialization settings. Similarly, if a document is opened in an Office 2007 client application, workflows can be started from within the application.
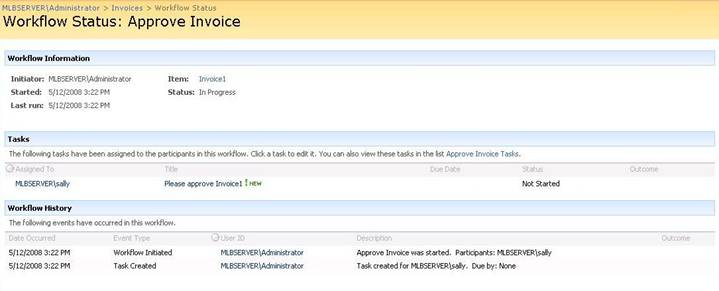
When a workflow is automatically initiated, default values are used to initialize workflow properties. Workflow initialization typically results in tasks being assigned to workflow participants, which they can respond to through the SharePoint site or through e-mail if the SharePoint site is configured to support e-mail notifications. Figure 10 illustrates an approval task assigned to a participant based on the Approve Invoice workflow defined in the previous section. In this case, Sally (the user) would click the “Please approve Invoice1” link to view the task form.
10: Viewing a workflow task assignment
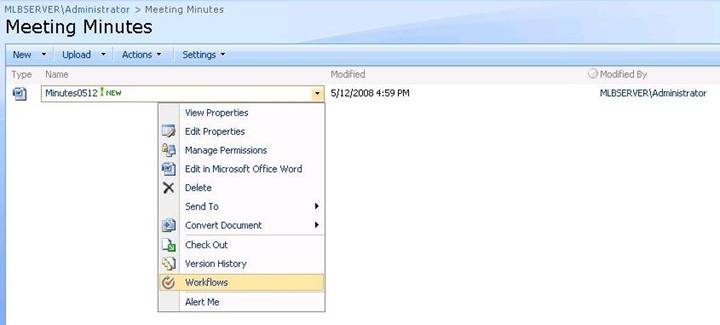
To manually initiate a workflow for a particular item, users can select Workflows from the item’s context menu. Consider a document library called “Meeting Minutes” that supports the Collect Feedback workflow to gather input from meeting attendees. In this case, rather than initiating the workflow automatically, the document owner manually initiates the workflow so that he or she can request feedback from all meeting participants. Figure 11 illustrates manually initiating a workflow from the document library.
11: Manually initiating a workflow for an item
The user is then presented with a page (see Figure 12) where he or she can choose to start one of the available workflows. Only one workflow instance can be initialized per workflow template. If a particular type of workflow is already running, its status is presented on this page under Running Workflows. Users can also see a history of workflows run on the current item. In the case of Figure 12, the user will select the Collect Feedback workflow.
12: Selecting a workflow for manual initialization

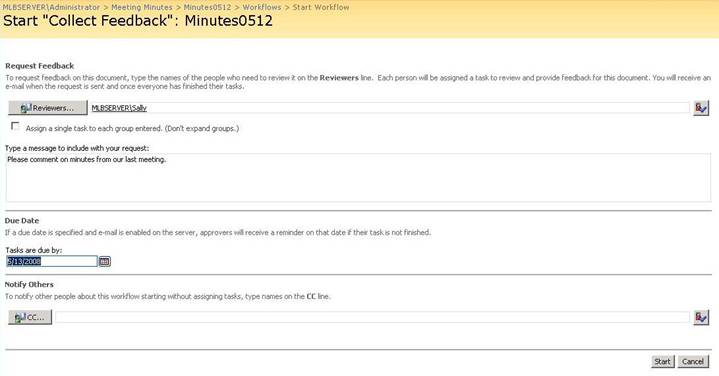
To begin the workflow manually, some information must be collected from the initiator (as shown in Figure 13). This includes a list of users to review the document, a comment with instructions for each reviewer, and a due date if applicable. Optionally, a notification can be sent to other users indicating a review process has begun. Once the user selects the Start button, the workflow begins and tasks are assigned to each reviewer.
13: Providing workflow initialization settings.
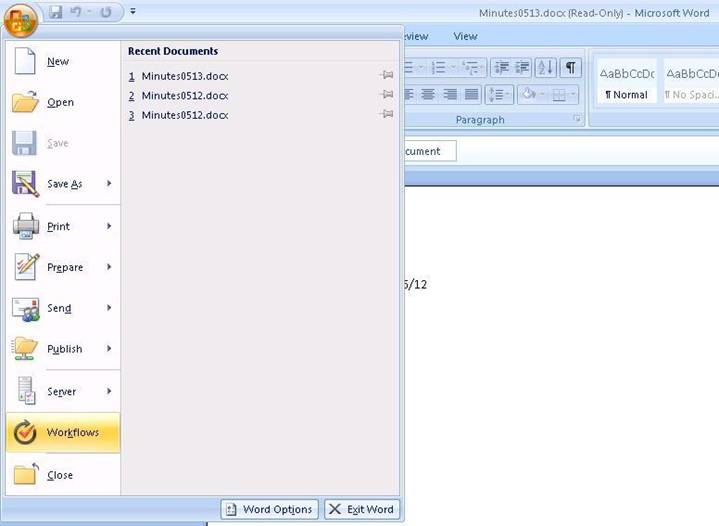
An alternative way to begin the same Collect Feedback workflow would be to open the document from the link in Figure 11 and from within the Office 2007 client application initiate the workflow. In the case of a Word document, Figure 15 illustrates how to initiate the workflow from the open document window by selecting Workflows from the Office button menu. This presents a dialog with information similar to Figure 13 for collecting workflow initialization data. After the workflow is initiated, specified users are assigned their review task as before.
14: Initiating a workflow from an Office 2007 client application (in this case, Word).
To further streamline interaction with a workflow, the SharePoint site can enable support for e-mail document uploads and notifications. E-mail support makes the following scenarios possible:
- Users can upload documents as email attachments to the SharePoint site, which can trigger a workflow.
- Workflows can send tasks as e-mail notifications so that users are immediately informed of the task. Directly from this e-mail, the user can be prompted to click a link to review a document, provide feedback from an e-mail form, or click a link leading the user to the SharePoint site.
With e-mail notifications and Office 2007 client integration, users need not visit the SharePoint site to proactively interact with workflows related to their business documents.
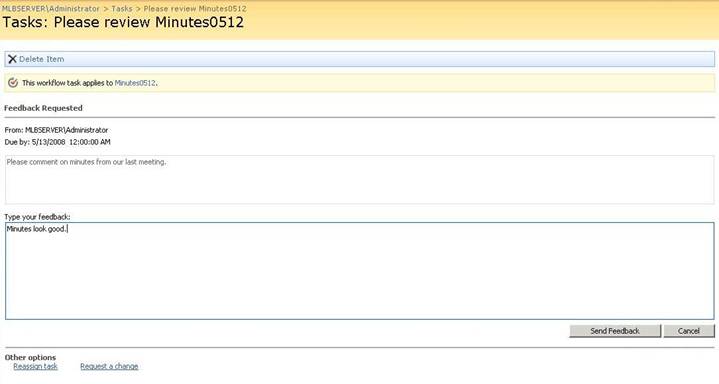
When users review their task list, they can see the status of the associated workflow in the Status column as shown in Figure 10 for the approval task. When the task is selected, users are presented with a page that prompts them for the information necessary to complete the task. In the case of the Collect Feedback workflow, a review task provides a link to the document or other item to review, an indication of any due date for the review, the review message, and a place to write the actual feedback. Figure 15 illustrates this feedback form. The reviewer sends their feedback by selecting Send Feedback.
15: Providing feedback during the review task
Q. Can multiple workflows be running in parallel on the same item?
Multiple workflows can be running for the same SharePoint asset as long as they are based on different workflow templates. Only a single workflow instance per template is allowed.
SharePoint Designer 2007 is a tool for building and designing SharePoint sites, enabling web designers to design and customize pages, create new pages and forms, and interact with document libraries, lists, and workflows. One of the most compelling features of SharePoint Designer 2007 is that it makes it easy for non-developers to create and modify workflows for a SharePoint application – to create new workflows that extend the capabilities of the packaged SharePoint workflows, by introducing business rules. SharePoint Designer provides wizards for creating declarative, rule-based workflows based on Workflow technology. The wizards greatly simplify adding business processing logic to SharePoint workflows using a set of default SharePoint Designer conditions and actions, or using custom conditions and actions created by Visual Studio 2008 and available through the SharePoint site. Custom workflows created with the designer are particularly useful when workflows require logic to evaluate input data, collect additional data from users through forms, validate input, perform calculations, synchronize lists, and more. Since the process is wizard-based, no coding effort is required. SharePoint Designer also handles publishing workflows directly to the associated SharePoint application.
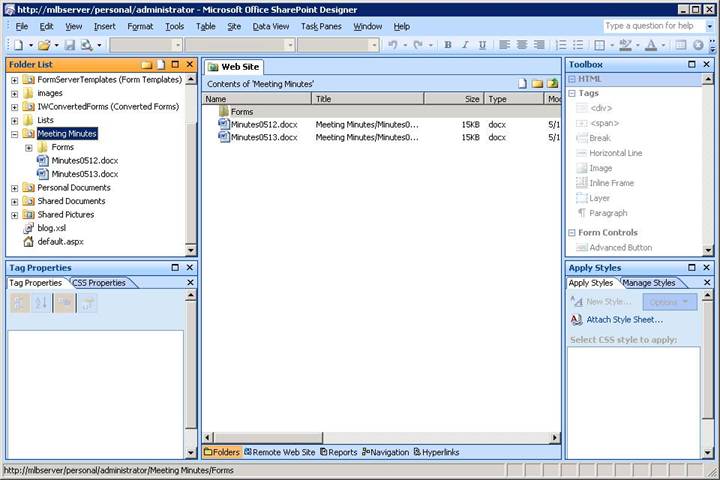
Workflows created with SharePoint Designer are always associated with a particular SharePoint site. Figure 16 illustrates the SharePoint Designer interface with an open site – the site’s files, lists, and other folders are shown in the Folders List window. Once a site is open, users can begin creating or modifying workflows for that site.
16: SharePoint Designer with an open site
Users create workflows by selecting the Workflow menu item (see Figure 17). This starts the Workflow Designer wizard, which guides the user through the steps necessary to create workflow.
17: Creating a Workflow from SharePoint Designer

From the first page in the wizard, users provide the following information:
Workflow Name: A friendly name for the workflow.
Workflow List: A document library or list that the workflow will be associated with. This selection is based on preexisting lists in the open SharePoint site.
Start Options: Specify whether the workflow can be started manually or automatically when items are created or changed.
The second page in the wizard is where users configure business rules for the workflow. This involves a process of completing one or more sets of conditions or resulting actions. Figure 18 illustrates an example of these two pages in the Workflow Designer wizard.
18: Associating a new workflow with a list from the Workflow Designer wizard

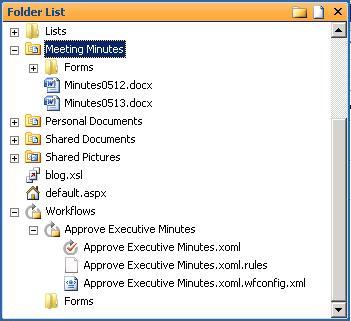
After the user completes the wizard, the new workflow is added to the site under the Workflows folder and associated with the specified list or document library (see Figure 19). Only custom workflows created with the SharePoint Designer appear in this list.
19: Workflows in the Folder List
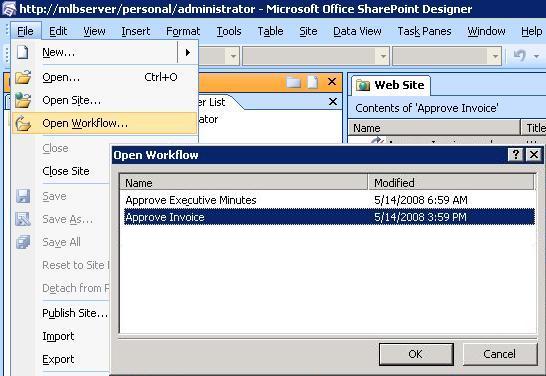
To edit the workflow, users can select the Open Workflow menu item and from the list select a workflow (see Figure 20). This launches the same Workflow Designer wizard, enabling users to edit workflow settings (with the exception of the workflow name).
20: Opening a workflow to edit
Workflows created by SharePoint Designer are based on the declarative model for Workflow. There are no code files and no assemblies to deploy – only XML markup and rules (these files are listed in Figure 19 as .xoml and .rules files). As such, publishing new or updated workflows can be done directly from the SharePoint Designer by selecting the Publish Site menu. Since workflows are already associated with the appropriate list or document library, no additional configuration steps are required on the SharePoint server. In other words, the workflow template, the site collection association, and the workflow association (from Figure 4) are handled in the publishing step.
SharePoint Designer workflows consist of one or more steps, each defining a set of conditions and resulting actions. Conditions always evaluate to a true or false result. The default set of conditions enables users to do the following:
- Compare values against a list column
- Compare values against workflow variables
- Look for keywords in an item title
- Check created or modified date ranges
- Check the user who created or modified the item
Figure 21 illustrates the list of default conditions available. Once a condition is selected, users click hyperlinks supplied by the condition to fill in the appropriate comparison values. Dialogs are presented to collect those values, and often each value is derived from a friendly drop-down list pre-populated with appropriate site, list, item, or workflow variables, although freeform values are also supported. If multiple conditions are selected, they are evaluated together.
21: Selecting conditions

If a condition evaluates to true, the associated action is performed. There are more than 20 default actions available to choose from, all based on Workflow activities. Figure 22 shows how users select an action from the dropdown list, and from the complete Workflow Actions dialog. Actions can be used to do the following:
- Write logs
- Interact with users by sending e-mails and assigning tasks
- Work with list items through create, copy, delete, check-in, and check-out actions
- Set column values for items
- Build strings or perform calculations
- Assign results to workflow variables that can be used in subsequent steps.
Workflow business rules will determine the appropriate combinations of conditions and actions to apply.
22: Selecting actions
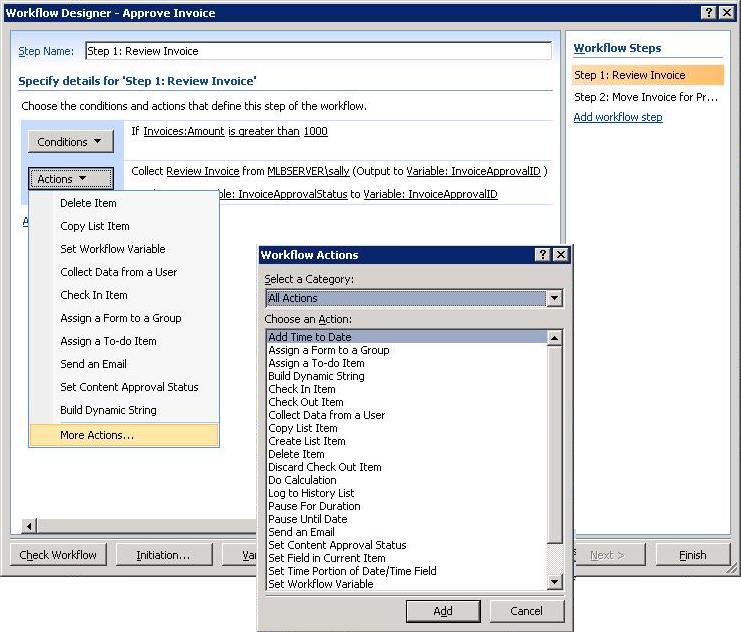
When an action is selected, users once again must populate action parameters by clicking hyperlinks and interacting with supplied dialogs or supplying freeform values. Multiple actions can also be selected for a condition.
Workflows may require one or more steps. Each step can evaluate conditions and include actions that run in sequence. Steps may also collect user input and initialize workflow variables that are useful to steps that follow. To illustrate the simplicity of this process with SharePoint Designer, consider a two-step invoice approval workflow with the following requirements:
- When invoices are uploaded to the Invoices list, the workflow will be initialized.
- If the invoice is less than or equal to $1000.00 it is approved.
- If the invoice is greater than $1000.00, it must be approved by Sally. A task will be assigned to collect Sally’s approval through a generated task form.
- If approved, the invoice is moved to the Approved Invoices list, and deleted from the Invoices list.
- If rejected, the invoice is moved to the Rejected Invoices list, and deleted from the Invoices list.
A custom workflow is required to accomplish this because it involves evaluating custom column values for the item submitted to the Invoices list, collecting user input for approval, and moving invoice items from one list to another according to the approval status.
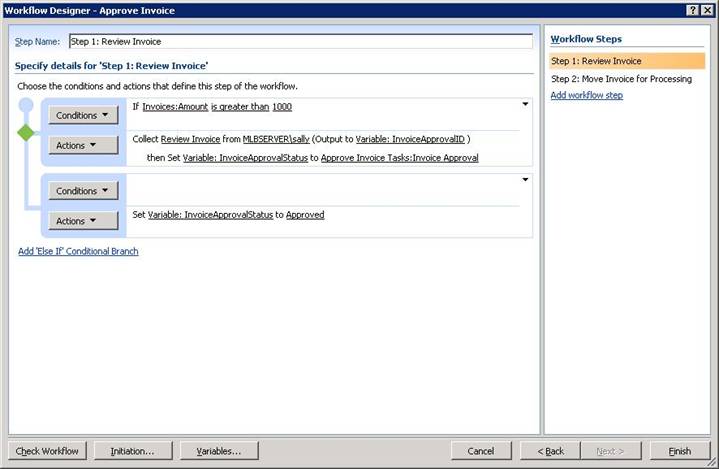
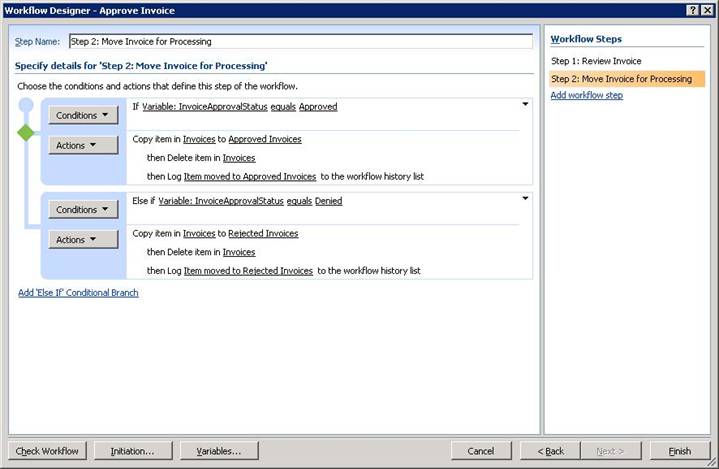
Step 1 is shown completed in Figure 23. The first condition is “Compare Invoices field,” which is configured to check the custom Amount column from the Invoices list and to see whether it is greater than $1000.00. If so, a “Collect data from user” action is executed that creates a task for the specified user or group (the user is Sally in this case) and prompts the user or group for an approval. The result of the approval selection is placed in a workflow variable named InvoiceApprovalID, which is then mapped to another workflow variable named InvoiceApprovalStatus, in the second action. If the invoice is less than or equal to $1000.00, the InvoiceApprovalStatus variable is set to Approved without collecting user input.
23: Invoice Approval Step 1
The “Collect data from user” action will present a form to the user based on the input requested for the task. This task form is automatically generated for the workflow to present data entry elements according to the fields added to the Review Invoice task. For this example, Figure 24 illustrates the steps to create a custom task that asks users to select from a radio button list to collect Approved or Denied status. The resulting task form generated for the user is shown in Figure 25. Additional fields could also be added, thus adding data entry elements to the task form.
When Sally completes the task shown in Figure 25, the radio button selection ID is placed into a variable named InvoiceApprovalID. This variable is used as a lookup to pass the Approved or Denied string to the workflow variable named InvoiceApprovalStatus. The next step in the workflow will use this value to determine how to proceed.
24: Creating a custom task to collect user input
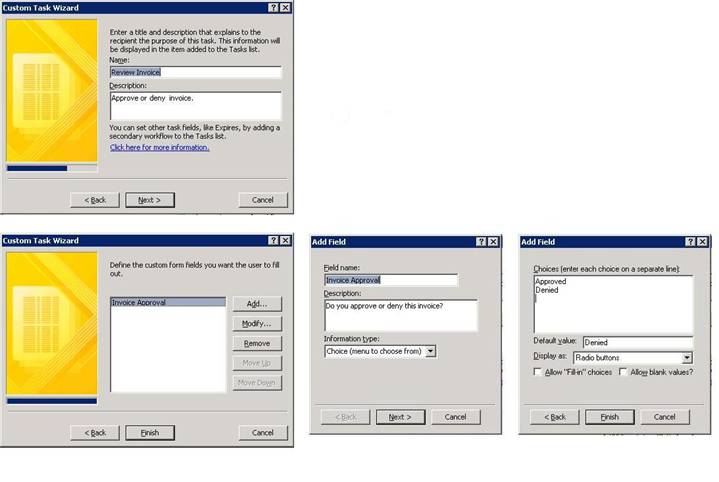
25: Custom task form to collect invoice approval status

The next step in the workflow, shown in Figure 26, evaluates the *InvoiceApprovalStatus *workflow variable. This is done using the “Compare any data source” condition, which includes an option to select Workflow Data as the source of data to compare. If the value of the variable is Approved, the current invoice is copied to the Approved Invoices list and deleted from the Invoices list. If the value is Denied, the current invoice is copied to the Rejected Invoices list and deleted from the Invoices list. Both conditions write a log to indicate the results of the workflow. The three actions used to accomplish this are “Copy list item,” “Delete item,” and “Write log to History List,” respectively.
26: Invoice approval step 2
This example illustrates the simplicity of creating a new workflow with SharePoint Designer, configuring business rules using conditions and actions, creating tasks that collect user input based on automatically generated task forms, and creating variables to pass information between workflow steps.
Another interesting thing that can be accomplished with SharePoint Designer workflows is secondary workflows. For example, once this workflow completes and moves items to another list, the list that receives the item may have a workflow that is initiated to handle post processing.
Q. Can conditions and actions be customized?
Developers can use Visual Studio 2008 to create custom condition types and custom activities. Both are deployed as .NET assemblies and must be properly installed to the SharePoint application before they can be used by SharePoint Designer 2007. This is discussed in a later section.
Q. Can I debug workflows in SharePoint Designer 2007?
No debugging functionality is available for workflows created with SharePoint Designer. The wizard restricts workflow to using preexisting rules and conditions that have presumably already been fully debugged and are safe for use. Users may introduce business logic errors as they configure workflows, and should test this by running the workflow prior to production deployment by engaging the workflow from within a test site.
Q. Are SharePoint workflows sequential or state machine workflows?
The SharePoint Designer wizard produces only sequential workflows based on Windows Workflow Foundation technology. Secondary workflows and lists can be used to simulate a state machine.
Q. Can workflows be associated with content types or multiple lists?
SharePoint Designer supports associating workflows only with a specific list in the SharePoint site. Visual Studio 2008 can be used to create custom workflows that are reusable across multiple sites, and can be associated with a specific content type, list, or document library.
Although SharePoint Designer greatly simplifies creating, modifying, and deploying custom workflows to a SharePoint site, workflows created with Visual Studio 2008 can have the following advantages:
Reuse: SharePoint Designer workflows can be associated with only a single list or document library; reuse is a copy and paste activity. Visual Studio workflows are packaged as assemblies and can be shared across sites and SharePoint assets.
Version Control: SharePoint Designer automatically makes copies of workflows when changes are made from within the environment. While this does version the workflow, there is little control over when versioning takes place, which can result in unnecessary copies. This process also does not integrate well with traditional source control procedures. Developers have complete control over versioning and source control policies for workflows produced with Visual Studio 2008.
Custom Code: Developers can produce workflows with features that extend beyond what SharePoint Designer conditions and actions can provide by interacting directly with the SharePoint object model from within workflows or custom activities, in addition to other custom code.
System Integration: Developers can communicate with external systems from a workflow – to coordinate flow between those systems and the SharePoint site.
State Machine Workflows: Developers can create state machine workflows using Visual Studio – adding another dimension to workflow design.
Visual Studio 2008 provides templates for developers to build workflows that target SharePoint 2007. The developer experience is still similar to building any workflow in Visual Studio. Developers can leverage most of the core Workflow activities alongside SharePoint-specific activities, as well as having access to the SharePoint object model to interact with SharePoint assets throughout the workflow. This added control comes with a price: only developers can create custom workflows this way, and they must be familiar with Workflow technology.
Developers can also create custom SharePoint activities with Visual Studio and deploy them for use with the SharePoint Designer to add value to the non-developer experience.
To simplify the development of custom workflows and activities that target SharePoint, Visual Studio 2008 includes project templates and provides access to SharePoint activities through the Toolbox. Developers can choose from two SharePoint project templates:
- SharePoint 2007 Sequential Workflow
- SharePoint 2007 State Machine Workflow
These templates (see Figure 27) respectively generate new Visual Studio class library projects each with a sample sequential or state machine workflow; with necessary project references to Office and SharePoint assemblies; with a reference variable for interacting with the SharePoint object model; and with deployment files that help with installing custom workflows into a SharePoint application.
27: SharePoint project templates for Visual Studio 2008

In addition to project templates, the Visual Studio Toolbox also includes a list of SharePoint activities as shown in Figure 28. Using the workflow design surface, developers can add standard workflow activities and SharePoint activities appropriate to workflow requirements.
28: SharePoint activities in the Visual Studio Toolbox

Many of the SharePoint activities available through the Toolbox are similar to actions used to create workflows from the SharePoint Designer. However, they are not a one-to-one match since some actions would be naturally replaced with developer code. SharePoint activities each expose an object model to make it easy for developers to set properties and interact with SharePoint sites and related assets.
The Visual Studio development experience for creating SharePoint workflows is much the same as for any other workflow:
- Developers choose a sequential or state machine template to begin – in this case, a SharePoint template so that the project and sample workflow are initialized appropriately for the SharePoint.
- From the Workflow Designer, developers arrange Workflow and SharePoint activities according to requirements. These activities can all be dragged to the design surface directly from the Toolbox.
- Developers supply property values, declarative rule settings and code to configure the workflow and its activities. In this case the code will leverage the SharePoint object model to interact with SharePoint assets associated with the workflow instance, such as a list item or document.
Figure 29 illustrates a sequential SharePoint workflow designed in Visual Studio. The purpose of the workflow is to handle invoice approval and track its payment through an external Accounts Payable (AP) system – logging the status of the workflow along the way. The driving force behind using Visual Studio to create a custom workflow in this case is to communication with the external system – sending it information to create a task within that system.
29: Custom sequential workflow created with Visual Studio 2008

The notable thing about this workflow is the mix of activities between SharePoint, Workflow 3.0, and Workflow 3.5, as shown in Table 2.
2: Summary of activities used in Figure 29
Activity Type |
Activity Name |
Function |
CreateTask |
CreateApproveInvoiceTask, CreateAPTask |
Creates a SharePoint task for the task list associated with this workflow. No code required. |
LogToHistoryListActivity |
LogApproveInvoiceTaskCreated, LogInvoiceApproved, LogAPSystemPaymentRequested, LogInvoicePaid, LogInvoiceDenied, LogMovedToRejectedList |
Writes a string to the history log associated with this workflow. No code required. |
OnTaskChanged |
OnApproveInvoiceTaskChanged, OnAPTaskChanged |
Listens for a change in a specific task, which may or may not be a status change. Code may be required to verify the type of change. |
SendActivity |
PayInvoice |
Calls a method on an external WCF service. |
Code |
MoveToRejectedList |
Custom code to execute. |
While |
WhileApprovalStatusUnchanged, WhileAPTaskNotComplete |
Looping until a condition is satisfied. |
IfElse |
CheckInvoiceApprovalStatus |
Branching based on a condition. |
CreateTask, LogToHistoryListActivity, and OnTaskChanged are all SharePoint activities. LogToHistoryListActivity is useful for providing visibility into the state of the workflow. CreateTask and OnTaskChanged are used to respectively create a new task in the task list for a workflow participant, and wait on the result of that task. CreateTask property settings (or code) determine the input required from a participant to complete the task, which influences the look of the automatically generated task form. OnTaskChanged is an event-based activity that will activate the workflow (if it is not active) for any change to the specified task, which means the code should check for relevant changes, such as the status of the task. SendActivity, CodeActivity, WhileActivity and IfElseActivity are all out-of-the-box Workflow activities.
CreateApproveInvoiceTask creates a custom approval task that a participant can complete through the SharePoint site or via e-mail if notifications are enabled. The task form to collect this information would look the same as Figure 25 assuming the requirements are equivalent. Once the task is completed, the OnApproveInvoiceTaskChanged activity must check to see that the task is complete and collect its status to forward to the rest of the workflow.
CreateAPTask works similarly in that it will notify the appropriate participant of the task and wait for that participant to complete the task. Where it differs is in the fact that the task relates to an activity that will be performed in another system – the AP system. PayInvoice will send relevant payment information to the AP system, and when a notification is received that there is an invoice to pay, the participant will presumably go to the AP system, pay the invoice, and mark the task as complete when he or she is done. OnAPTaskChanged will validate that the task is complete before terminating the workflow.
If the invoice is denied, code associated with the MoveToRejectedList activity is executed. While SharePoint Designer provided actions to copy an item from one list to another and delete an item from a list, in a Visual Studio workflow the same result is accomplished by interacting with the SharePoint object model.
What this workflow template illustrates is how easy it is to replicate core SharePoint workflow activities often found in packaged or SharePoint Designer workflows, while also adding any necessary custom coding to achieve what only a Visual Studio workflow can provide.
Templates
Custom workflows created with SharePoint Designer can be deployed to the SharePoint site with a simple publish command. This is because the designer has prior knowledge of the site and list that the workflow will be associated with, and because it does not generate any code or assemblies that require more than a simple file copy operation.
Workflow templates created with Visual Studio are compiled into assemblies, regardless of whether the workflow is created as XML markup only (XAML), code only, or a combination of the two. A few installation steps are required before a SharePoint site will recognize the new template so that it can then be associated with a content type, list or document library:
- Install the assembly into the .NET Global Assembly Cache (GAC).
- Copy the deployment helper files generated for the project by the SharePoint template (Feature.xml and Workflow.xml) into the SharePoint features directory.
- Activate the workflow for the SharePoint site collection.
- Configure and deploy any custom forms that the workflow depends on, such as InfoPath forms.
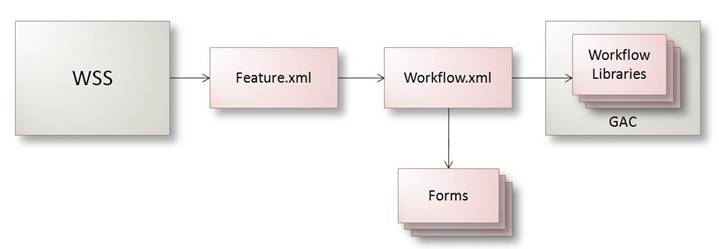
Figure 30 illustrates the deployment architecture for a custom workflow created with Visual Studio 2008. SharePoint relies on the features.xml file to find workflow templates defined in Workflow.xml. Each workflow template inside Workflow.xml points to the assembly where the workflow is defined, and other related dependencies such as custom forms.
30: Custom workflow deployment architecture
Once Visual Studio workflow templates are deployed and associated with a site collection, they will be listed with the other packaged workflow templates shown earlier in Figure 6.
Custom workflow activities are used to encapsulate reusable workflow logic that can be incorporated into many workflows, and potentially shared among many applications. Developers can create custom SharePoint activities to reuse workflow logic between SharePoint workflows. SharePoint Designer 2007 can also leverage these activities, giving non-developers the opportunity to incorporate them into custom workflows.
Creating a custom activity for SharePoint is like creating any other custom activity in Visual Studio 2008, with the exception that SharePoint activities are included in the design:
- Create a new workflow activity library.
- From the Workflow Designer, organize Workflow and SharePoint activities according to requirements.
- Configure activity properties and implement necessary code.
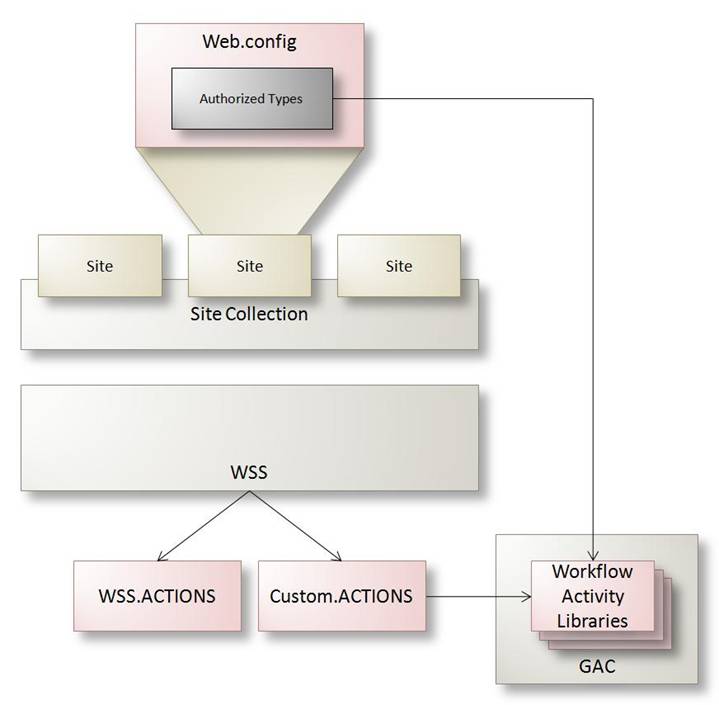
SharePoint Designer 2007 will include custom activities in the actions list (see Figure 22) once they are installed to the SharePoint site. Figure 31 provides an overview of this deployment architecture, which requires the following steps:
- Install the activity library assembly to the GAC.
- Create a custom .ACTIONS file for the activity and copy it to the same directory as the WSS.ACTIONS file (the default SharePoint Designer actions are stored in WSS.ACTIONS).
- Add a section to the Web.config for the SharePoint site that authorizes the use of the activity library assembly.
31: Deploying custom activities as SharePoint Designer actions
Q. What can be done with the SharePoint object model from within a custom workflow created in Visual Studio?
Developers have access to information ranging from granular details pertaining to the running workflow instance to global information about the entire site or site collection. For example, developers can access:
- The document or item that the workflow pertains to, for example, an uploaded document.
- Properties of the item, such as the list or site it belongs to.
- Information about the workflow, such as the initiating user, status, task list, or history list.
- Information about the site or site collection.
Q. Can I debug SharePoint workflows in Visual Studio?
Visual Studio 2008 introduced new features to simplify debugging SharePoint workflows. When developers create a new workflow project using SharePoint templates, the wizard requests information that supports the debugging effort including:
- The SharePoint site URL
- A default list or document library to test with
- The task list and history list to work with
- Instructions on how to initialize the workflow (manual or automatic)
Feature and workflow definition files are generated for the project so that when developers run the project in debug mode, Visual Studio can deploy the workflow library as a feature as illustrated in Figure 30. Developers can also debug SharePoint workflows from the Workflow Designer view, as with any other workflow.
Q. Can I edit workflows created with SharePoint Designer in Visual Studio?
Yes, by copying the declarative files into a new Visual Studio workflow project.
Q. Can I create Visual Studio workflows on a machine that does not have SharePoint installed?
Yes, if you copy the required SharePoint assemblies to the development machine. This would also require remote debugging against the SharePoint site.
Q. Can I create workflows on a client operating system?
To create workflows using SharePoint Designer or Visual Studio a SharePoint development machine is required. WSS and MOSS cannot run on client operating systems.