Windows Workflow Foundation: Merchant Service Workflows
By Zoiner Tejada, Hershey Technologies
Articles in this series
- Choosing the Right Workflow Root
- Job Requisition Workflows
- Replicators in Blog Monitoring Workflows
- Software Bug Reporting Workflows
- Calendar Scheduling Workflows
- Merchant Service Workflows
- Rules-Driven Workflows
- Final Thoughts
Published: March, 2009
Many online music stores allow their customers to purchase individual songs with a credit card, and the companies encourage a single click purchase approach that does not force the purchaser to complete a shopping cart before making payment. This often leads to transactions where users may charge amounts of less than one dollar, and as the user is shopping, they might make multiple such small transactions within a short window of time. The merchant services that are responsible for actually charging the credit cards, and ultimately pay the online store, usually charge a per transaction fee that is some combination percentage of total sale plus a minimum flat fee per transaction. This fee is often over $1. In order to be able to sell items for less than $1, an approach these online stores take is to batch a user’s purchases, waiting for some interval to pass and collecting multiple purchases into one transaction submitted to the merchant service.
Scenario Introduction
In this article we examine the portion of the merchant service workflow that deals with collecting multiple small transactions under one order, and when either a time-limit expires, the transaction is “committed” to the merchant service. Along the way we will demonstrate how to build queue based custom activities that react to the purchase of an item from the online store and examine how the differences that surface in using the same activity in Sequential and State Machine workflows.
From a high level, a user selects an item and makes her first purchase. This creates an OrderId that will be used to group subsequent purchases as they occur. When either the window expires or the total amount exceeds a configured threshold, the workflow automatically commits the order. In real online stores, if the user then submitted another purchase, a new order would be started. This could be reflected by the launch of a new workflow instance, though that is beyond the scope of this sample application.
Sequential Workflow Implementation
The user interface is designed to accommodate the purchase of individual songs, showing the title and the track cost, both of which can be freely entered by the user, but serve to simulate the selection of song and specification of price, as shown in Figure 1.
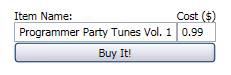
Figure 1 - Purchasing user interface
To keep things simple, the item name can be anything, as in this scenario we are particularly concerned with two values: the cost of the item purchased and then window of the time that begins when the user makes a first purchase. When the user first clicks the “Buy It!” button a new workflow is created that represents that order. Subsequent presses of the button add the item to the order.
The implementation of the sequential version of this workflow is quite straightforward, and is shown in Figure 2.

Figure 2 - Sequential version of the Merchant Service Workflow
In the code behind, the workflow defines the following variables:
| Variable Name | Type | Description |
|---|---|---|
Total |
Decimal |
The dollar amount total of the order. |
PurchasedItems |
List<Item> |
The items purchased under this order. |
OrderId |
String |
A string that uniquely identifies this order in the system. A GUID in string form is used by these workflows. |
WaitExpired |
Bool |
A Boolean that is set to true when the window has expired and the order should be committed. |
Item |
Item |
The item most recently purchased, primarily used to store the first item when the workflow is initially launched. |
The workflow is created and launched upon the first purchase and initializes PurchasedItems with a list containing the single item purchased, Total equal to the item’s cost, OrderId equal to a new GUID and Item equal to the item. The first activity to execute is the WhileActivity whileBelowLimits which relies on the following declarative condition:
this.Total <= 50.0m && !this.WaitExpired
This results in the while loop executing so long as the order total is $50 or less (arbitrarily chosen, in production the threshold amount would be sourced from configuration) and is still within the order window (which could be another configurable value). Therefore, if the user makes a purchase for an item costing more than $50, the workflow will immediately commit the transaction. Otherwise, it will execute listenActivity which listens for one of two events to occur, either the delay activity waitInterval’s duration expires or a user makes another purchase, which causes the execution of onItemPurchased1, which is a custom activity whose implementation is detailed in the next section.
In the case that waitInterval executes, the branch containing onItemPurchased1 is cancelled and setWaitExpired1, which sets the value of the WaitExpired variable to true, executes. The loop condition will then be re-evaluated and evaluate to false, causing the commitTransaction activity to execute and finish the workflow.
In the case that another purchase is made before the delay expires, the onItemPurchased1 activity executes, which simply receives the item purchased, adds the item’s cost to the Total variable and the item itself to the PurchasedItems variable. Again, the while condition is evaluated, and if the Total threshold is exceeded the workflow will complete after executing commitTransaction, which is merely a place holder custom activity that could be replaced with one that makes an actual call to the merchant service. When the threshold is not exceeded, the delay will be reset and the workflow waits for the next event (either the delay expiring or an item being purchased).
Using Queues To Communicate With Workflows
One approach used in previous articles to communicate data from external sources into a workflow instance was to use the ExternalDataExchangeService, paired with local services that would be called by external stimuli and would trigger the execution of HandleExternalEvent activities registered to listen for the event raised. While one can certainly build custom activities that follow this pattern, and replace the HandleExternalEvent activity in a workflow, there is an alternative that removes the need to utilize the ExternalDataExchangeService all together.
One can build custom activities that register with the Workflow Runtime and listen for data to be input into specific, named queues. When such an event occurs, the Workflow Runtime resumes the workflow instance and provides the data item to the waiting custom activity. There are two interfaces that a custom activity such as OnItemPurchased needs to implement to be event driven in this manner:
public interface IEventActivity
{
IComparable QueueName { get; }
void Subscribe(ActivityExecutionContext parentContext,                IActivityEventListener<QueueEventArgs> parentEventHandler);
void Unsubscribe(ActivityExecutionContext parentContext, IActivityEventListener<QueueEventArgs> parentEventHandler);
}
public interface IActivityEventListener<QueueEventArgs>
{
void OnEvent(object sender, QueueEventArgs e);
}
In the OnItemPurchased custom activity, we create a queue named after the Order ID. It is this string value that is set as the value for QueueName when the OnItemPurchased activity is first created.
protected override void Initialize(IServiceProvider provider)
{
    this.QueueName = OrderId;
}
In the Subscribe implementation, we use the WorkflowQueuingService (which is acquired from the Activity Execution Context passed into Subscribe) to check if the queue already exists, and to create it if it does not.
public void Subscribe(ActivityExecutionContext parentContext, IActivityEventListener<QueueEventArgs> parentEventHandler)
{
    WorkflowQueue workflowQueue = CreateQueue(parentContext);
    workflowQueue.RegisterForQueueItemAvailable(parentEventHandler);
}
private WorkflowQueue CreateQueue(ActivityExecutionContext context)
{
WorkflowQueuingService qService = context.GetService<WorkflowQueuingService>();
    if (!qService.Exists(this.QueueName))
    {
        qService.CreateWorkflowQueue(this.QueueName, true);
    }
    return qService.GetWorkflowQueue(this.QueueName);
}
Depending on where the OnItemPurchased activity is placed, the activity which is registered (e.g., the value of parentEventHandler in the Subscribe method) to respond to the queued data item may be either the activity’s parent (such as in the case of a ListenActivity) or the activity itself (such as when the activity stands alone in a sequence). In the former case, the parent will simply schedule OnItemPurchased for execution, and OnItemPurchased will run through its Execute method (shown below) as if it was not an event driven activity at all- the implementation for OnEvent will not be called. In the latter case, OnItemPurchased will run through its Execute method, but subscribe itself as the event handler. When data arrives in the queue, the OnItemPurchased.OnEvent will execute.
protected override ActivityExecutionStatus Execute(ActivityExecutionContext executionContext)
{
    if (ProcessQueueItem(executionContext))
    {
        return ActivityExecutionStatus.Closed;
    }
    Subscribe(executionContext, this);
    return ActivityExecutionStatus.Executing;
}
public void OnEvent(object sender, QueueEventArgs e)
{
    // If activity is not scheduled for execution, do nothing
    if (this.ExecutionStatus == ActivityExecutionStatus.Executing)
    {
ActivityExecutionContext context = sender as ActivityExecutionContext;
      if (this.ProcessQueueItem(context))
      {
            context.CloseActivity();
      }
    }
}
The actual work performed by the OnItemPurchased activity occurs within the ProcessQueueItem method, where we get the item from the named workflow queue, and update the variables of the activity (which are bound to the corresponding variables on the workflow).
private bool ProcessQueueItem(ActivityExecutionContext context)
{
WorkflowQueuingService qService = context.GetService<WorkflowQueuingService>();
    if (!qService.Exists(this.QueueName))
    {
        return false;
    }
    WorkflowQueue queue = qService.GetWorkflowQueue(this.QueueName);
    if (queue.Count == 0)
    {
        return false;
    }
    Item purchasedItem = queue.Dequeue() as Item;
    this.Item = purchasedItem;
    this.PurchasedItems.Add(Item);
    this.Total += purchasedItem.ItemCost;
    Unsubscribe(context, this);
    DeleteQueue(context);
    return true;
}
Finally, when the activity has done its work or been canceled, we need to do some housekeeping which involves unsubscribing from events for the queue and deleting the queue.
protected override ActivityExecutionStatus Cancel(ActivityExecutionContext context)
{
    Unsubscribe(context, this);
    DeleteQueue(context);
    return ActivityExecutionStatus.Closed;
}
public void Unsubscribe(ActivityExecutionContext parentContext, IActivityEventListener<QueueEventArgs> parentEventHandler)
{
WorkflowQueuingService qService = parentContext.GetService<WorkflowQueuingService>();
    if (qService.Exists(this.QueueName))
    {
WorkflowQueue workflowQueue = qService.GetWorkflowQueue(this.QueueName);
            workflowQueue.UnregisterForQueueItemAvailable(
parentEventHandler);
    }
}
private void DeleteQueue(ActivityExecutionContext context)
{
WorkflowQueuingService qService = context.GetService<WorkflowQueuingService>();
qService.DeleteWorkflowQueue(this.QueueName);
}
Here too it is important to note, that Unsubscribe may be called by the activity itself or its parent in the same approach as described for Subscribe.
With an understanding of how OnItemPurchased is implemented, let’s turn our attention to using it in the State Machine Workflow.
State Machine Implementation
The state machine merchant service workflow (see Figure 3) defines the same variables as the sequential version, excepting WaitExpired because it does not rely on awhile loop that would need this.

Figure 3 - State Machine version of the Merchant Service workflow
The workflow begins as before, and immediately executes the State Initialization activity BeginPurchase that checks if the cost of the initial item purchased exceeds the order total threshold (using the same condition as was used by the sequential version). Figure 4 below shows this.

Figure 4 - Handling of initial purchase
If it does, it transitions directly to the CommitPurchases state (which could include other activities that actually make the call to the merchant service). Otherwise, it transitions to the PurchasingState, where it waits for either an item to be purchased (Figure 5) or the delay to expire (Figure 6).

Figure 5 - Handling of a subsequent purchase
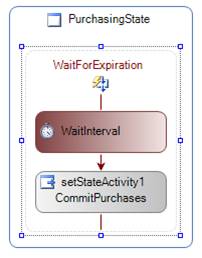
Figure 6 - Handling of the delay expiration
Note that in this sequence, the onItemPurchased1 activity is hosted within the ItemPurchased EventDriven activity (figure 5), just as the delay is hosted within WaitForExpiration (figure 6). When a subsequent purchase occurs and ItemPurchased is triggered, the Total threshold is evaluated again and if it is not exceeded, the workflow loops back to the PurchasingState to wait again. However, if it is exceeded the workflow transitions to the CommitPurchases state and completes.
There are a few observations to be made about using the OnItemPurchased activity in the State Machine Workflow. First, there is no way to place it outside of anything but an EventDriven activity. In terms of its implementation, this means in a state machine there will always be an EventDriven activity that will schedule OnItemPurchased for execution and call Subscribe/Unsubscribe. Second, while we might want to have more than one OnItemPurchased activity in an EventDriven sequence, that is not allowed. There can be only one activity that implements IEventActivity and it must be the first activity in the sequence. This is different from a sequential workflow, where the OnItemPurchased activity could be used multiple times directly in the sequence.