A Developer's Introduction to Windows Communication Foundation 4
Aaron Skonnard, Pluralsight
Original: November 2009
Updated to RTM: April 2010
Overview
.NET 4 comes with some compelling new features and welcomed improvements in the area of Windows Communication Foundation (WCF). These WCF enhancements focus primarily on simplifying the developer experience, enabling more communication scenarios, and providing rich integration with Windows Workflow Foundation (WF) by making “workflow services” a first-class citizen moving forward.
The good news is most of the WCF 4 changes focus on making today’s common scenarios easier and making new communication scenarios and development styles possible. As a result, moving your existing WCF solutions to .NET 4 will be fairly seamless in terms of migration. Then you simply decide which WCF 4 features you want to take advantage of in your solutions moving forward. The rest of this paper introduces you to each of the new WCF 4 feature areas and demonstrates how they work.
What’s New in WCF 4
WCF 4 comes with a wide range of specific features but Figure 1 describes the main feature areas that we’ll focus on throughout the paper below. These feature areas summarize most of what’s new in WCF 4 and they highlight the top-level opportunities offered by this release of the .NET framework.
Figure 1: WCF 4 Feature Areas
| Feature Area | Description |
|---|---|
Simplified Configuration |
Simplification of the WCF configuration section through support for default endpoints, binding and behavior configurations. These changes make it possible to host configuration-free services, greatly simplifying the developer experience for the most common WCF scenarios. |
Discovery |
New framework support for both ad hoc and managed service discovery behaviors, which conform to the standard WS-Discovery protocol. |
Routing Service |
New framework support for a configurable routing service that you can use in your WCF solutions. Provides features for content-based routing, protocol bridging, and error handling. |
REST Improvements |
Enhancements to WCF WebHttp Services with some additional features and tooling that simplify REST service development. |
Workflow Services |
Rich framework support for integrating WCF with WF to implement declarative long-running workflow services. This new programming model gives you the best both frameworks have to offer (WCF & WF). |
Once we’re done covering these main feature areas, we’ll briefly discuss some of the more advanced lower-level WCF features that come with .NET 4 including things like improved type resolution capabilities, support for queues with competing consumers (“receive context”), support for unwrapped binary data through a byte stream encoder, and support for high-performance ETW-based tracing.
By the time we’re done, you’ll see that WCF 4 becomes easier to use and provides more built-in support for some of today’s most common scenarios and development styles.
Simplified Configuration
The unified programming model offered by WCF in 3.x is both a blessing and a curse – it simplifies writing service logic for a variety of different communication scenarios, however it also increases the complexity on the configuration side of things because it provides so many different underlying communications options that you’re forced to understand before you can get started.
The reality is WCF configuration usually becomes the most costly area of using WCF in practice today and much of that complexity lands on the IT/operations staff who are unprepared to deal with it.
Given this reality, when you consider the net complexity of using WCF 3.x, one might reasonably conclude that it’s harder to use than its predecessor ASP.NET Web services (ASMX). With ASMX, you were able to define a [WebMethod] operation and the runtime automatically provided a default configuration for the underlying communications. When moving to WCF 3.x, on the other hand, developers have to know enough about the various WCF configuration options to define at least one endpoint. And the daunting number of configuration options often scares some developers away.
In an effort to make the overall WCF experience just as easy as ASMX, WCF 4 comes with a new “default configuration” model that completely removes the need for any WCF configuration. If you don’t provide any WCF configuration for a particular service, the WCF 4 runtime automatically configures your service with some standard endpoints and default binding/behavior configurations. This makes it much easier to get a WCF service up and running, especially for those who aren’t familiar with the various WCF configuration options and are happy to accept the defaults, at least to get started.
Default Endpoints
With WCF 3.x, if you try to host a service without any configured endpoints, the ServiceHost instance will throw an exception informing you that you need to configure at least one endpoint. With WCF 4, this is no longer the case because the runtime automatically adds one or more “default endpoints” for you, thereby making the service usable without any configuration.
Here's how it works. When the host application calls Open on the ServiceHost instance, it builds the internal service description from the application configuration file along with anything the host application may have configured explicitly and if the number of configured endpoints is still zero, it calls AddDefaultEndpoints, a new public method found on the ServiceHost class. This method adds one or more endpoints to the service description based on the service’s base addresses (in IIS scenarios, this is the .svc address). Since the method is public, you can also call it directly in custom hosting scenarios.
To be precise, the implementation of AddDefaultEndpoints adds one default endpoint per base address for each service contract implemented by the service. For example, if the service implements two service contracts and you configure the host with a single base address, AddDefaultEndpoints will configure the service with two default endpoints (one for each service contract). However, if the service implements two service contracts and the host is configured with two base addresses (one for HTTP and one for TCP), AddDefaultEndpoints will configure the service with four default endpoints.
Let's take a look at a complete example to illustrate ho`w this works. Suppose you have the following WCF service contracts and the following service implementation:
[ServiceContract]
public interface IHello
{
[OperationContract]
void SayHello(string name);
}
[ServiceContract]
public interface IGoodbye
{
[OperationContract]
void SayGoodbye(string name);
}
public class GreetingService : IHello, IGoodbye // service implements both contracts
{
public void SayHello(string name)
{
Console.WriteLine("Hello {0}", name);
}
public void SayGoodbye(string name)
{
Console.WriteLine("Goodbye {0}", name);
}
}
With WCF 4, you can now use ServiceHost to host the GreetingService service without any application configuration whatsoever. When using ServiceHost in custom hosting scenarios, you will need to specify one or more base addresses to use. The following shows how to host the GreetingService in a console application, and again, you can assume there's no app.config file associated with this program:
class Program
{
static void Main(string[] args)
{
// Host is configured with two base addresses, one for HTTP and one for TCP
ServiceHost host = new ServiceHost(typeof(GreetingService),
new Uri("https://localhost:8080/greeting"),
new Uri("net.tcp://localhost:8081/greeting"));
host.Open();
foreach (ServiceEndpoint se in host.Description.Endpoints)
Console.WriteLine("A: {0}, B: {1}, C: {2}",
se.Address, se.Binding.Name, se.Contract.Name);
Console.WriteLine("Press <Enter> to stop the service.");
Console.ReadLine();
host.Close();
}
}
This example configures the ServiceHost with two base addresses: one for HTTP and another for TCP. When you run this program, you'll see four endpoints printed to the console window as illustrated in Figure 2. You'll get two for the HTTP base address, one per contract, and two for the TCP base address, again one per contract. This is all provided behind the scenes by the ServiceHost instance.
Figure 2: Default endpoints displayed in the console window

Notice how WCF chooses to use the BasicHttpBinding for the default HTTP endpoints and the NetTcpBinding for the default TCP endpoints. I’ll show you how to change these defaults shortly.
Remember, this default endpoint behavior only kicks in when the service has not been configured with any endpoints. If I change the console application to configure the service with at least one endpoint, you will no longer see any of these default endpoints show up in the output. To illustrate this, I'll simply add the following line of code that calls AddServiceEndpoint after constructing the ServiceHost instance:
...
ServiceHost host = new ServiceHost(typeof(GreetingService),
new Uri("https://localhost:8080/greeting"),
new Uri("net.tcp://localhost:8081/greeting"));
host.AddServiceEndpoint(typeof(IHello), new WSHttpBinding(), "myendpoint");
...
If you run the console application with this line of code inserted, you'll notice that only a single endpoint now appears in the output – the one we configured manually in the code above (see Figure 3).
Figure 3: Console output after configuring the host with a single endpoint

However, you can always call AddDefaultEndpoints yourself if you’d still like to add the set of default endpoints along with your own. The following code example illustrates how to do this:
...
ServiceHost host = new ServiceHost(typeof(GreetingService),
new Uri("https://localhost:8080/greeting"),
new Uri("net.tcp://localhost:8081/greeting"));
host.AddServiceEndpoint(typeof(IHello), new WSHttpBinding(), "myendpoint");
host.AddDefaultEndpoints();
...
If you run the console application again with this change, you’ll see five endpoints displayed in the console window – the one I configured manually along with the four default endpoints (see Figure 4).
Figure 4: Console output after calling AddDefaultEndpoints manually

Now that we understand the algorithm and mechanics for adding default endpoints to services at runtime, the next question is how does WCF decide which binding to use for a particular based address?
Default Protocol Mapping
The answer to this question is simple. WCF defines a default protocol mapping between transport protocol schemes (e.g., http, net.tcp, net.pipe, etc) and the built-in WCF bindings. The default protocol mapping is found in the .NET 4 machine.config.comments file and it looks like this:
<system.serviceModel>
<protocolMapping>
<add scheme="http" binding="basicHttpBinding" bindingConfiguration="" />
<add scheme="net.tcp" binding="netTcpBinding" bindingConfiguration=""/>
<add scheme="net.pipe" binding="netNamedPipeBinding" bindingConfiguration=""/>
<add scheme="net.msmq" binding="netMsmqBinding" bindingConfiguration=""/>
</protocolMapping>
...
You can override these mappings at the machine level by adding this section to machine.config and modifying the mapping for each protocol scheme. Or if you'd only like to override it within the scope of an application, you can override this section within your application/web configuration file.
For example, if your organization is primarily focused on building RESTful services with WCF, it might make sense to change the default binding for the “http” protocol scheme to the WebHttpBinding. The following example illustrates how to accomplish this within an application configuration file:
<configuration>
<system.serviceModel>
<protocolMapping>
<add scheme="http" binding="webHttpBinding"/>
</protocolMapping>
</system.serviceModel>
</configuration>
Now if I rerun the console application shown earlier with this app.config in place, the two default HTTP-based endpoints will now show they're using the WebHttpBinding (see Figure 5).
Figure 5: Console output after override the default HTTP protocol mapping

Once WCF determines which binding to use via the protocol mapping table, it uses the default binding configuration when configuring the default endpoint. If you’re not happy with the built-in binding defaults, you can also override the default configuration for a particular binding.
Default Binding Configurations
Every WCF binding comes with a default configuration that is used unless explicitly overridden by the host application for a particular endpoint. Each binding instance you use always comes with the built-in defaults unless you choose to override by applying an explicit binding configuration.
In WCF 3.x, you do this by defining a named binding configuration that you can apply to endpoint definitions through the bindingConfiguration attribute. The mechanics of doing this properly is cumbersome and error-prone. The following configuration file shows a typical example:
<configuration>
<system.serviceModel>
<bindings>
<basicHttpBinding>
<binding name="BasicWithMtom" messageEncoding="Mtom"/>
</basicHttpBinding>
</bindings>
<services>
<service name="GreetingService">
<endpoint address="mtom" binding="basicHttpBinding"
bindingConfiguration="BasicWithMtom"
contract="IHello"/>
</service>
</services>
</system.serviceModel>
</configuration>
In the above example, the “BasicWithMtom” binding configuration overrides the defaults for the BasicHttpBinding by changing the message encoding to MTOM. However, this binding configuration only takes effect when you apply it to a specific endpoint through the “bindingConfiguration” attribute – this is the step that often eludes developers and operations staff, thereby causing configuration problems.
With WCF 4, you can now define default binding configurations by simply omitting the binding configuration name when defining the new configuration. Then WCF will use that default configuration for any endpoints using that binding that don’t have an explicit binding configuration set on them.
For example, if we add the following app.config file to the console application shown earlier, the two default HTTP endpoints will pick up this default BasicHttpBinding configuration, which enables MTOM:
<configuration>
<system.serviceModel>
<bindings>
<basicHttpBinding>
<binding messageEncoding="Mtom"/> <!-- notice there’s no name attribute -->
</basicHttpBinding>
</bindings>
</system.serviceModel>
</configuration>
Of course, you can also add these default binding configurations to machine.config if you want them to take effect across all services running on the machine or you can define them on an application by application basis by adding the default binding configurations within the application configuration file.
This feature gives you a simple mechanism to define a standard set of binding defaults that you can use across all of your services without imposing the complexities of binding configurations onto other developers or the IT/operations staff. They can simply choose the appropriate binding and rest assured that the proper default configuration will be provided by the hosting environment.
In addition to default binding configurations, the other thing to consider for your services and endpoints is what their default behavior configuration should be.
Default Behavior Configurations
WCF 4 also makes it possible to define default behavior configurations for services and endpoints, which can simplify things when you want to share a standard default behavior configuration across all services or endpoints running on a machine or within a solution.
In WCF 3.x, you have to define named behavior configurations that you explicitly apply to services and endpoints through the “behaviorConfiguration” attribute. With WCF 4, you can define default behavior configurations by omitting the name in the configuration definition. If you add these default behaviors to machine.config, they’ll apply to all services or endpoints hosted on the machine. If you add them to app.config, they’ll only take effect within the scope of the host application. Here’s an example:
<configuration>
<system.serviceModel>
<behaviors>
<serviceBehaviors>
<behavior> <!-- notice no name attribute -->
<serviceMetadata httpGetEnabled="true"/>
</behavior>
</serviceBehaviors>
</behaviors>
</system.serviceModel>
</configuration>
This example turns on service metadata for any service that doesn’t come with an explicit behavior configuration. If we add this default behavior configuration to the app.config file for the console application show earlier, and run the application again, we can browse to the base HTTP address to retrieve the service help page and the service’s WSDL definition (see Figure 6).
Figure 6: Browsing to the service metadata enabled by the default behavior configuration

Another new feature in WCF 4 is that behavior configurations now support an inheritance model. If an application defines a behavior configuration using the same name as one already defined in machine.config, the application-specific behavior configuration will be merged with the machine-wide configuration, adding any additional behaviors to the derived composite behavior configuration.
Standard Endpoints
Related to default endpoints is another new WCF 4 feature known as “standard endpoints”. You can think of a standard endpoint as a common preconfigured endpoint definition built into the WCF 4 framework that you can simply use. Standard endpoints define a “standard” endpoint configuration that you don’t typically change, although you can if you need to as you’ll see shortly.
Figure 7 describes the standard endpoints that ship with WCF 4. These provide standard endpoint definitions for some of the most common WCF 4 features and communication scenarios. For example, in the case of a MEX endpoint, you will always need to specify IMetadataExchange for the service contract and are most likely to choose HTTP. So instead of forcing you to always do that manually, WCF provides a standard endpoint definition for metdata exchange called “mexEndpoint” that’s easy to use.
Figure 7: Standard endpoints in WCF 4
| Standard endpoint name | Description |
|---|---|
mexEndpoint |
Defines a standard endpoint for MEX configured with IMetadataExchange for the service contract, mexHttpBinding as the default binding (you can change this), and an empty address. |
dynamicEndpoint |
Defines a standard endpoint configured to use WCF Discovery within a WCF client application. When using this standard endpoint, an address is not required because during the first call, the client will query for a service endpoint matching the specified contract and automatically connect to it for you. By default the discovery query is sent over multicast UDP but you can specify the discovery binding and search criteria to use when you need to. |
discoveryEndpoint |
Defines a standard endpoint that is pre-configured for discovery operations within a client application. The user needs to specify the address and the binding when using this standard endpoint. |
udpDiscoveryEndpoint |
Defines a standard endpoint that is pre-configured for discovery operations within a client application using the UDP binding at a multicast address. Derives from DiscoveryEndpoint. |
announcementEndpoint |
Defines a standard endpoint that is pre-configured for the announcement functionality of discovery. The user needs to specify the address and the binding when using this standard endpoint. |
udpAnnouncementEndpoint |
Defines a standard endpoint that is pre-configured for the announcement functionality over a UDP binding at a multicast address. This endpoint derives from announcementEndpoint. |
workflowControlEndpoint |
Defines a standard endpoint for controlling the execution of workflow instances (create, run, suspend, terminate, etc). |
webHttpEndpoint |
Defines a standard endpoint configured with the WebHttpBinding and the WebHttpBehavior. Use to expose REST services. |
webScriptEndpoint |
Defines a standard endpoint configured with the WebHttpBinding and the WebScriptEnablingBehavior. Use to expose Ajax services. |
You can leverage any of these standard endpoints in your own service configurations by simply referencing them by name. The <endpoint> element now comes with a “kind” attribute that you can use to specify the name of a standard endpoint. For instance, the following example configures the GreetingService with a MEX endpoint by leveraging the standard “mexEndpoint” definition:
<configuration>
<system.serviceModel>
<services>
<service name="GreetingService">
<endpoint kind="basicHttpBinding" contract="IHello"/>
<endpoint kind="mexEndpoint" address="mex" />
</service>
</services>
</system.serviceModel>
</configuration>
Although the standard endpoints shield you from most of the configuration details (e.g., with the mexEndpoint I didn’t have to specify the binding or contract), there may still be times when you want to use them but need to configure the standard endpoint definitions a little bit differently.
When you need to do this, you can use the <standardEndpoints> section and override the endpoint configuration for the standard endpoint. Then you can reference that configuration when defining a new <endpoint> via the endpointConfiguration attribute as illustrated here:
<configuration>
<system.serviceModel>
<services>
<service name="GreetingService">
<endpoint binding="basicHttpBinding" contract="IHello"/>
<endpoint kind="udpDiscoveryEndpoint" endpointConfiguration="D11"/>
</service>
</services>
<standardEndpoints>
<udpDiscoveryEndpoint>
<standardEndpoint name="D11" discoveryVersion="WSDiscovery11"/>
</udpDiscoveryEndpoint>
</standardEndpoints>
<behaviors>
<serviceBehaviors>
<behavior>
<serviceDiscovery/>
<serviceMetadata httpGetEnabled="true"/>
</behavior>
</serviceBehaviors>
</behaviors>
</system.serviceModel>
</configuration>
This example happens to change the default WS-Discovery version for the standard endpoint named “udpDiscoveryEndpoint” (we’ll talk more about service discovery shortly).
Simplifying IIS/ASP.NET Hosting
Given these new features for default endpoints, default binding configurations, and default behavior configurations, hosting in IIS/ASP.NET becomes much easier in WCF 4. ASP.NET developers who are used to working with ASMX services can now define WCF services that are just as simple in nature.
In fact, check out how simple the following WCF service definition is:
<!-- HelloWorld.svc -->
<%@ ServiceHost Language="C#" Debug="true" Service="HelloWorldService
CodeBehind="~/App_Code/HelloWorldService.cs" %>
[ServiceContract]
public class HelloWorldService
{
[OperationContract]
public string HelloWorld()
{
return "hello, world";
}
}
This is the simplest form of WCF service definition because we’re not using a separate interface definition to define the service contract and everything is defined in one file, HelloWorld.svc (note: I’m not recommending this approach, just noting it’s possible to draw a comparison with ASMX). This should feel a lot like typical ASMX services, the primary difference being the attribute names that you use on the service class (e.g., [WebService] and [WebMethod]). There are definitely fewer moving parts.
With the new WCF 4 features described in the previous section, now you can browse to HelloWorld.svc without any additional WCF configuration and the WCF activation logic will create the ServiceHost instance behind the scenes and configure it with a single default HTTP endpoint. And if you’ve added a default service behavior to your machine.config file enabling service metadata, you’ll see the WCF help page and the link to the WSDL definition when you browse to HelloWorld.svc (see Figure 8).
Figure 8: HelloWorldService help page

If you haven’t enabled service metadata machine-wide, you can enable it within your Web application by adding the following default behavior configuration to your web.config file:
...
<system.serviceModel>
<behaviors>
<serviceBehaviors>
<behavior> <!-- notice there’s no name attribute -->
<serviceMetadata httpGetEnabled="true"/>
</behavior>
</serviceBehaviors>
</behaviors>
</system.serviceModel>
...
You can also change other default settings by following the procedures outlined in the previous sections. For example, you can change the default protocol mapping, add default binding configurations, or additional default behavior configurations. If the service implements more than one service contract the resulting ServiceHost instance will be configured with one HTTP endpoint per contract.
For example, suppose we host our GreetingService (from earlier) through the .svc file shown here:
<!-- GreetingService.svc -->
<%@ServiceHost Service="GreetingService"%>
Given our definition for GreetingService, the first time you browse to GreetingService.svc, the WCF activation logic will create the ServiceHost instance and it will add two default HTTP endpoints for the GreetingService type (one for each service contract). You can verify this by browsing to the WSDL definition and you’ll find two <port> elements within the <service> element.
Overall these WCF configuration simplifications should make it much easier for ASP.NET developers to get WCF services up and running within their Web applications, and it brings the simplest case much closer to the experience developers were used to with ASP.NET Web services.
File-less Activation
Although .svc files make it easy to expose WCF services, an even easier approach would be to define virtual activation endpoints within Web.config, thereby removing the need for .svc files altogether.
In WCF 4, you can define virtual service activation endpoints that map to your service types in Web.config. This makes it possible to activate WCF services without having to maintain physical .svc files (a.k.a. “file-less activation”). The following example shows how to configure an activation endpoint:
<configuration>
<system.serviceModel>
<serviceHostingEnvironment>
<serviceActivations>
<add relativeAddress="Greeting.svc" service="GreetingService"/>
</serviceActivations>
</serviceHostingEnvironment>
</system.serviceModel>
</configuration>
With this in place, it’s now possible to activate the GreetingService using a relative path of “Greeting.svc” (relative to the base address of the Web application). In order to illustrate this, I’ve created an IIS application on my machine called “GreetingSite”, which I assigned to the “ASP.NET v4.0” application pool, and mapped it to the GreetingService project directory that contains the web.config shown above. Now I can simply browse to https://localhost/GreetingSite/Greeting.svc without actually having a physical .svc file on disk. Figure 9 shows what this looks like in the browser.
Figure 9: File-less activation example

Discovery
The next major WCF 4 feature we’re going to discuss is service discovery. In some specialized service oriented environments, there are services whose runtime location is dynamic and constantly changing. For example, consider environments where different types of service-enabled devices are constantly joining and leaving the network as part of the overall business solution. Dealing with this reality requires clients to dynamically discover the runtime location of service endpoints.
WS-Discovery is an OASIS specification that defines a SOAP-based protocol for dynamically discovering the location of service endpoints at runtime. The protocol allows clients to probe for service endpoints that match certain criteria in order to retrieve a list of suitable candidates. A client can then choose a specific endpoint from the discovered list and use its current runtime endpoint address.
WS-Discovery defines two primary modes of operation: ad hoc mode and managed mode. In ad hoc mode, clients probe for services by sending multicast messages. The framework provides UDP multicast mechanism for this ad-hoc mode. Services that match the probe respond directly to the client. In order to minimize the need for client polling, services can also "announce" themselves when joining or leaving the network by sending a multicast message to clients who may be "listening". Ad hoc discovery is limited by the protocol used for multicasting messages, in the case for UDP only the services listening in on the local subnet will be able to receive the messages.
With managed service discovery, you provide a discovery proxy on the network that “manages” the discoverable service endpoints. Clients talk directly to the discovery proxy to locate services based on probing criteria. The discovery proxy needs a repository of services that it can match against the query. How the proxy is populated with this information is an implementation detail. Discovery proxies can easily be connected to an exisiting service repository, they can be pre-configured with a list of endpoints, or a discovery proxy can even listen for announcements to update its cache. In managed mode, announcements can be unicast directly to a recipient, potentially by a discovery proxy.
The .NET 4.0 framework provides the base classes that you need to implement your own discovery proxy. The base classes abstract away the discovery protocol details so you can simply focus on the logic you want the discovery proxy to contain. For example, you only need to define what the discovery proxy will do in response to a Probe Message, Announcement Messages and Resolve Messages.
WCF 4 provides a complete implementation of the WS-Discovery protocol, and it provides support for both the ad hoc and managed discovery modes. We’ll take a brief look at each of these below.
Simple Service Discovery
The easiest way to enable service discovery is through the ad hoc mode. WCF makes it easy to enable service discovery within your service host applications by providing some standard discovery endpoints and a service discovery behavior. To configure your service for discovery, simply add the standard “udpDiscoveryEndpoint” endpoint and then enable the <serviceDiscovery> behavior on the service.
Here’s a complete example illustrating how to do this:
<configuration>
<system.serviceModel>
<services>
<service name="CalculatorService">
<endpoint binding="wsHttpBinding" contract="ICalculatorService" />
<!-- add a standard UDP discovery endpoint-->
<endpoint name="udpDiscovery" kind="udpDiscoveryEndpoint"/>
</service>
</services>
<behaviors>
<serviceBehaviors>
<behavior>
<serviceDiscovery/> <!-- enable service discovery behavior -->
</behavior>
</serviceBehaviors>
</behaviors>
</system.serviceModel>
</configuration>
By doing this, your service becomes discoverable over UDP on the local subnet. Clients can then take advantage of WS-Discovery at runtime to “discover” the actual address of the running service. WCF 4 makes it easy for clients to accomplish this through the dynamicEndpoint standard endpoint.
Simply take your existing client endpoint that you were using to connect to the service, remove the address and add a kind=”dynamicEndpoint” tag.
<configuration>
<system.serviceModel>
<client>
<endpoint
name="calculatorEndpoint"
kind="dynamicEndpoint"
binding="wsHttpBinding"
contract="ICalculatorService">
</endpoint>
</client>
</system.serviceModel>
</configuration>
When the first service call is made, the client will send out a multicast query looking for services that match the ICalculatorService contract and attempt to connect to one. Various settings allow you to fine tune your serach, adjust the discovery bindings and control the discovery process. You can also do all of this programmatically by using the DiscoveryClient class.
The following example goes one step further by showing how to use the UdpDiscoveryEndpoint programmatically to discover an ICalculatorService endpoint and then invoke it:
// Create DiscoveryClient
DiscoveryClient discoveryClient =
new DiscoveryClient(new UdpDiscoveryEndpoint());
// Find ICalculatorService endpoints in the specified scope
FindCriteria findCriteria = new FindCriteria(typeof(ICalculatorService));
FindResponse findResponse = discoveryClient.Find(findCriteria);
// Just pick the first discovered endpoint
EndpointAddress address = findResponse.Endpoints[0].Address;
// Create the target service client
CalculatorServiceClient client =
new CalculatorServiceClient("calculatorEndpoint");
// Connect to the discovered service endpoint
client.Endpoint.Address = address;
Console.WriteLine("Invoking CalculatorService at {0}", address);
// Call the Add service operation.
double result = client.Add(100, 15.99);
Console.WriteLine("Add({0},{1}) = {2}", 100, 15.99, result);
Once the client program has retrieved the collection of discovered endpoints, it can use one of them to actually invoke the target service. Figure 10 shows the output of running the client code shown above assuming the service is also running at the same time. Note: in this example, the Find operation on the discovery client is synchronous; discovery provides support for asynchronous find operations as well.
Figure 10: Output of running the discovery client code

Using Scopes when Discovering Endpoints
In the previous example, the client simply probed for services based on the service contract type. Clients can narrow the discovery results by providing additional scoping information when sending the discovery probes. Let’s look at a simple example to see how “scopes” can be used during discovery.
First, the service needs to associate one or more scopes with each endpoint it’s going to publish for discovery. WCF 4 comes with an <endpointDiscovery> behavior that you can use for defining a set of scopes that you can associate with an endpoint definition. The following example illustrates how to associate two scopes with the single endpoint defined on the service:
<configuration>
<system.serviceModel>
<services>
<service name="CalculatorService"
behaviorConfiguration="calculatorServiceBehavior">
<endpoint binding="wsHttpBinding"
contract="ICalculatorService"
behaviorConfiguration="ep1Behavior" />
<endpoint name="udpDiscovery" kind="udpDiscoveryEndpoint"/>
</service>
</services>
<behaviors>
<serviceBehaviors>
<behavior name="calculatorServiceBehavior">
<serviceDiscovery/>
</behavior>
</serviceBehaviors>
<endpointBehaviors>
<behavior name="ep1Behavior">
<endpointDiscovery>
<!-- scopes associated with this endpoint behavior -->
<scopes>
<add scope="http://www.example.org/calculator"/>
<add scope="ldap:///ou=engineering,o=exampleorg,c=us"/>
</scopes>
</endpointDiscovery>
</behavior>
</endpointBehaviors>
</behaviors>
</system.serviceModel>
</configuration>
Clients can probe for service endpoints based on specific scopes at runtime. They can do so by adding a list of target scopes to the FindCriteria instance that you supply to the Find operation. The following code illustrates how to discover ICalculatorService endpoints matching a specific LDAP scope:
...
// Create DiscoveryClient
DiscoveryClient discoveryClient = new DiscoveryClient("udpDiscoveryEndpoint");
// Find ICalculatorService endpoints in the specified scope
Uri scope = new Uri("ldap:///ou=engineering,o=exampleorg,c=us");
FindCriteria findCriteria = new FindCriteria(typeof(ICalculatorService));
findCriteria.Scopes.Add(scope);
FindResponse findResponse = discoveryClient.Find(findCriteria);
...
Leveraging scopes makes it possible to fine tune your discovery implementation so that clients can more easily discovery the specific service endpoints of interest to them. Discovery allows for further customization as well. For example, services can add custom XML metadata to an endpoint. This information is sent along to the client in response to the client’s query.
Service Announcements
WCF 4 also makes it easy to configure services to “announce” their endpoints when they start up. This allows clients who are “listening” to learn about new service endpoints right as they join the network, thereby reducing the amount of probing (and multicast messaging) performed by clients.
You can configure a service with an announcement endpoint by using the <serviceDiscovery> behavior. The <serviceDiscovery> behavior allows you to define a collection of announcement endpoints that will be exposed by the service. You can use the standard “udpAnnouncementEndpoint” for most cases.
You’ll also still need to configure the service with a standard “udpDiscoveryEndpoint” if you want it to respond to discovery probes initiated by clients. The following example shows a typical configuration:
<configuration>
<system.serviceModel>
<services>
<service name="CalculatorService">
<endpoint binding="wsHttpBinding" contract="ICalculatorService"/>
<endpoint kind="udpDiscoveryEndpoint"/>
</service>
</services>
<behaviors>
<serviceBehaviors>
<behavior>
<serviceDiscovery>
<announcementEndpoints>
<endpoint kind="udpAnnouncementEndpoint"/>
</announcementEndpoints>
</serviceDiscovery>
</behavior>
</serviceBehaviors>
</behaviors>
</system.serviceModel>
</configuration>
With this configuration in place, the service will announce itself when it comes online and it will also announce when it’s going offline. In order to take advantage of these announcements, you’ll have to specifically design your clients to listen for them at runtime. You do this by hosting an announcement service within the client application that implements the WS-Discovery announcement protocol.
WCF 4 comes with a class called AnnouncementService designed specifically for this purpose. The AnnouncementService provides two event handlers: OnlineAnnouncementReceived and OfflineAnnouncementReceived. Client applications can simply host an instance of the AnnouncementService using ServiceHost and register event handlers for these two events.
Whenever a service comes online and announces itself, the client-hosted AnnouncementService will receive the “online” announcement and OnlineAnnouncementReceived will fire in the client. When the service goes offline, it will send an “offline” announcement and OfflineAnnouncementReceived will fire in the client. The following illustrates a sample client application that hosts the AnnouncementService and implements handlers for the two announcement events:
class Client
{
public static void Main()
{
// Create an AnnouncementService instance
AnnouncementService announcementService = new AnnouncementService();
// Subscribe the announcement events
announcementService.OnlineAnnouncementReceived += OnOnlineEvent;
announcementService.OfflineAnnouncementReceived += OnOfflineEvent;
// Create ServiceHost for the AnnouncementService
using (ServiceHost announcementServiceHost =
new ServiceHost(announcementService))
{
// Listen for the announcements sent over UDP multicast
announcementServiceHost.AddServiceEndpoint(
new UdpAnnouncementEndpoint());
announcementServiceHost.Open();
Console.WriteLine("Listening for service announcements.");
Console.WriteLine();
Console.WriteLine("Press <ENTER> to terminate.");
Console.ReadLine();
}
}
static void OnOnlineEvent(object sender, AnnouncementEventArgs e)
{
Console.WriteLine();
Console.WriteLine("Received an online announcement from {0}:",
e.EndpointDiscoveryMetadata.Address);
PrintEndpointDiscoveryMetadata(e.EndpointDiscoveryMetadata);
}
static void OnOfflineEvent(object sender, AnnouncementEventArgs e)
{
Console.WriteLine();
Console.WriteLine("Received an offline announcement from {0}:",
e.EndpointDiscoveryMetadata.Address);
PrintEndpointDiscoveryMetadata(e.EndpointDiscoveryMetadata);
}
...
}
Figure 11: Listening for discovery announcement messages
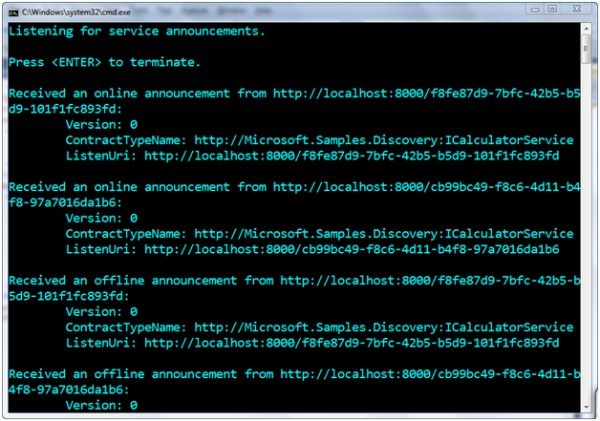
Now suppose I run this client program and leave it up and running for a while. Then later I run a few instances of the service host application. When each one starts up, we will see an “online” announcemnt message appear in the client console window. When I close each of the service host applications, we’ll then see an “offline” announcement message appear in the client console window. Figure 11 shows the resulting client console window after doing what I just described.
Remember, the ad hoc discovery mode only works on a local subnet. If you want to use WS-Discovery beyond the boundaries of your local network, you’ll need to turn to the managed discovery mode. WCF 4 provides support for building the necessary managed discovery components as well.
Managed Service Discovery
Implementing the managed discovery mode is a little more involved than the ad hoc mode because it requires you to implement a discovery proxy service. The discovery proxy service is the component that will keep track of all the available service endpoints. In this example we use the announcement functionality to update the discovery proxy. There are many other ways to provide a discovery proxy with the relevant discovery information, for example you can connect an existing database of endpoints and capture data from there. So how do you implement a discovery proxy service?
WCF 4 comes with a base class named DiscoveryProxy that you can derive from to implement a discovery proxy service. Figure 12 shows the start of a custom discovery proxy service implementation. The .NET 4 SDK samples contains a complete sample implementation for your reference. Once you’ve finished implementing the discovery proxy service, you need to host it somewhere.
Figure 12: Implementing a custom discovery proxy service
[ServiceBehavior(InstanceContextMode = InstanceContextMode.Single,
ConcurrencyMode = ConcurrencyMode.Multiple)]
public class MyDiscoveryProxy : DiscoveryProxyBase
{
// Repository to store EndpointDiscoveryMetadata.
// A database or a flat file could also be used instead.
Dictionary<EndpointAddress, EndpointDiscoveryMetadata> onlineServices;
public MyDiscoveryProxy()
{
this.onlineServices =
new Dictionary<EndpointAddress, EndpointDiscoveryMetadata>();
}
// OnBeginOnlineAnnouncement is called when a Hello message is received by Proxy
protected override IAsyncResult OnBeginOnlineAnnouncement(
DiscoveryMessageSequence messageSequence, EndpointDiscoveryMetadata
endpointDiscoveryMetadata, AsyncCallback callback, object state)
{
this.AddOnlineService(endpointDiscoveryMetadata);
return new OnOnlineAnnouncementAsyncResult(callback, state);
}
protected override void OnEndOnlineAnnouncement(IAsyncResult result)
{
OnOnlineAnnouncementAsyncResult.End(result);
}
// OnBeginOfflineAnnouncement is called when a Bye message is received by Proxy
protected override IAsyncResult OnBeginOfflineAnnouncement(
DiscoveryMessageSequence messageSequence, EndpointDiscoveryMetadata
endpointDiscoveryMetadata, AsyncCallback callback, object state)
{
this.RemoveOnlineService(endpointDiscoveryMetadata);
return new OnOfflineAnnouncementAsyncResult(callback, state);
}
protected override void OnEndOfflineAnnouncement(IAsyncResult result)
{
OnOfflineAnnouncementAsyncResult.End(result);
}
// OnBeginFind is called when a Probe request message is received by Proxy
protected override IAsyncResult OnBeginFind(
FindRequestContext findRequestContext, AsyncCallback callback, object state)
{
this.MatchFromOnlineService(findRequestContext);
return new OnFindAsyncResult(callback, state);
}
protected override void OnEndFind(IAsyncResult result)
{
OnFindAsyncResult.End(result);
}
...
For this example, I’ll simply host the MyDiscoveryProxy service in a console application. I’ll configure the host with two endpoints: a discovery endpoint and an announcement endpoint. The following example illustrates how to properly host the MyDiscoveryProxy service with both of these endpoints:
class Program
{
public static void Main()
{
Uri probeEndpointAddress = new Uri("net.tcp://localhost:8001/Probe");
Uri announcementEndpointAddress =
new Uri("net.tcp://localhost:9021/Announcement");
ServiceHost proxyServiceHost = new ServiceHost(new MyDiscoveryProxy());
DiscoveryEndpoint discoveryEndpoint = new DiscoveryEndpoint(
new NetTcpBinding(), new EndpointAddress(probeEndpointAddress));
discoveryEndpoint.IsSystemEndpoint = false;
AnnouncementEndpoint announcementEndpoint = new AnnouncementEndpoint(
new NetTcpBinding(), new EndpointAddress(announcementEndpointAddress));
proxyServiceHost.AddServiceEndpoint(discoveryEndpoint);
proxyServiceHost.AddServiceEndpoint(announcementEndpoint);
proxyServiceHost.Open();
Console.WriteLine("Proxy Service started.");
Console.WriteLine();
Console.WriteLine("Press <ENTER> to terminate the service.");
Console.WriteLine();
Console.ReadLine();
proxyServiceHost.Close();
}
}
Once you have a discovery proxy service up and running, you can configure your services to announce themselves directly to the discovery proxy service. Likewise, you can configure your client applications to probe the discovery proxy service directly (no more multicast messaging).
You configure the service to announce itself directly to the discovery proxy service by specifying the discovery proxy’s announcement address when creating the AnnouncementEndpoint within the service host application. The following example shows how to accomplish this:
...
Uri baseAddress = new Uri("net.tcp://localhost:9002/CalculatorService/" +
Guid.NewGuid().ToString());
Uri announcementEndpointAddress = new Uri("net.tcp://localhost:9021/Announcement");
ServiceHost serviceHost = new ServiceHost(typeof(CalculatorService), baseAddress);
ServiceEndpoint netTcpEndpoint = serviceHost.AddServiceEndpoint(
typeof(ICalculatorService), new NetTcpBinding(), string.Empty);
// Create an announcement endpoint pointing to the hosted proxy service
AnnouncementEndpoint announcementEndpoint = new AnnouncementEndpoint(
new NetTcpBinding(), new EndpointAddress(announcementEndpointAddress));
ServiceDiscoveryBehavior serviceDiscoveryBehavior = new ServiceDiscoveryBehavior();
serviceDiscoveryBehavior.AnnouncementEndpoints.Add(announcementEndpoint);
serviceHost.Description.Behaviors.Add(serviceDiscoveryBehavior);
serviceHost.Open();
...
Then you can configure your client applications to communicate directly with the discovery proxy service by specifying the discovery proxy’s probe address when creating the DiscoveryEndpoint within the client application. The following example illustrates one way to do this:
...
// Create a Discovery Endpoint that points to the proxy service.
Uri probeEndpointAddress = new Uri("net.tcp://localhost:8001/Probe");
DiscoveryEndpoint discoveryEndpoint = new DiscoveryEndpoint(
new NetTcpBinding(), new EndpointAddress(probeEndpointAddress));
// Create DiscoveryClient using the previously created discoveryEndpoint
DiscoveryClient discoveryClient = new DiscoveryClient(discoveryEndpoint);
// Find ICalculatorService endpoints
FindResponse findResponse = discoveryClient.Find(
new FindCriteria(typeof(ICalculatorService)));
...
Now let’s walk through a complete example. First, I’ll run the discovery proxy application so the discovery proxy service is available for use. Then I’ll run an instance of the service host application, which will announce itself with the discovery proxy. Once this happens, we’ll see a message printed to the discovery proxy application’s console window (see Figure 13). This illustrates that the service announced itself successfully to the discovery proxy, and the discovery proxy saved the information about the new “online” service endpoint. Now if we run the client code shown above, it will probe the discovery proxy directly and retrieve the endpoint address of the target service currently running.
Figure 13: Output from the discovery proxy service at runtime

The beauty of managed service discovery is that it works across network boundaries (it’s based on traditional service calls) and it reduces the need for multicast messaging within your discovery solution. In addition, since the clients go through a discovery proxy to look for services, the services themselves don’t need to be up and running all the time in order to be discovered.
Advanced Discovery Proxy Usage
The WCF programming model gives you a lot of flexibility in implementing a discovery proxy. Receiving announcements is one way to populate your list of services; however it is not the only method. For example if your environment already contains a service repository, you can easily build a discovery proxy façade on top of that store in order to make the repository discoverable at runtime.
A discover proxy can be setup in either ad hoc or manage mode. When operating in managed mode, clients communicate with the proxy directly in a unicast manner using announcements, probes and resolves. The proxy also transmits the response in a unicast manner back to the sender.
If operating in ad hoc mode a proxy can listen for multicast discovery messages and respond directly to the sender. In this ad hoc mode, a proxy can also be specifically configured to suppress multicast messages. That is, if a proxy receives a multicast message, it informs the sender of its presence and informs the sender to direct further queries at the proxy, thereby avoiding further multicast messages.
For more information on these advanced discovery scenarios, see the WS-Discovery Primer at http://www.oasis-open.org/committees/download.php/32184/WS-D-primer-wd-04.docx.
Routing Service
In some service oriented environments, it’s often useful to take advantage of centralized “routing” services that act as brokers or gateways to the actual business services scattered around the organization. This decouples consumers from the real business services and makes it possible to perform a variety of different types of intermediate processing within the routing node.
For example, some environments use routing to implement a centralized security boundary that all incoming messages must pass through. Some use content-based routing techniques to determine which target service to use based on the content of a particular incoming message. Others use routing to implement protocol bridging, thereby allowing consumers to use one set of protocols to communicate while the router uses a different set of protocols to communicate with the target service. It’s also not uncommon to use routing for various load-balancing or even service versioning techniques.
Whatever the reason, the “intermediate routing” pattern is a common requirement when building large-scale SOA solutions today. In WCF 3.x, there wasn’t official support for routing. Although the framework provided the necessary APIs to implement your own routing services, it was a lot of work to do so properly. Several articles have been published in MSDN Magazine showing how to accomplish this.
Since routing is such a common requirement these days, WCF 4 now comes with an official “routing service” in the framework that you can simply host and configure in your own solutions.
Understanding the RoutingService
WCF 4 comes with a new class called RoutingService, which provides a generic WCF routing implementation for use within your applications. The RoutingService can handle routing messages over any WCF-supported protocol using a variety of different messaging patterns like one-way, request-response, and duplex messaging). The following shows the RoutingService class definition:
[ServiceBehavior(AddressFilterMode = AddressFilterMode.Any,
InstanceContextMode = InstanceContextMode.PerSession,
UseSynchronizationContext = false, ValidateMustUnderstand = false),
AspNetCompatibilityRequirements(RequirementsMode =
AspNetCompatibilityRequirementsMode.Allowed)]
public sealed class RoutingService : // contracts allow different communication patterns
ISimplexDatagramRouter, ISimplexSessionRouter, IRequestReplyRouter,
IDuplexSessionRouter, IDisposable
{
... // implementation omitted
}
As you can see, the RoutingService class derives from multiple service contracts in order to support multiple messaging patterns. Each service contract provides support for a different messaging pattern including support for session-based communications when appropriate.
The whole purpose of the RoutingService is to receive incoming messages from consumers and to “route” them to an appropriate downstream service. The RouterService determines which target service to use by evaluating each incoming message against a set of message filters. Hence, as a developer, you control the routing behavior by defining the message filters, typically in a configuration file. The target services might reside on the same machine as the RouterService but they don’t have to – they could also be distributed across the network and they might require a variety of different protocols.
Hosting the RoutingService
You can host the RoutingService in your application like you would any other WCF service. You simply create a ServiceHost instance and specify RoutingService for the service type. Once you call Open on the ServiceHost instance, your RoutingService will be ready to “route” messages as illustrated here:
using System;
using System.ServiceModel;
using System.ServiceModel.Routing;
public static void Main()
{
// Create a ServiceHost for the RoutingService type.
using (ServiceHost serviceHost =
new ServiceHost(typeof(RoutingService)))
{
try
{
serviceHost.Open();
Console.WriteLine("The Routing Service is now running.");
Console.WriteLine("Press <ENTER> to terminate router.");
// The service can now be accessed.
Console.ReadLine();
serviceHost.Close();
}
catch (CommunicationException)
{
serviceHost.Abort();
}
}
}
You also configure the RoutingService like any other service and that’s where you define the routing filters. First, you need to configure it with one or more endpoints. When defining a routing endpoint, you choose a WCF binding and one of the routing service contracts implemented by the RoutingService shown above (e.g., ISimplexDatagramRouter, IRequestReplyRouter, etc). You can expose more than one endpoint on your RoutingService if you want to support multiple messaging patterns or WCF bindings.
The following example illustrates how to configure the RoutingService with four routing endpoints: two that use the BasicHttpBinding (one-way and request-reply) and two that use the WSHttpBinding (one-way and request-reply). Notice how it’s just like configuring any other WCF service:
<configuration>
<system.serviceModel>
<services>
<!--ROUTING SERVICE -->
<service behaviorConfiguration="routingData"
name="System.ServiceModel.Routing.RoutingService">
<host>
<baseAddresses>
<add baseAddress="https://localhost:8000/routingservice/router"/>
</baseAddresses>
</host>
<!--
Define and configure the endpoint we want the Router to listen on and the
Contract we want it to use. Router provided contracts are:
ISimplexDatagramRouter, ISimplexSessionRouter, IRequestReplyRouter, and
IDuplexSessionRouter.
-->
<endpoint address="oneway-basic"
binding="basicHttpBinding"
name="onewayEndpointBasic"
contract="System.ServiceModel.Routing.ISimplexDatagramRouter" />
<endpoint address="oneway-ws"
binding="wsHttpBinding"
name="onewayEndpointWS"
contract="System.ServiceModel.Routing.ISimplexDatagramRouter" />
<endpoint address="twoway-basic"
binding="basicHttpBinding"
name="reqReplyEndpointBasic"
contract="System.ServiceModel.Routing.IRequestReplyRouter" />
<endpoint address="twoway-ws"
binding="wsHttpBinding"
name="reqReplyEndpointWS"
contract="System.ServiceModel.Routing.IRequestReplyRouter" />
</service>
</services>
...
The ISimplexDatagramRouter and IRequestReplyRouter interfaces define generic one-way and request-reply service contract definitions that can be used in conjunction with business-specific service contracts. The following shows how these interfaces were defined in WCF:
[ServiceContract(Namespace="https://schemas.microsoft.com/netfx/2009/05/routing",
SessionMode = SessionMode.Allowed)]
public interface ISimplexDatagramRouter
{
[OperationContract(AsyncPattern = true, IsOneWay = true, Action = "*")]
IAsyncResult BeginProcessMessage(Message message, AsyncCallback callback,
object state);
void EndProcessMessage(IAsyncResult result);
}
[ServiceContract(Namespace="https://schemas.microsoft.com/netfx/2009/05/routing",
SessionMode = SessionMode.Allowed)]
public interface IRequestReplyRouter
{
[OperationContract(AsyncPattern = true, IsOneWay= false, Action = "*",
ReplyAction = "*")]
[GenericTransactionFlow(TransactionFlowOption.Allowed)]
IAsyncResult BeginProcessRequest(Message message, AsyncCallback callback,
object state);
Message EndProcessRequest(IAsyncResult result);
}
The endpoint configuration above exposes the routing endpoints for consumers to use. Client applications will choose one of these endpoints to use within their client code and will direct all service invocations directly to the RoutingService. When the RoutingService receives a message through one of these endpoints, it evaluates the routing message filters to determine where to forward the message.
Configuring the RoutingService with Message Filters
You can configure the RoutingService with message filters either through code or configuration (like everything else in WCF). WCF 4 provides a RoutingBehavior for managing the routing message filters. You first need to enable the RoutingBehavior on the RouterService, and then you specify the name of the filter table you wish to use with this particular instance of the RoutingService:
<configuration>
<system.serviceModel>
...
<behaviors>
<serviceBehaviors>
<behavior name="routingData">
<serviceMetadata httpGetEnabled="True"/>
<!-- Define the Routing Behavior and specify the filter table name -->
<routing filterTableName="filterTable1" />
</behavior>
</serviceBehaviors>
</behaviors>
...
If you look in the prior example where we configured the RoutingService with endpoints, you’ll see that we’ve applied the “routingData” behavior to the service through the behaviorConfiguration attribute. Next, we need to define a filter table named “filterTable1”.
However, before we can define a filter table, we need endpoint definitions for the target services we intend to route to. You define these target endpoints within the WCF <client> configuration section because the RoutingService is essentially the “client” when it forwards messages to a target service. The following example shows how to define two target endpoints that we can route to:
<configuration>
...
<!-- Define the client endpoints that we want the Router to communicate with.
These are the destinations that the Router will send messages to. -->
<client>
<endpoint name="CalculatorService1"
address="https://localhost:8000/servicemodelsamples/calcservice1"
binding="wsHttpBinding" contract="*" />
<endpoint name="CalculatorService2"
address="https://localhost:8001/servicemodelsamples/calcservice2"
binding="wsHttpBinding" contract="*" />
</client>
...
Now we can define the actual filter table, which will determine the routing logic at runtime. You define the filter table entries within the <filterTables> element. Each entry within the <filterTable> defines a mapping between a routing “filter” and a target endpoint. You define the “filters” you wish to use within the <filters> element – each <filter> entry specifies what type of filter you wish to use along with the filter-specific data (such as an action value, an XPath expression, etc).
The following example illustrates how to configure a filter table with a single filter that maps to the CalculatorService1 endpoint. In this case, the “MatchAll” filter matches all incoming messages:
<configuration>
...
<!--ROUTING SECTION -->
<routing>
<!-- Define the filters that we want the router to use. -->
<filters>
<filter name="MatchAllFilter1" filterType="MatchAll" />
</filters>
<!-- Define the filter table that contains the matchAll filter -->
<filterTables>
<filterTable name="filterTable1">
<!-- Map the filter to a client endpoint that was previously defined.
Messages matching this filter will be sent to this destination. -->
<add filterName="MatchAllFilter1" endpointName="CalculatorService1" />
</filterTable>
</filterTables>
</routing>
</system.serviceModel>
</configuration>
We can verify that the routing works properly by running the routing service host application, the CalculatorService1 host application, and a client that’s designed to send messages to one of the router endpoints. When we run the client, we should see the messages arrive at CalculatorService 1 after they are “routed” by the intermediate RoutingService (see Figure 14, Figure 15, and Figure 16).
Figure 14: The RoutingService host application
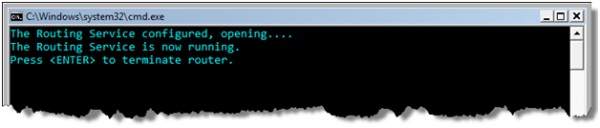
Figure 15: Client targeting the RoutingService at https://localhost:8000/routingservice/router

Figure 16: The target service (CalculatorService1)

Message Filters and Content-based Routing
WCF comes with several built-in MessageFilter classes that you can use in conjunction with your routing message filters to inspect the content of the incoming messages.
For example, WCF provides an ActionMessageFilter that allows you to match specific WS-Addressing “action” values. WCF also provides EndpointAddressMessageFilter, EndpointNameMessageFilter, and PrefixEndpointAddressMessageFilter that let you match specific endpoint details. One of the most flexible is the XPathMessageFilter, which allows you to evaluate XPath expressions against the incoming messages. All of these filters allow you to perform content-based routing within your solution.
In addition to these built-in MessageFilter types, WCF 4 also makes it possible to define custom message filters, which happens to be one of the primary extensibility points for the RoutingService.
Let’s look at an example of performing content-based routing based on action values. Suppose we want to route half of the CalculatorService operations to CalculatorService1 and the other half to CalculatorService2. You can accomplish this by defining filters for each of the different CalculatorService action values, and mapping half of them to each target service endpoint as illustrated here:
<configuration>
...
<!--ROUTING SECTION -->
<routing>
<!-- Define the filters that we want the router to use. -->
<filters>
<filter name="addFilter" filterType="Action"
filterData="http://Microsoft.Samples.ServiceModel/ICalculator/Add"/>
<filter name="subFilter" filterType="Action"
filterData="http://Microsoft.Samples.ServiceModel/ICalculator/Subtract"/>
<filter name="mulFilter" filterType="Action"
filterData="http://Microsoft.Samples.ServiceModel/ICalculator/Multiply"/>
<filter name="divFilter" filterType="Action"
filterData="http://Microsoft.Samples.ServiceModel/ICalculator/Divide"/>
</filters>
<filterTables>
<filterTable name="filterTable1">
<add filterName="addFilter" endpointName="CalculatorService1"/>
<add filterName="subFilter" endpointName="CalculatorService2"/>
<add filterName="mulFilter" endpointName="CalculatorService1"/>
<add filterName="divFilter" endpointName="CalculatorService2"/>
</filterTable>
</filterTables>
</routing>
</system.serviceModel>
</configuration>
Now when we run the solution and execute the client that invokes all four operations, we’ll see half of the operations appear in each service console window (see Figure 17 and Figure 18).
Figure 17: Output of CalculatorService1

Figure 18: Output of CalculatorService2

The XPathMessageFilter gives you even more flexibility because you can supply a variety of different XPath expressions to evaluate against the incoming messages. Your XPath expressions can evaluate any part of the incoming message including SOAP headers or the SOAP body. This gives you a great deal of flexibility when building content-based message filters. In order to understand the mechanics of XPathMessageFilter, the following shows how to rewrite the last example using XPath expressions:
<configuration>
...
<!--ROUTING SECTION -->
<routing>
<!-- Define the filters that we want the router to use. -->
<filters>
<filter name="addFilter" filterType="XPath"
filterData="/s:Envelope/s:Header/wsa:Action =
'http://Microsoft.Samples.ServiceModel/ICalculator/Add'"/>
<filter name="subFilter" filterType="XPath"
filterData="/s:Envelope/s:Header/wsa:Action =
'http://Microsoft.Samples.ServiceModel/ICalculator/Subtract'"/>
<filter name="mulFilter" filterType="XPath"
filterData="/s:Envelope/s:Header/wsa:Action =
'http://Microsoft.Samples.ServiceModel/ICalculator/Multiply'"/>
<filter name="divFilter" filterType="XPath"
filterData="/s:Envelope/s:Header/wsa:Action =
'http://Microsoft.Samples.ServiceModel/ICalculator/Divide'"/>
</filters>
<namespaceTable>
<add prefix="s" namespace="http://www.w3.org/2003/05/soap-envelope" />
<add prefix="wsa" namespace="http://www.w3.org/2005/08/addressing" />
</namespaceTable>
<filterTables>
<filterTable name="filterTable1">
<add filterName="addFilter" endpointName="CalculatorService1"/>
<add filterName="subFilter" endpointName="CalculatorService2"/>
<add filterName="mulFilter" endpointName="CalculatorService1"/>
<add filterName="divFilter" endpointName="CalculatorService2"/>
</filterTable>
</filterTables>
</routing>
</system.serviceModel>
</configuration>
Notice the filterData attribute contains an XPath expression that will be evaluated against the incoming message (the expressions simply check the action values in this example). Notice how I also defined a set of namespace prefix bindings using the <namespaceTable> element. This is necessary if you wish to use namespace prefixes within your XPath expressions like I’ve done above. Re-running the solution with this configuration produces the same results as before (see Figure 17 and Figure 18).
You will need to use this XPath filter technique any time you need to route messages based on custom SOAP headers or based on the content found within the body of the SOAP message.
Protocol Bridging
In the previous examples, we were using the same WCF binding (WSHttpBinding) to talk between the client and the router, and between the router and the target services. The RoutingService is capable of bridging the communication across most WCF bindings. For example, you may want to configure the router so the clients communicate with it over the WSHttpBinding, but then the router communicates with the downstream target services using the NetTcpBinding or the NetNamedPipeBinding.
Let’s see how to configure the RoutingService to handle this scenario. We’ll leave the RoutingService endpoint configuration the same as above, which allows consumers to communicate with the RoutingService over BasicHttpBinding or the WSHttpBinding. But now we’ll change the client endpoint definitions for the target services to use NetTcpBinding and NetNamedPipeBinding as shown here:
<configuration>
...
<!-- Define the client endpoints that we want the Router to communicate with.
These are the destinations that the Router will send messages to. -->
<client>
<endpoint name="CalculatorService1"
address="net.tcp://localhost:8001/servicemodelsamples/calcservice1"
binding="netTcpBinding" contract="*" />
<endpoint name="CalculatorService2"
address="net.pipe://localhost/servicemodelsamples/calcservice2"
binding="netNamedPipeBinding" contract="*" />
</client>
...
And, of course, we’ll need to update the CalculatorService1 and CalculatorService2 applications to support compatible NetTcpBinding and NetNamedPipeBinding endpoints respectively. With this configuration in place, consumers can talk to the RoutingService using BasicHttpBinding/WSHttpBinding and the router will communicate with the target services using either NetTcpBinding or NetNamedPipeBinding depending on which service the message is being routed to.
Error Handing and Fault Tolerance
The RoutingService also provides a built-in mechanism to deal with runtime communication errors and to support a basic level of fault tolerance. When defining your filter table, you can define different lists of alternate endpoints that will be used by the RoutingService if communicating with the initial target endpoint results in an error. This essentially makes it possible to have lists of “backup” endpoints.
The following example illustrates how to define a list of backup endpoints within the <backupLists> element that we can associate with our filter table entries:
<configuration>
...
<!--ROUTING SECTION -->
<routing>
... <!-- Define the filters that we want the router to use. -->
<filterTables>
<filterTable name="filterTable1">
<add filterName="addFilter" endpointName="CalculatorService1"
alternateEndpoints="backupEndpoints"/>
<add filterName="subFilter" endpointName="CalculatorService1"
alternateEndpoints="backupEndpoints"/>
<add filterName="mulFilter" endpointName="CalculatorService1"
alternateEndpoints="backupEndpoints"/>
<add filterName="divFilter" endpointName="CalculatorService1"
alternateEndpoints="backupEndpoints"/>
</filterTable>
</filterTables>
<backupLists>
<backupList name="backupEndpoints">
<add endpointName="CalculatorService2"/>
</backupList>
</backupLists>
</routing>
</system.serviceModel>
</configuration>
Notice how we configured all of the filter table entries to forward to CalculatorService1 in this example, because CalculatorService2 is now our “backup” endpoint that will only be used when CalculatorService1 results in a TimeoutException, a CommunicationException, or a derived exception type. For example, if I run the solution again and close CalculatorService1, and then execute the client program, we’ll see all messages end up in CalculatorService2. It’s important to note, once again, that all of this routing configuration can be performed dynamically in the host application code.
Multicast Routing Behavior
The RoutingService also supports automatically routing a particular incoming message to multiple destinations in a “multicast” fashion. When the incoming message matches multiple filters found in the configured filter table, the RoutingService will automatically route the message to each of the target endpoints associated with the “matched” filters.
The following example shows two routing entries configured with the same wildcard filter, which matches all incoming messages:
<configuration>
...
<!--ROUTING SECTION -->
<routing>
<!-- Define the filters that we want the router to use. -->
<filters>
<filter name="wildcardFilter" filterType="MatchAll" />
</filters>
<filterTables>
<filterTable name="filterTable1">
<add filterName="wildcardFilter" endpointName="CalculatorService1"/>
<add filterName="wildcardFilter" endpointName="CalculatorService2"/>
<add filterName="wildcardFilter" endpointName="CalculatorService3"/>
</filterTable>
</filterTables>
</routing>
</system.serviceModel>
</configuration>
With this configuration in place, each incoming SOAP message will be automatically routed to all target endpoints, regardless of what’s found in the messages.
This multicast behavior composes with the protocol bridging and error handling capabilities discussed in the previous sections. The only issue is multicast only works for one-way or duplex communication but not request-response communication, since the underlying system needs to maintain a one-to-one ratio between outgoing requests and incoming responses.
Improved REST Support
WCF 4 comes with several new features that come in handy when building RESTful services using WCF. This set of features is now referred to as WCF WebHttp Services. They include support for an automatic help page that describes the RESTful service to consumers, simplified HTTP caching, message format selection, REST-friendly exceptions, ASP.NET routing integration, some new Visual Studio project templates, and more. We won’t have space to cover all of these features here in detail but I will give you a quick introduction to a few of my favorites below, along with links to more information on the rest.
Many of these features were first introduced by the WCF REST Starter Kit last year and are now making it into the official framework. You may see more WCF REST Starter Kit features follow-suit in the future.
Automatic Help Page
When using the WebServiceHost class in WCF 4, your RESTful services will automatically enjoy the benefits of the automatic help page functionality. This is a much needed addition when using REST given the lack of WSDL metadata and client-side code generation – it makes it much easier for consumers to figure out how to get started with your service – so it’s usually a good idea to enable this new feature.
When you use the WebServiceHost class to host your service, it automatically configures your service with the WebHttpBehavior and adds a default HTTP endpoint configured with the WebHttpBinding (at the base HTTP address). As of WCF 4, the WebHttpBehavior class comes with a HelpEnabled property that controls whether or not the new help page is enabled within the host. The following configuration example shows how to enable the automatic help page feature for a specific REST endpoint:
<configuration>
<system.serviceModel>
<serviceHostingEnvironment aspNetCompatibilityEnabled="true" />
<behaviors>
<endpointBehaviors>
<behavior name="HelpBehavior">
<webHttp helpEnabled="true" />
</behavior>
</endpointBehaviors>
</behaviors>
<services>
<service name="CounterResource">
<endpoint behaviorConfiguration="HelpBehavior"
binding="webHttpBinding"
contract="CounterResource" />
</service>
</services>
</system.serviceModel>
</configuration>
You can see the help page by browsing to service’s your base address with “help” appended to the end of the URL (see Figure 19).
Figure 19: Automatic help page for RESTFul services

The help page provides a human-readable description of each operation annotated with [WebGet] or [WebInvoke], and for each one it describes the URI template, the supported HTTP operation, and the supported message formats, basically everything a consumer needs to know (see Figure 20). You can also provide a more human friendly description by applying a [Description] attribute to each operation.
For each request/response, the help page also provides an XML Schema and a corresponding sample XML instance that consumers can use to integrate with the service. Consumers can use the schema to generate appropriate client-side serializable types or they can simply inspect the sample XML document to manually determine how to write the appropriate XML processing code. Both approaches are useful.
Figure 20: Automatic help page for a specific operation

This new help page feature automatically makes your RESTful services more discoverable, which ultimately makes them easier for others to consume. Your consumers can discover the service’s URI design, the supported HTTP operations, and the request/response formats, and your description will always stay in sync with your WCF code – similar to how things work with ASP.NET Web Services.
HTTP Caching Support
One of the primary potential benefits of REST is HTTP caching. However, in order to realize that benefit, you have to leverage the various HTTP caching headers in your request and response messages. You can accomplish this within your WCF service operations by manually accessing the request/response headers through the WebOperationContext instance but it’s not trivial to do properly.
Hence, WCF 4 comes with a simpler model for controlling caching through the [AspNetCacheProfile] attribute that you can declaratively apply to your GET operations. This attribute allows you to specifying an ASP.NET caching profile name for each operation and behind the scenes there’s a caching inspector (CachingParameterInspector) that takes care of handling all of the underlying HTTP caching details.
The [AspNetCacheProfile] implementation builds on the standard ASP.NET output caching mechanism. The following example shows how to apply the [AspNetCacheProfile] attribute to a [WebGet] operation:
...
[AspNetCacheProfile("CacheFor60Seconds")]
[WebGet(UriTemplate=XmlItemTemplate)]
[OperationContract]
public Counter GetItemInXml()
{
return HandleGet();
}
...
With this in place, you’ll need to define an ASP.NET output caching profile named “CacheFor60Seconds” within your web.config file. The following web.config shows how this can be done:
<configuration>
<system.web>
<caching>
<outputCacheSettings>
<outputCacheProfiles>
<add name="CacheFor60Seconds" duration="60" varyByParam="format" />
</outputCacheProfiles>
</outputCacheSettings>
</caching>
</system.web>
<system.serviceModel>
<serviceHostingEnvironment aspNetCompatibilityEnabled="true" />
</system.serviceModel>
</configuration>
Notice how the ASP.NET caching profile is set to cache the output for 60 seconds and it’s configured to vary the cache by the “format” query string variable. This is important because the service in question supports both XML and JSON, which you control through the format variable (e.g., “?format=json”). The service needs to cache XML and JSON responses independently of one another.
This configuration file also illustrates how to enable the ASP.NET compatibility mode, which is required when you wish to take advantage of various ASP.NET features like output caching.
The [AspNetCacheProfile] attribute makes it much easier to take advantage of HTTP caching without requiring you to work with the HTTP caching headers directly. The underlying WCF behavior takes care of injecting the HTTP Cache-Control, Date, Expires, and Vary HTTP headers in the response, which clients can also take advantage of to determine proper caching semantics around future round-trips.
Message Format Selection
If you look back at Figure 19, you’ll notice that the CounterResource service supports both XML and JSON formats for the GET, POST, and PUT operations. This has been possible since WCF 3.5 through the RequestFormat and ResponseFormat properties found on the [WebGet] and [WebInvoke] attributes.
I accomplished this in the CounterResource service by defining a separate operation contract for each version – one for the XML version and another for the JSON version – as illustrated here:
...
[WebGet(UriTemplate="")]
[OperationContract]
public Counter GetItemInXml()
{
return HandleGet();
}
[WebGet(UriTemplate = "?format=json", ResponseFormat=WebMessageFormat.Json)]
[OperationContract]
public Counter GetItemInJson()
{
return HandleGet();
}
...
This unfortunately means that for every logical operation, you need two operation contracts if you wish to support both XML and JSON formats. In the case of CounterResource service, I was required to have six operation contracts to support both XML and JSON for the GET, POST, and PUT operations.
WCF 4 makes this scenario much easier to handle by providing support for automatic format selection based on HTTP “Accept” headers, which is a better way of doing it. Let me explain how this works.
First, we only need a single operation contract for each logical operation:
[WebGet(UriTemplate="")]
[OperationContract]
public Counter GetItem()
{
return HandleGet();
}
Then we the automatic format selection on the standard webHttpEndpoint as illustrated here:
<configuration>
<system.serviceModel>
<standardEndpoints>
<webHttpEndpoint>
<!-- the "" standard endpoint is used for auto creating a web endpoint. -->
<standardEndpoint name="" helpEnabled="true"
automaticFormatSelectionEnabled="true"/>
</webHttpEndpoint>
</standardEndpoints>
</system.serviceModel>
</configuration>
With this in place, the service is now capable of handling and returning either XML or JSON messages. It figures out which format to use by first inspecting the HTTP Accept header found in the request message. If that doesn’t work, it will use the same message format as the request message, assuming it’s either XML or JSON, otherwise it will use the default format for the specific operation.
It’s now up to the client to determine which format to use through the HTTP Content-Type and Accept headers. The Content-Type header specifies the format in the request message while the Accept header indicates what format the client “accepts” back from the service. For example, if the client wants to receive JSON back from the service, it should specify the following HTTP Accept header in the request:
Accept: application/json
This is easy to accomplish in any HTTP client programming model and it’s also easy to do using tools like Fiddler. Figure 21 shows how to use Fiddler to get JSON back from our new-and-improve service.
Figure 21: Using the HTTP Accept header to retrieve JSON
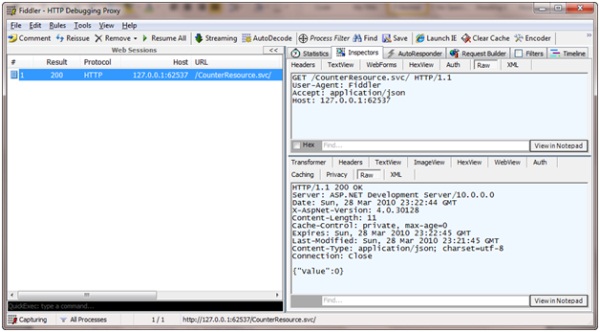
WCF 4 also provides new APIs that make it easy to explicitly specify the message format at runtime. The following code shows how we can extend the GetItem operation by writing code that first looks for a “format” query string parameter and explicitly sets the response format accordingly. If it doesn’t find a “format” parameter, it will simply rely on the Accept header like before.
[WebGet(UriTemplate="")]
[OperationContract]
public Counter GetItem()
{
// if a format query string parameter has been specified,
// set the response format to that. If no such
// query string parameter exists the Accept header will be used
string formatQueryStringValue =
WebOperationContext.Current.IncomingRequest.UriTemplateMatch.QueryParameters[
"format"];
if (!string.IsNullOrEmpty(formatQueryStringValue))
{
if (formatQueryStringValue.Equals("xml",
System.StringComparison.OrdinalIgnoreCase))
{
WebOperationContext.Current.OutgoingResponse.Format = WebMessageFormat.Xml;
}
else if (formatQueryStringValue.Equals("json",
System.StringComparison.OrdinalIgnoreCase))
{
WebOperationContext.Current.OutgoingResponse.Format = WebMessageFormat.Json;
}
else
{
throw new WebFaultException<string>(string.Format("Unsupported format '{0}'",
formatQueryStringValue), HttpStatusCode.BadRequest);
}
}
return HandleGet();
}
In the end, these new features make it so you no longer have to hard-code a message format type into your [WebGet] and [WebInvoke] operation contracts like you did in WCF 3.5.
RESTful Error Handling
Since RESTful services don’t use SOAP, you no longer have the standard SOAP fault mechanism at your disposal, which makes it possible to automatically map between .NET exceptions and SOAP fault messages. When building REST services in WCF 3.5, you had to manually construct the HTTP response message whenever you wanted to customize the HTTP error message sent back to the client.
In WCF 4, you’ll find a new class called WebFaultException<T> that makes it much easier to transmit “Web faults” (e.g. HTTP errors) back to your consumers. It works very much like FaultException<T> in WCF but you can specify an HTTP status code and a detail type to provide more details.
The following example shows how to return an HTTP 400 (Bad Request) error when the user specifies an unsupported format type – I’m simply using string for the detail type:
if (!string.IsNullOrEmpty(format))
{
if (format.Equals("xml", System.StringComparison.OrdinalIgnoreCase))
{
WebOperationContext.Current.OutgoingResponse.Format = WebMessageFormat.Xml;
}
else if (format.Equals("json", System.StringComparison.OrdinalIgnoreCase))
{
WebOperationContext.Current.OutgoingResponse.Format = WebMessageFormat.Json;
}
else
{
throw new WebFaultException<string>(string.Format("Unsupported format '{0}'",
format), HttpStatusCode.BadRequest);
}
}
This new feature makes it much more natural to return standard HTTP error messages by simply throwing exceptions like you normally do in your SOAP-based services.
Integrating WCF with ASP.NET Routes
There are a lot of similarities between the URL-based routing capabilities found in both WCF 4 and ASP.NET 4. They both let you do the same thing – essentially map URL templates to methods on classes. There is, however, one significant difference between the two models.
The WCF 4 approach ties the URL template design to a single class through the [WebGet] and [WebInvoke] attributes applied to the class definition during development. As the service grows and evolves over time, this can lead to a large monolithic design that can’t be factored into smaller chunks. The ASP.NET 4 approach, on the other hand, decouples the routing logic from the target class definition thereby allowing you to map your service routes across numerous class definitions when desired.
WCF 4 now provides the ability to integrate the ASP.NET routing engine with your WCF 4 services, making it possible to benefit from the ASP.NET routing model on top of your WCF services.
You accomplish this in your Global.asax RegisterRoutes method by taking advantage of the new ServiceRoute class that lets you map an ASP.NET route to a WCF service class:
private void RegisterRoutes()
{
WebServiceHostFactory factory = new WebServiceHostFactory();
RouteTable.Routes.Add(new ServiceRoute("Bookmarks", factory,
typeof(BookmarkService)));
RouteTable.Routes.Add(new ServiceRoute("Users", factory,
typeof(UserService)));
}
I’m calling RouteTable.Routes.Add twice to add new routes for two different WCF service classes. The first route maps “/Bookmarks” to the BookmarkService class while the second route maps “/Users” to the UserService class. Notice how both routes are configured to use the WebServiceHostFactory.
Now when we use the [WebGet] and [WebInvoke] attributes on the WCF service class definitions, we will use relative paths – and they will be relative to the ASP.NET route specified here.
REST Project Templates
One of the neat features in Visual Studio 2010 is the Extension Manager, which you can access from Tools | Extension Manager. The Extension Manager makes it possible for Microsoft and other third parties to integrate new project templates, controls, and tools into your Visual Studio 2010 experience with a simple click of a button. For Microsoft product teams, this is great because it makes it possible to ship things after RTM and still make them official extensions provided by Microsoft.
If you bring up the Extension Manager and expand the “Templates” node, you’ll find a child node named “WCF”. Click on “WCF” and you should see four new WCF REST Service Templates – one for each .NET version (3.5 vs 4.0) and one per language (C# vs. VB.NET) as illustrated in Figure 22.
Figure 22: New WCF REST Project Templates in the Extension Manager

You can select these new project templates and download them to your local Visual Studio 2010 installation and use them like any other project type. You’ll find the new REST project type under Visual C# | Web | WCF REST Service Application (assuming you installed the C# version).
When you use it to create a new project, you’ll notice that the WCF REST service application it generates uses most of the new WCF 4 features I’ve highlighted throughout this section.
More Information
In addition to what we’ve discussed here, WCF 4 comes with several more advanced REST capabilities and new WCF API extensions that simplify things like handling custom message formats (not XML or JSON), returning template-based “views” using the new T4 functionality, implementing conditional GET and ETag support, implementing optimistic concurrency, and generating outbound links.
For more information on all of these new WCF 4 features, including the ones we didn’t have space to cover here, browse to the .NET Endpoint Blog and find the entry on Introducing WCF WebHttp Services in .NET 4. The team has provided a thorough 12 part blog series that walks through each new feature one blog entry at a time, along with plenty of sample code and step-by-step instructions.
Workflow Services
One of the feature areas that received the most attention in .NET 4 was that of “workflow services”. Microsoft has been heavily investing in improving the integration between WCF and WF in order to provide a rich and declarative programming model for building a wide variety of applications.
Understanding Workflow Services
WF gives you a declarative programming model that raises the level of abstraction for those writing the logic. What WF ultimately gives you is a framework for writing your own languages by defining your own library of business domain activities. Then it gives you a visual designer for composing those activities into programs, and a runtime that knows how to manage the execution of those programs.
WF provides an especially good model for implementing long-running applications that need to wait for different types of external events to occur, such as receiving a message from another system. Its persistence model makes it possible to make efficient use of system resources by only keeping the program in memory when it’s actually running. When the program is waiting for an external event to occur, it can be persisted to the database thereby freeing the system resources it was using.
Figure 23: Workflow Services
The thing that makes WF different from other development frameworks is that it gives you these features while still allowing you to program using a sequential flow-control programming logic, which is usually much easier for developers reading and writing the code to understand.
If you’re building WCF services that are long-running in nature or could benefit from some of the other benefits I just described, you can implement your WCF services using a WF workflow. And you can use WF to coordinate the logic of consuming other external services.
Figure 23 illustrates these concepts.
Although this has been possible since .NET 3.5, .NET 4 has made significant strides in improving the developer experience and providing some of the needed features that were missing in .NET 3.5.
By combining the worlds of WCF and WF, you get the best of both worlds. You get a declarative programming model, a developer-friendly experience thanks to the WF designers, a powerful runtime for managing long-running services, and the rich communication flexibility offered by WCF.
Building your First Workflow Service
In order to give you a feel for the new workflow services developer experience, I’ll walk you through a complete example of building one using .NET 4 and the new Visual Studio 2010 designer.
If you open Visual Studio 2010 and select File | New Project, you’ll find a new workflow project under the WCF templates – it’s called “WCF Workflow Service Application”. I’ll select this project template and give it a name of “HelloWorldWorkflowService”, and create the new project.
Figure 24: Visual Studio 2010 Workflow Services Project Templates

Once created, the new project will simply contain two files – a Service1.xamlx file containing the declarative workflow service definition and a Web.config file containing the service configuration.
One of the most compelling things about the new workflow services model in .NET 4 is that the entire service definition can be defined in XAML. In our new project, Service1.xamlx file contains the service definition and the implementation is simply a XAML-based workflow. The Web.config file contains the WCF service configuration – this is where you’ll define the workflow service endpoints and behaviors.
Figure 25 shows what the Visual Studio 2010 designer looks like for the Service1.xamlx file. Notice that it’s just the standard workflow designer, only in this particular case the workflow we’re designing will serve as a WCF service implementation. The key to integrating this workflow definition with WCF is the new WorkflowServiceHost and the set of WCF “Messaging” activities (see the Toolbox in Figure 25).
Figure 25: Designing a workflow service in Visual Studio 2010

The skeleton workflow service provided with this project template contains a Receive activity followed by a Send activity. Notice the Receive activity contains an OperationName property and it’s currently set to “GetData”. It also has a Content property for binding the incoming message to a local variable defined within the Sequence activity – in this case, the variable is called “data” and it’s of type Int32 (see the Variables window underneath the workflow design service in Figure 25).
The Receive activity is also configured to activate the service, which means that in incoming message can cause a new instance of the workflow to be created. Notice the CanCreateInstance property is checked within the Properties window on the right in Figure 25).
Let’s customize this workflow service a little. First I’ll change the service filename from Service1.xamlx to HelloWorld.xamlx. Next I’ll change the name of the service to “HelloWorldService” in the propery window. Next I’ll change the Receive activity’s OperationName property to “SayHello”. And finally, I’ll define a new variable called “personName” of type String within the Sequence.
Then I’ll bind the Receive activity’s Content property to the “personName” variable as illustrated in Figure 26. Next I’ll bind the Send activity’s Content property to a string in the format of “hello {0}!” inserting the personName variable into the placeholder. Then I’ll save the resulting Service1.xamlx file.
Figure 26: Defining the Content property for the Receive activity

At this point, go ahead and open the HelloWorld.xamlx file and inspect its contents. You can do this by right clicking on the file in Solution Explorer and selecting “Open With…” followed by “XML Editor”. This allows you to look at the raw XAML definition for the service. It’s important to note that the XAML definition represents the complete service implementation. There is no C# code at all.
For this sample, we’ll rely on the default HTTP endpoint and assume we have a standard service behavior in place that automatically enables service metadata so we don’t need any WCF configuration.
Now we’re ready to test our XAML-based workflow service. This is as easy as pressing F5 in Visual Studio 2010. Pressing F5 will load the workflow service into the ASP.NET Development Server and cause the WCF Test Client to appear. The WCF Test Client automatically connects to the workflow service, downloads the WSDL metadata and makes it possible to test the workflow service logic (see Figure 27).
Figure 27: Testing the Workflow Service

This illustrates that the workflow services infrastructure is able to dynamically produce a WSDL definition for the service by inspecting the Send and Receive activities used within the workflow definition and the types of messages they are sending and receiving.
This completes the simple walkthrough of building your first declarative workflow service in .NET 4. We saw that the service implementation is defined completely in XAML, and that you use the Send/Receive activities to model the messaging interactions within the workflow. We also saw that .NET 4 comes with hosting support for .xamlx files, thereby removing the need for additional .svc files. We’ll continue digging into each of these areas in more detail throughout the following sections.
Hosting Workflow Services
.NET 4 comes with new-and-improved hosting infrastructure for workflow services. You can host workflow services in IIS/WAS or in your own applications using WorkflowServiceHost. The .NET 4 hosting infrastructure provides the necessary pieces for managing long-running workflow instances and for correlating messages when you have multiple service instances running concurrently. .NET 4 also provides a standard workflow control endpoint for managing workflow instances remotely.
Hosting in IIS/ASP.NET
The simple HelloWorldWorkflowService example we walked through in the previous section illustrated how to host workflow services in IIS/ASP.NET. Although we tested the service using the ASP.NET Development Server, it would have worked the same within IIS using an ASP.NET 4 application pool. .NET 4 installs the necessary handler for .xamlx requests, which handles the creation of the WorkflowServiceHost behind the scenes and the activation of the individual workflow instances.
Although we used the “zero config” approach in our first example, you can configure workflow services within Web.config like any other WCF service. This is where you’d configure any WCF endpoints and behaviors you’d like to use. You can expose as many endpoints as you’d like on your workflow services but you should consider using one of the new “context” bindings (e.g., BasicHttpContextBinding, WSHttpContextBinding, or NetTcpContextBinding) that manage instance-specific communication.
The following example illustrates how to configure a workflow service with two HTTP endpoints:
<configuration>
<system.serviceModel>
<services>
<service name="HelloWorldWorkflowService">
<endpoint binding="basicHttpContextBinding" contract="IHelloWorld"/>
<endpoint address="ws" binding="wsHttpContextBinding"
contract="IHelloWorld"/>
</service>
...
You can also configure the workflow service with WCF behaviors. The following example illustrates how to configure this workflow service with a few of the standard WCF behaviors:
<configuration>
<system.serviceModel>
<services>
<service name="HelloWorldWorkflowService"
behaviorConfiguration="HelloWorldWorkflowService.Service1Behavior" >
<endpoint binding="basicHttpContextBinding" contract="IHelloWorld"/>
<endpoint address="ws" binding="wsHttpContextBinding"
contract="IHelloWorld"/>
</service>
</services>
<behaviors>
<serviceBehaviors>
<behavior name="HelloWorldWorkflowService.Service1Behavior">
<serviceDebug includeExceptionDetailInFaults="False" />
<serviceMetadata httpGetEnabled="True"/>
</behavior>
</serviceBehaviors>
...
In addition to these standard WCF behaviors, .NET 4 comes with some new WF-specific behaviors for controlling workflow persistence, workflow tracking, and other workflow runtime behaviors in conjunction with your workflow services. See the .NET 4 SDK samples for more details.
Self-hosting with WorkflowServiceHost
Although .NET 3.5 came with a WorkflowServiceHost class for hosting workflow services, it needed to be redesigned given all the changes to the WF runtime and programming model in .NET 4. Hence, .NET 4 comes with a new WorkflowServiceHost class found in the System.ServiceModel.Activities assembly.
The WorkflowServiceHost class makes it easy to host workflow services in your own application whether it be a console application, a WPF application, or a Windows service. The following code fragment illustrates how to use WorkflowServiceHost within your own application code:
...
WorkflowServiceHost host = new WorkflowServiceHost("HelloWorld.xamlx",
new Uri("https://localhost:8080/helloworld"));
host.AddDefaultEndpoints();
host.Description.Behaviors.Add(
new ServiceMetadataBehavior { HttpGetEnabled = true });
host.Open();
Console.WriteLine("Host is open");
Console.ReadLine();
...
As you can see, whether you choose to host your workflow services in IIS/ASP.NET or in your own applications, they are just as easy to host as any WCF service.
WorkflowControlEndpoint
Hosting a workflow service takes care of initializing the WF runtime and activating new workflow instances when activating messages arrive through one of the exposed endpoints. In addition to this basic hosting functionality, it’s also important to be able to manage the configuration and execution of these running workflow instances remotely. .NET 4 makes this easy to accomplish by providing a standard WorkflowControlEndpoint that you can expose on your workflow services.
The following example illustrates how to add the standard workflow control endpoint to your service in a custom hosting scenario:
...
WorkflowServiceHost host = new WorkflowServiceHost("HelloWorld.xamlx",
new Uri("https://localhost:8080/helloworld"));
host.AddDefaultEndpoints();
WorkflowControlEndpoint wce = new WorkflowControlEndpoint(
new NetNamedPipeBinding(),
new EndpointAddress("net.pipe://localhost/helloworld/WCE"));
host.AddServiceEndpoint(wce);
host.Open();
...
If you’re hosting in IIS/ASP.NET, you can add the standard WorkflowControlEndpoint as follows:
<configuration>
<system.serviceModel>
<services>
<service name="HelloWorldWorkflowService"
behaviorConfiguration="HelloWorldWorkflowService.Service1Behavior" >
<endpoint address="" binding="basicHttpContextBinding" contract="IHelloWorld"/>
<endpoint address="ws" binding="wsHttpContextBinding" contract="IHelloWorld"/>
<endpoint address="wce" binding="wsHttpBinding" kind="workflowControlEndpoint"/>
</service>
...
The WorkflowControlEndpoint will make it possible for your workflow service to be managed within different hosting environments. One such environment is made possible by the Windows Server AppFabric, which will be available in a future version of Windows Server.
Send/Receive Activities
.NET 3.5 came with two messaging activities – Send and Receive – for sending and receiving messages using WCF but they were quite limited in terms of their functionality. .NET 4 enhances the Send and Receive activities with some additional features (e.g., correlation) and it adds a few more messaging activities – SendReply and ReceiveReply – that simplify modeling request-reply operations.
When you use the Send/Receive activities within a workflow service, you’re essentially using them to model the service contract that will be exposed to clients through the WSDL definition. When using the Receive activity, you give it an operation name and you map the incoming message to a .NET type. Although we’ve been using simple strings thus far, you can also use complex user-defined data contracts as well. Let’s update the HelloWorldWorkflowService to use the following data contract type:
[DataContract(Namespace="")]
public class Person
{
[DataMember]
public string Id;
[DataMember]
public string FirstName;
[DataMember]
public string LastName;
}
If we add this class definition to the Web project and return to HelloWorld.xamlx, we can then define a new variable called “personMsg” of type Person (the data contract defined above). Then we can map both the ReceiveRequest and SendResponse activities to the personMsg variable through the “Content” property. In order to do this, simply select each activity and press the “Content” button to bring up the “Content Definition” window. Then, enter “personMsg” in the “Message Data” text box and “Person” in the “Message Type” text box. You’ll need to do this for both activities.
The Send/Receive activities also make it possible to configure other aspects of the WCF service such as the operation name, the service contract name, the action, the collection of known types, the protection level, and the serializer to use at runtime (e.g., DataContractSerializer vs. XmlSerializer). On the Send activity, you also specify the target endpoint details. All of these settings are configurable via the Properties window when you have the Send/Receive activity selected.
With these changes in place, you can test HelloWorld.xamlx again to see that the SayHello operation is now defined to receive and return messages of type Person.
Defining Request-Reply Operations
In order to make it easier to model request-reply operations, .NET 4 introduces a few new activities for modeling these types of interactions. One is the SendReply activity that you can combine with a Receive activity to implement a request-reply operation within the service. There’s also a ReceiveReply activity that you can combine with a Send activity when invoking an external service within a workflow.
.NET 4 also comes with a few higher-level activities called ReceiveAndSendReply and SendAndReceiveReply, which you’ll see within the Visual Studio 2010 Toolbox. These activities simply compose Receive/Send with SendReply/ReceiveReply respectively and make them easy to use. When you drag them onto the workflow design surface, you’ll see that they expand to a sequence that contains a Send or Receive activity followed by the appropriate “reply” activity.
Add Service Reference
In order to make things even easier when consuming external services, Visual Studio 2010 also provides an “Add Service Reference” feature that works like you’d expect it to, except instead of generating a client proxy class definition it generates a set of client-side activities. After you select “Add Service Reference” and specify the address of the WSDL definition, Visual Studio downloads the WSDL and generates a custom activity for each operation found in the WSDL definition.
Let’s look at a simple example. Suppose there’s a CalculatorService with Add, Subtract, Multiply, and Divide operations that we want to use from our workflow service. We can simply select “Add Service Reference” and specify the location of the CalculatorService WSDL definition as illustrated in Figure 28.
Figure 28: Add Service Reference

Once we press OK to add the service reference, Visual Studio downloads the WSDL definition and generates four custom activities that will appear in the toolbox. You now have Add, Subtract, Multiply, and Divide activities that are easy to use within workflows to invoke the external service.
Correlation
When building systems that consist of long-running workflow services, it’s common to have numerous instances of a single workflow service running simultaneously waiting for the same event to occur (e.g., waiting for a specific message to arrive before continuing). The challenge with this scenario is that you need a way to correlate the incoming message with the right workflow instance. Typically the way you determine the correct workflow instance is by inspecting the content of the incoming message.
.NET 4 comes with a sophisticated content-based message correlation feature that you can use in conjunction with the Send and Receive activities that we just discussed. The implementation of this feature revolves around what are known as “correlation handles”, another new concept in .NET 4.
In order to begin using correlation, you must first define a workflow variable of type CorrelationHandle. You can think of this variable as the rendezvous point for connecting a piece of data from (potentially) two different messages (being processed by two different messaging activities). Both the Send and Receive activities provide a CorrelatesWith property for specifying a CorrelationHandle variable.
In order to correlate messages being sent by multiple Send/Receive activities, you must specify the same correlation handle across all activities that wish to participate in the correlation. Then on each activity, you configure the correlation key that will map to on the message being processed by that particular activity (e.g., the SSN element in one message could correlate with the CustomerId element in another message). You define correlation keys using XPath expressions that are evaluated against the messages.
Let’s extend our HelloWorldWorkflowService to see an example of how this works. Currently, the sample we’ve been working with receives a Person message and returns it back to the client. Let’s add another ReceiveAndSendReply activity just below the SendResponse activity at the bottom of the workflow. Doing this adds Sequence that contains another Receive followed by another SendReply. I’ll give the Receive activity an operation name of “Finish”, and we’re going to require the client to supply a salutation in the Finish message that we’ll use to construct the final greeting response.
In other words, clients will first call SayHello supplying their full name to kick off a new workflow service instance. Then the workflow instance will wait until the client calls Finish supplying a salutation (and this could potential take minutes, hours, or days, during which time the workflow could persist). Once the client calls Finish supplying the salutation, the workflow builds a greeting using the salutation and the original name and returns it. In this scenario, we can easily have multiple running workflow instances waiting for the Finish operation to be called so we’ll definitely need to correlate the Finish message with the preceding SayHello message. Since this is the case, I need to associate the Receive activity for “Finish” with the same correlation handle that we specified on the “SayHello” activity (nameHandle).
Now let’s look at the message content we’re going to correlate across these two activities. For this example, I’m going to use the following two data contract types to model the messages:
[DataContract(Namespace="")]
public class Person
{
[DataMember]
public string FirstName { get; set; }
[DataMember]
public string LastName { get; set; }
}
[DataContract(Namespace = "")]
public class Greeting
{
[DataMember]
public string Salutation { get; set; }
[DataMember]
public string NameKey { get; set; }
}
The Receive activity for “SayHello” is configured to use the Person message and the Receive activity for “Finish” is configured to use the Greeting message. We’re going to assume that the LastName value is always unique so we can use it as the unique value for correlation. Hence, when the client sends the “Finish” message, it must provide the same LastName value used in the preceding “SayHello” message.
Now let’s see how to configure the correlation handle to set this up. I’ve already defined a CorrelationHandle variable within the sequence named “handle”. The first thing we need to do is “initialize” the correlation handle within the “SayHello” Receive activity. So select the “SayHello” Receive activity and press the button next to the “CorrelationInitializers” text box.
Here you need to select “Query correlation initializer” from the drop down box, and then you should be able to choose the “LastName” property for the query field (this should produce an XPath expression of ”sm:body()/xg0:Person/xg0:LastName” as illustrated in Figure 29).
Then we need to specify that the “Finish” Receive activity with correlate on the same handle. Select the “Finish” Receive activity and press the “CorrelatesOn” button. Then specify “handle” for the “CorrelatesWith” handle and then select “NameKey” for the query field (see Figure 30).
Figure 29: Defining a correlation key for “SayHello”
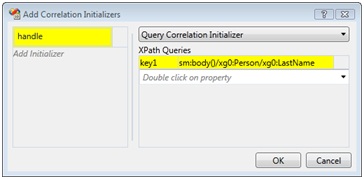
Figure 30: Defining a correlation key for “Finish”

This ultimately means that the LastName element in the Person message needs to match the NameKey element in the Greeting message across the two separate requests. With this in place, the workflow infrastructure will be able to automatically correlate the messages for us and route the incoming “Finish” messages to the correct workflow instance (based on “LastName/NameKey”).
The final SendReply activity returns the following formatted string to the caller including information from the original “personMsg” and the new “greetingMsg”:
String.Format("{0} {1} {2}!",
greetingMsg.Salutation, personMsg.FirstName, personMsg.LastName)
I’m going to test the correlation feature by using the WCF Test Client to start several workflow instances by calling SayHello numerous times with different FirstName and LastName values. After doing this, we should have several running instances of the workflow service. Now, we can call the Finish operation specifying one of the same LastName values used in one of the SayHello messages and we should see the corresponding FirstName value used in the final greeting returned to the client (see Figure 31).
This illustrates content-based correlation in action, a compelling workflow services feature that comes with .NET 4. It’s important to note that you can also perform correlation based on channel and protocol-level data like you may have done in .NET 3.5 (e.g., using the channel or workflow instance ID). Content-based correlation is a more flexible and sophisticated approach to do the same thing.
Figure 31: Testing the content-based correlation example
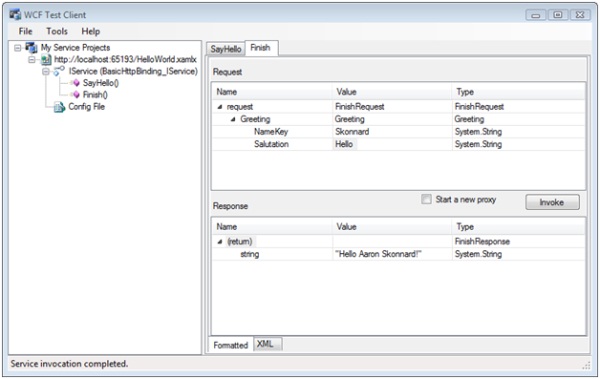
That brings us to the end of our workflow services coverage. We’ve only been able to scratch the surface of workflow services in this paper but you’ll be able to find additional information in the .NET 4 SDK samples and in the growing MSDN documentation found online. As you can see, the combination of WCF and WF 4 opens the doors to an entirely new development model for building declarative, long-running, and asynchronous services that can enjoy the best features both frameworks have to offer.
Miscellaneous Advanced Features
In addition to everything else we’ve talked about in this paper, WCF 4 comes with a few more advanced features that you may find useful. These advanced features include improved type resolution support through DataContractResolver, the ability to handle competing queue consumers using ReceiveContext, a new byte stream encoder, and high-performance ETW-based tracing.
Type Resolution with DataContractResolver
In WCF 3.x, there is a type resolution feature referred to as “known types”. During deserialization, when the serializer encounters an instance that isn’t of the same type as the declared type, it inspects the list of declared “known types” to figure out what type to use. As the author of the service, you can annotate your types/methods with the [KnownType] or [ServiceKnownType] attributes to define the list of possible substitutions. This feature is commonly used to support inheritance and polymorphism.
Unfortunately, WCF 3.x doesn’t provide an easy way to override the type-mapping algorithm used by DataContractSerializer when performing this type of dynamic type resolution at runtime. In order to address that issue, WCF 4 provides the abstract DataContractResolver class that you can derive from to implement your own custom type resolution algorithm. The following shows how to get started:
class MyDataContractResolver : DataContractResolver
{
Assembly assembly;
public MyDataContractResolver(Assembly assembly)
{
this.assembly = assembly;
}
// Used at deserialization
// Allows users to map xsi:type name to any Type
public override Type ResolveName(string typeName, string typeNamespace,
Type declaredType, DataContractResolver knownTypeResolver)
{
... // implement your mapping
}
// Used at serialization
// Maps any Type to a new xsi:type representation
public override bool TryResolveType(Type type, Type declaredType,
DataContractResolver knownTypeResolver, out XmlDictionaryString typeName,
out XmlDictionaryString typeNamespace)
{
... // implement your mapping
}
}
Once you have your custom DataContractResolver implemented, you can supply it to DataContractSerializer as illustrated here:
DataContractSerializer dcs = new DataContractSerializer(
typeof(Object), null, int.MaxValue, false, true, null,
new MyDataContractResolver(assembly));
Now when you use this DataContractSerializer instance to serialize/deserialize objects, your custom DataContractResolver will be called to perform the custom type resolution.
In order to inject your custom DataContractResolver into the WCF runtime behind the scenes, you’ll need to write a WCF contract behavior that plugs into the DataContractSerializerOperationBehavior and overrides the default resolver. The .NET 4 SDK comes with a complete example that illustrates how to accomplish this through a contract behavior and a custom attribute called [KnownAssembly].
Custom type resolution can be useful when you want to override the DataContractSerializer defaults, control exactly which types are used for serialization, or to dynamically manage known types.
Processing Queued Messages with ReceiveContext
With WCF 3.x, you can guarantee exactly-once delivery of messages when using the NetMsmqBinding by using transactional queues and enlisting the WCF service operation in the MSMQ transaction. When exceptions are thrown while processing a message, WCF will ensure that the message isn’t lost by returning the message to a queue (it might be returned to the originating queue, a poison message queue, or a dead letter queue depending on the configuration).
Although this functionality is important, there are a few issues that folks commonly run into. One is that the transactions are expensive and it produces a lot of reading/writing with the queues, which introduces more overhead and complexity. Another issue is that there’s no way to ensure that the same service processes the message next time it’s pulled from the queue (e.g., there’s no way for a particular service to “lock” a message), which is a guarantee you might want to make in certain scenarios.
In order to address these issues, WCF 4 introduces a new API called ReceiveContext for processing queued messages. With ReceiveContext, a service can “peek” a message on the queue to begin processing it and if anything goes wrong and an exception is thrown, it remains on the queue. Services can also “lock” messages in order to retry processing at a later point in time. ReceiveContext provides a mechanism for “completing” the message once processed it so it can be removed from the queue.
This approach simplifies things on several fronts because messages are no longer being read and re-written to queues over the network, and individual messages aren’t bouncing across different service instances during processing. Let’s take a look at a simple example to illustrate how it works.
The following example shows how to use ReceiveContext to process messages arriving at a queue:
...
[OperationBehavior(TransactionScopeRequired = true, TransactionAutoComplete = true)]
[ReceiveContextEnabled(ManualControl = true)]
public void CalculateProduct(int firstNumber, int secondNumber)
{
ReceiveContext receiveContext;
if (!ReceiveContext.TryGet(OperationContext.Current.IncomingMessageProperties,
out receiveContext))
{
Console.WriteLine("ReceiveContext not installed/found on this machine.");
return;
}
if ((firstNumber * secondNumber) % 2 == (receiveCount % 2))
{
receiveContext.Complete(TimeSpan.MaxValue);
Console.WriteLine("{0} x {1} = {2}", firstNumber, secondNumber,
firstNumber * secondNumber);
}
else
{
receiveContext.Abandon(TimeSpan.MaxValue);
Console.WriteLine("{0} & {1} not processed", firstNumber, secondNumber);
}
receiveCount++;
}
...
Assuming a successful pass, we call ReceiveContext.Complete to finish processing the message causing it to be removed from the underlying queue. Otherwise we call Abandon, which leaves the message on the queue for future retries. The .NET 4 SDK comes with a complete sample that you can use to explore this new feature in more depth.
Streamline Encoding with ByteStreamMessageEncodingBindingElement
In some messaging scenarios, you simply want to transmit “blobs” of binary data without any wrapping or additional processing whatsoever. In order to simplify this scenario, WCF 4 comes with a new ByteStreamMessageEncodingBindingElement that does just that. Unfortunately, .NET 4 doesn’t come with a new binding for this encoder so you’ll have to author a custom binding in order to make use of it.
The .NET 4 SDK comes with a complete example that illustrates how to define a custom binding that uses the ByteStreamMessageEncodingBindingElement through a custom binding class. Once you have the new binding class in place, the byte stream encoder becomes very easy to use with your services.
High-performance ETW-based Tracing
WCF 4 also makes some improvements on the tracing and diagnostics front. WCF 4 now makes use of ETW for tracing, which greatly improves tracing performance and provides better integration with other related technologies like Windows Workflow Foundation, Windows Server AppFabric, and the various management technologies found in Windows Server, offering a better model for the platform.
With ETW, event providers write events to sessions and sessions can optionally persist those events to a log. Consumers can listen to real-time session events or read those events from a log after the fact. ETW controllers are responsible for enabling/disabling sessions and associating providers with sessions.
The .NET 4 SDK provides a simple example that illustrates how to leverage this new high-performance tracing architecture in conjunction with your WCF services.
Conclusion
WCF 4 brings numerous improvements and several completely new features that address some of today’s most common communication scenarios. First and foremost, WCF 4 becomes easier to use through the simplified configuration model and better support for common defaults.
In addition, WCF 4 provides first-class support for service discovery and routing, which are common requirements in most enterprise environments and large SOA initiatives – these features alone set WCF apart from many of the competing frameworks. WCF 4 also simplifies REST-based service development and provides several other more advanced WCF features that address some specific pain points today.
In addition to all of this, WCF 4 provides sophisticated integration with WF in order to provide a new model for developing declarative workflow services. Workflow services make it possible to develop long-running and asynchronous services that benefit from the WF programming model and underlying runtime. And thanks to the new WCF-based activities and the designer support found within Visual Studio 2010, this new programming model is becoming a first-class option for authoring services.
In .NET 4 the worlds of WCF and WF are merging together to offer a cohesive programming model that gives you the best both worlds have to offer. For more information on what’s new in WF 4, check out A Developer’s Introduction to Windows Workflow Foundation in .NET 4.
About the Author
Aaron Skonnard is a cofounder of Pluralsight, a Microsoft training provider offering both instructor-led and on-demand .NET developer courses. These days Aaron spends most of his time recording Pluralsight On-Demand! courses focused on Cloud Computing, Windows Azure, WCF and REST. Aaron has spent years writing, speaking, and teaching professional developers around the world. You can reach him at http://pluralsight.com/aaron and http://twitter.com/skonnard.