Creating a Workflow with Windows PowerShell Activities
You can create a Windows PowerShell workflow by selecting activities from the Visual Studio Toolbox and dragging them to the Workflow Designer window. For information about adding Windows PowerShell activities to the Visual Studio Toolbox, see Adding Windows PowerShell Activities to the Visual Studio Toolbox.
The following procedures describe how to create a workflow that checks the domain status of a group of user-specified computers, joins them to a domain if they are not already joined, and then checks the status again.
Setting up the Project
Follow the procedure in Adding Windows PowerShell Activities to the Visual Studio Toolbox to create a workflow project and add the activities from the Microsoft.Powershell.Activities and Microsoft.Powershell.Management.Activities assemblies to the toolbox.
Add System.Management.Automation, Microsoft.PowerShell.Activities, System.Management, Microsoft.PowerShell.Management.Activities, and Microsoft.PowerShell.Commands.Management as to the project as reference assemblies.
Adding Activities to the Workflow
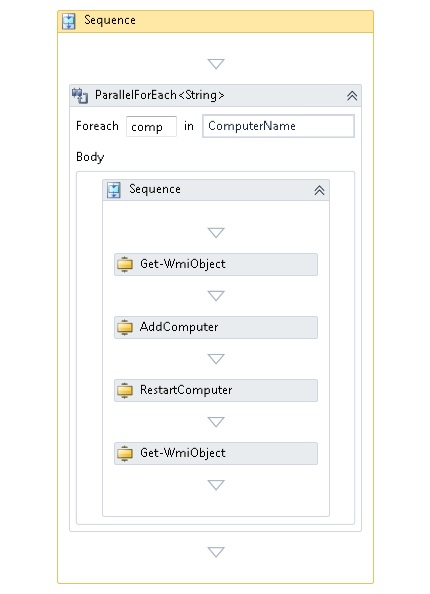
Add a Sequence activity to the workflow.
Create an argument named
ComputerNamewith an argument type ofString[]. This argument represents the names of the computers to check and join.Create an argument named
DomainCredof type System.Management.Automation.PSCredential. This argument represents the domain credentials of a domain account that is authorized to join a computer to the domain.Create an argument named
MachineCredof type System.Management.Automation.PSCredential. This argument represents the credentials of an administrator on the computers to check and join.Add a ParallelForEach activity inside the Sequence activity. Enter
compandComputerNamein the text boxes so that the loop iterates through the elements of theComputerNamearray.Add a Sequence activity to the body of the ParallelForEach activity. Set the DisplayName property of the sequence to
JoinDomain.Add a GetWmiObject activity to the JoinDomain sequence.
Edit the properties of the GetWmiObject activity as follows.
Property Value Class "Win32_ComputerSystem" PSComputerName {comp} PSCredential MachineCred Add an AddComputer activity to the JoinDomain sequence after the GetWmiObject activity.
Edit the properties of the AddComputer activity as follows.
Property Value ComputerName {comp} DomainCredential DomainCred Add a RestartComputer activity to the JoinDomain sequence after the AddComputer activity.
Edit the properties of the RestartComputer activity as follows.
Property Value ComputerName {comp} Credential MachineCred For Microsoft.PowerShell.Commands.WaitForServiceTypes.PowerShell Force True Wait True PSComputerName {""} Add a GetWmiObject activity to the JoinDomain sequence after the RestartComputer activity. Edit its properties to be the same as the previous GetWmiObject activity.
When you have finished the procedures, the workflow design window should look like this.