Setup guide: Target iOS mobile devices in a Visual Studio Tools for Apache Cordova project
If you want to build an iOS version of your app, you'll need a Mac to do it. Currently, there is no way to build an iOS app without one. You can use a physical Mac or a cloud-hosted one. Just make sure that it's running Mac OS X Mavericks or later.
In this guide, we'll help you get everything setup right so that you can build, run, and debug your app. We'll stop a few times to check and see if everything is working as expected. If something isn't behaving, we'll propose a few ideas that have worked for others.
Let's help you set things up.
First, install a few things onto your Mac
Install version
0.12.9of Node.js.This version of node.js is compatible with all versions of Cordova. If you have trouble finding it on the Node.js website, see Install the most compatible version of Node.js (0.12.x).
That said, you can use Node.js version
4xor5xas long as your project uses Cordova CLI version5.4.1or later.Install Xcode.
In the Launchpad, open Xcode.

Accept the license agreement and then close Xcode.
This seems like a strange step, but our tools depend on Xcode and it won't run until you accept this license.
Open a Terminal app, and type this command.
xcode-select -–installThis installs the Xcode command-line tools.
In the Terminal app, type this command.
sudo npm install -g remotebuildThis installs the remote agent. It's a secure build server that you run on your Mac. You'll connect to it from your Windows computer so that you can build, run, and debug iOS apps in Visual Studio.
Start the remote agent on your Mac
You can start the remote agent in secure mode or without secure mode.
Option 1: Start the remote agent (secure mode)
This is the safest mode. Visual Studio uses SSL certificates to securely transfer build payloads to the remote agent.
Your build payload is encrypted and that protects your intellectual property from being intercepted. When you start the agent in secure mode, you'll get a security PIN. You can't connect to the remote agent without it. That prevents outsiders from using the open port of your remote agent to run malicious code.
To start the remote agent in secure mode, type this command.
remotebuild
The agent installs Homebrew, and then starts. The host name, port number, and security pin appear in the Terminal app.
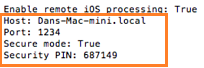
You'll use those pieces of information in the next section. In fact, you'll want to do that part fairly soon because the security pin is active for only 10 minutes.
Option 2: Start the remote agent (without secure mode)
This is the easiest yet riskiest way to start the remote agent. Visual Studio uses simple HTTP connections to transfer build payloads.
Often times when folks have trouble connecting to their remote agent, they'll start it without secure mode and the connection issue disappears.
Start the remote agent without secure mode only if you are comfortable with the trade-offs between risk and convenience.
For example, if your Mac is publicly accessible over the internet and has access to sensitive materials, you'll probably want to run your remote agent in secure mode. If you don't, anyone could build an app against your remote agent, and that app could run malicious code. That said, if your Mac is accessible to only you, it's easier and less error prone to run your remote agent without secure mode.
To start the remote agent without secure mode, type this command
remotebuild --secure false
The agent installs Homebrew, and then starts. The host name, and port number appear in the Terminal app.
You'll use those pieces of information in the next section.
Connect Visual Studio to the remote agent
On your Windows computer, open Visual Studio.
On the Visual Studio menu bar, choose Tools->Options.
In the Options dialog box, open Tools for Apache Cordova, and then choose iOS Configuration.
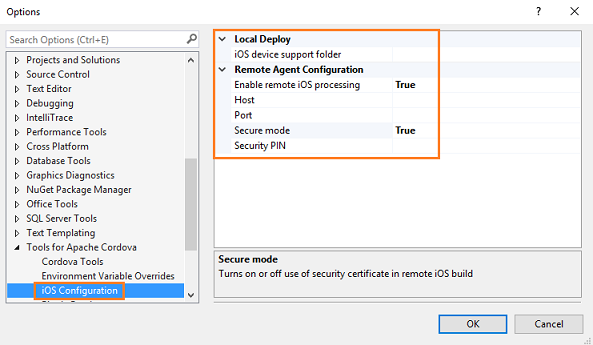
Add the host name and port number to the appropriate fields in this dialog box.
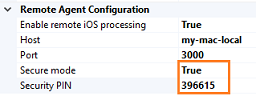
If you're using secure mode, set the Secure mode field to True, and then add the security pin.
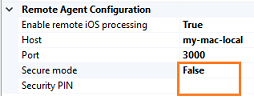
If you're not using secure mode, set the Secure mode field to False, and then leave the Security PIN field blank.
Choose the OK button to close this dialog box.
Visual Studio connects to the remote agent. If you don't receive any errors, you've successfully connected.
Troubleshooting: Let's fix it
Did you receive an error that relates to your certificate?
Is the host name of your Mac not resolving?
Have you been told that your security PIN is invalid or has expired?
Are you experiencing a symptom that does not appear in this list?
Run your app in an iOS simulator
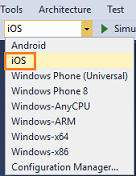
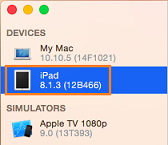
On the Standard toolbar, choose the iOS platform.
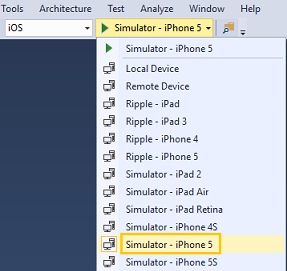
Choose iPhone 5 simulator.
Press the F5 key to start the app.
As your app builds, messages appear in the Terminal app. This means that Visual Studio has connected to the remote agent and is using that agent to build and deploy your app to the Mac.
When the build is complete, your app will appear in the iPhone 5 simulator on your Mac.
Troubleshooting: Let's fix it
Did you receive an error that tells you that a tool requires Xcode?
Did you receive an error that relates to your certificate?
Is the host name of your Mac not resolving?
Have you been told that your security PIN invalid or has expired?
Did you receive an error indicating that the port is already in use?
Did you receive an error that like this one: - Command failed with exit code ENOENT?
Did you receive any other type of build error
Are you experiencing a symptom that does not appear in this list?
Create a provisioning profile
You'll need a provisioning profile to run your app on a device. Create one by using an Apple Developer account. You can also create one with your free Apple ID but there are limitations. See Supported Capabilities.
If your team already has a provisioning profile, see Option 3: Use your team's provisioning profile.
Option 1: Use an Apple Developer account
This type of provisioning profile gives you the most flexibility. For this option, we'll do these things:
Enroll in the Apple Developer program
Request a certificate
Create an App ID
Register your device
Create a provisioning profile
Download the provisioning profile in Xcode
Install the provisioning profile onto your device
Let's go through each step in this process.
Enroll in the Apple Developer program
Request a certificate
Connect your device to your Mac. Make sure that your device is turned on.
Start Xcode.
In Xcode, add your Apple ID.
In the menu bar, choose Xcode->Preferences.
In the Accounts page, choose the View Details button.
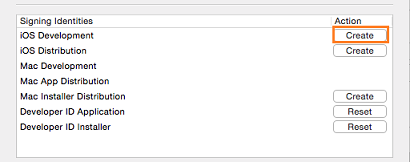
In the account details page, choose the Create button next to the iOS Development signing identity.
Choose the Done button to close the account details page.
Need more detail? See Creating Signing Identities.
Create an App ID
We'll use a wildcard App ID because it's the most flexible. You can use one for multiple apps. You need an explicit App ID (an App ID that you can use with only one app) only if you decide to enable certain services in your provisioning profile.
On your Mac, open Safari, and log into the Apple Developer Member Center.
On the Member Center page, choose the Identifiers link.
Sometimes Xcode generates a wildcard App ID for you. Take a look at the list of App ID's. If any of these have a
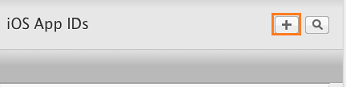
*in the ID field, then you have a wildcard App ID. If not, proceed to the next step.If you don't have a wildcard App ID, choose the + button to create one.
The Registering an App ID page appears.
Choose the Wildcard App ID option and then place a
*in the Bundle ID field.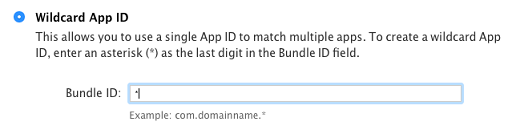
Fill in the rest of the fields on that page, and then choose the Continue button.
In the Confirm your App ID page, choose the Submit button.
The Registration complete page appears.
Need more detail? see Registering App IDs.
Register your device
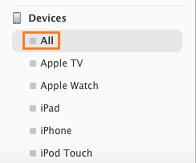
In the Certificates, Identifiers & Profiles page, choose the All link that is located under the Devices heading.
Choose the + button.

In the Registering a New Device or Multiple Devices page, provide the name and UDID of the device, and then choose the Continue button.
UDID stands for Unique Device Identifier. It's a 40-character string that uniquely identifies your device. You can find it by using Xcode or ITunes. See Locating Device ID's.
In the Review and register page, choose the Register button.
Need more detail? See Registering Devices Using Member Center
Create a provisioning profile
On the Member Center page, choose the Certificates, Identifiers & Profiles link.
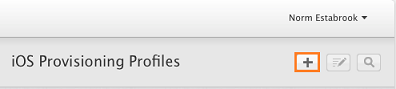
In the Certificates, Identifiers & Profiles page, choose the Provisioning Profiles link.
In the Provisioning Profiles page, choose the + button.
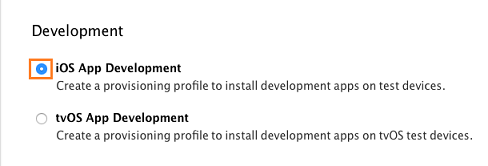
In the What type of provisioning profile do you need? page, choose the iOS App Development option, and then choose the Continue button.
In the Select App ID page, choose the wildcard App ID that you just created, and then choose the Continue button.

In the Select certificates page, select the checkbox next to the certificate that you created earlier, and then choose the Continue button.

In the Select devices page, select the checkbox next to the device that you registered earlier, and then choose the Continue button.
In the Name this profile and generate page, name your profile, and then choose the Generate button.
In the Your provisioning profile is ready page, choose the Download button.
Need more detail? See Creating provisioning profiles using Member Center
Download the provisioning profile in Xcode
Open Xcode.
In the menu bar, choose Xcode->Preferences.
In the Accounts page, choose the View Details button.
In the account details page, choose the Download button next to your provisioning profile's signing identity.

Choose the Done button to close the account details page.
Install the provisioning profile to your device
Connect your device to your Mac. Make sure that your device is turned on.
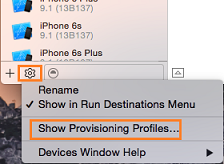
In the menu bar, choose Window->Devices.
In the Devices pane, select your device.
At the bottom of the Devices pane, choose the settings icon, and then choose the Show Provisioning Profiles.
In the Provisioning profiles installed on .. dialog box, choose the + icon.
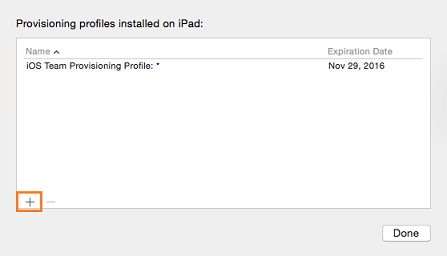
Navigate the location where you downloaded your provisioning profile, choose the file, and then choose the Install button.
In the In the Provisioning profiles installed on .. dialog box, choose the Done button.
Proceed to the Run your app on a device section.
Option 2: Use your free Apple ID
First, take some time to review the limitations of this type of provisioning profile. If you're comfortable with those limitations, let's get started!
Start Xcode 7.
In Xcode 7, add your Apple ID.
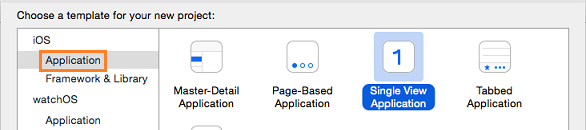
In Xcode 7, choose File->New->Project.
In the Choose a template for your new project dialog box, in the iOS group, choose the Application category, choose any template, and then choose the Next button.
Name your product, organization, and identifier anything you want, and then choose the Next button.
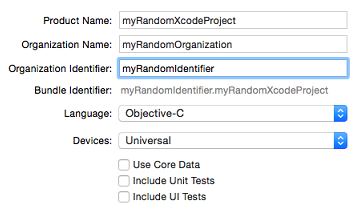
Choose a location to save your project, and then choose the Create button.
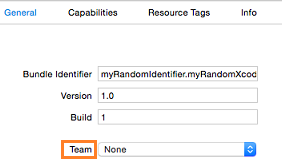
The General page of the project properties appears.
In the Team pop-up menu, choose your Apple ID.
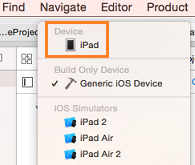
Connect your device to your Mac. Make sure that your device is turned on.
In the Scheme pop-up menu, choose your device.
If the device has the message version lower than deployment target, you can either update the operating system of your device or choose a version of iOS from the Deployment Target pop-up menu that matches the operating system version of your device.
If a Fix Issue button appears below the Team pop-up menu, choose that button.
Xcode creates a provisioning profile and the Fix Issue button disappears.
Choose the Run button to run your project.
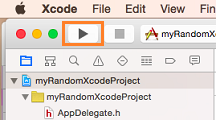
Running your project, ensures that your provisioning profile works. Xcode installs your blank app to the device and then starts it.
Need more detail? See any of these articles on the Apple Developer website:
Option 3: Use your team's provisioning profile
If your team shares a provisioning profile, all you have to do is register your device with the profile and then download and install that profile onto your device.
Register the UDID of your device with the provisioning profile
UDID stands for Unique Device Identifier. It's a 40-character string that uniquely identifies your device. You can find it by using Xcode or ITunes. See Locating Device ID's.
Send that information to the person on your team who manages the provisioning profile. For the purpose of this discussion, we'll call that person the profile administrator.
If you have administrator access to the Apple Developer Account, you can register the device yourself. Here's the steps:
On your Mac, open Safari, and log into the Apple Developer Member Center.
In the Registering a New Device or Multiple Devices page, provide the name and UDID of the device, and then choose the Continue button.
In the Review and register page, choose the Register button.
Download the provisioning profile from the Apple Developer Member Center
After you've confirmed that your profile administrator has added the UDID of your device to the provisioning profile, log into your shared Apple Developer account, and in the Apple Developer Member Center, locate your shared provisioning profile and download it.
Download the provisioning profile in Xcode
Open Xcode.
In the menu bar, choose Xcode->Preferences.
In the Accounts page, choose the View Details button.
In the account details page, choose the Download button next to your provisioning profile's signing identity.
Choose the Done button to close the account details page.
Install the provisioning profile to your device
Connect your device to your Mac. Make sure that your device is turned on.
In the menu bar, choose Window->Devices.
In the Devices pane, select your device.
At the bottom of the Devices pane, choose the settings icon, and then choose the Show Provisioning Profiles.
In the Provisioning profiles installed on .. dialog box, choose the + icon.
Navigate the location where you downloaded your provisioning profile, choose the file, and then choose the Install button.
In the In the Provisioning profiles installed on .. dialog box, choose the Done button.
Proceed to the Run your app on a device section.
Run your app on a device
Connect the device to a Mac
On your Mac
Connect your device.
Make sure that your device is turned on.
Make sure that the remote agent is running.
On your Windows computer
In Visual Studio, open the project for your app.
On the Standard toolbar, choose the iOS platform.
Choose Remote Device.
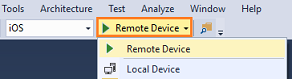
Press the F5 key to start your app.
Visual Studio builds your app by connecting to the remote agent on your Mac. When the build is complete, your app appears on the device that is connected to your Mac.
Troubleshooting: Let's fix it
You've been told that we were unable to find the app you're trying to debug
You've been told that no provisioning profiles were found
Did you receive an error that relates to your certificate?
Is the host name of your Mac not resolving?
Have you been told that your security PIN invalid or has expired?
Did you receive an error indicating that the port is already in use?
Did you receive any other type of build error
Are you experiencing a symptom that does not appear in this list?
Connect the device to a Windows computer
You can attach an iOS device to your Windows computer, then set breakpoints in your app and debug it. As long as you can connect to your Mac, you don't have be anywhere near it. This makes it easier to build and debug iOS apps on a Windows computer and share a Mac with other developers on your team.
To do this, you'll need a provisioning profile that you create by using an Apple Developer Account. If haven't yet done this, see Option 1: Use an Apple Developer Account. That section of content also shows you how to install the provisioning profile to your device. That is also very important.
Note: To deploy to a device from Windows you will first need to tell Visual Studio where it can find the iOS device support folder. We have verified that using a local copy of the files will technically work but we recommend using a file share to ensure you’re always on the latest bits. As a result, we'll go through how to set this up using the file share method.
On your Mac
Make sure that the remote agent is running.
Share the Application folder with Windows computers.
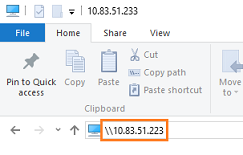
On your Windows computer
In a File Explorer window, log into the IP address of the mac.
 .
.The first time you attempt to open files on your mac, you'll be prompted for a username and password. Enter the username and password of the account that you turned on Windows File Sharing for.
This establishes a file sharing connection between your Windows computer and your Mac.
Install Apple iTunes.
Connect your device.
Make sure that your device is turned on.
Apple iTunes automatically starts.
On the Visual Studio menu bar, choose Tools->Options.
In the Options dialog box, open Tools for Apache Cordova, and then choose iOS Configuration.
In the iOS device support folder field, add this path:
\\<IPAddress>\Applications\Xcode.app\Contents\Developer\Platforms\iPhoneOS.platform\DeviceSupportwhere IPAddress is the IP Address of your Mac.The following image shows an example:

Choose the OK button to close this dialog box.
In Visual Studio, open the project for your app.
On the Standard toolbar, choose the iOS platform.
Choose Local Device.
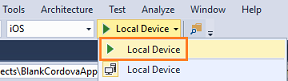
Press the F5 key to start your app.
Visual Studio builds your app by connecting to the remote agent on your mac. When the build is complete, the app appears on your device.
Stop the remote agent on your Mac
In the Terminal app on your Mac, press Ctrl+C.
Troubleshooting: Let's fix it
You've been told that we were unable to find the app you're trying to debug
Did you receive an error that relates to your certificate?
Is the host name of your Mac not resolving?
Have you been told that your security PIN invalid or has expired?
Did you receive an error that tells you that a tool requires Xcode?
Did you receive an error indicating that the port is already in use?
You've been told that no provisioning profiles were found
Did you receive any other type of build error
Did you receive an error that like this one: - Command failed with exit code ENOENT?
You try to build an app for iOS 10 using XCode 8, but builds are failing
Are you experiencing a symptom that does not appear in this list?
Did you receive an error that relates to your certificate?
This can happen when Visual Studio has trouble finding your Mac on the network or if host name or IP address of your Mac changed.
Possible issue 1: Windows has trouble finding your Mac on the network
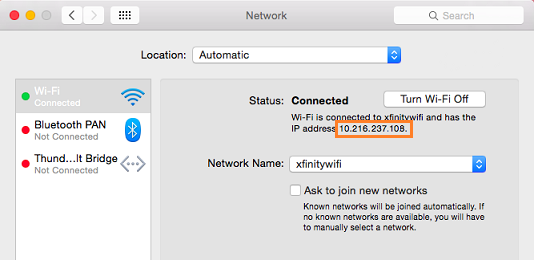
On your Windows computer, open a Command Prompt, and ping the IP address of your Mac. For example, if the IP address of your Mac is 10.83.51.174, you'd type ping 10.83.51.174.
If you don't receive any return messages in the Command Prompt window, your Mac and your Windows computer might be connected to different networks.
This can happen sometimes when your company has more than one Wi-Fi network. When a Mac wakes from a sleep, it connects to the first available Wi-Fi network. That might not be the network of your Windows computer.
This image shows a preferred order of Wi-Fi networks.

The MSFTCORP Wi-Fi network appears first. When this Mac wakes from a sleep, it will use that network.
The network that is used by your Windows Computer should appear first in this list. Otherwise, you'll experience these issues intermittently.
If this doesn't resolve your issue, it's possible that the host name or IP address of your Mac changed.
Possible issue 2: The host name or IP address of your Mac has changed
When you first started the remote agent, a certificate was generated. That certificate paired Visual Studio to your Mac's IP address or host name. If the IP address or host name changes, your certificate becomes invalid.
Try this. Stop the remote agent on your Mac. Then, in a Terminal, run this command:
remotebuild certificates reset
Then, run this command:
remotebuild certificates generate
Start the remote agent.
On your Windows computer, in the Options dialog box, open Tools for Apache Cordova, and then choose iOS Configuration.
Add the host name and port number to the appropriate fields in this dialog box.
If you're using secure mode, set the Secure mode field to True, and then add the security pin.
If you're not using secure mode, set the Secure mode field to False, and then leave the Security PIN field blank.
Choose the OK button to close this dialog box.
Visual Studio connects to the remote agent. If you don't receive any errors, you've successfully connected.
Still not working? Reach out to us here.
If you've resolved this problem another way, please share it in a comment.
Is the host name of your Mac not resolving?
First, make sure that the Host name in Visual Studio matches computer name in the in the Sharing settings of your Mac.
Alternatively, you can set the Host name in Visual Studio to the IP address that appears in the Network settings of your Mac.
Still not working? Reach out to us here.
If you've resolved this problem another way, please share it in a comment.
Have you been told that your security PIN is invalid or has expired?
This can happen the first time you set things up because your security PIN is good for only 10 minutes. then it expires.
This can also happen if your attempting to use the same PIN for multiple Windows computers. More than one Windows computer can use the same remote build service, but each computer must have it's own PIN.
To generate a new PIN:
First, stop the remote agent. On your Mac, open a Terminal app, and type CTRL+C to stop it.
In the Terminal app, type
remotebuild certificates generate.Your new security PIN appears in the Terminal app window. Add that PIN to the Security PIN field in Visual Studio.
If this doesn't work, return to your Mac and in the Terminal app, type
remotebuild certificates resetand then typeremotebuild certificates generateto get another PIN number.
Still not working? Reach out to us here.
If you've resolved this problem another way, please share it in a comment.
You've been told that we were unable to find the app you're trying to debug
On your device, open the Safari settings and enable the Web Inspector setting.
See Safari iOS.
If this doesn't work, reset the settings on your iOS device.
Still not working? Reach out to us here.
If you've resolved this problem another way, please share it in a comment.
Did you receive an error that tells you that a tool requires Xcode?
Make sure that Xcode is installed on your Mac. Then, open Xcode and accept the license agreement. This is important. If you don't accept the license agreement, you'll keep getting build errors.
Still not working? Reach out to us here.
If you've resolved this problem another way, please share it in a comment.
Did you receive an error indicating that the port is already in use?
Most likely, an instance of remotebuild is already running. Stop the remotebuild agent by typing Ctrl+C in the Terminal App window, and then restart it.
Alternatively, start the remotebuild agent on a different port. (Try using port 3000 first before switching to another port.)
Run this command in the Terminal App on your Mac to start the agent.
remotebuild --port <portnumber>Update the port number in Visual Studio (Tools > Options > Tools for Apache Cordova > iOS Configuration).
Run your app again.
Did you receive an error that like this one: - Command failed with exit code ENOENT?
This can happen if your project uses a version of the Cordova Command Line Interface (CLI) that is lower than 4.3.
To fix this problem, update the CLI version of your project.
Still not working? Reach out to us here.
If you've resolved this problem another way, please share it in a comment.
You've been told that no provisioning profiles were found
Most likely, Xcode hasn't yet registered your device or requested your development certificate. You can make these things happen by creating a project in Xcode, and then choosing the Fix Issue button in the general settings page of your new project.
For steps, see the Option 2: Use your free Apple ID section of this topic.
Important: At step 7, in the team pop-up menu, make sure to choose your team or individual name that is associated with your provisioning profile. Choose your Apple ID only if you chose to use your free Apple ID to create the provisioning profile.
Did you receive any other type of build error
Under the covers, Visual Studio Tools for Apache Cordova uses the Cordova SDK to manage interactions with mobile device SDKs and other tools. Therefore, when you see build errors that aren't covered elsewhere in this guide, chances are that the errors are coming from external tools used by Visual Studio. When this happens, general purpose Cordova best practices, tips and tricks apply. Refer to the Apache Cordova documentation or existing Apache Cordova or Visual Studio Tolls for Apache Cordova questions on Stack Overflow for help from other people who have solved similar issues.
Still not working? Reach out to us here.
If you've resolved this problem another way, please share it in a comment.
You try to run your app on a device that is connected to your Windows computer but the project can't find it
It's possible that the ios-webkit-debug-proxy.exe and idevicedebugserverproxy.exe processes were started in a previous attempt to run this project.
On your Windows computer, open the Task Manager and then choose the Proceses tab. If those processes appear in the list, right-click them, and then click End Process.
You try to build an app for iOS 10 using XCode 8, but builds are failing.
This is a known issue with Apache Cordova 6.3.1 and for the Visual Studio tools we've been working on a fix for this. To work around the issue for now, you'll need to perform the following steps:
- Add a
developmentTeamproperty to theiosbuild settings in your project'sbuild.jsonfile (an example is shown below). - Set the
build.jsonfile'scodeSignIdentityproperty to the static valueiPhone Developer. - Setup a
before_compilehook in your project to copy thedevelopmentTeamproperty into the project'splatforms/ios/cordova/build.xcconfigfile.
The project's build.json file should look something like the following:
{
  "ios": {
    "debug": {
      "developmentTeam": "DEVELOPMENT_TEAM_NAME"
    },
    "release": {
      "developmentTeam": "DEVELOPMENT_TEAM_NAME",
      "codeSignIdentity": "iPhone Developer"
    }
  }
}
To simplify the process, Darryl Pogue published a sample hook that makes the required changes to the project's build.xconfig file based on the build.json example shown above. To use this hook, copy the sample xcode8.js file to your project's hooks folder, and then modify the project's config.xml to execute it before the compilation step using the following code:
<platform name="ios">
  <hook type="before_compile" src="hooks/xcode8.js" />
</platform>
Creating a Distribution Build
At this point, the Cordova build process works, and you can run, test and debug your app. Unfortunately, the app isn't being signed with the correct development certificate needed for distribution. In order to sign them with a distribution certificate, you'll need to create an archive of the app by following the instructions found in: Uploading Your App to iTunes Connect.
If you can't run or debug an iOS 10 app
Developers building Cordova applications for iOS 10 may encounter the following errors:
Http 404: Error mounting developer disk image
Http 500: No devices found to debug. Please ensure that a device is connected and awake and retry.
This is caused by the Mac development environment needing an update to several modules. To fix the issue, on Mac OS, open a terminal window and issue the following command:
brew update && brew upgrade libimobiledevice --HEAD && brew upgrade ios-webkit-debug-proxy ideviceinstaller
Are you experiencing a symptom that does not appear in this list?
Try these things:
Review iOS and OSX Tips and Workarounds.
Review Known issues: iOS.
Reach out to us here or start a discussion at the bottom of this topic.