Deploy the Project Management Office Accelerator
Although people in your organization can start using Project for the web as soon as you subscribe to Microsoft 365, you'll probably want to customize the environment to meet your specific business needs. Save time with several common scenarios by deploying the Project Management Office Accelerator (PMO Accelerator).
Prerequisites
- Admin rights in an environment with the deployed Project for the web solution.
- Rights to create Power Automate flows using the Common Data Service connector.
Deploy the Accelerator
Download the Accelerator and save it locally. Don't unpack it—the import process uses the zipped file.
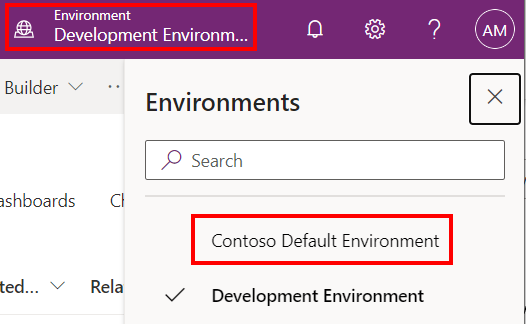
Open the Power Apps Portal.
Open the Environment menu and select your Project for the web environment.
In the navigation pane, select Solutions.
On the command bar, select Import.
In the Import a solution dialog, select Browse, then find and select the Accelerator file you downloaded.
Select Next, then select an existing connection to a Power Automate flow, or create a new connection.
Select Next and then select Import.
When deployment succeeds, the Project Power App will resemble this:

Use the Accelerator components without Project for the web
You may reuse the Accelerator components in your own applications, per the LICENSE. Using the Accelerator with the Project Power App or using the Project for the web tables employed by the Accelerator is only permitted according to the terms of your Project plan and subscriptions.
Resolve error messages that appear during deployment
The following table lists known errors that sometimes appear while you are deploying the Accelerator solution, and provides steps to resolve them. If the steps don't resolve the error, you can get support from Microsoft.
| Error message | Fix |
|---|---|
| There are missing dependencies. Install the following solutions before installing this one: "msdyn_ProjectServiceCore (1.0.0.87)". | In the environment where you're deploying the Accelerator, select Solutions in the navigation pane. Find the Project Service Core solution, and then select Update next to the solution name. After the update is complete, deploy the Accelerator solution. |
| Failed to activate component(s). Flow save failed with code OpenApiOperationParameterValidationFailed and message Input parameter item validation failed in workflow operation... | Resolve flow errors. |
| Flow save failed with code OpenApiOperationParameterValidationFailed and message Input parameter item validation failed in workflow operation Create_a_new_record: The API operation 'CreateRecord' is missing required property item/msdyn_schedulemode. | Resolve flow errors. |
Resolve flow errors
Open the Power Apps Portal.
Open the Environment menu and select your Project for the web environment.
In the navigation pane, select Solutions.
Open the Project Accelerator solution, and then in the navigation pane select Cloud flows.
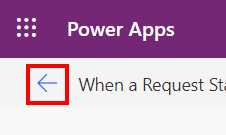
Select When a Request State is Updated....
On the command bar, select Edit.
Select the Condition step.
In the If yes condition, select Create a new record.

Set Scheduling Mode to Fixed Duration.
On the command bar, select Save, and then select the back arrow on the far left.
Select When a Request State is Updated....
On the command bar, select Turn On, and then select the back arrow on the far left.
On the command bar, select Publish all customizations.
Support and Troubleshooting
Microsoft fully supports the deployment and use of the Accelerator with Project for the web. Although we don't support any customizations added on top of the Accelerator, we do support the core functionality in such circumstances.
Accelerator support options
- Open a new service request through the Microsoft 365 admin center Support tab.
- Raise an issue in Github.
Next Steps
Feedback
Coming soon: Throughout 2024 we will be phasing out GitHub Issues as the feedback mechanism for content and replacing it with a new feedback system. For more information see: https://aka.ms/ContentUserFeedback.
Submit and view feedback for