Windows Hello for Business settings in Configuration Manager
Applies to: Configuration Manager (current branch)
Configuration Manager integrates with Windows Hello for Business. (This feature was formerly known as Microsoft Passport for Work.) Windows Hello for Business is an alternative sign-in method for Windows 10 devices. It uses Active Directory or a Microsoft Entra account to replace a password, smart card, or virtual smart card. Hello for Business lets you use a user gesture to sign in instead of a password. A user gesture might be a PIN, biometric authentication, or an external device such as a fingerprint reader.
Important
Starting in version 2203, this company resource access feature is no longer supported. For more information, see Frequently asked questions about resource access deprecation.
Active Directory Federation Services Registration Authority (ADFS RA) deployment is simpler, provides a better user experience, and has a more deterministic certificate enrollment experience. Use ADFS RA for certificate-based authentication with Windows Hello for Business.
For more information, see Windows Hello for Business.
Note
Configuration Manager doesn't enable this optional feature by default. You must enable this feature before using it. For more information, see Enable optional features from updates.
Configuration Manager integrates with Windows Hello for Business in the following ways:
Control which gestures users can and can't use to sign in.
Store authentication certificates in the Windows Hello for Business key storage provider (KSP). For more information, see Certificate profiles.
Create and deploy a Windows Hello for Business profile to control its settings on domain-joined Windows 10 devices that run the Configuration Manager client. Starting in version 1910, you can't use certificate-based authentication. When using key-based authentication, you don't need to deploy a certificate profile.
Configure a profile
In the Configuration Manager console, go to the Assets and Compliance workspace. Expand Compliance Settings, expand Company Resource Access, and select the Windows Hello for Business Profiles node.
In the ribbon, select Create Windows Hello for Business Profile to start the profile wizard.
On the General page, specify a name and an optional description for this profile.
On the Supported Platforms page, select the OS versions to which this profile should apply.
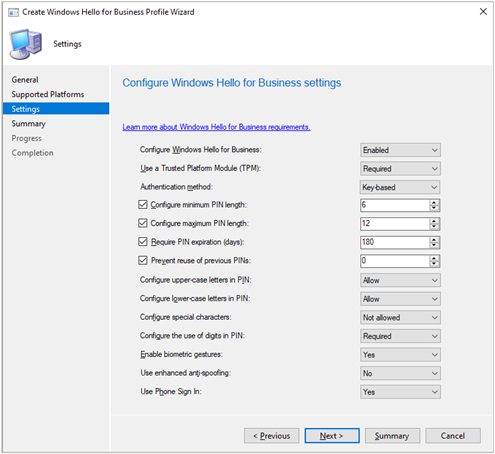
On the Settings page, configure the following settings:
Configure Windows Hello for Business: Specify whether this profile enables, disables, or doesn't configure Hello for Business.
Use a Trusted Platform Module (TPM): A TPM provides an additional layer of data security. Choose one of the following values:
Required: Only devices with an accessible TPM can provision Windows Hello for Business.
Preferred: Devices first attempt to use a TPM. If it's not available, they can use software encryption.
Authentication method: Set this option to Not configured or Key-based.
Note
Starting in version 1910, certificate-based authentication with Windows Hello for Business settings in Configuration Manager isn't supported.
Configure minimum PIN length: If you want to require a minimum length for the user's PIN, enable this option and specify a value. When enabled, the default value is
4.Configure maximum PIN length: If you want to require a maximum length for the user's PIN, enable this option and specify a value. When enabled the default value is
127.Require PIN expiration (days): Specifies the number of days before the user must change the device PIN.
Prevent reuse of previous PINs: Don't allow users to use PINs they have previously used.
Require upper-case letters in PIN: Specifies whether users must include uppercase letters in the Windows Hello for Business PIN. Choose from:
Allowed: Users can use uppercase characters in their PIN, but don't have to.
Required: Users must include at least one uppercase character in their PIN.
Not allowed: Users can't use uppercase characters in their PIN.
Require lower-case letters in PIN: Specifies whether users must include lowercase letters in the Windows Hello for Business PIN. Choose from:
Allowed: Users can use lowercase characters in their PIN, but don't have to.
Required: Users must include at least one lowercase character in their PIN.
Not allowed: Users can't use lowercase characters in their PIN.
Configure special characters: Specifies the use of special characters in the PIN. Choose from:
Note
Special characters include the following set:
! " # $ % & ' ( ) * + , - . / : ; < = > ? @ [ \ ] ^ _ ` { | } ~Allowed: Users can use special characters in their PIN, but don't have to.
Required: Users must include at least one special character in their PIN.
Not allowed: Users can't use special characters in their PIN. This behavior is also if the setting is Not configured.
Configure the use of digits in PIN: Specifies the use of numbers in the PIN. Choose from:
Allowed: Users can use numbers in their PIN, but don't have to.
Required: Users must include at least one number in their PIN.
Not allowed: Users can't use numbers in their PIN.
Enable biometric gestures: Use biometric authentication such as facial recognition or fingerprint. These modes are an alternative to a PIN for Windows Hello for Business. Users still configure a PIN in case biometric authentication fails.
If set to Yes, Windows Hello for Business allows biometric authentication. If set to No, Windows Hello for Business prevents biometric authentication for all account types.
Use enhanced anti-spoofing: Configures enhanced anti-spoofing on devices that support it. If set to Yes, where supported, Windows requires all users to use anti-spoofing for facial features.
Use Phone Sign In: Configures two-factor authentication with a mobile phone.
Complete the wizard.
The following screenshot is an example of Windows Hello for Business profile settings:
Configure permissions
As a Domain Administrator or equivalent credentials, sign in to a secure, administrative workstation that has the following optional feature installed: RSAT: Active Directory Domain Services and Lightweight Directory Services Tools.
Open the Active Directory Users and Computers console.
Select the domain, go to the Action Menu, and select Properties.
Switch to the Security tab, and select Advanced.
Tip
If you don't see the Security tab, close the properties window. Go to the View menu, and select Advanced Features.
Select Add.
Choose Select a principal and enter
Key Admins.From the Applies to list, select Descendant User objects.
At the bottom of the page, select Clear all.
In the Properties section, select Read msDS-KeyCredentialLink.
Select OK to save your changes and close all windows.
Next steps
Feedback
Coming soon: Throughout 2024 we will be phasing out GitHub Issues as the feedback mechanism for content and replacing it with a new feedback system. For more information see: https://aka.ms/ContentUserFeedback.
Submit and view feedback for