Working with Tasks in SharePoint Workflows using Visual Studio
Learn about the revised workflow task framework that was introduced in SharePoint Server 2013, (and which is available in SharePoint Server 2016, SharePoint Server 2019, and SharePoint Server Subscription Edition). This is built on the Workflow Manager (which was more recently superseded by 'SharePoint Workflow Manager'; see associated announcement ).
Provided by: Andrew Connell, Voitanos
Note
SharePoint 2010 workflows have been retired since August 1, 2020 for new SharePoint Online tenants and removed from existing SharePoint Online tenants on November 1, 2020. If you’re using SharePoint 2010 workflows, we recommend migrating to Power Automate or other supported solutions. For more info, see SharePoint 2010 workflow retirement.
This article is accompanied by an end-to-end code sample that you can use to follow the article, or as a starter for your own SharePoint workflow projects. You can find the downloadable code here.
One of the greatest benefits that the SharePoint brings to Windows Workflow Foundation is the implementation of a new and improved task management framework that incorporates the new Workflow Manager as its hosting environment.
Reviewing workflow tasks in SharePoint 2007 and SharePoint 2010
Both SharePoint Server 2007 and SharePoint Server 2010 implemented workflow tasks in a similar manner. When you created a workflow association on a list, content type, or site (in SharePoint Server 2010), you designated a specific list as the location where the workflow tasks would be created. This list was a standard SharePoint Task list (ID = 107) that used the standard SharePoint Task content type (ID = 0x0108). Users then could access items in the list to view, edit, and complete the task. The workflow instances monitored the task items in the list for updates if the workflow was configured to do so.
However, the default rendering of the task form in SharePoint was pre-determined, even for custom workflows. For full flexibility, you needed to use ASP.NET Web Forms or InfoPath Forms when you created custom form solutions to support your tasks.
What's new with tasks in SharePoint Server 2013
The manner in which tasks are created, managed, and handled in SharePoint Server 2013 has changed due to changes in the SharePoint architecture.
The central change is that workflows are no longer managed and processed inside of SharePoint. Instead, SharePoint utilizes a new component called Workflow Manager, which runs externally. Workflow Manager hosts the Windows Workflow Foundation runtime and necessary services required by the Windows Workflow Foundation. When a workflow is published or a new instance of a published workflow is started, SharePoint notifies Workflow Manager, which in turn processes the workflow episodes. When a workflow needs to access information in SharePoint, such as list item properties or user properties, it authenticates itself using the OAuth and talks back to SharePoint with web service calls using the REST APIs.
The overall customization trend for the SharePoint platform also changed in SharePoint, although this change started with the implementation of sandboxed solutions in SharePoint 2010. In SharePoint, Microsoft introduced changes that moved customizations off of SharePoint Server and onto either to the client's browser or to external resources. These changes include the new SharePoint app model, support for assigning app identity, authentication using OAuth, improvements to the client-side object model (CSOM), and the REST APIs.
Architectural changes to workflow tasks in SharePoint
How do the architectural changes in SharePoint affect workflow tasks? For workflow tasks, the affect isn't significant except when you're working with custom task forms. In the past, you created task forms using InfoPath or ASP.NET Web Forms. SharePoint, on the other hand, uses the default list item rendering form for workflow tasks.
You might sometimes need to customize the appearance or the behavior of task fields. To do this, create a custom task content type that contains a site column. The site column can then use the new client-side rendering framework in SharePoint, which requires creating a JavaScript file that defines how the field should look and act in the browser.
For more information about using client-side rendering, see How To Customize a List View in Apps for SharePoint Using Client-Side Rendering.
Individual task items are based on content types. Importantly, there are some changes to content types in SharePoint Server 2013. In SharePoint Server 2007 and SharePoint Server 2010, workflow tasks were created with the Task content type (ID = 0x0108). This is the same content type that is used to manually create non-workflow tasks in the task lists. SharePoint Server 2013 changes this by introducing a new content type, Workflow Task (SharePoint 2013) (ID = 0x0108003365C4474CAE8C42BCE396314E88E51F), which inherits from the Task content type and which indicates that the tasks are to be used only for workflow.
This new Workflow Task content type differs from the earlier Task content type in that it has two new columns:
WorkflowInstanceId: Contains a reference to the workflow instance identifier that created the task, which is used in such places as the workflow instance status page. The status page can use this field to query the associated workflow task list for all list items whose WorkflowInstanceId column contains the specified ID.
TaskOutcome: A choice field that is used in the presentation of the task form to allow the user to select different completion criteria options. The task edit form presents the specified workflow task outcomes as buttons at the bottom of the form, next to the Save and Cancel buttons. Workflows in SharePoint aren't limited to just the two options Approved and Rejected, as shown in Figure 1.
Figure 1. Workflow task outcomes

Content types are a part of workflow tasks. Content types simply dictate the structure of the task list items. Equally important is the task list template, which has also changed in SharePoint.
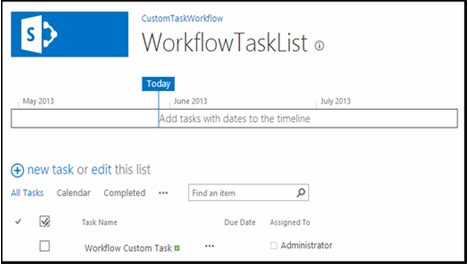
Prior to SharePoint, the workflow task list used the same list template as the standard task list (ID = 107). It was a standard SharePoint task list that could also contain non-workflow tasks. But in SharePoint the approach is different in that it introduces a new type of a list. This list, called the hierarchy tasks list, introduces a timeline view at the top of the page to show the scheduling of tasks, as shown in Figure 2. It also lets users view task dependencies.
Figure 2. Hierarchy tasks list
Creating workflow task options in SharePoint
Both SharePoint Designer 2013 and Visual Studio provide workflow authors two ways to create workflow tasks. One is to create a single task that is assigned to a person or a group. The other is to create a task and assign it to multiple people. When creating a single task in a custom workflow using Visual Studio, use the SingleTask activity. By using this activity, you can modify the properties either in the Properties tool window, or with the wizard, as shown in Figure 3.
Figure 3. Single-task wizard
SharePoint lets you specify whether multiple tasks should run serially or in parallel, and specifying the criteria for task completion. Should SharePoint wait for all tasks to be completed, or for a percentage of them to be completed with a specific outcome? To create multiple tasks in Visual Studio, use the CompositeTask activity, whose wizard and properties resemble the SingleTask activity, as shown in Figure 4.
Figure 4. Composite task wizard

How to: Create and assign tasks in custom workflows
Following is a walkthrough that demonstrates how to create and assign tasks in a custom workflow. Before starting, make sure that you have access to a SharePoint developer site.
1. Create a new SharePoint app project
- Create a new SharePoint app project and configure the project as a SharePoint-hosted add-in.
- To the project, add a new Announcement list instance to the project. This will be used as the container for items used to test the workflow.
- Add a workflow item the project by right-clicking the project icon in Solution Explorer and selecting Add, followed by New Item.
- In the Add New Item dialog box, select the Workflow project item from the Office/SharePoint category and name it "CustomTaskWorkflow", and then select Next.
2. Collect information on the New Announcement item
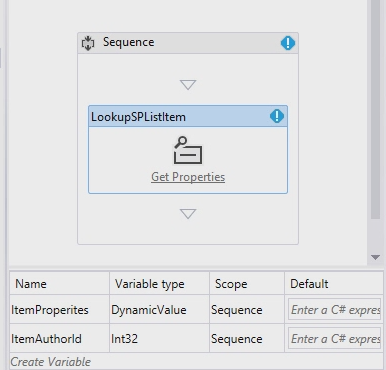
We're going to create a task in our workflow and assign it to the person who created the announcement list item that kicks off the workflow. The list item itself will provide the information to the workflow. We'll use a LookupSPListItemProperties activity, which returns a dynamic value from the REST web service that it calls in SharePoint. We're then going to store this value in a new variable named AnnouncementItemProperties, whose data type we'll change to DynamicValue.
Create an AnnouncementItemAuthorId variable to store the ID of the person who created the list item, as shown in Figure 5.
Figure 5. LookupSPListItemProperties activity
Drop the LookupSPListItem activity onto the workflow design surface and set the ListID property to (current list).
Set the ItemId to (current item).
Set the Result output to the AnnouncementItemProperties variable that we created earlier.
To get the author of the item from the variable, select the Get Properties link in the LookupSPListItem activity and add a GetDynamicValueProperties activity to the design surface. Set its Source property to the output of the LookupSPListItem activity.
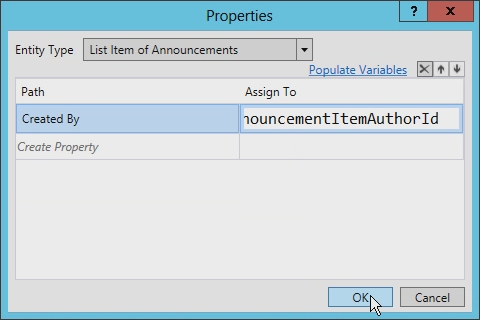
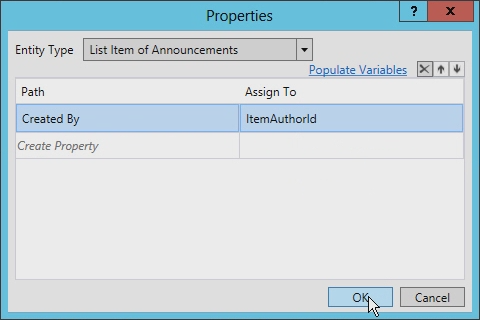
Select the [???] button on the Properties property to bring up the Properties dialog box.
In the Properties dialog box, change the Entity Type to List Item of Announcements, as shown in Figure 6.
Assign the Created By path to the variable AnnouncementItemAuthorId, as shown in Figure 6.
Figure 6. Properties dialog
3. Create and Assign the task
At this point we can create and assign the task to the author of the announcement item.
From the toolbox, add a SingleTask activity to the workflow design surface.
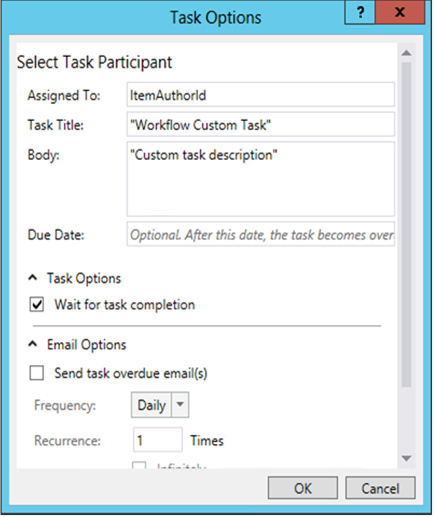
Select the Configure link in the activity to open the Task Options dialog box.
Set the Assigned To property to the variable used to store the author identifier.
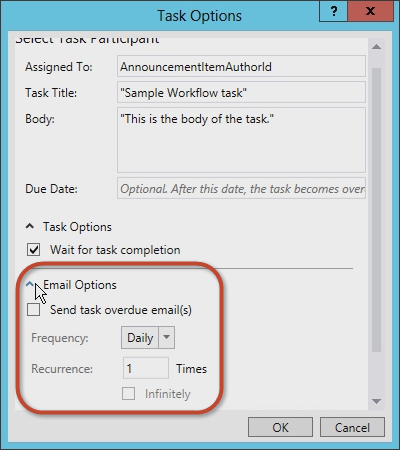
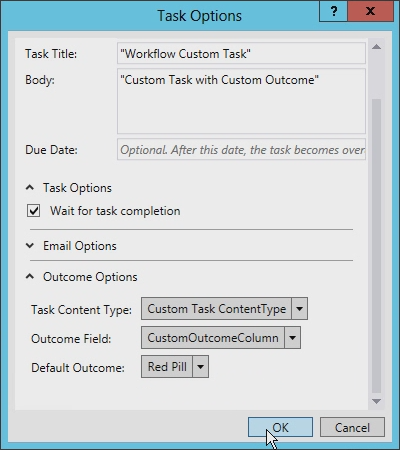
Modify the title and body of the task, as shown in Figure 7.
Figure 7. Task Options dialog

There are several other options that can be set in the Task Options dialog box. For example, you can set the workflow to wait for the task to complete by simply selecting the box (see Figure 7). Previous versions of SharePoint workflows required a difficult workaround to accomplish this.
Notice in Figure 8 the email options that you can set. Among other options, you can ensure that email messages are sent whenever the task is overdue and specifying how often the reminders are sent.
Figure 8. Email Options settings
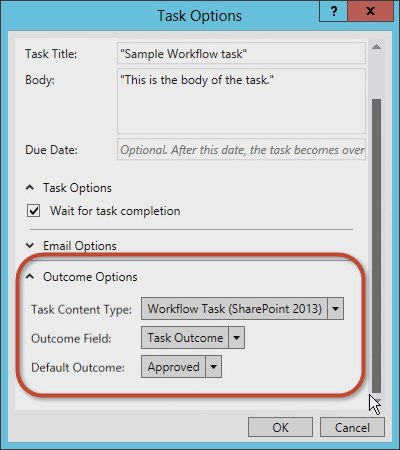
You can also set the task outcome options. You can select the workflow task content type, the Outcome Field, and the Default Outcome, as shown in Figure 9.
Figure 9. Outcome Options settings
4. Examine and modify the task properties
Once you have accepted values in the Task Options dialog box, select the SingleTask activity and then inspect the Properties property grid (see Figure 10).
Figure 10. Properties tool window
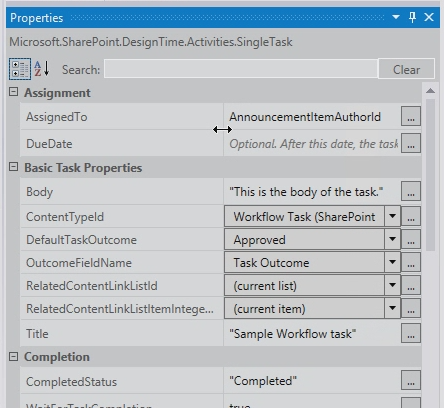
Using the Properties property grid, you can specify whether you want the task to wait for completion before proceeding, and you can configure the email messages that the task generates, including the initial assignment email message, the overdue email message, and the task cancellation email message.
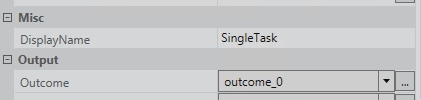
Notice that the Outcome property automatically created a variable named outcome_0 for the task. To see what is contained in this variable, add a WriteToHistory activity on the design surface and update the message to write out the result, as shown in Figure 11.
Figure 11. Outcome property value
5. Test the workflow
To test the workflow, do the following:
Press F5 to build and run, or select the Start button in Visual Studio. If you're testing in an on-premises installation of SharePoint, Visual Studio starts the Workflow Manager Test Service Host utility and deploys the workflow to the developer site. After a moment, the developer site opens.
Navigate to the Announcements list and create a list item, then start the custom workflow manually.
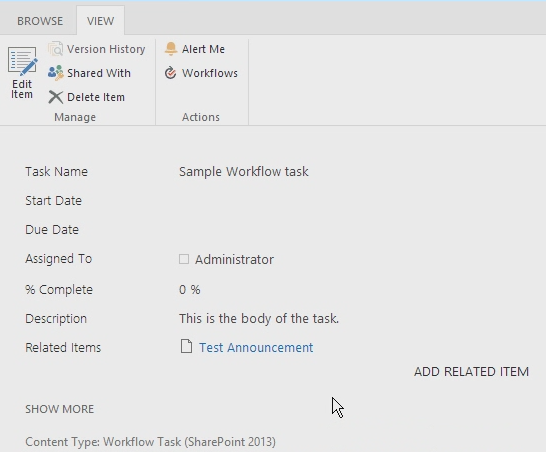
Return to the workflow instance status page to find the task that was created by the workflow. Select on the task to see the form. Note the Task Name and Assigned To fields that were defined in the workflow, as shown in Figure 12.
Figure 12. Task form
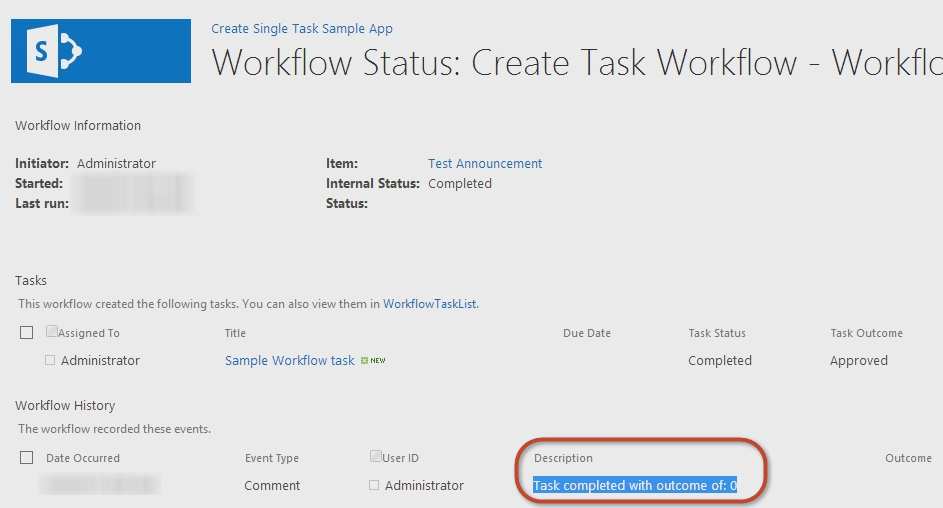
Finally, return to the task, edit the form, and then select the Approve or Reject to complete the task. Notice that the result of the task is shown in the Workflow History list for the workflow instance, as shown in Figure 13.
Figure 13. Workflow History list
How to: Create a custom task type with a custom outcome
The previous walkthrough demonstrated how to create a simple task and configure its properties. However, sometimes the default options might not meet your needs. For example, consider a task that asks someone to review a document. Upon reviewing the draft document, the reviewer should exercise one of two options: send the draft document back to the author for revision, or forward the document to the editor. Unfortunately, neither of the default options ( Approved and Rejected) meets the reviewers needs. More appropriate options would be "Return to Author" and "Proceed to Editor".
When creating workflows using either SharePoint Designer 2013 or Visual Studio, you can create custom workflow tasks that include custom task outcomes. To do this, you create a custom task as a special content type and then add a custom site column that defines the outcomes you desire. You can derive the custom column from the field type called OutcomeChoice, which is a choice field.
This approach can pose a challenge, however, in that the content type that the custom task is derived from is the Workflow Task (SharePoint) content type, which includes the default TaskOutcome site column that contains the Approved and Rejected options. However, you can work around the default setting by removing the TaskOutcome column from the custom task content type and ensure it isn't present in the workflow task list. Otherwise, it would result in showing multiple options. For example, consider a custom outcome that had two options, "Red Pill" and "Blue Pill." If the default outcome isn't removed, then the users completing the task would be presented with all available outcome options, as shown in Figure 14, even if those outcome options don't apply.
Figure 14. Outcome options

As a best practice, you want to create a different workflow task list for each type of task that you create.
Create a SharePoint app project
To begin the walkthrough for creating a custom workflow task using Visual Studio, you first want to ensure that you have access to a SharePoint Server 2013, SharePoint Server 2016, SharePoint Server 2019, or SharePoint Server Subscription Edition developer site.
- In Visual Studio, create a new SharePoint app project that is configured as a SharePoint-hosted add-in.
- To the project, add a new Announcement list instance. You'll use this as the container for items used to test the workflow.
- Next, add a workflow item the project by right-clicking the project icon in the Solution Explorer and selecting Add, followed by New Item.
- In the Add New Item dialog box, select the Workflow project item from the Office/SharePoint category and name it "CustomTaskWorkflow"; then select Next.
Create the custom outcome column
Once we have the Announcements list created, we next want to create the custom content type that will contain the custom task and the site column for the custom outcome field.
- Right-click the project and select Add, followed by New Item.
- Now choose the Site Column project item template and set the name of this field to "CustomOutcomeColumn". Within the template for the site column there are a few changes that need to be made.
- Set the field type of the column to OutcomeChoice, which is the required field type for an outcome column.
- Remove the Required column.
- Next, because the OutcomeChoice field type is based on the choice field type, add a few choices of your own.
The new custom site column markup should now look like the following:
<?xml version="1.0" encoding="utf-8"?>
<Elements xmlns="http://schemas.microsoft.com/sharepoint/">
  <Field
       ID="{7b7edd9e-f5d1-4558-a2c8-e733dcfb0a5e}"
       Name="CustomSiteColumn"
       DisplayName="Better State"
       Type="OutcomeChoice"
       Required="FALSE"
       Group="Custom Site Columns">
       <CHOICES>
         <CHOICE>Florida</CHOICE>
         <CHOICE>Georgia</CHOICE>
       </CHOICES>
       <Default>Florida</Default>
  </Field>
</Elements>
Create a custom task content type
After creating the site column, the next step is to create a specialized content type for the custom task.
- Add a new content type project item to the project with the name CustomTaskContentType.
- When prompted to select which content type this is based on, select the Workflow Task (SharePoint) content type.
- Next, add the custom outcome column to the list of available columns and also remove the default outcome column so the markup of the content type looks like the following example.
<?xml version="1.0" encoding="utf-8"?>
<Elements xmlns="http://schemas.microsoft.com/sharepoint/">
  <!-- Parent ContentType: Workflow Task (SharePoint 2013) (0x0108003365C4474CAE8C42BCE396314E88E51F) -->
  <ContentType
      ID="0x0108003365C4474CAE8C42BCE396314E88E51F00D368DFB2B31A447BB184BA1334E5119E"
      Name="CustomContentType"
      Group="Custom Content Types"
      Description="My Content Type"
      Inherits="TRUE" Version="0">
      <FieldRefs>
         <FieldRef
            ID="{7b7edd9e-f5d1-4558-a2c8-e733dcfb0a5e}"
            DisplayName="Better State"
            Required="FALSE"
            Name="CustomSiteColumn" />
            <RemoveFieldRef
               ID="{55B29417-1042-47F0-9DFF-CE8156667F96}"
               Name="TaskOutcome" />
      </FieldRefs>
  </ContentType>
</Elements>
Create a workflow
Now we create a workflow so we can test the custom site column and content type.
Add a workflow to our project and configure it to be a list workflow.
Create an association with this workflow using the Announcements list that we created earlier.
Create a new variable of type DynamicValue and name it "ItemProperties"; we're going to use this variable to store the item that kicks off the workflow's properties.
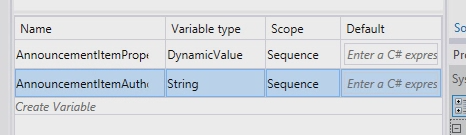
Create an Int32 variable and name it "ItemAuthorId", as shown in Figure 15.
Figure 15. Creating a workflow variable
Collect the list item properties
Now we collect the list item properties.
Drop the LookupSPListItem activity onto the design surface and set the ListID property to (current list) and the ItemId property to (current item).
Now set the Result output to the ItemProperties DynamicValue variable that we created a moment ago.
To get the author of the item from the variable, select the Get Properties link in the LookupSPListItem activity and add a GetDynamicValueProperties activity on the design surface.
Set the item's Source property to the output of the LookupSPListItem activity automatically.
Select the [???] button on the Properties property to display the Properties dialog box.
Change the Entity Type to List Item of Announcements to give the dialog box a context and assign the Created By path to the variable ItemAuthorId, as shown in Figure 16.
Figure 16. Properties dialog
Create a single task
Now we can create the single task.
Add a SingleTask activity to the design surface.
Select the Configure link in the activity to open the Task Options dialog box.
Set the Body field to some string (it doesn't matter what), then set the Assigned To property to the variable you're using to store the author identifier (in our case, ItemAuthorId).
Change the title of the task, as shown in Figure 17.
Figure 17. Task Title setting

Finally, set the Outcome Options to use the new custom content type and custom outcome column.
The dialog box determines what is available by looking at all the content types that are derived from the Workflow Task (SharePoint 2013) content type, as shown in Figure 18.
Figure 18. Outcome Options settings
Update the AssignedTo field
Before we go any further, we need to update the AssignedTo field on the SingleTask activity because it's expecting a string, not an integer. To remedy this, add ToString() to the end of the expression.
Also, notice that the Outcome property automatically created a variable named outcome_0. To see what is in this variable, add a WriteToHistory activity on the design surface and update the message to write out the result.
Update the workflow task list
The final step is to configure the workflow task list. By default, the task list that the app creates only accepts the content type Workflow Task (SharePoint 2013). This workflow uses a custom content type for the custom outcome. Open the Elements.xml file for the workflow task list and change the <ContentTypeBinding> element's ContentTypeId attribute to match the content type in the project, as shown in the code example following.
<?xml version="1.0" encoding="utf-8" ?>
<Elements xmlns="http://schemas.microsoft.com/sharepoint/">
  <ListInstance
      FeatureId="{f9ce21f8-f437-4f7e-8bc6-946378c850f0}"
      TemplateType="171"
      Title="WorkflowTaskList"
      Description="This list instance is used for workflow Task items."
      Url="Lists/WorkflowTaskList"
      RootWebOnly="FALSE" />
  <!-- CustomContentType -->
  <ContentTypeBinding
      ListUrl="Lists/WorkflowTaskList"
      RootWebOnly="FALSE"
      ContentTypeId="0x0108003365C4474CAE8C42BCE396314E88E51F00D368DFB2B31A447BB184BA1334E5119E"/>
</Elements>
Test the custom content task with a custom task outcome
Now let's test the workflow.
In Visual Studio, press F5 or select the Start button. If testing in an on-premises local install of SharePoint, Visual Studio will start the Workflow Manager Test Service Host utility and deploy the workflow to the developer site. After a moment, the developer site will open.
Navigate to the Announcements list and create a new item. After creating the item, start the custom workflow manually.
Next, return to the workflow instance's status page to find the task that was created by the workflow.
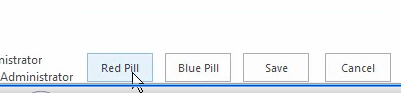
Select on the task and, using the Edit button in the ribbon, switch to edit mode. At the bottom of the form there should be four buttons. The first two buttons are the custom outcome buttons that, when pressed, will mark the task as complete. The second two buttons are the default Save and Cancel buttons that simply update the list item without completing the task, as shown in Figure 19.
Figure 19. Custom outcome buttons
Conclusion
Microsoft introduced workflows into the SharePoint Server 2007 platform, and they remained mostly unchanged in SharePoint Server 2010 in architecture, implementation, or process. This was also true for tasks in SharePoint workflows. However, SharePoint Server 2013 has introduced many changes to workflows in architecture and implementation. (And these changes remain accessible in SharePoint Server 2016, SharePoint Server 2019, and SharePoint Server Subscription Edition.)
This article discussed the changes related to workflow tasks that were driven from changes to the workflow story in SharePoint. It demonstrated how to create a simple workflow that applied tasks in SharePoint using Visual Studio. These types of tasks are suitable for many developers, although at times custom tasks and custom outcomes are desired, which can be accomplished using Visual Studio as has been shown.
See also
Feedback
Coming soon: Throughout 2024 we will be phasing out GitHub Issues as the feedback mechanism for content and replacing it with a new feedback system. For more information see: https://aka.ms/ContentUserFeedback.
Submit and view feedback for