Use the experimental People Picker widget in SharePoint Add-ins
Important
The SharePoint Add-In model in SharePoint Online has been retired as of November 27th 2023, checkout the full retirement announcement to learn more.
Retirement means that the feature will not get any new investments, but it's still supported. End-of-life means that the feature will be discontinued and is no longer available for use.
You can use the People Picker widget on any webpage, even if the page is not hosted in SharePoint. Use the People Picker widget in your add-ins to help users find and select people and groups.
Warning
The Office Web Widgets - Experimental are only provided for research and feedback purposes. Do not use in production scenarios. The Office Web Widgets behavior may change significantly in future releases. Read and review the Office Web Widgets - Experimental License Terms.
You can use the experimental People Picker widget in add-ins to help your users find and select people and groups in a tenant. Users can start typing in the text box and the widget retrieves the people whose name or e-mail matches the text.
People Picker widget solving a query

Your add-in can access the selected people by reading the selectedItems property of the widget. The selectedItems property is an array of objects that represent people or groups. The following table shows the available properties of the user object.
| Property | Description |
|---|---|
| department | The department of the user or group. |
| displayName | The display name of the user or group. |
| The e-mail address of the user or group. | |
| isResolved | Indicates if the widget has successfully resolved the text in the widget against a user or group in the tenant. |
| jobTitle | The job title of the user. |
| loginName | The sign-in name of the user or group. |
| mobile | The mobile phone number of the user or group. |
| principalId | The principal ID of the user or group. |
| principalType | Indicates if the item is a user or a group. It has a value of 1 if it's a user, 4 if it's a group. |
| sipAddress | The sip address of the user or group. |
| text | The text title of the user or group name. |
The People Picker widget has a cache of the most recently used (MRU) entries. The cache stores the five latest entries that the widget resolved.
Prerequisites for using the examples in this article
To use the examples in this article, you need the following:
- Visual Studio 2013 or later.
- NuGet Package Manager. For more information, see Installing NuGet.
- A SharePoint development environment (app isolation required for on-premises scenarios).
- Office Web Widgets - Experimental NuGet package. For more information about how to install a NuGet package, see NuGet Package Manager UI. You can also browse the NuGet gallery page.
Use the People Picker widget in a provider-hosted SharePoint Add-in
In this example, a simple page is hosted outside of SharePoint that declares a People Picker widget using markup. To keep things simple, this example doesn't declare any options, but you can see an example with options in the NextSteps section.
To use the People Picker widget, you must do the following:
Create SharePoint Add-in and web projects.
Create a module on the add-in web. This step ensures that an add-in web is created when users deploy the add-in.
Note
The cross-domain library requires the existence of an add-in web. The People Picker widget communicates with SharePoint by using the cross-domain library.
Create an add-in page that declares a People Picker widget instance using markup.
To create a SharePoint Add-in and web projects
Open Visual Studio as administrator. (To do this, select the Visual Studio icon on the Start menu, and select Run as administrator.)
Create a new project using the SharePoint Add-in template.The SharePoint Add-in template is located under Templates > Visual C# , Office/SharePoint > Add-ins.
Provide the SharePoint website URL that you want to use for debugging.
Select Provider-hosted as the hosting option for your add-in.
Note
You can also use the People Picker widget with other hosting options or even with Office Add-ins or your own website.
Select ASP.NET Web Forms Application as the type of web application project.
Select Windows Azure Access Control Service as the authentication option.
To create a module on the add-in web
Select the SharePoint Add-in project in Solution Explorer. Select Add > New Item.
Select Visual C# Items > Office/SharePoint > Module. Provide a name for your module.
Note
If you're building a SharePoint-hosted add-in, you don't need to create an extra module.
To add a new page that uses the People Picker widget
Select the Pages folder in the web project in Solution Explorer.
Copy the following code and paste it in an ASPX file in the project. The code performs the following tasks:
Adds references to the required Office libraries and resources.
Initializes the controls runtime.
Runs the renderAll method of the Office Controls runtime.
Declares a placeholder for the People Picker widget.
<!DOCTYPE html> <html> <head> <!-- IE9 or superior --> <meta http-equiv="X-UA-Compatible" content="IE=9" > <title>People Picker HTML Markup</title> <!-- Widgets Specific CSS File --> <link rel="stylesheet" type="text/css" href="../Scripts/Office.Controls.css" /> <!-- Ajax, jQuery, and utils --> <script src=" https://ajax.aspnetcdn.com/ajax/4.0/1/MicrosoftAjax.js.js"> </script> <script src=" https://ajax.aspnetcdn.com/ajax/jQuery/jquery-1.9.1.min.js"> </script> <script type="text/javascript"> // Function to retrieve a query string value. // For production purposes you may want to use // a library to handle the query string. function getQueryStringParameter(paramToRetrieve) { var params = document.URL.split("?")[1].split("&"); var strParams = ""; for (var i = 0; i < params.length; i = i + 1) { var singleParam = params[i].split("="); if (singleParam[0] == paramToRetrieve) return singleParam[1]; } } </script> <!-- Cross-Domain Library and Office controls runtime --> <script type="text/javascript"> //Register namespace and variables used through the sample Type.registerNamespace("Office.Samples.PeoplePickerBasic"); //Retrieve context tokens from the querystring Office.Samples.PeoplePickerBasic.appWebUrl = decodeURIComponent(getQueryStringParameter("SPAppWebUrl")); Office.Samples.PeoplePickerBasic.hostWebUrl = decodeURIComponent(getQueryStringParameter("SPHostUrl")); //Pattern to dynamically load JSOM and and the cross-domain library var scriptbase = Office.Samples.PeoplePickerBasic.hostWebUrl + "/_layouts/15/"; //Get the cross-domain library $.getScript(scriptbase + "SP.RequestExecutor.js", //Get the Office controls runtime and // continue to the createControl function function () { $.getScript("../Scripts/Office.Controls.js", createControl) } ); </script> <!--People Picker --> <script src="../Scripts/Office.Controls.PeoplePicker.js" type="text/javascript"> </script> </head> <body> Basic People Picker sample (HTML markup declaration): <div id="PeoplePickerDiv" data-office-control="Office.Controls.PeoplePicker"> </div> <script type="text/javascript"> function createControl() { //Initialize Controls Runtime Office.Controls.Runtime.initialize({ sharePointHostUrl: Office.Samples.PeoplePickerBasic.hostWebUrl, appWebUrl: Office.Samples.PeoplePickerBasic.appWebUrl }); //Render the widget, this must be executed after the //placeholder DOM is loaded Office.Controls.Runtime.renderAll(); } </script> </body> </html>
Note
The previous code example explicitly specifies the host web and add-in web URLs to initialize the Office controls runtime. However, if the add-in web and host web URLs are specified in the SPAppWebUrl and SPHostUrl query string parameters respectively, you can pass an empty object and the code attempts to get the parameters automatically. The SPAppWebUrl and SPHostUrl parameters are included in the query string when you use the {StandardTokens} token.
The following example shows you how to pass an empty object to the initialize method:
// Initialize with an empty object and the code
// will attempt to get the tokens from the
// query string directly.
Office.Controls.Runtime.initialize({});
To build and run the solution
Select the F5 key.
Note
When you select F5, Visual Studio builds the solution, deploys the add-in, and opens the permissions page for the add-in.
Select the Trust It button.
Select the add-in icon on the Site Contents page.
To download this sample from the code gallery, see the Use the People Picker experimental widget in an add-in code sample.
Next steps
This article shows how to use the People Picker widget in your add-in by using HTML. You can also explore the following scenarios and details about the widget.
Use JavaScript to declare the People Picker widget
Depending on your preference, you might want to use JavaScript instead of HTML to declare the widget. If this is the case, you can use the following markup as the placeholder for the widget.
<div id="PeoplePickerDiv"></div>
Use the following JavaScript code to instantiate the People Picker.
new Office.Controls.PeoplePicker(
    document.getElementById("PeoplePickerDiv"), {});
For a code sample that shows how to perform the tasks, see the JSSimple.html page in the Use the People Picker experimental widget in an add-in code sample.
Specify options for the widget
You can specify options for the widget by using the data-office-options attribute in the widget declaration. The following HTML shows how to specify options for the PeoplePicker widget.
<div id="PeoplePickerDiv"
        data-office-control="Office.Controls.PeoplePicker"
        data-office-options='{
        "allowMultipleSelections" : true,
        "onChange" : handleChange,
        "placeholder" : "Check the count message, it changes when you add names..."
    }'>
</div>
The following code shows how to specify options when you declare the PeoplePicker widget using JavaScript.
new Office.Controls.PeoplePicker(
    document.getElementById("PeoplePickerDiv"), {
        allowMultipleSelections: true,
        placeholder: "Check the count message, it changes when you add names...",
        onChange: function (ctrl) {
            document.getElementById("count").textContent =
ctrl.selectedItems.length.toString();
        }
    });
You can also specify event handlers for the onChange, onAdded, and onRemoved events. Note in the previous code that the event handler for the onChange event receives a single parameter ctrl, which is a reference to the widget.
For an example of how to specify options, see the MarkupOptions.html and JSOptions.html pages in the Use the People Picker experimental widget in an add-in code sample.
Retrieve the people or groups selected in the widget
To retrieve the people in the widget, you must perform the following tasks:
Get a reference to the widget.
Access the selectedItems property of the widget.
You can get a reference to the widget using the following syntax.
var pplPicker = document.getElementById("PeoplePickerDiv")._officeControl;
You can also save a reference when you instantiate the widget.
var pplPicker = new Office.Controls.PeoplePicker(
                        document.getElementById("PeoplePickerDiv"), {});
The selectedItems property is an array of objects that represent people or groups. People or groups in the selectedItems array can be either resolved or unresolved, which you can check in the isResolved property. The following example shows how to access the element i in the array and use the name of the person or group.
var principal = pplPicker.selectedItems[i];
$("#msg").text(principal.text + " is selected in the control.");
For an example of how to retrieve the selected people or groups from the widget, see the demo.html page of the Office Web Widgets - Experimental Demo code sample.
Customize the style of the widget
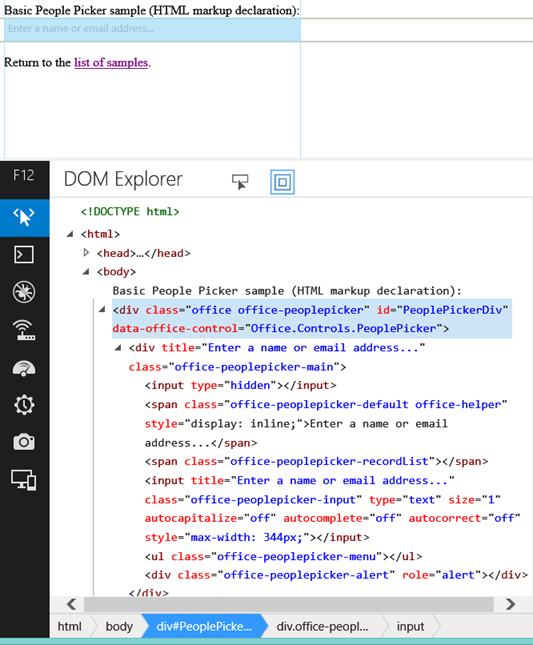
As a developer, you might want to customize the look and feel of the widget. The following image shows the HTML hierarchy in the widget after it has been rendered. The widget defines many classes prefixed by office-peoplepicker, which you can find and customize in the Office.Controls.css style sheet.
HTML hierarchy in the People Picker widget
You can use the experimental People Picker widget to select people and groups in your tenant, and your add-in can then use the principals selected by your users. Please provide ideas and comments at the Office Developer Platform UserVoice site.
See also
Feedback
Coming soon: Throughout 2024 we will be phasing out GitHub Issues as the feedback mechanism for content and replacing it with a new feedback system. For more information see: https://aka.ms/ContentUserFeedback.
Submit and view feedback for