Configure RHEL failover cluster instance (FCI) cluster for SQL Server
Applies to: ![]() SQL Server - Linux
SQL Server - Linux
This guide provides instructions to create a two-node shared disk failover cluster for SQL Server on Red Hat Enterprise Linux. The clustering layer is based on Red Hat Enterprise Linux (RHEL) HA add-on built on top of Pacemaker. The SQL Server instance is active on either one node or the other.
Note
Access to Red Hat HA add-on and documentation requires a subscription.
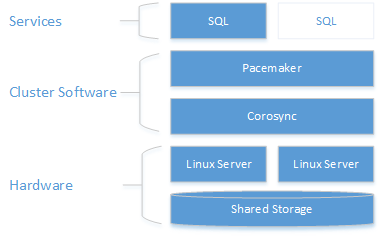
As the following diagram shows, storage is presented to two servers. Clustering components - Corosync and Pacemaker - coordinate communications and resource management. One of the servers has the active connection to the storage resources and the SQL Server. When Pacemaker detects a failure, the clustering components are responsible for moving the resources to the other node.
For more information on cluster configuration, resource agents options, and management, visit RHEL reference documentation.
Note
At this point, SQL Server integration with Pacemaker isn't as coupled as with WSFC on Windows. From within SQL Server, there's no knowledge about the presence of the cluster, all orchestration is outside in and the service is controlled as a standalone instance by Pacemaker. Also for example, cluster dmvs sys.dm_os_cluster_nodes and sys.dm_os_cluster_properties will no records.
To use a connection string that points to a string server name and not use the IP, they will have to register in their DNS server the IP used to create the virtual IP resource (as explained in the following sections) with the chosen server name.
The following sections walk through the steps to set up a failover cluster solution.
Prerequisites
To complete the following end-to-end scenario, you need two machines to deploy the two nodes cluster and another server to configure the NFS server. The following steps outline how these servers will be configured.
Set up and configure the operating system on each cluster node
The first step is to configure the operating system on the cluster nodes. For this walk through, use RHEL with a valid subscription for the HA add-on.
Install and configure SQL Server on each cluster node
Install and setup SQL Server on both nodes. For detailed instructions, see Install SQL Server on Linux.
Designate one node as primary and the other as secondary, for purposes of configuration. Use these terms for the following this guide.
On the secondary node, stop and disable SQL Server.
The following example stops and disables SQL Server:
sudo systemctl stop mssql-server
sudo systemctl disable mssql-server
Note
At setup time, a Server Master Key is generated for the SQL Server instance and placed at /var/opt/mssql/secrets/machine-key. On Linux, SQL Server always runs as a local account called mssql. Because it's a local account, its identity isn't shared across nodes. Therefore, you need to copy the encryption key from primary node to each secondary node so each local mssql account can access it to decrypt the Server Master Key.
On the primary node, create a SQL Server login for Pacemaker and grant the login permission to run
sp_server_diagnostics. Pacemaker uses this account to verify which node is running SQL Server.sudo systemctl start mssql-serverConnect to the SQL Server
masterdatabase with the sa account and run the following:USE [master] GO CREATE LOGIN [<loginName>] with PASSWORD= N'<loginPassword>' ALTER SERVER ROLE [sysadmin] ADD MEMBER [<loginName>]Alternatively, you can set the permissions at a more granular level. The Pacemaker login requires
VIEW SERVER STATEto query health status withsp_server_diagnostics,setupadminandALTER ANY LINKED SERVERto update the FCI instance name with the resource name by runningsp_dropserverandsp_addserver.On the primary node, stop and disable SQL Server.
Configure the hosts file for each cluster node. The host file must include the IP address and name of every cluster node.
Check the IP address for each node. The following script shows the IP address of your current node.
sudo ip addr showSet the computer name on each node. Give each node a unique name that is 15 characters or less. Set the computer name by adding it to
/etc/hosts. The following script lets you edit/etc/hostswithvi.sudo vi /etc/hostsThe following example shows
/etc/hostswith additions for two nodes namedsqlfcivm1andsqlfcivm2.127.0.0.1 localhost localhost4 localhost4.localdomain4 ::1 localhost localhost6 localhost6.localdomain6 10.128.18.128 sqlfcivm1 10.128.16.77 sqlfcivm2
In the next section, you'll configure shared storage and move your database files to that storage.
Configure shared storage and move database files
There are various solutions for providing shared storage. This walk-through demonstrates configuring shared storage with NFS. We recommend following best practices and use Kerberos to secure NFS (you can find an example here: https://www.certdepot.net/rhel7-use-kerberos-control-access-nfs-network-shares/).
Warning
If you don't secure NFS, then anyone who can access your network and spoof the IP address of a SQL node will be able to access your data files. As always, make sure you threat model your system before using it in production. Another storage option is to use SMB fileshare.
Configure shared storage with NFS
Important
Hosting database files on a NFS server with version <4 isn't supported in this release. This includes using NFS for shared disk failover clustering as well as databases on nonclustered instances. We are working on enabling other NFS server versions in the upcoming releases.
On the NFS Server, perform the following steps:
Install
nfs-utilssudo yum -y install nfs-utilsEnable and start
rpcbindsudo systemctl enable rpcbind && sudo systemctl start rpcbindEnable and start
nfs-serversudo systemctl enable nfs-server && sudo systemctl start nfs-serverEdit
/etc/exportsto export the directory you want to share. You need one line for each share you want. For example:/mnt/nfs 10.8.8.0/24(rw,sync,no_subtree_check,no_root_squash)Export the shares
sudo exportfs -ravVerify that the paths are shared/exported, run from the NFS server
sudo showmount -eAdd exception in SELinux
sudo setsebool -P nfs_export_all_rw 1Open the firewall the server.
sudo firewall-cmd --permanent --add-service=nfs
sudo firewall-cmd --permanent --add-service=mountd
sudo firewall-cmd --permanent --add-service=rpc-bind
sudo firewall-cmd --reload
Configure all cluster nodes to connect to the NFS shared storage
Do the following steps on all cluster nodes.
Install
nfs-utilssudo yum -y install nfs-utilsOpen up the firewall on clients and NFS server
sudo firewall-cmd --permanent --add-service=nfs
sudo firewall-cmd --permanent --add-service=mountd
sudo firewall-cmd --permanent --add-service=rpc-bind
sudo firewall-cmd --reload
Verify that you can see the NFS shares on client machines
sudo showmount -e <IP OF NFS SERVER>Repeat these steps on all cluster nodes.
For more information about using NFS, see the following resources:
- NFS servers and firewalld | Stack Exchange
- Mounting an NFS Volume | Linux Network Administrators Guide
- NFS server configuration | Red Hat Customer Portal
Mount database files directory to point to the shared storage
On the primary node only, save the database files to a temporary location.The following script, creates a new temporary directory, copies the database files to the new directory, and removes the old database files. As SQL Server runs as local user
mssql, you need to make sure that after data transfer to the mounted share, local user has read-write access to the share.sudo su mssql mkdir /var/opt/mssql/tmp cp /var/opt/mssql/data/* /var/opt/mssql/tmp rm /var/opt/mssql/data/* exitOn all cluster nodes, edit
/etc/fstabfile to include the mount command.<IP OF NFS SERVER>:<shared_storage_path> <database_files_directory_path> nfs timeo=14,intrThe following script shows an example of the edit.
10.8.8.0:/mnt/nfs /var/opt/mssql/data nfs timeo=14,intr
Note
If using a File System (FS) resource as recommended here, there's no need to preserve the mounting command in /etc/fstab. Pacemaker will take care of mounting the folder when it starts the FS clustered resource. With the help of fencing, it will ensure the FS is never mounted twice.
Run
mount -acommand for the system to update the mounted paths.Copy the database and log files that you saved to
/var/opt/mssql/tmpto the newly mounted share/var/opt/mssql/data. This step only needs to be done on the primary node. Make sure that you give read write permissions to themssqllocal user.sudo chown mssql /var/opt/mssql/data sudo chgrp mssql /var/opt/mssql/data sudo su mssql cp /var/opt/mssql/tmp/* /var/opt/mssql/data/ rm /var/opt/mssql/tmp/* exitValidate that SQL Server starts successfully with the new file path. Do this on each node. At this point only one node should run SQL Server at a time. They can't both run at the same time because they will both try to access the data files simultaneously (to avoid accidentally starting SQL Server on both nodes, use a File System cluster resource to make sure the share isn't mounted twice by the different nodes). The following commands start SQL Server, check the status, and then stop SQL Server.
sudo systemctl start mssql-server
sudo systemctl status mssql-server
sudo systemctl stop mssql-server
At this point, both instances of SQL Server are configured to run with the database files on the shared storage. The next step is to configure SQL Server for Pacemaker.
Install and configure Pacemaker on each cluster node
On both cluster nodes, create a file to store the SQL Server username and password for the Pacemaker login. The following command creates and populates this file:
sudo touch /var/opt/mssql/secrets/passwd
echo '<loginName>' | sudo tee -a /var/opt/mssql/secrets/passwd
echo '<loginPassword>' | sudo tee -a /var/opt/mssql/secrets/passwd
sudo chown root:root /var/opt/mssql/secrets/passwd
sudo chmod 600 /var/opt/mssql/secrets/passwd
On both cluster nodes, open the Pacemaker firewall ports. To open these ports with
firewalld, run the following command:sudo firewall-cmd --permanent --add-service=high-availability sudo firewall-cmd --reloadIf you're using another firewall that doesn't have a built-in high-availability configuration, the following ports need to be opened for Pacemaker to be able to communicate with other nodes in the cluster:
- TCP: Ports 2224, 3121, 21064
- UDP: Port 5405
Install Pacemaker packages on each node.
sudo yum install pacemaker pcs fence-agents-all resource-agentsSet the password for the default user that is created when installing Pacemaker and Corosync packages. Use the same password on both nodes.
sudo passwd haclusterEnable and start
pcsdservice and Pacemaker. This will allow nodes to rejoin the cluster after the reboot. Run the following command on both nodes.sudo systemctl enable pcsd sudo systemctl start pcsd sudo systemctl enable pacemakerInstall the FCI resource agent for SQL Server. Run the following commands on both nodes.
sudo yum install mssql-server-ha
Configure fencing agent
A STONITH device provides a fencing agent. Setting up Pacemaker on Red Hat Enterprise Linux in Azure provides an example of how to create a STONITH device for this cluster in Azure. Modify the instructions for your environment.
Create the cluster
On one of the nodes, create the cluster.
sudo pcs cluster auth <nodeName1 nodeName2 ...> -u hacluster
sudo pcs cluster setup --name <clusterName> <nodeName1 nodeName2 ...>
sudo pcs cluster start --all
Configure the cluster resources for SQL Server, File System and virtual IP resources and push the configuration to the cluster. You need the following information:
- SQL Server Resource Name: A name for the clustered SQL Server resource.
- Floating IP Resource Name: A name for the virtual IP address resource.
- IP Address: The IP address that clients use to connect to the clustered instance of SQL Server.
- File System Resource Name: A name for the File System resource.
- device: The NFS share path
- device: The local path that it's mounted to the share
- fstype: File share type (that is,
nfs)
Update the values from the following script for your environment. Run on one node to configure and start the clustered service.
sudo pcs cluster cib cfg
sudo pcs -f cfg resource create <sqlServerResourceName> ocf:mssql:fci
sudo pcs -f cfg resource create <floatingIPResourceName> ocf:heartbeat:IPaddr2 ip=<ip Address>
sudo pcs -f cfg resource create <fileShareResourceName> Filesystem device=<networkPath> directory=<localPath> fstype=<fileShareType>
sudo pcs -f cfg constraint colocation add <virtualIPResourceName> <sqlResourceName>
sudo pcs -f cfg constraint colocation add <fileShareResourceName> <sqlResourceName>
sudo pcs cluster cib-push cfg
For example, the following script creates a SQL Server clustered resource named
mssqlha, and a floating IP resource with IP address10.0.0.99. It also creates a Filesystem resource and adds constraints so all resources are colocated on same node as SQL resource.sudo pcs cluster cib cfg sudo pcs -f cfg resource create mssqlha ocf:mssql:fci sudo pcs -f cfg resource create virtualip ocf:heartbeat:IPaddr2 ip=10.0.0.99 sudo pcs -f cfg resource create fs Filesystem device="10.8.8.0:/mnt/nfs" directory="/var/opt/mssql/data" fstype="nfs" sudo pcs -f cfg constraint colocation add virtualip mssqlha sudo pcs -f cfg constraint colocation add fs mssqlha sudo pcs cluster cib-push cfgAfter the configuration is pushed, SQL Server will start on one node.
Verify that SQL Server is started.
sudo pcs statusThe following example shows the results when Pacemaker has successfully started a clustered instance of SQL Server.
fs     (ocf::heartbeat:Filesystem):    Started sqlfcivm1
virtualip     (ocf::heartbeat:IPaddr2):      Started sqlfcivm1
mssqlha  (ocf::mssql:fci): Started sqlfcivm1

PCSD Status:
 sqlfcivm1: Online
 sqlfcivm2: Online

Daemon Status:
 corosync: active/disabled
 pacemaker: active/enabled
 pcsd: active/enabled
Related content
Feedback
Coming soon: Throughout 2024 we will be phasing out GitHub Issues as the feedback mechanism for content and replacing it with a new feedback system. For more information see: https://aka.ms/ContentUserFeedback.
Submit and view feedback for