Set up TLS for Orchestrator
Important
This version of Orchestrator has reached the end of support. We recommend you to upgrade to Orchestrator 2022.
This article describes how to set up Transport Security Layer (TLS) protocol version 1.2 with System Center - Orchestrator.
Before you start
- Orchestrator should be running version 2016 with Update Rollup 4 or later, 1801, 1807, 2019, or 2022.
- Security fixes should be up-to-date on the Orchestrator.
- System Center updates should be up-to-date.
- SQL Server 2012 Native client 11.0 or later should be installed on the Orchestrator management server. To download and install Microsoft SQL Server 2012 Native Client 11.0, see this Microsoft Download Center webpage.
- Orchestrator should be running .NET version 4.6. Follow these instructions to determine which version of .NET is installed.
- To work with TLS 1.2, System Center components generate SHA1 or SHA2 self-signed certificates. If SSL certificates from a certificate authority (CA) certificates are used, they should use SHA1 or SHA2.
- Install the SQL server version that supports TLS 1.2. SQL Server 2016 or later supports TLS 1.2.
Install a SQL Server update for TLS 1.2 support
- Open KB 3135244.
- Download and install the update for your SQL Server version.
- You don't need this update if you're running SQL Server 2016 or later.
- SQL Server 2008 R2 doesn't support TLS 1.2.
Configure and use TLS 1.2
Configure Orchestrator to use TLS 1.2
a. Start the registry editor on the Orchestrator. To do this, right-click Start, type regedit in the Run box, and then select OK.
b.Locate the following registry subkey:
HKEY_LOCAL_MACHINE\SOFTWARE\Microsoft\.NETFramework\v4.0.30319.c. Create the DWORD SchUseStrongCrypto [Value=1] under this key.
d. Locate the following registry subkey:
HKEY_LOCAL_MACHINE\SOFTWARE\WOW6432Node\Microsoft\.NetFramework\v4.0.30319.e. Create the DWORD SchUseStrongCrypto [Value=1] under this key.
f. Set System Center to use only TLS 1.2.
Before you change the registry in this step, back up the registry in case you need to restore it later. Then set the following registry key values.
Values for 64-bit operating systems
Path Registry key Value HKEY_LOCAL_MACHINE\SOFTWARE\Microsoft.NETFramework\v2.0.50727 SystemDefaultTlsVersions dword:00000001 HKEY_LOCAL_MACHINE\SOFTWARE\Wow6432Node\Microsoft.NETFramework\v2.0.50727 SystemDefaultTlsVersions dword:00000001 HKEY_LOCAL_MACHINE\SOFTWARE\Microsoft.NETFramework\v4.0.30319 SystemDefaultTlsVersions dword:00000001 HKEY_LOCAL_MACHINE\SOFTWARE\Wow6432Node\Microsoft.NETFramework\v4.0.30319 SystemDefaultTlsVersions dword:00000001 Values for 32-bit operating systems
Path Registry key Value HKEY_LOCAL_MACHINE\SOFTWARE\Microsoft.NETFramework\v4.0.30319 SystemDefaultTlsVersions dword:00000001 HKEY_LOCAL_MACHINE\SOFTWARE\Microsoft.NETFramework\v2.0.50727 SystemDefaultTlsVersions dword:00000001 Set Windows to use only TLS 1.2.
Method 1: Manually modify the registry
Important
Carefully follow the steps in this section. You could cause serious problems if you modify the registry incorrectly. Before you begin, back up the registry so you can restore it if a problems occurs.
Use the following steps to enable or disable all SCHANNEL protocols across the system.
Note
We recommend that you enable the TLS 1.2 protocol for incoming communications. Enable the TLS 1.2, TLS 1.1, and TLS 1.0 protocols for all outgoing communications. Registry changes don't affect the use of the Kerberos protocol or NTLM protocol.
a. Start Registry Editor. To do this, right-click Start, type regedit in the Run box, and then select OK.
b. Locate the following registry subkey:
HKEY_LOCAL_MACHINE\System\CurrentControlSet\Control\SecurityProviders\SCHANNEL\Protocolsc. Right-click Protocol, and point to New > Key.
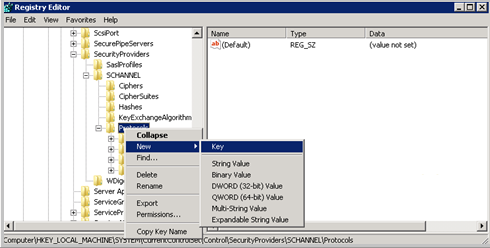
d. Enter SSL 3.0.
e. Repeat the previous two steps to create keys for TLS 0, TLS 1.1, and TLS 1.2. These keys resemble directories.
f. Create a client key and a server key under each of the SSL 3.0, TLS 1.0, TLS 1.1, and TLS 1.2 keys.
g. To enable a protocol, create the DWORD value under each client and server key, as follows:
- DisabledByDefault [Value = 0]
- Enabled [Value = 1]
h. To disable a protocol, change the DWORD value under each client and server key, as follows:
- DisabledByDefault [Value = 1]
- Enabled [Value = 0]
i. Select File > Exit.
Method 2: Automatically modify the registry
Run the following Windows PowerShell script in administrator mode to automatically configure Windows to use only the TLS 1.2 protocol:
$ProtocolList       = @("SSL 2.0", "SSL 3.0", "TLS 1.0", "TLS 1.1", "TLS 1.2")
$ProtocolSubKeyList = @("Client", "Server")
$DisabledByDefault  = "DisabledByDefault"
$registryPath       = "HKLM:\SYSTEM\CurrentControlSet\Control\SecurityProviders\SCHANNEL\Protocols\"

foreach ($Protocol in $ProtocolList)
{
    foreach ($key in $ProtocolSubKeyList)
    {
        $currentRegPath = $registryPath + $Protocol + "\" + $key
        Write-Output "Current Registry Path: `"$currentRegPath`""

        if (!(Test-Path $currentRegPath))
        {
            Write-Output " `'$key`' not found: Creating new Registry Key"
            New-Item -Path $currentRegPath -Force | out-Null
        }
        if ($Protocol -eq "TLS 1.2")
        {
            Write-Output " Enabling - TLS 1.2"
            New-ItemProperty -Path $currentRegPath -Name $DisabledByDefault -Value "0" -PropertyType DWORD -Force | Out-Null
            New-ItemProperty -Path $currentRegPath -Name 'Enabled' -Value "1" -PropertyType DWORD -Force | Out-Null
        }
        else
        {
            Write-Output " Disabling - $Protocol"
            New-ItemProperty -Path $currentRegPath -Name $DisabledByDefault -Value "1" -PropertyType DWORD -Force | Out-Null
            New-ItemProperty -Path $currentRegPath -Name 'Enabled' -Value "0" -PropertyType DWORD -Force | Out-Null
        }
        Write-Output " "
    }
}
Install the following updates on all Service Manager roles. Update roles on management servers, Azure Data Warehouse servers, the Self-Service portal, and Analyst consoles (including the Analyst consoles installed on the Orchestrator Runbook servers).
Operating system Required update Windows 8.1 and Windows Server 2012 R2 3154520 Support for TLS System Default Versions included in the .NET Framework 3.5 on Windows 8.1 and Windows Server 2012 R2 Windows Server 2012 3154519 Support for TLS System Default Versions included in the .NET Framework 3.5 on Windows Server 2012 Windows 7 SP1 and Windows Server 2008 R2 SP1 3154518 Support for TLS System Default Versions included in the .NET Framework 3.5.1 on Windows 7 SP1 and Server 2008 R2 SP1 Windows 10 and Windows Server 2016 3154521 Hotfix rollup 3154521 for the .NET Framework 4.5.2 and 4.5.1 on Windows
3156421 Cumulative Update for Windows 10 Version 1511 and Windows Server 2016 Technical Preview 4: May 10, 2016Restart the computer.
Note
After you set Microsoft System Center Orchestrator to use only the TLS 1.2 protocol for connections, the Integration Packs stop working. To fix this issue, follow these steps:
- Start Registry Editor.
- Locate the following registry subkey: HKEY_LOCAL_MACHINE\SOFTWARE\Wow6432Node\Microsoft.NETFramework\v4.0.30319
- Check whether the SystemDefaultTlsVersions value exists. - If the value exists, make sure that its data is set to 1. - If the value does not exist, create a DWORD (32-bit) value, and specify the following values: Name: SystemDefaultTlsVersions Value data: 1
- Click OK.
For detailed information, see this KB article.
Next steps
Learn more about the TLS 1.2 protocol.
Feedback
Coming soon: Throughout 2024 we will be phasing out GitHub Issues as the feedback mechanism for content and replacing it with a new feedback system. For more information see: https://aka.ms/ContentUserFeedback.
Submit and view feedback for