Windows stop error 0xC0000102 Status File Corrupt
This article provides steps to resolve issues where the Windows operating system (OS) encounters the stop error 0xC0000102, which keeps an Azure virtual machine (VM) from booting.
Symptoms
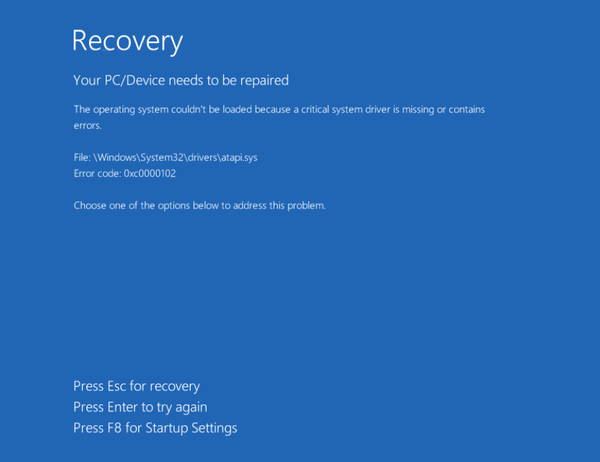
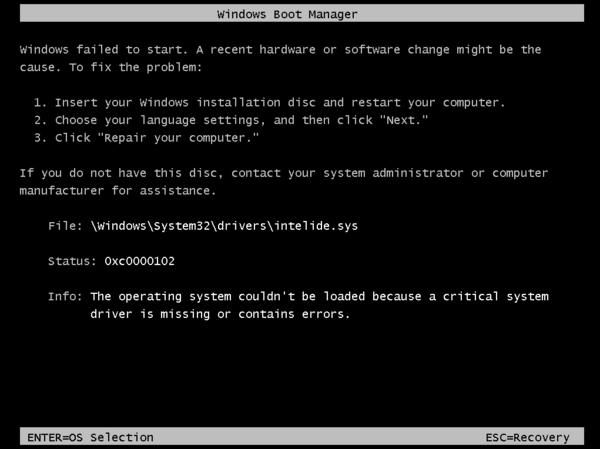
When you use boot diagnostics to view the screenshot of the VM, the screenshot displays the message that the OS encountered error code 0xC0000102 during startup.
Cause
Error 0xC0000102 is a STATUS_FILE_CORRUPT_ERROR, which means a corrupted file is preventing your VM from starting correctly. There are two possible causes for this error code:
- The file displayed in the error message is corrupt.
- The disk structure has become corrupt and unreadable.
Solution
Try restoring the VM from a backup
If you have a recent backup of the VM, you may try restoring the VM from the backup to fix the start problem. If restoring the VM from backup isn't possible, follow these steps:
- Create and Access a Repair VM
- Repair or replace the corrupt file
- Enable serial console and memory dump collection
- Rebuild the VM
Note
When encountering this error, the Guest OS isn't operational. You'll be troubleshooting in offline mode to resolve this issue.
Step 1: Create and access a repair VM
- Follow steps 1-3 of the VM repair process example to prepare a Repair VM.
- Use Remote Desktop Connection connect to the Repair VM.
Step 2: Repair or replace the corrupt file
Repair the corrupt file
Open an elevated CMD prompt and run chkdsk on the disk:
chkdsk <<DRIVE LETTER>: /FReplace the corrupt file
Use boot diagnostics to view the screenshot of the VM. Note the file that is displayed in the error.
To replace the corrupt binary, take the following steps:
Browse to the location of the binary that was displayed in the screenshot.
Note the version of the file. (Right-click Properties and select the Details tab.)
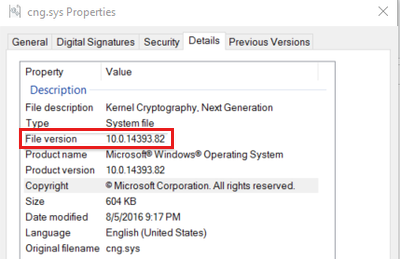
Rename the file as <FILENAME.EXT>.OLD. For example, the file shown in the image above would be renamed from \windows\system32\drivers\cng.sys to \windows\system32\drivers\cng.sys.old.
Restore this file from the internal repository.
Launch a CMD session and locate the volume holding your Windows directory.
Browse to \windows\winsxs and search for the binary displayed on your screenshot:
dir <<binary from the screenshot with extension>> /sThe following command will list all the different versions of the specified file that the VM contains and will give you the path history of that component. You should choose the most recent of the same version from the list and proceed to copy that file to the folder path described in the screenshot.
copy

<<drive>>:\Windows\WinSxS\<<directory_where_file_is>>\<<binary_with_extension>> <<drive>>:\Windows\System32\Drivers\
Step 3: Enable the Serial Console and memory dump collection
Before rebuilding the VM, it is recommended to enable memory dump collection and Serial Console. To do so, run the following script:
Open an elevated command prompt session (run as administrator).
List the BCD store data and determine the boot loader identifier, which you'll use in the next step.
For a Generation 1 VM, enter the following command and note the identifier listed:
bcdedit /store <BOOT PARTITON>:\boot\bcd /enumIn the command, replace
<BOOT PARTITON>with the letter of the partition in the attached disk that contains the boot folder.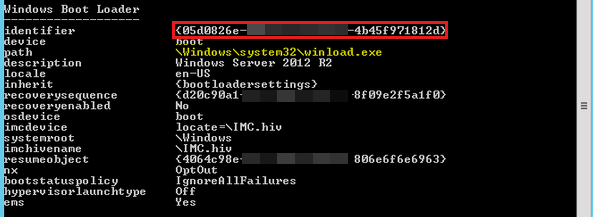
For a Generation 2 VM, enter the following command and note the identifier listed:
BCDEDIT /store <LETTER OF THE EFI SYSTEM PARTITION>:EFI\Microsoft\boot\bcd /enum- In the command, replace
<LETTER OF THE EFI SYSTEM PARTITION>with the letter of the EFI System Partition. - It may be helpful to launch the Disk Management console to identify the appropriate system partition labeled as EFI System Partition.
- The identifier may be a unique GUID or it could be the default bootmgr.
- In the command, replace
Run the following commands to enable Serial Console:
BCDEDIT /store <VOLUME LETTER WHERE THE BCD FOLDER IS>:\boot\bcd /ems {<BOOT LOADER IDENTIFIER>} ON BCDEDIT /store <VOLUME LETTER WHERE THE BCD FOLDER IS>:\boot\bcd /emssettings EMSPORT:1 EMSBAUDRATE:115200- In the command, replace
<VOLUME LETTER WHERE THE BCD FOLDER IS>with the letter of the BCD folder. - In the command, replace
<BOOT LOADER IDENTIFIER>with the identifier you found in the previous step.
- In the command, replace
Verify that the free space on the OS disk is greater than the memory size (RAM) on the VM.
- If there's not enough space on the OS disk, you should change the location where the memory dump file will be created. Rather than creating the file on the OS disk, you can refer it to any other data disk attached to the VM that has enough free space. To change the location, replace %SystemRoot% with the drive letter (for example F:) of the data disk in the commands listed below.
- Enter the commands below (suggested dump configuration):
Load Registry Hive from the broken OS Disk:
REG LOAD HKLM\BROKENSYSTEM <VOLUME LETTER OF BROKEN OS DISK>:\windows\system32\config\SYSTEMEnable on ControlSet001:
REG ADD "HKLM\BROKENSYSTEM\ControlSet001\Control\CrashControl" /v CrashDumpEnabled /t REG_DWORD /d 1 /f
REG ADD "HKLM\BROKENSYSTEM\ControlSet001\Control\CrashControl" /v DumpFile /t REG_EXPAND_SZ /d "%SystemRoot%\MEMORY.DMP" /f
REG ADD "HKLM\BROKENSYSTEM\ControlSet001\Control\CrashControl" /v NMICrashDump /t REG_DWORD /d 1 /f
Enable on ControlSet002:
REG ADD "HKLM\BROKENSYSTEM\ControlSet002\Control\CrashControl" /v CrashDumpEnabled /t REG_DWORD /d 1 /f
REG ADD "HKLM\BROKENSYSTEM\ControlSet002\Control\CrashControl" /v DumpFile /t REG_EXPAND_SZ /d "%SystemRoot%\MEMORY.DMP" /f
REG ADD "HKLM\BROKENSYSTEM\ControlSet002\Control\CrashControl" /v NMICrashDump /t REG_DWORD /d 1 /f
Unload Broken OS Disk:
REG UNLOAD HKLM\BROKENSYSTEM
Step 4: Rebuild the VM
Use step 5 of the VM Repair Commands to rebuild the VM.
Contact us for help
If you have questions or need help, create a support request, or ask Azure community support. You can also submit product feedback to Azure feedback community.
Feedback
Coming soon: Throughout 2024 we will be phasing out GitHub Issues as the feedback mechanism for content and replacing it with a new feedback system. For more information see: https://aka.ms/ContentUserFeedback.
Submit and view feedback for