Virtual machine is unresponsive while applying audit policy configuration policy
This article provides steps to resolve issues where the virtual machine (VM) becomes unresponsive while applying the Audit Policy Configuration policy, which prevents the booting of an Azure VM.
Symptom
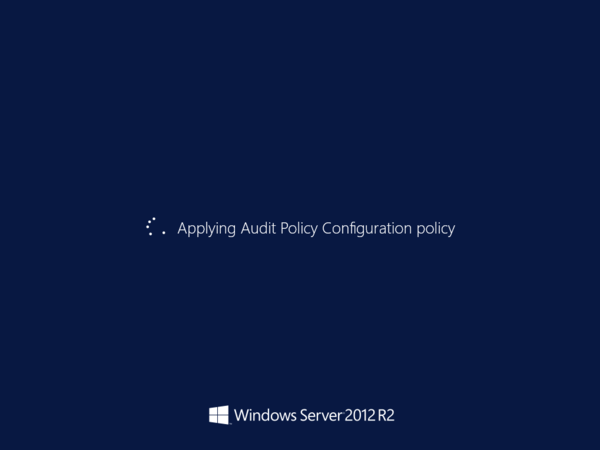
When you use Boot diagnostics to view the screenshot of the VM, you will see that the screenshot displays that the operating system (OS) was unresponsive during a boot with the message Applying Audit Policy Configuration policy.

Cause
There are conflicting locks when the policy attempts to clean up old user profiles.
Note
This applies only to Windows Server 2012 and Windows Server 2012 R2.
Here’s the problematic policy: Computer Configuration\Policies\Administrative Templates\System/User Profiles\Delete user profiles older than a specified number of days on system restart.
Solution
Process overview
Tip
If you have a recent backup of the VM, you may try restoring the VM from the backup to fix the boot problem.
- Create and Access a Repair VM.
- Disable the policy.
- Enable serial console and memory dump collection.
- Rebuild the VM.
- Collect the memory dump file and submit a support ticket.
Create and access a repair VM
- Use steps 1-3 of the VM Repair Commands to prepare a Repair VM.
- Using Remote Desktop Connection, connect to the Repair VM.
Disable the policy
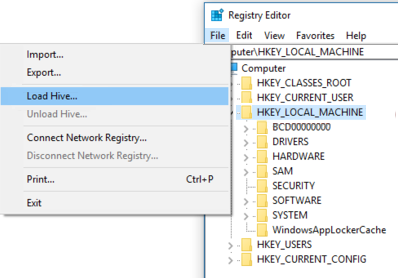
On the repair VM, open the Registry Editor.
Locate the key HKEY_LOCAL_MACHINE and select File > Load Hive from the menu.
- You can use Load Hive to load registry keys from an offline system. In this case, the system is the broken disk attached to the repair VM.
- System-wide settings are stored on HKEY_LOCAL_MACHINE and can be abbreviated as HKLM.
In the attached disk, open the
\windows\system32\config\SOFTWAREfile.- When you're prompted for a name, enter BROKENSOFTWARE.
- To verify that BROKENSOFTWARE was loaded, expand HKEY_LOCAL_MACHINE and look for the added BROKENSOFTWARE key.
Go to BROKENSOFTWARE and check if the CleanupProfiles key exists in the loaded hive.
- If the key exists, the CleanupProfiles policy is set. Its value represents the retention policy measured in days.
- If the key doesn't exist, the CleanupProfiles policy isn't set. In this situation, skip ahead to submit a support ticket with a memory dump file.
Delete the CleanupProfiles key by using this command:
reg delete "HKLM\BROKENSOFTWARE\Policies\Microsoft\Windows\System" /v CleanupProfiles /fUnload the BROKENSOFTWARE hive by using this command:
reg unload HKLM\BROKENSOFTWARE
Enable the serial console and memory dump collection
Recommended: Before you rebuild the VM, enable the Serial Console and memory dump collection by running the following script:
Open an elevated command prompt session as an Administrator.
List the BCD store data and determine the boot loader identifier, which you will use in the next step.
For a Generation 1 VM, enter the following command and note the identifier listed:
bcdedit /store <BOOT PARTITON>:\boot\bcd /enumIn the command, replace
<BOOT PARTITON>with the letter of the partition in the attached disk that contains the boot folder.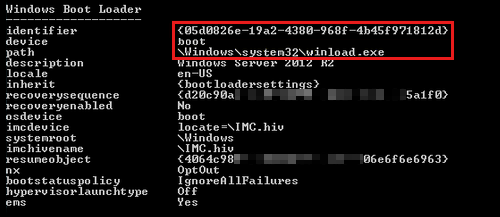
For a Generation 2 VM, enter the following command and note the identifier listed:
bcdedit /store <LETTER OF THE EFI SYSTEM PARTITION>:EFI\Microsoft\boot\bcd /enum- In the command, replace
<LETTER OF THE EFI SYSTEM PARTITION>with the letter of the EFI System Partition. - It may be helpful to launch the Disk Management console to identify the appropriate system partition labeled as EFI System Partition.
- The identifier may be a unique GUID or it could be the default bootmgr.
- In the command, replace
Run the following commands:
Enable the Serial Console:
bcdedit /store <VOLUME LETTER WHERE THE BCD FOLDER IS>:\boot\bcd /ems {<BOOT LOADER IDENTIFIER>} ON
bcdedit /store <VOLUME LETTER WHERE THE BCD FOLDER IS>:\boot\bcd /emssettings EMSPORT:1 EMSBAUDRATE:115200
Verify that the free space on the OS disk is larger than the memory size (RAM) on the VM.
If there's not enough space on the OS disk, change the location where the memory dump file will be created, and refer that location to any data disk attached to the VM that has enough free space. To change the location, replace %SystemRoot% with the drive letter of the data disk, such as F:, in the following commands.
Suggested configuration to enable OS Dump:
Load Registry Hive from the broken OS Disk:
REG LOAD HKLM\BROKENSYSTEM <VOLUME LETTER OF BROKEN OS DISK>:\windows\system32\config\SYSTEMEnable on ControlSet001:
REG ADD "HKLM\BROKENSYSTEM\ControlSet001\Control\CrashControl" /v CrashDumpEnabled /t REG_DWORD /d 1 /f
REG ADD "HKLM\BROKENSYSTEM\ControlSet001\Control\CrashControl" /v DumpFile /t REG_EXPAND_SZ /d "%SystemRoot%\MEMORY.DMP" /f
REG ADD "HKLM\BROKENSYSTEM\ControlSet001\Control\CrashControl" /v NMICrashDump /t REG_DWORD /d 1 /f
Enable on ControlSet002:
REG ADD "HKLM\BROKENSYSTEM\ControlSet002\Control\CrashControl" /v CrashDumpEnabled /t REG_DWORD /d 1 /f
REG ADD "HKLM\BROKENSYSTEM\ControlSet002\Control\CrashControl" /v DumpFile /t REG_EXPAND_SZ /d "%SystemRoot%\MEMORY.DMP" /f
REG ADD "HKLM\BROKENSYSTEM\ControlSet002\Control\CrashControl" /v NMICrashDump /t REG_DWORD /d 1 /f
Unload Broken OS Disk:
REG UNLOAD HKLM\BROKENSYSTEM
Rebuild the virtual machine
Use step 5 of the VM Repair Commands to rebuild the VM.
Test if your VM boots normally to see if the issue has fixed the issue.
- If the issue hasn’t been fixed, then continue to collect a dump file and submit a support ticket.
- If the issue has been fixed, then no further steps are necessary.
If the issue was fixed, the policy is now disabled locally. For a permanent solution, don't use the CleanupProfiles policy on VMs, as it will automatically delete user profiles. Use a different method to perform profile cleanups, such as a scheduled task or script.
Don’t use this policy: Machine\Admin Templates\System\User Profiles\Delete user profiles older than a specified number of days on system restart.
The issue should now be fixed
Test your VM to make sure it is functioning like normal. If you are still experiencing issues, then you can continue to the next section for further assistance.
Collect the memory dump file and submit a support ticket
To resolve this problem, you would need first to gather the memory dump file for the crash and then contact support with the memory dump file. To collect the dump file, follow these steps:
Attach the OS disk to a new Repair VM
- Use steps 1-3 of the VM Repair Commands to prepare a new Repair VM.
- Using Remote Desktop Connection connect to the Repair VM.
Locate the dump file and submit a support ticket
- On the repair VM, go to windows folder in the attached OS disk. If the driver letter that is assigned to the attached OS disk is labeled as F, then you need to go to
F:\Windows. - Locate the
memory.dmpfile, and then submit a support ticket with the memory dump file. - If you are having trouble locating the
memory.dmpfile, then use non-maskable interrupt (NMI) calls in serial console instead. Follow the guide to generate a crash dump file using NMI calls here.
Contact us for help
If you have questions or need help, create a support request, or ask Azure community support. You can also submit product feedback to Azure feedback community.
Feedback
Coming soon: Throughout 2024 we will be phasing out GitHub Issues as the feedback mechanism for content and replacing it with a new feedback system. For more information see: https://aka.ms/ContentUserFeedback.
Submit and view feedback for