User-defined data collector set doesn't run as scheduled
This article provides a workaround for an issue in which a user-defined data collector set that is configured to run on a schedule does not run.
Applies to: Windows Server 2019 - all editions, Windows 10 version 1909 - all editions, Windows 10 version 1903 - all editions, Windows 10 version 1809 - all editions, Windows 10 version 1803 - all editions, Windows 10 version 1709 - all editions, Windows 10 version 1703 - all editions
Symptoms
In the Computer Management console in one of the affected versions of Windows, you create a data collector set in the Performance > Data Collector Sets > User Defined folder. You configure a schedule as part of the data collector set definition.
During the scheduled running time, you notice that Performance Monitor does not start collecting data. If you configured the data collector set to save data to a file, the file isn't created and no data is saved. In Task Scheduler, the task history indicates that the task ran successfully. However, the task didn't actually do anything.
In Task Scheduler, if you open the scheduled task and then select Actions, the actions list contains Custom Handler.
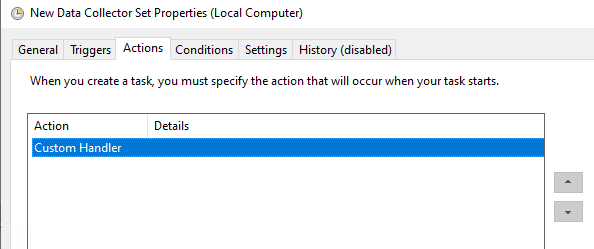
The list doesn't contain the expected action, Start a program, which includes the specific commands and arguments.
Note
In the Task Scheduler Library, tasks for data collector sets appear by default in Microsoft > Windows > PLA.
Cause
Starting in Windows 10 version 1703 and Windows Server 1703, the way that scheduled tasks are automatically created for data collector sets was changed. Because of the change, the actions for these tasks aren't created correctly.
Resolution
This issue is fixed in Windows 10, version 2004 and later versions and in Windows Server, version 2004 and later versions.
Workaround
You can manually fix the scheduled task that is associated with a data collector set. To do this, follow these steps:
In Task Scheduler, do one of the following to open the Properties dialog box of the affected task:
- If the task appears in the Active tasks list in Task Scheduler, double-click the task. Then in the detailed task list, right-click the task and select Properties.
- Go to Task Scheduler Library > Microsoft > Windows > PLA, right-click the task, and then select Properties.
Select Actions, select Custom Handler, and then select Delete.
Select New.
In Program/script, type the following string:
C:\windows\system32\rundll32.exeIn Add arguments, type the following string:
C:\windows\system32\pla.dll,PlaHost "{Name}" "$(Arg0)"Note
In this string, {Name} represents the name of the data collector set.
Select OK.
Feedback
Coming soon: Throughout 2024 we will be phasing out GitHub Issues as the feedback mechanism for content and replacing it with a new feedback system. For more information see: https://aka.ms/ContentUserFeedback.
Submit and view feedback for