Basic unit testing in action with Jasmine and Karma
Following on the Primer and Unit testing environments, Let’s now follow a piece of code and an associated unit test through the process. For this exercise, create a folder with two subfolders, js and test, where we’ll save the files involved.
The sample code for this topic is karma-jasmine-cli and karma-jasmine-gulp-VS in the cordova-samples repository on GitHub. There is also a simple variant using QUnit, karma-qunit-cli.
The unit
First, the unit is a simple function to convert a piece of JSON with one set of properties into an object with different properties. Save this code to js/normalize.js:
/** @description Converts JSON data that may contain Name and PersonalIdentifier
 *    properties to an object with the properties name (string) and id (positive
 *    integer up to 9999999999.
 * @param {string} jsonIn The JSON data to normalize.
 * @return {object} An object with name (string) and id (integer) properties,
 *    defaulting to "default" and 0, or null if the JSON is null or invalid.
 */
function normalizeData(jsonIn) {
    data = JSON.parse(jsonIn);
    return {
        name: data.Name,
        id: data.PersonalIdentifier
    };
}
Understand that this code is strictly part of the app’s functionality: it has nothing whatsoever to do with our choice of test framework or test runner. It’s also intentionally faulty so that we can learn about writing tests as we challenge the assumptions it makes about the JSON input.
Note: although it’s tempting to give an example unit that just involves simple math or a string operation, that sort of code usually comes from a library that should already be thoroughly tested. You need write unit tests for only your own code, not library code.
The unit test
Next, each unit test is a piece of code that validates the unit by:
- Calling it with specific inputs, and,
- Checking the output against the expected value.
A unit test must follow the conventions of the test framework you’re using. In this case, let’s use Jasmine. Save this code to test/normalize_tests.js:
// First argument to 'describe' (which is defined by Jasmine) is the testing module that will
// appear in test reports. The second argument is a callback containing the individual tests.

describe("normalizeData", function () {
    // The 'it' function of Jasmine defined an individual test. The first argument is
    // a description of the test that's appended to the module name. Because a module name
    // is typically a noun, like the name of the function being tested, the description for
    // an individual test is typically written in an action-data format.

    it("accepts golden path data", function () {
        // Invoke the unit being tested as necessary
        var json = '{"Name": "Maria", "PersonalIdentifier": 2111858}';
        var norm = normalizeData(json);

        // Check the results; "expect" and toEqual are Jasmine methods.
        expect(norm.name).toEqual("Maria");
        expect(norm.id).toEqual(2111858);
    });
});
Notice how this individual unit test is specific: it calls the unit under test with one set of inputs and gives an exact name/description for the test with those inputs. This follows the best practice of isolating each unit test to an individual test case, creating a 1:1 mapping between the name of the test, as it appears in reports, and the exact test case (that is, the arguments used in the test). When the test runner reports a failure, then, you know exactly where to look in your code and can easily step through that one test in the debugger to isolate the failure.
Although it will seem tedious to keep every test isolated—which means you might have dozens of unit tests for one code unit!—it saves you time in the end. If you attempt to combine a bunch of cases into a single unit test, and that test fails, you’ll not immediately know which specific case failed. You’d then have to step through every case of that test in the debugger, and, finding that process to be too tedious and time-consuming, you’ll end up breaking out every case into its own individual unit test anyway. It’s best, then, to just write specific unit tests from the get-go that each handle one and only one test case. As we’ll see later on, thinking through test cases and then turning those into actual unit tests need not take a long time, so don’t let the idea that writing a bunch of tests for one unit will be tedious and time-consuming.
The test runner
With the unit and unit test in hand, we now need a test runner that knows how to execute Jasmine tests and report results. For this first exercise, we’ll run tests on the command line using Karma, which you’ll need to install along with Jasmine as follows:
- Make sure you have Node.js installed. This will already be the case if you’ve installed the Visual Studio Tools for Apache Cordova, otherwise visit https://nodejs.org.
- Open a command prompt and navigate to the folder you created for this exercise.
- Run the following commands:
| Command | Purpose |
| npm install --save-dev jasmine | Installs Jasmine |
| npm install --save-dev karma | Installs Karma |
| npm install --save-dev karma-jasmine karma-<browser>-launcher | Installs Karma dependencies; replace <browser> with whatever you have installed, e.g. chrome, firefox, or ie. |
- Create a configuration file for Karma using its built-in utility. On the command line, go to the folder for this exercise and run
karma init. This will ask you a series of questions:- For the framework, press Tab until you see
Jasmine - For the files, enter
js/**/*.jsandtest/**/*.js(matching the folders where we put our unit and unit test code, with**meaning “include all subfolders”) - For the browser, select whichever you have installed. Note that browser names in the configuration file are case-sensitive, for example
Chrome,IE, orFirefox, whereas in their related npm package names they're lower case. - Accept the defaults for everything else.
- For the framework, press Tab until you see
Again, see karma-jasmine-cli for the full sample code including a configuration file.
Running the tests from the command line
Now you can run the tests from the command line:
karma start --single-run
You’ll see the browser—a suitable JavaScript runtime—launch to run the tests. Karma’s output shows on the console, and should include a report like this at the end of the chain:
Firefox 40.0.0 (Windows 10 0.0.0): Executed 1 of 1 SUCCESS (0.025 secs / 0.004 secs)
Command-line test runners in Visual Studio
At this point we have all the mechanics in place to run Jasmine unit tests with the Karma test runner from the command line. The karma command above can be easily run from within a longer build process defined with task runners like Grunt and gulp, including a build process for a Cordova app. See Automate tasks for your Cordova project using gulp for details. Here, we'll just walk through how to integrate a Karma test run with Visual Studio using gulp.
The Visual Studio that contains the code for this section can be found on karma-jasmine-gulp-VS.
Note: If you'd prefer instead to use a test runner like Chutzpah that integrates with the Visual Studio Test Explorer, feel free to skip this section and continue with Use Chutzpah in Visual Studio.
Step 1: Project set up
Let's start with a new Apache Cordova project in Visual Studio and add copy the files created earlier in this topic:
- Copy karma_conf.js into the project root.
- Copy the tests folder into the project root.
- Copy normalize.js into www/scripts.
Step 2: Edit package.json
Open package.json and add dependencies for gulp, karma, jasmine, and so forth. Visual Studio will download those dependencies as soon as your save the file:
{
  "name": "UTestJVS",
  "version": "1.0.0",
  "dependencies": {
  },
   "description": "",
  "repository": {
    "type": "git",
    "url": "https://github.com/karma-runner/gulp-karma"
  },
  "bugs": {
    "url": "https://github.com/karma-runner/gulp-karma/issues"
  },
  "homepage": "https://github.com/karma-runner/gulp-karma",
  "devDependencies": {
    "karma": "^0.13.0",
    "karma-jasmine": "^0.3.6",
    "karma-firefox-launcher": "^0.2.0",  //Or your chosen browser
    "gulp": "^3.9.0"
  }
}
Step 3: Editing karma_conf.js
Open karma_conf.js and make sure the locations of the files match the Cordova app project structure:
files: [
    'www/scripts/*.js',
    'tests/*.js'
],
Step 4: Create gulpfile.js
Gulp is a popular JavaScript-based task runner with a large number of plugins to control many common tasks, including unit testing. For details on task automation with gulp, see Automate tasks for your Cordova project using gulp. For our purposes here, what we need to run unit tests through Visual Studio's task runner is a gulpfile.js that contains the definitions of the testing tasks.
In Visual Studio's Solution Explorer, right click on the app project, select Add > New JavaScript file..., name the file gulpfile.js, and click Add.
Paste the following contents into gulpfile.js:
var gulp = require('gulp');
var Server = require('karma').Server;

// Run test once and exit
gulp.task('test', function (done) {
  new Server({
    configFile: __dirname + '/karma.conf.js',
    singleRun: true
  }, done).start();
});
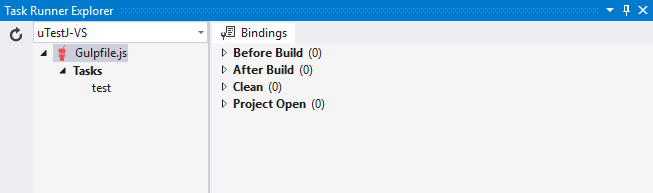
Step 5: Run tests in Task Runner Explorer
With gulpfile.js in place, select the View > Other Windows > Task Runner Explorer... menu command in Visual Studio. In Task Runner Explorer, you'll see the tasks defined in gulpfile.js:
Right click on the test task and select Run to launch Karma and run the tests, the output of which is shown directly in Task Runner Explorer:

All that's happening here is that Visual Studio is launching gulp from the command line and showing the output. You can also directly run gulp from the command line in the project folder.