Add packages to your Cordova project with the Bower Package Manager
While working on your Cordova project, you might want download and use a JavaScript or CSS framework that was built by someone else. To help with this, you might want to add the Bower package manager to your web developer "tool belt". Bower advertises itself as "a package manager for the web" and is a JavaScript utility that you can use to search framework packages and download them into a project. These packages are built by an active community of developers and framework authors.
Note
In the past, you might have used the NuGet package manager to download packages, such as JavaScript libraries. Bower is now the recommended package manager to use for client-side libraries, since it is more actively maintained by JavaScript & CSS library authors and it works well across Windows, Mac OS X, and Linux platforms. NuGet is still an option for Cordova projects in Visual Studio, but most packages install their files outside of the www folder used by Cordova. You can work around this by manually copying your files into the www folder.
In this article, we'll walk through how to use Bower directly from a command line and from within the Visual Studio Tools for Apache Cordova.
How do I add libraries to my Cordova project using the Bower command line?
To use Bower from the command line, you'll need to install Node.js from nodejs.org. Then you'll use the Node Package Manager (NPM), included with Node.js, to install bower:
npm install -g bower
After Bower is installed, you can use it to add a new JavaScript library to your Cordova project. For example, the following command adds the AngularJS library to the current directory.
bower install angular
This creates a bower_components folder in the current location, and within that folder, you'll find the AngularJS library files:
bower_components
    angular
Now you can save your bower configuration to use later:
bower init
This command takes you through a set of questions (be sure to choose to save your dependencies). When finished, you'll end up with a bower.json file that defines all the packages that your app depends upon, like so:
  "dependencies": {
    "angular": "~1.4.3"
  }
Finally, when you commit your changes to source control, or share your source with others, be sure to include the bower.json file. The bower_components folder should not be included in source control. This folder is there to save on disk space and makes it easier when you change library versions later, so you don't have to commit a new bower_components folder.
When you share your project files, another developer only needs to use the following command from the root of the project folder. This will then download all of your dependencies:
bower update
You can search for packages directly from the Bower website or from the command line:
bower search <packageName>
After you use the command above, you could get more information about a package, such as available version numbers, using the info command:
bower info <packageName>
Once you find a package and version combination that you like, add it to your bower.json file using the bower install command described earlier.
How do I add libraries to my Cordova project in the Visual Studio Tools for Apache Cordova?
In Visual Studio, support for Bower is built-in; if a bower.json file is included in a project, the tools recognize that Bower is being used, and will automatically download dependencies.
To use Bower to download libraries into a new project, add a new bower.json file to your project:
Right-click on your project and choose Add->New Item
Select the JavaScript File template and name your file bower.json, then click the Add button.
In the file that opens, replace the contents with the following:
{
  "name": "ProjectName",
  "dependencies": {
    "angular": "~1.4.3"
  }
}
Replacing "ProjectName" with the name of your project.
Save your changes.
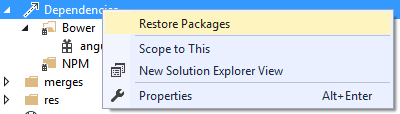
In Visual Studio's Solution Explorer, you'll notice a Dependencies item with a Bower folder underneath that. After a short wait, Bower will finish installing the Angular package and you'll see angular (1.4.3) appear inside of the Bower folder.
You can manage Bower packages within Solution Explorer by right-clicking on the Dependencies\Bower folder, or by right-clicking on packages within that folder. For example, the Restore Packages menu acts the same as the bower update command and will download the latest packages.
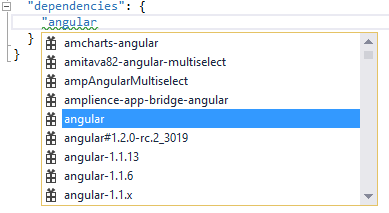
To add a new package to your project, you'll edit the bower.json file. As you edit this file, the IntelliSense feature in Visual Studio will search the Bower repository for you and suggest packages to install. For example, in the following image IntelliSense is making suggestions as you type, listing any package names that contain the word "angular":
When entering a version number, IntelliSense also suggests the latest stable version number:

How do I use a file in my Cordova project, after it's installed from Bower?
By default, any packages downloaded from Bower will be saved to disk in a bower_components folder located next to the bower.json file. In a typical Cordova project, this means you'll have a project folder that looks like the following:
bower_components/
  <library>/
    file.js
platforms/
  ...
www/
  index.html
bower.json
config.xml
If you need to deploy the files from Bower as part of your application, then you'll need to copy these files directly from bower_components into your www folder. If you want to pick the specific files that get deployed to your app, this can be done manually or by using a tool like a task runner. If you want to deploy all of the bower_components with your app, then you can use the steps in the following section to simplify your project layout.
How do I set up Bower to deploy all of my dependencies with my Cordova application?
Bower packages often come with many files you don't need to include as part of your built application. However, if you don't mind deploying these files with your app, you can easily set up Bower to add all packages directly into your project's www folder so that they're deployed. To do this, add a new file called .bowerrc to the root of your project:
Right-click on your project and choose the Add->New Item menu.
Select the Text File template, name the file .bowerrc and click the Add button.
Replace the contents of the file with the following:
{
  "directory": "www/lib"
}
The next time you use the bower update command or restore packages in Visual Studio, a lib folder will be created in your app's www folder and all packages will be downloaded to it. You can then remove the bower_components folder from the root of your project on the file system.