Blend for Visual Studio overview
Blend for Visual Studio helps you design XAML-based Windows and Web applications. It provides the same basic XAML design experience as Visual Studio and adds visual designers for advanced tasks such as animations and behaviors. For a comparison between Blend and Visual Studio, see Design XAML in Visual Studio and Blend for Visual Studio.
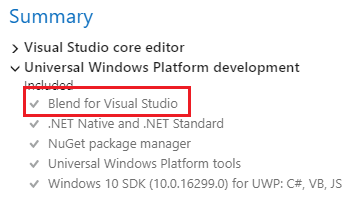
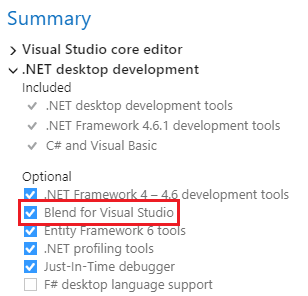
Blend for Visual Studio is a component of Visual Studio. To install Blend, in the Visual Studio Installer choose either the Universal Windows Platform development or .NET desktop development workload. Both of these workloads include the Blend for Visual Studio component.
If you're new to Blend for Visual Studio, take a moment to become familiar with the unique features of the workspace. This topic takes you on a quick tour.
Open Blend
To switch to the Blend UI, open a XAML-based project in Visual Studio and select View > Design in Blend..., and the Blend for Visual Studio UI opens.
Tools panel
You can use the Tools panel in Blend for Visual Studio to create and modify objects in your application. The Tools panel appears on the left-hand side of the XAML designer when you have a .xaml file open.
You create the objects by selecting a tool and drawing on the artboard with your mouse.

Tip
Some of the tools in the Tools panel have variations, for example, instead of a rectangle, you can choose an ellipse or a line. To access these variations, right-click or click and hold on the tool.

Selection tools
Select objects and paths. Use the Direct Selection tool to select nested objects and path segments.
View tools
Adjust the view of the artboard, such as for panning and zooming.
Brush tools
Work with the visual attributes of an object, such as transforming a brush or applying a gradient.
Object tools
Draw the most common objects on the artboard, such as paths, shapes, layout panels, text, and controls.
Asset tools
Access the Assets window and show the most recently used asset from the library.
Assets window
The Assets window contains all the available controls and is similar to the Toolbox in Visual Studio. In addition to controls, you'll find everything you can add to your artboard in the Assets window, including styles, media, behaviors, and effects. To open the Assets window, choose View > Assets Window or press Ctrl+Alt+X.

- Enter text in the Search Assets box to filter the list of assets.
- Switch between Grid mode and List mode view view of assets by using the buttons at the top right.
Objects and Timeline window
Use this window to organize the objects on your artboard and, if you want, to animate them. To open the Objects and Timeline window, choose View > Document Outline. In addition to the functionality provided in the Document Outline window in Visual Studio, the Objects and Timeline window in Blend for Visual Studio has a timeline composition area on the right. Use the timeline when you're creating and editing animations.

Use the storyboard-related buttons  to create, delete, close, or select a storyboard. Use the Timeline composition area on the right to view the timeline and move keyframes.
Hover over each button in the window to learn more about the available functionality.
See also
Feedback
Coming soon: Throughout 2024 we will be phasing out GitHub Issues as the feedback mechanism for content and replacing it with a new feedback system. For more information see: https://aka.ms/ContentUserFeedback.
Submit and view feedback for