BitLocker drive encryption in Windows 10 for OEMs
BitLocker drive encryption provides offline data and operating system protection by ensuring that the drive is not tampered with while the operating system is offline. BitLocker drive encryption uses a TPM, either discrete or firmware, that supports the Static Root of Trust Measurement as defined by the Trusted Computing Group.
BitLocker drive encryption hardware requirements
BitLocker drive encryption uses a system partition separate from the Windows partition. The BitLocker system partition must meet the following requirements.
- The BitLocker system partition is configured as the active partition.
- The BitLocker system partition must not be encrypted.
- The BitLocker system partition must have at least 250 MB of free space, above and beyond any space used by required files. This additional system partition can be used to host Windows Recovery Environment (RE) and OEM tools (provided by the OEM), so long as the partition still meets the 250 MB free space requirement.
For more information see System and utility partitions, and Hard drives and partitions.
BitLocker automatic device encryption
BitLocker automatic device encryption uses BitLocker drive encryption technology to automatically encrypt internal drives after the user completes the Out Of Box Experience (OOBE) on Modern Standby or HSTI-compliant hardware.
Note
BitLocker automatic device encryption starts during Out-of-box (OOBE) experience. However, protection is enabled (armed) only after users sign in with a Microsoft Account or an Azure Active Directory account. Until that, protection is suspended and data is not protected. BitLocker automatic device encryption is not enabled with local accounts, in which case BitLocker can be manually enabled using the BitLocker Control Panel.
BitLocker automatic device encryption hardware requirements
BitLocker automatic device encryption is enabled when:
- The device contains a TPM (Trusted Platform Module), either TPM 1.2 or TPM 2.0.
- UEFI Secure Boot is enabled. See Secure Boot for more information.
- Platform Secure Boot is enabled
- Direct memory access (DMA) protection is enabled
The following tests must pass before Windows 10 will enable Automatic BitLocker device encryption. If you want to create hardware that supports this capability, you must verify that your device passes these tests.
TPM: Device must include a TPM with PCR 7 support. See System.Fundamentals.TPM20.TPM20.
- If presence of expandable cards results in OROM UEFI drivers being loaded by UEFI BIOS during boot, then BitLocker will NOT use PCR7 binding.
- If you are running a device that does not bind to PCR7 and Bitlocker is enabled, there are no security downsides because BitLocker is still secure when using regular UEFI PCR profile (0,2,4,11).
- Any extra CA hash (even Windows Prod CA) before final bootmgr Windows Prod CA will prevent BitLocker from choosing to use PCR7. It does not matter if the extra hash or hashes are from UEFI CA (aka. Microsoft 3rd Party CA) or some other CA.
Secure boot: UEFI Secure Boot is enabled. See System.Fundamentals.Firmware.UEFISecureBoot.
Modern Standby requirements or HSTI validation. This requirement is met by one of the following:
- Modern Standby requirements are implemented. These include requirements for UEFI Secure Boot and protection from unauthorized DMA.
- Starting with Windows 10, version, 1703, this requirement can be met through HSTI test:
- Platform Secure Boot self-test (or additional self-tests as configured in the registry) must be reported by HSTI as implemented and passed.
- Excluding Thunderbolt, HSTI must report no non-allowed DMA busses.
- If Thunderbolt is present, HSTI must report that Thunderbolt is configured securely (security level must be SL1 – “User Authorization” or higher).
You must have 250MB of free space on top of everything you need to boot (and recover Windows, if you put WinRE on the system partition). For more information, see System and utility partitions.
When the requirements as listed above are met, System Information indicates the system supports BitLocker automatic device encryption. This functionality is available in Windows 10, version 1703 or after. Here's how to check System Information.
- Click Start, and type System information
- Right-click System Information app and click Open as Administrator. Allow the app to make changes to your device by clicking Yes. Some devices might require elevated permissions to view the encryption settings.
- In System Summary, see Device Encryption Support. The value will state if the device is encrypted, or if not, reasons why it is disabled.
Applying firmware updates to devices
In addition to running HLK tests, OEMs need to test firmware updates with BitLocker turned on. To prevent devices from starting recovery unnecessarily, follow these guidelines to apply firmware updates:
- Suspend BitLocker (required for devices bound to PCR[07] only if the firmware update changes the Secure Boot policy)
- Apply the update
- Restart the device
- Resume BitLocker
The firmware update should require the device to suspend Bitlocker only for a short time, and the device should restart as soon as possible. BitLocker can be suspended programmatically just before shutting down by using the DisableKeyProtectors method in Windows Management Instrumentation (WMI).
Un-allowed DMA capable bus/device(s) detected
This System Information status in Device Encryption Support means Windows detected at least one potential external DMA capable bus or device that may expose a DMA threat.
To resolve this issue, contact the IHV(s) to determine if this device has no external DMA ports. If confirmed by the IHVs that the bus or device only has internal DMA, then the OEM can add this to the allowed list.
To add a bus or device to the allowed list, you need to add a value to a registry key. To do this, you need to take the ownership of the AllowedBuses registry key first. Follow these steps:
Navigate to the HKEY_LOCAL_MACHINE\SYSTEM\CurrentControlSet\Control\DmaSecurity\AllowedBuses registry key.
Right click the registry key and select Permissions….
Click Advanced, click the Change link in the Owner field, enter your user account name, click Check Names, and then click OK three times to close all permission dialogs.
Right click the registry key and select Permissions… again.
Click the Add… button, add your user account, click Check Names, and then click OK. and then select the checkbox under Allow for Full Control. Then click OK.
Then, under the AllowedBuses key, add string (REG_SZ) name/value pairs for each flagged DMA capable bus that is determined to be safe:
- Key: device friendly name /description
- Value: PCI\VEN_ID&DEV_ID.
Ensure the IDs match the output from the HLK test. For example, if you have a safe device with a friendly name of “Contoso PCI Express Root Port”, vendor ID 1022 and Device ID 157C, you would create a Registry entry named Contoso PCI Express Root Port as REG_SZ data type in: HKEY_LOCAL_MACHINE\SYSTEM\CurrentControlSet\Control\DmaSecurity\AllowedBuses
Where the value = "PCI\VEN_1022&DEV_157C"
Disable BitLocker automatic device encryption
OEMs can choose to disable device encryption and instead implement their own encryption technology on a device. To disable BitLocker automatic device encryption, you can use an Unattend file and set PreventDeviceEncryption to True.
Alternately, you can update the HKEY_LOCAL_MACHINE\SYSTEM\CurrentControlSet\Control\BitLocker registry key:
Value: PreventDeviceEncryption equal to True (1).
Troubleshooting BitLocker HLK Tests
Recommended Prerequisites
Triage is much simpler when you know the following pieces of information about the device under test:
- TPM spec (e.g. 1.2, 2.0)
- BitLocker PCR profile (e.g. 7, 11 or 0, 2, 4, 11)
- Whether the machine is non-AOAC or AOAC (e.g. Surface devices are AOAC machines)
This info is recommended but not required to perform triage.
BitLocker HLK issues are usually related to one of the following: misinterpreting test results, or PCR7 binding issues.
Misinterpreting test results
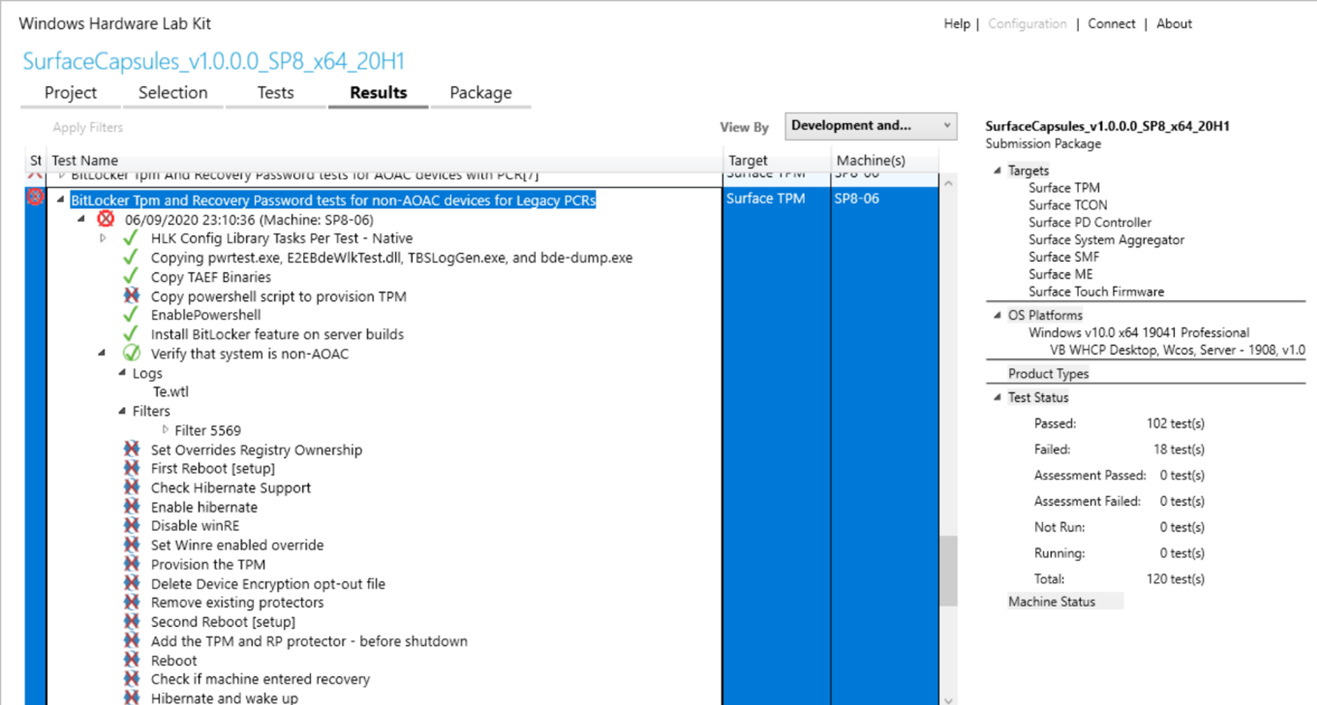
An HLK test consists of multiple test steps. Some test steps may fail without impacting the success/failure of the overall test. See here for more information about interpreting the results page. If some test steps have failed but the overall test passes (as indicated by a green check next to the test name), stop here. The test ran successfully and there is no more action needed on your part.
Triaging steps:
Confirm that you are running the right test against the machine. Right click on any step of the failing test > Infrastructure > Gatherer logs > look inside RUNTIMEBLOCK.xml for the item IsAOAC. If IsAOAC=true and you are running a non-AOAC test, then disregard the failure and do not run this test against the machine. If necessary, reach out to the Microsoft Support team for an errata for passing the playlist.
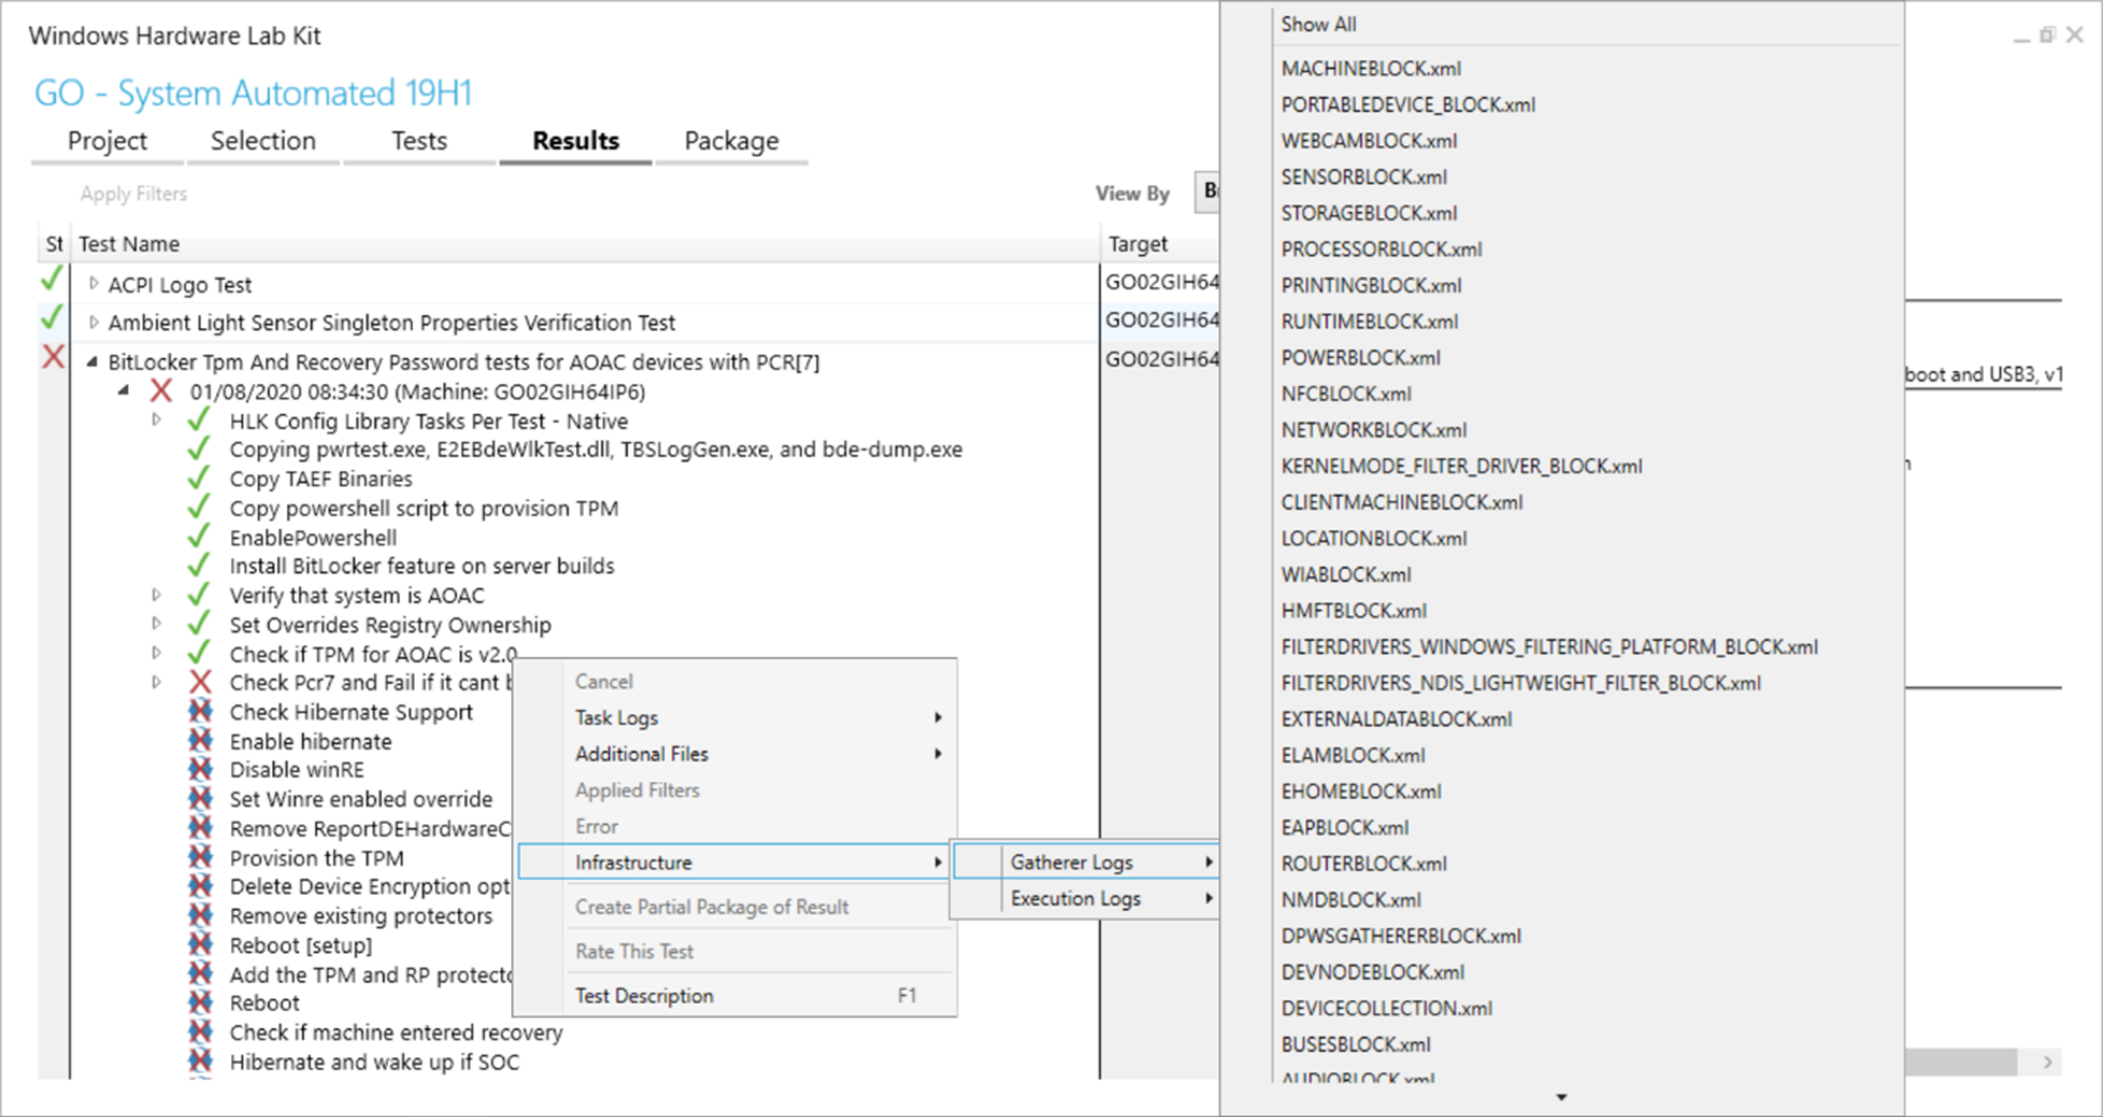
Determine whether a filter is being applied to the test. HLK may automatically suggest a filter for an incorrectly mapped test. A filter appears as a green check mark inside a circle next to a test step. (Note that some filters may show that the subsequent test steps have failed or were canceled.) Examine the extended information about the filter by expanding the test step with the special icon. If the filter says to disregard the test failure, stop here.
PCR7 issues
A common BitLocker issue that is specific to the two PCR7 tests is a failure to bind to PCR7.
Triaging steps:
Find the error message in the HLK logs. Expand the failing test step and examine the Te.wtl log. (You can also access this log by right clicking on a test step > Task logs > Te.wtl) Continue following the triage steps if you see this error:
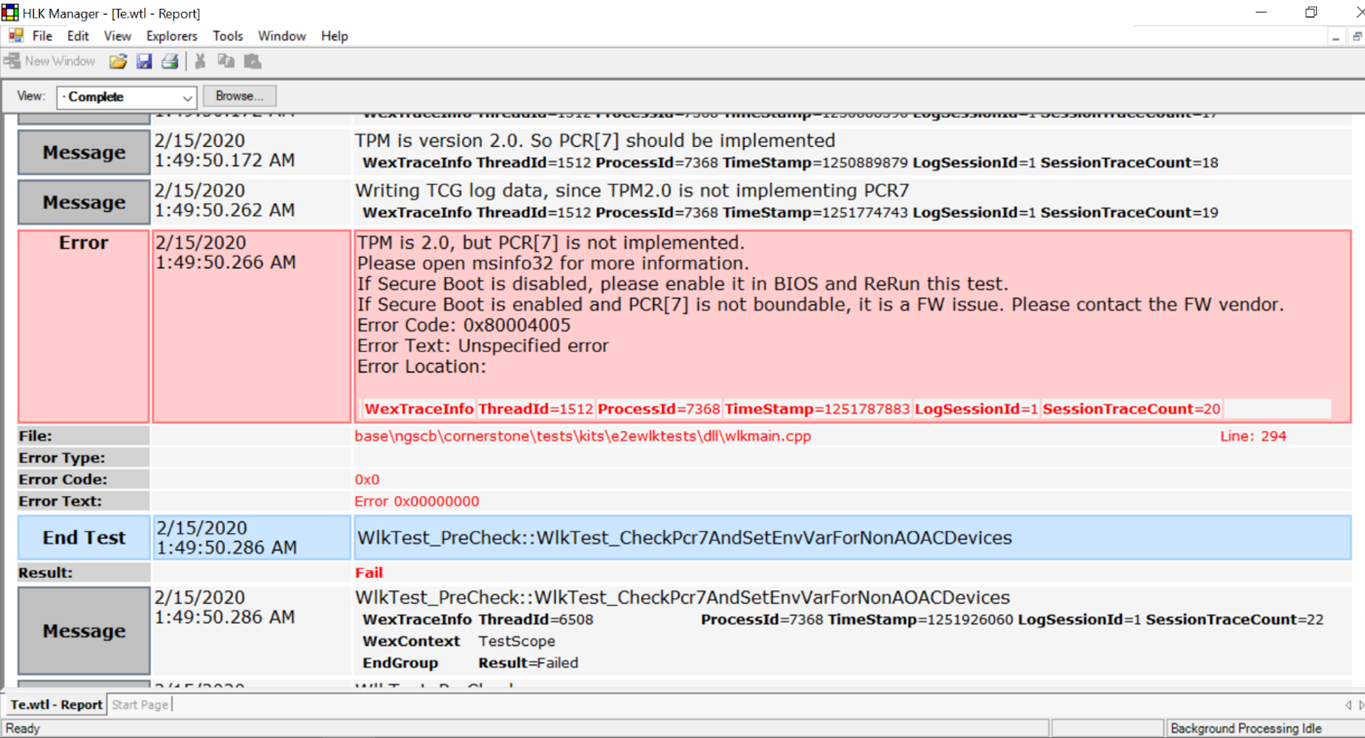
Run msinfo32 as an administrator and check Secure Boot State/PCR7 Configuration. The test should be run with Secure Boot on. If PCR7 binding is unsupported, then run the appropriate Legacy PCR HLK test instead. If PCR7 binding is not possible, then continue following the triage steps.
Examine the error logs. Right click on the test task > Additional files. Usually, the PCR7 binding issue is a result of incorrect measurements into PCR7.
- Event logs. The Microsoft-BitLocker-Management log contains valuable error information about why PCR7 cannot be used. BitLocker HLK test should only run on a machine with BitLocker installed. Event logs shall be checked on the machine generating them.
- Measured boot logs. These can also be found at C:\Windows\Logs\MeasuredBoot
Parse the measured boot log using TBSLogGenerator.exe or equivalent. On the HLK controller, TBSLogGenerator.exe is found under the HLK tests directory where you have installed HLK, for example C:\Program Files (x86)\Windows Kits\10\Hardware Lab Kit\Tests\amd64\nttest\BASETEST\ngscb\TBSLogGenerator.exe.”
- TBSLogGenerator.exe -lf <path to measured boot log> > OutputLog.txt
- In OutputLog.txt, search for "PCR[07]" and examine the measurements, listed in order. The first measurement should look something like this:
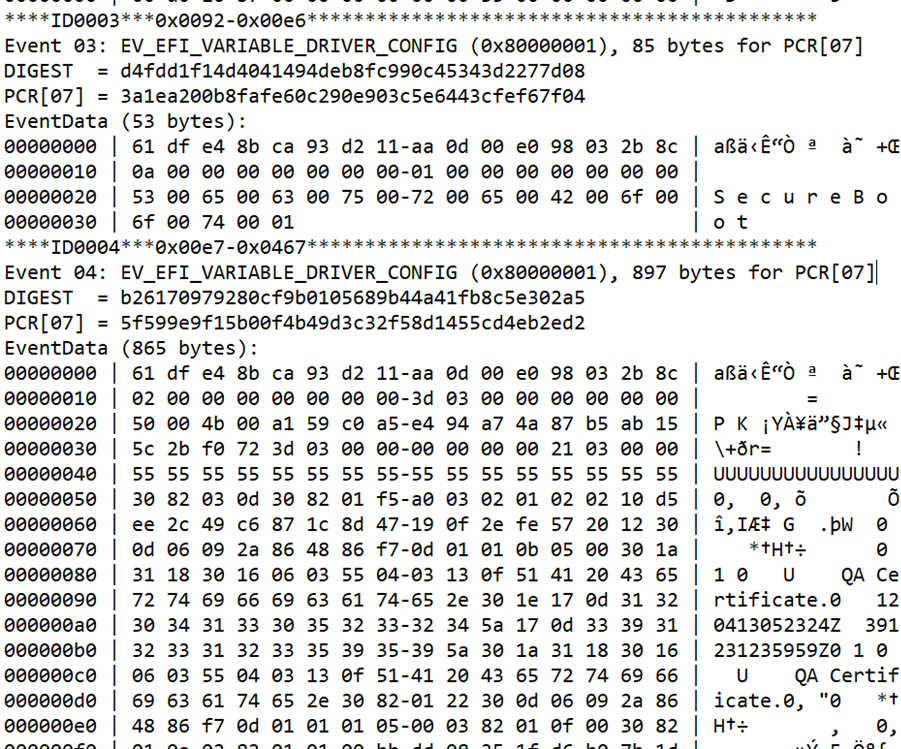
BitLocker expects certain static root of trust measurements static root of trust measurements in PCR7, and any variation in these measurements often prohibits binding to PCR7. The following values should be measured (in order, and without extraneous measurements in between) into PCR7:
- The contents of the SecureBoot variable
- The contents of the PK variable
- The contents of the KEK variable
- The contents of the EFI_IMAGE_SECURITY_DATABASE variable (DB)
- The contents of the EFI_IMAGE_SECURITY_DATABASE1 variable (DBX)
- (optional but common EV_SEPARATOR)
- Entries in the EFI_IMAGE_SECURITY_DATABASE that are used to validate EFI Drivers or EFI Boot Applications in the boot path. BitLocker expects only one entry here.
Common issues with the measured boot log:
- UEFI debug mode on
- Missing PK or KEK variables: PK/KEK measurement has no data (e.g. 4 bytes of 0's)
- Untrusted UEFI CA signatory
Some measured boot issues, such as running with UEFI debug mode on, may be remedied by the tester. Other issues may require an errata, in which case you should reach out to the Microsoft Support team for guidance.