Time Travel Debugging - Sample App Walkthrough
![]()
This lab introduces Time Travel Debugging (TTD), using a small sample program with a code flaw. TTD is used to debug, identify and root cause the issue. Although the issue in this small program is easy to find, the general procedure can be used on more complex code. This general procedure can be summarized as follows.
- Capture a time travel trace of the failed program.
- Use the dx (Display Debugger Object Model Expression) command to find the exception event stored in the recording.
- Use the !tt (time travel) command to travel to the position of the exception event in the trace.
- From that point in the trace single step backwards until the faulting code in question comes into scope.
- With the faulting code in scope, look at the local values and develop a hypothesis of a variable that may contain an incorrect value.
- Determine the memory address of the variable with the incorrect value.
- Set a memory access (ba) breakpoint on the address of the suspect variable using the ba (Break on Access) command.
- Use g- to run back to last point of memory access of the suspect variable.
- See if that location, or a few instructions before, is the point of the code flaw. If so, you are done. If the incorrect value came from some other variable, set another break on access breakpoint on the second variable.
- Use g- to run back to the last point of memory access on the second suspect variable. See if that location or a few instructions before contains the code flaw. If so, you are done.
- Repeat this process walking back until the code that set the incorrect value that caused the error is located.
Although the general techniques described in this procedure apply to a broad set of code issues, there are unique code issues that will require a unique approach. The techniques illustrated in the walkthrough should serve to expand your debugging tool set and will illustrate some of what is possible with a TTD trace.
Lab objectives
After completing this lab, you will be able to use the general procedure with a time travel trace to locate issues in code.
Lab setup
You will need the following hardware to be able to complete the lab.
- A laptop or desktop computer (host) running Windows 10 or Windows 11
You will need the following software to be able to complete the lab.
- The WinDbg. For information on installing WinDbg, see WinDbg - Installation
- Visual Studio to build the sample C++ code.
The lab has the following three sections.
- Section 1: Build the sample code
- Section 2: Record a trace of the "DisplayGreeting" sample
- Section 3: Analyze the trace file recording to identify the code issue
Section 1: Build the sample code
In Section 1, you will build the sample code using Visual Studio.
Create the sample app in Visual Studio
In Microsoft Visual Studio, click File > New > Project/Solution... and click on the Visual C++ templates.
Select the Win32 Console Application.
Provide a project name of DisplayGreeting and click on OK.
Uncheck the Security Development Lifecycle (SDL) checks.
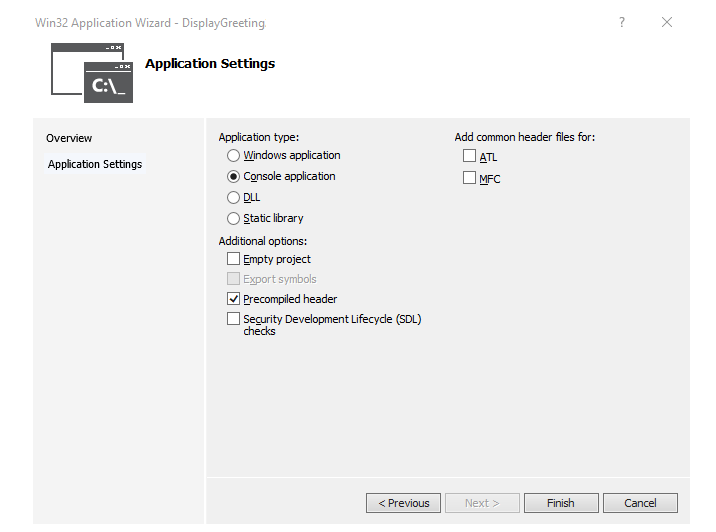
Click on Finish.
Paste in the following text to the DisplayGreeting.cpp pane in Visual Studio.
// DisplayGreeting.cpp : Defines the entry point for the console application.
//

#include "stdafx.h"
#include <array>
#include <stdio.h>
#include <string.h>

void GetCppConGreeting(wchar_t* buffer, size_t size)
{
    wchar_t const* const message = L"HELLO FROM THE WINDBG TEAM. GOOD LUCK IN ALL OF YOUR TIME TRAVEL DEBUGGING!";

    wcscpy_s(buffer, size, message);
}

int main()
{
     std::array <wchar_t, 50> greeting{};
     GetCppConGreeting(greeting.data(), sizeof(greeting));

     wprintf(L"%ls\n", greeting.data());

     return 0;
}
In Visual Studio, click Project > DisplayGreeting properties. Then click on C/C++ and Code Generation.
Set the following properties.
Setting Value Security Check Disable Security Check (/GS-) Basic Runtime Checks Default Note
Although these setting are not recommended, it is possible to imagine a scenario where someone would advise using these settings to expedite coding or to facilitate certain testing environments.
In Visual Studio, click Build > Build Solution.
If all goes well, the build windows should display a message indicating that the build succeeded.
Locate the built sample app files
In the Solution Explorer, right click on the DisplayGreeting project and select Open Folder in File explorer.
Navigate to the Debug folder that contains the complied exe and symbol pdb file for the sample. For example, you would navigate to C:\Projects\DisplayGreeting\Debug, if that's the folder that your projects are stored in.
Run the sample app with the code flaw
Double click on the exe file to run the sample app.
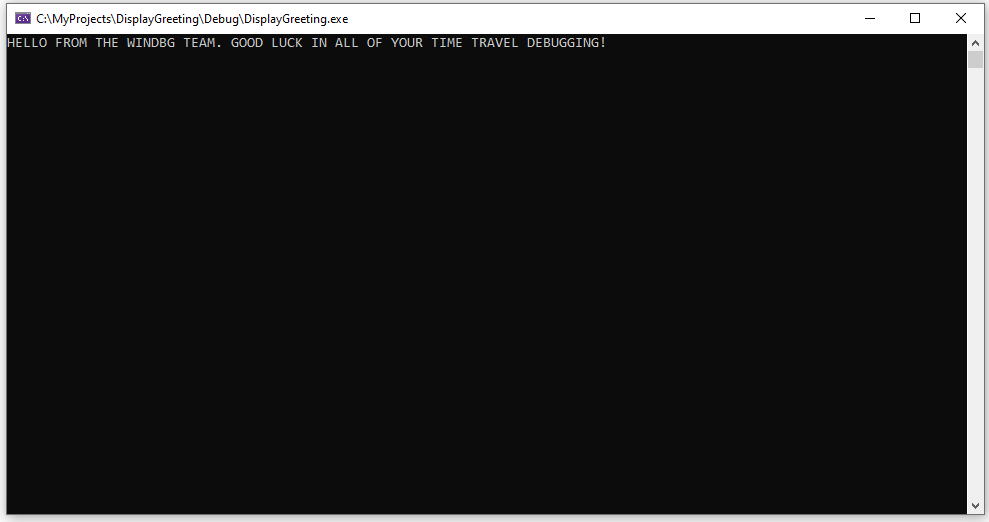
If this dialog box appears, select Close program

In the next section of the walkthrough, we will record the execution of the sample app to see if we can determine why this exception is occurring.
Section 2: Record a trace of the "DisplayGreeting" sample
In Section 2, you will record a trace of the misbehaving sample "DisplayGreeting" app
To launch the sample app and record a TTD trace, follow these steps. For general information about recording TTD traces, see Time Travel Debugging - Record a trace
Run WinDbg as an Administrator, so as to be able to record time travel traces.
In WinDbg, select File > Start debugging > Launch executable (advanced).
Enter the path to the user mode executable that you wish to record or select Browse to navigate to the executable. For information about working with the launch executable menu in WinDbg, see WinDbg - Start a user-mode session.
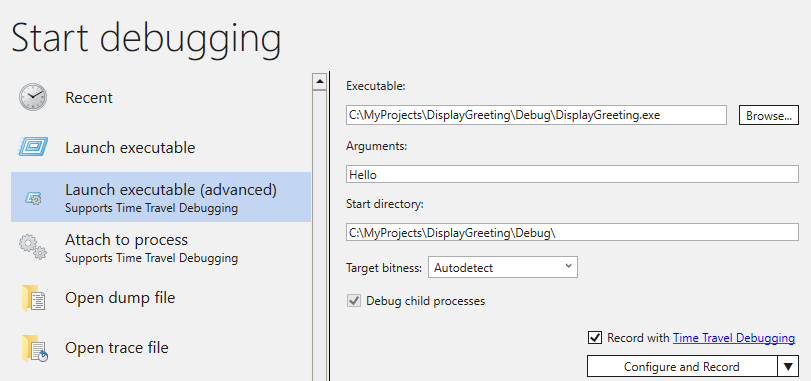
Check the Record with Time Travel Debugging box to record a trace when the executable is launched.
Click Configure and Record to start recording.
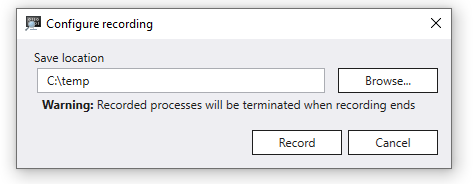
When the "Configure recording" dialog box appears, Click Record to launch the executable and start recording.
The recording dialog appears indicating the trace is being recorded. Shortly after that, the application crashes.
Click on Close Program, to dismiss the "DisplayGreeting has stopped working" dialog box.
When the program crashes, the trace file will be closed and written out to disk.
The debugger will automatically open the trace file and index it. Indexing is a process that enables efficient debugging of the trace file. This indexing process will take longer for larger trace files.
(5120.2540): Break instruction exception - code 80000003 (first/second chance not available)
Time Travel Position: D:0 [Unindexed] Index
!index
Indexed 10/22 keyframes
Indexed 20/22 keyframes
Indexed 22/22 keyframes
Successfully created the index in 755ms.
Note
A keyframe is a location in a trace used for indexing. Keyframes are generated automatically. Larger traces will contain more keyframes.
At this point you are at the beginning of the trace file and are ready to travel forward and backward in time.
Now that you have a recorded a TTD trace, you can replay the trace back or work with the trace file, for example sharing it with a co-worker. For more information about working with trace files, see Time Travel Debugging - Working with Trace Files
In the next section of this lab we will analyze the trace file to locate the issue with our code.
Section 3: Analyze the trace file recording to identify the code issue
In Section 3, you will analyze the trace file recording to identify the code issue.
Configure the WinDbg Environment
Add your local symbol location to the symbol path and reload the symbols, by typing the following commands.
.sympath+ C:\MyProjects\DisplayGreeting\Debug
.reload
Add your local code location to the source path by typing the following command.
.srcpath+ C:\MyProjects\DisplayGreeting\DisplayGreetingTo be able to view the state of the stack and local variables, on the WinDbg ribbon, select View and Locals and View and Stack. Organize the windows to allow you to view them, the source code and the command windows at the same time.
On the WinDbg ribbon, select Source and Open Source File. Locate the DisplayGreeting.cpp file and open it.
Examine the exception
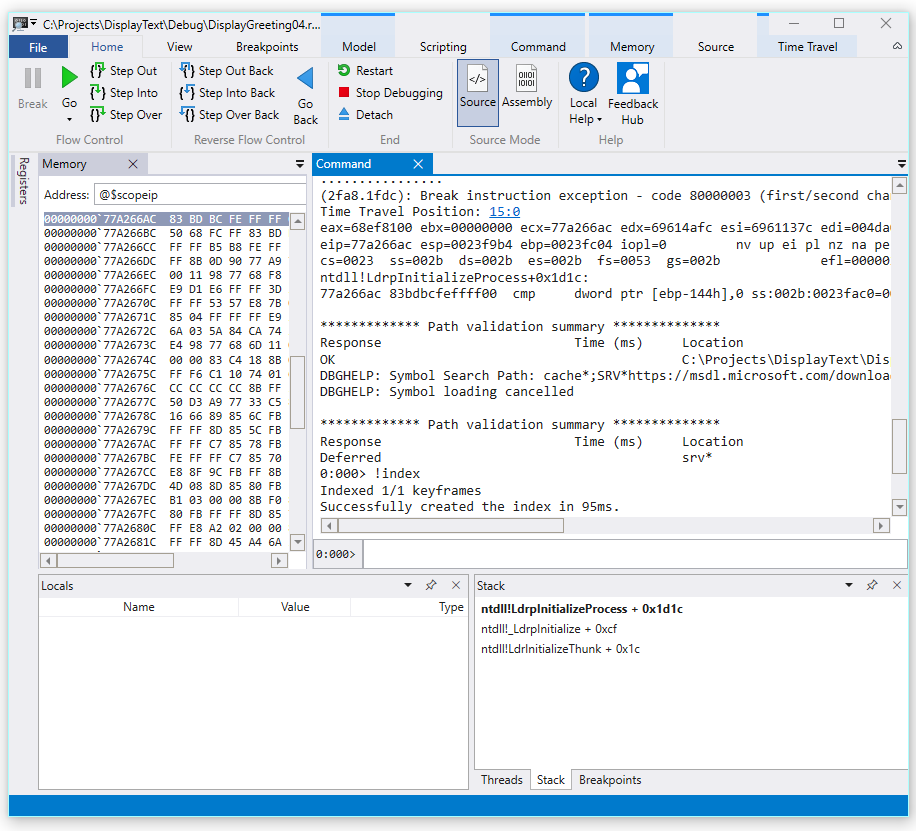
When the trace file was loaded it displays information that an exception occurred.
2fa8.1fdc): Break instruction exception - code 80000003 (first/second chance not available)
Time Travel Position: 15:0
eax=68ef8100 ebx=00000000 ecx=77a266ac edx=69614afc esi=6961137c edi=004da000
eip=77a266ac esp=0023f9b4 ebp=0023fc04 iopl=0         nv up ei pl nz na pe nc
cs=0023  ss=002b  ds=002b  es=002b  fs=0053  gs=002b             efl=00000206
ntdll!LdrpInitializeProcess+0x1d1c:
77a266ac 83bdbcfeffff00  cmp     dword ptr [ebp-144h],0 ss:002b:0023fac0=00000000
Use the dx command to list all of the events in the recording. The exception event is listed in the events.
0:000> dx -r1 @$curprocess.TTD.Events
...
[0x2c]           : Module Loaded at position: 9967:0
[0x2d]           : Exception at 9BDC:0
[0x2e]           : Thread terminated at 9C43:0
...
Note
In this walkthrough three periods are used to indicate that extraneous output was removed.
Click on the Exception event to display information about that TTD event.
0:000> dx -r1 @$curprocess.TTD.Events[17]
@$curprocess.TTD.Events[17]                 : Exception at 68:0
    Type             : Exception
    Position         : 68:0 [Time Travel]
    Exception        : Exception of type Hardware at PC: 0X540020
Click on the Exception field to further drill down on the exception data.
0:000> dx -r1 @$curprocess.TTD.Events[17].Exception
@$curprocess.TTD.Events[17].Exception                 : Exception of type Hardware at PC: 0X540020
    Position         : 68:0 [Time Travel]
    Type             : Hardware
    ProgramCounter   : 0x540020
    Code             : 0xc0000005
    Flags            : 0x0
    RecordAddress    : 0x0
The exception data indicates that this is a Hardware fault thrown by the CPU. It also provides the exception code of 0xc0000005 that indicates that this is an access violation. This typically indicates that we were attempting to write to memory that we don't have access to.
Click on the [Time Travel] link in the exception event to move to that position in the trace.
0:000> dx @$curprocess.TTD.Events[17].Exception.Position.SeekTo()
Setting position: 68:0

@$curprocess.TTD.Events[17].Exception.Position.SeekTo()
(16c8.1f28): Break instruction exception - code 80000003 (first/second chance not available)
Time Travel Position: 68:0
eax=00000000 ebx=00cf8000 ecx=99da9203 edx=69cf1a6c esi=00191046 edi=00191046
eip=00540020 esp=00effe4c ebp=00520055 iopl=0         nv up ei pl zr na pe nc
cs=0023  ss=002b  ds=002b  es=002b  fs=0053  gs=002b             efl=00000246
00540020 ??
Of note in this output is that the stack and base pointer are pointing to two very different addresses.
esp=00effe4c ebp=00520055This could indicate that stack corruption - possibly a function returned and then corrupted the stack. To validate this, we need to travel back to before the CPU state was corrupted and see if we can determine when the stack corruption occurred.
Examine the local variables and set a code breakpoint
At the point of failure in trace it is common to end up a few steps after the true cause in error handling code. With time travel we can go back an instruction at a time, to locate the true root cause.
From the Home ribbon use the Step Into Back command to step back three instructions. As you do this, continue to examine the stack and memory windows.
The command window will display the time travel position and the registers as you step back three instructions.
0:000> t-
Time Travel Position: 67:40
eax=00000000 ebx=00cf8000 ecx=99da9203 edx=69cf1a6c esi=00191046 edi=00191046
eip=00540020 esp=00effe4c ebp=00520055 iopl=0         nv up ei pl zr na pe nc
cs=0023  ss=002b  ds=002b  es=002b  fs=0053  gs=002b             efl=00000246
00540020 ??              ???

0:000> t-
Time Travel Position: 67:3F
eax=00000000 ebx=00cf8000 ecx=99da9203 edx=69cf1a6c esi=00191046 edi=00191046
eip=0019193d esp=00effe48 ebp=00520055 iopl=0         nv up ei pl zr na pe nc
cs=0023  ss=002b  ds=002b  es=002b  fs=0053  gs=002b             efl=00000246
DisplayGreeting!main+0x4d:
0019193d c3

0:000> t-
Time Travel Position: 67:39
eax=0000004c ebx=00cf8000 ecx=99da9203 edx=69cf1a6c esi=00191046 edi=00191046
eip=00191935 esp=00effd94 ebp=00effe44 iopl=0         nv up ei pl nz ac po nc
cs=0023  ss=002b  ds=002b  es=002b  fs=0053  gs=002b             efl=00000212
DisplayGreeting!main+0x45:
Note
In this walkthrough, the command output shows the commands that can be used instead of the UI Menu options to allow users with a command line usage preference to use command line commands.
At this point in the trace our stack and base pointer have values that make more sense, so it appears that we have getting closer to the point in the code where the corruption occurred.
esp=00effd94 ebp=00effe44Also of interest is that the locals window contains values from our target app and the source code window is highlighting the line of code that is ready to be executed at this point in the trace.
To further investigate, we can open up a memory window to view the contents near the base pointer memory address of 0x00effe44.
To display the associated ASCII characters, from the Memory ribbon, select Text and then ASCII.
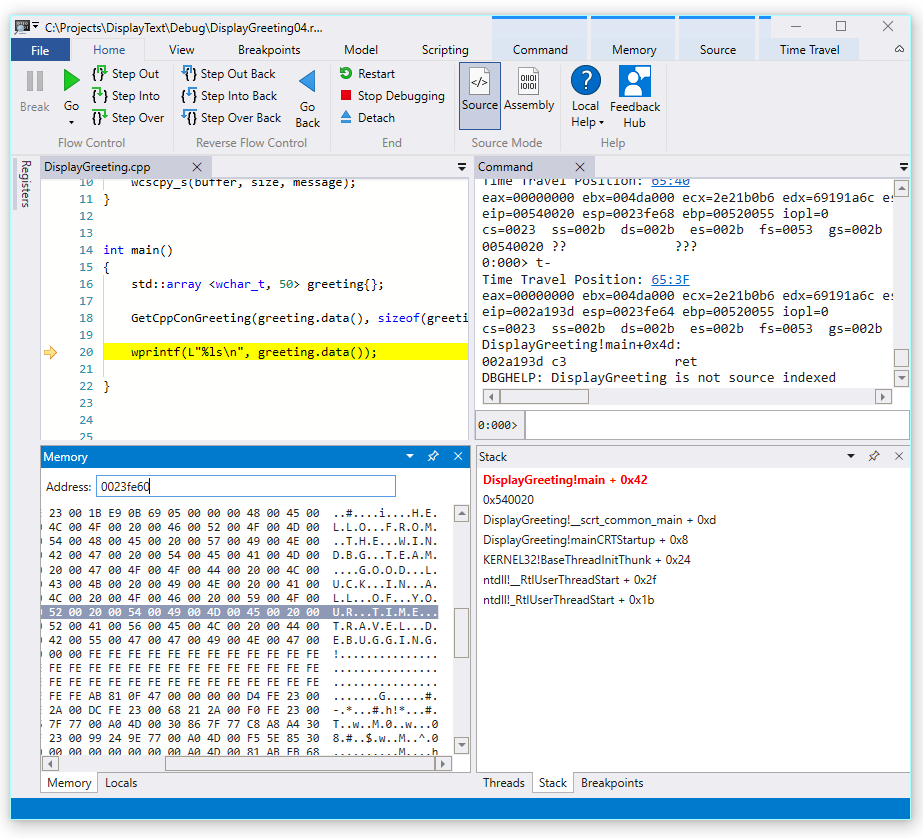
Instead of the base pointer pointing to an instruction it is pointing to our message text. So something is not right here, this may be close to the point in time that we have corrupted the stack. To further investigate we will set a breakpoint.
Note
In this very small sample it would be pretty easy to just look in the code, but if there are hundreds of lines of code and dozens of subroutines the techniques described here can be used to decrease the time necessary to locate the issue.
TTD and breakpoints
Using breakpoints is a common approach to pause code execution at some event of interest. TTD allows you to set a breakpoint and travel back in time until that breakpoint is hit after the trace has been recorded. The ability to examine the process state after an issue has happened, to determine the best location for a breakpoint, enables additional debugging workflows unique to TTD.
Memory access breakpoints
You can set breakpoints that fire when a memory location is accessed. Use the ba (break on access) command, with the following syntax.
ba <access> <size> <address> {options}
| Option | Description |
|---|---|
e |
execute (when CPU fetches an instruction from the address) |
r |
read/write (when CPU reads or writes to the address) |
w |
write (when the CPU writes to the address) |
Note that you can only set four data breakpoints at any given time and it is up to you to make sure that you are aligning your data correctly or you won’t trigger the breakpoint (words must end in addresses divisible by 2, dwords must be divisible by 4, and quadwords by 0 or 8).
Set the break on memory access breakpoint for the base pointer
At this point in the trace we would like to set a breakpoint on write memory access to base pointer - ebp which in our example is 00effe44. To do this use the ba command using the address we want to monitor. We want to monitor writes for four bytes, so we specify w4.
0:000> ba w4 00effe44Select View and then Breakpoints to confirm they are set as intended.

From the Home menu, select Go Back to travel back in time until the breakpoint is hit.
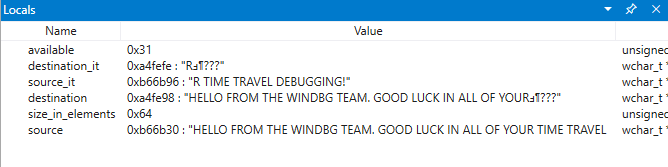
0:000> g-
Breakpoint 0 hit
Time Travel Position: 5B:92
eax=0000000f ebx=003db000 ecx=00000000 edx=00cc1a6c esi=00d41046 edi=0053fde8
eip=00d4174a esp=0053fcf8 ebp=0053fde8 iopl=0         nv up ei pl nz ac pe nc
cs=0023  ss=002b  ds=002b  es=002b  fs=0053  gs=002b             efl=00000216
DisplayGreeting!DisplayGreeting+0x3a:
00d4174a c745e000000000  mov     dword ptr [ebp-20h],0 ss:002b:0053fdc8=cccccccc
Select View and then Locals. In the locals window we can see that the destination variable has only part of the message, while the source has contains all of the text. This information supports the idea that the stack was corrupted.
At this point we can examine the program stack to see what code is active. From the View ribbon select Stack.
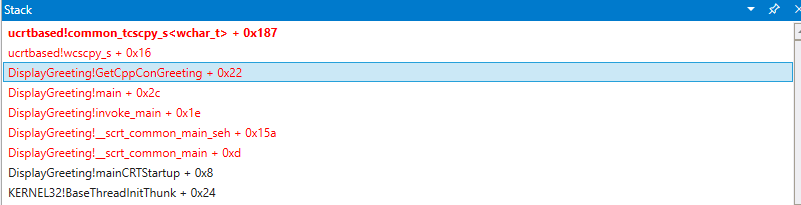
As it is very unlikely that the Microsoft provided wscpy_s() function would have a code bug like this, we look further in the stack. The stack shows that Greeting!main calls Greeting!GetCppConGreeting. In our very small code sample we could just open the code at this point and likely find the error pretty easily. But to illustrate the techniques that can be used with larger, more complex program, we will set a new breakpoint to investigate further.
Set the break on access breakpoint for the GetCppConGreeting function
Use the breakpoints window to clear the existing breakpoint by right clicking on the existing breakpoint and selecting Remove.
Determine the address of the DisplayGreeting!GetCppConGreeting function using the dx command.
0:000> dx &DisplayGreeting!GetCppConGreeting
&DisplayGreeting!GetCppConGreeting                 : 0xb61720 [Type: void (__cdecl*)(wchar_t *,unsigned int)]
    [Type: void __cdecl(wchar_t *,unsigned int)]
Use the ba command to set a breakpoint on memory access. Because the function will just be read from memory for execution, we need to set a r - read breakpoint.
0:000> ba r4 b61720Confirm that a Hardware Read breakpoint is active in the breakpoints window.

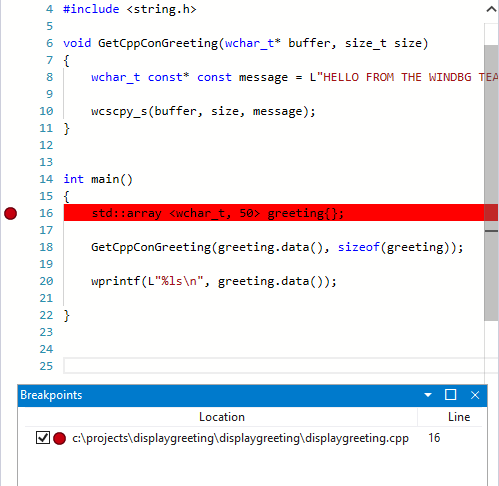
As we are wondering about the size of the greeting string we will set a watch window to display the value of sizeof(greeting). From the View ribbon, select Watch and provide sizeof(greeting).
On the Time Travel menu, use Time travel to start or use the
!tt 0command to move to the start of the trace.0:000> !tt 0 Setting position to the beginning of the trace Setting position: 15:0 (1e5c.710): Break instruction exception - code 80000003 (first/second chance not available) Time Travel Position: 15:0 eax=68e28100 ebx=00000000 ecx=77a266ac edx=69e34afc esi=69e3137c edi=00fa2000 eip=77a266ac esp=00ddf3b8 ebp=00ddf608 iopl=0 nv up ei pl nz na pe nc cs=0023 ss=002b ds=002b es=002b fs=0053 gs=002b efl=00000206 ntdll!LdrpInitializeProcess+0x1d1c: 77a266ac 83bdbcfeffff00 cmp dword ptr [ebp-144h],0 ss:002b:00ddf4c4=00000000On the Home menu, select Go or use the
gcommand, to move forward in the code until the breakpoint is hit.0:000> g Breakpoint 2 hit Time Travel Position: 4B:1AD eax=00ddf800 ebx=00fa2000 ecx=00ddf800 edx=00b61046 esi=00b61046 edi=00b61046 eip=00b61721 esp=00ddf7a4 ebp=00ddf864 iopl=0 nv up ei pl nz na po nc cs=0023 ss=002b ds=002b es=002b fs=0053 gs=002b efl=00000202 DisplayGreeting!GetCppConGreeting+0x1: 00b61721 8bec mov ebp,espOn the Home menu, select Step Out Back or use the
g-ucommand to back one step.0:000> g-u Time Travel Position: 4B:1AA eax=00ddf800 ebx=00fa2000 ecx=00ddf800 edx=00b61046 esi=00b61046 edi=00b61046 eip=00b61917 esp=00ddf7ac ebp=00ddf864 iopl=0 nv up ei pl nz na po nc cs=0023 ss=002b ds=002b es=002b fs=0053 gs=002b efl=00000202 DisplayGreeting!main+0x27: 00b61917 e8def7ffff call DisplayGreeting!ILT+245(?GetCppConGreetingYAXPA_WIZ) (00b610fa)It looks like we have found the root cause. The greeting array that we declared is 50 characters in length, while the sizeof(greeting) that we pass into GetCppConGreeting is 0x64, 100).

As we look at the size issue further, we also notice that the message is 75 characters in length, 76 including the end of string character.
HELLO FROM THE WINDBG TEAM. GOOD LUCK IN ALL OF YOUR TIME TRAVEL DEBUGGING!One way to fix the code would be to expand the size of the character array to 100.
std::array <wchar_t, 100> greeting{};And we also need to change sizeof(greeting) to size(greeting) in this line of code.
GetCppConGreeting(greeting.data(), size(greeting));To validate these fixes, we could recompile the code and confirm that it runs without error.
Setting a breakpoint using the source window
An alternative way to perform this investigation would be to set a breakpoint by clicking on any line of code. For example clicking on the right side of the std:array definition line in the source window will set a breakpoint there.
On the Time Travel menu, use Time travel to start command to move to the start of the trace.
0:000> !tt 0
Setting position to the beginning of the trace
Setting position: 15:0
(1e5c.710): Break instruction exception - code 80000003 (first/second chance not available)
Time Travel Position: 15:0
eax=68e28100 ebx=00000000 ecx=77a266ac edx=69e34afc esi=69e3137c edi=00fa2000
eip=77a266ac esp=00ddf3b8 ebp=00ddf608 iopl=0         nv up ei pl nz na pe nc
cs=0023  ss=002b  ds=002b  es=002b  fs=0053  gs=002b             efl=00000206
ntdll!LdrpInitializeProcess+0x1d1c:
77a266ac 83bdbcfeffff00  cmp     dword ptr [ebp-144h],0 ss:002b:00ddf4c4=00000000
On the Home Ribbon click on Go to travel back until the breakpoint is hit.
Breakpoint 0 hit Time Travel Position: 5B:AF eax=0000000f ebx=00c20000 ecx=00000000 edx=00000000 esi=013a1046 edi=00effa60 eip=013a17c1 esp=00eff970 ebp=00effa60 iopl=0 nv up ei pl nz na po nc cs=0023 ss=002b ds=002b es=002b fs=0053 gs=002b efl=00000202 DisplayGreeting!DisplayGreeting+0x41: 013a17c1 8bf4 mov esi,esp
Set the break on access breakpoint for the greeting variable
Another alternative way to perform this investigation, would be to set a breakpoint on suspect variables and examine what code is changing them. For example, to set a breakpoint on the greeting variable in the GetCppConGreeting method, use this procedure.
This portion of the walkthrough assumes that you are still located at the breakpoint from the previous section.
From View and then Locals. In the locals window, greeting is available in the current context, so we will be able to determine its memory location.
Use the dx command to examine the greeting array.
0:000> dx &greeting &greeting : 0xddf800 [Type: std::array<wchar_t,50> *] [+0x000] _Elems : "꽘棶檙瞝???" [Type: wchar_t [50]]In this trace, greeting is located in memory at ddf800.
Use the breakpoints window to clear any existing breakpoint by right clicking on the existing breakpoint and selecting Remove.
Set the breakpoint with the ba command using the memory address we want to monitor for write access.
ba w4 ddf800On the Time Travel menu, use Time travel to start command to move to the start of the trace.
0:000> !tt 0
Setting position to the beginning of the trace
Setting position: 15:0
(1e5c.710): Break instruction exception - code 80000003 (first/second chance not available)
Time Travel Position: 15:0
eax=68e28100 ebx=00000000 ecx=77a266ac edx=69e34afc esi=69e3137c edi=00fa2000
eip=77a266ac esp=00ddf3b8 ebp=00ddf608 iopl=0         nv up ei pl nz na pe nc
cs=0023  ss=002b  ds=002b  es=002b  fs=0053  gs=002b             efl=00000206
ntdll!LdrpInitializeProcess+0x1d1c:
77a266ac 83bdbcfeffff00  cmp     dword ptr [ebp-144h],0 ss:002b:00ddf4c4=00000000
On the Home menu, select Go to travel forward to the first point of memory access of the greeting array.
0:000> g- Breakpoint 0 hit Time Travel Position: 5B:9C eax=cccccccc ebx=002b1000 ecx=00000000 edx=68d51a6c esi=013a1046 edi=001bf7d8 eip=013a1735 esp=001bf6b8 ebp=001bf7d8 iopl=0 nv up ei pl nz na po nc cs=0023 ss=002b ds=002b es=002b fs=0053 gs=002b efl=00000202 DisplayGreeting!GetCppConGreeting+0x25: 013a1735 c745ec04000000 mov dword ptr [ebp-14h],4 ss:002b:001bf7c4=ccccccccAlternatively, we could have traveled to the end of the trace and worked in reverse through the code to find that last point in the trace that the array memory location was written to.
Use the TTD.Memory objects to view memory access
Another way to determine at what points in the trace memory has been accessed, is to use the TTD.Memory objects and the dx command.
Use the dx command to examine the greeting array.
0:000> dx &greeting
&greeting                 : 0xddf800 [Type: std::array<wchar_t,50> *]
   [+0x000] _Elems           : "꽘棶檙瞝???" [Type: wchar_t [50]]
In this trace, greeting is located in memory at ddf800.
Use the dx command to look at the four bytes in memory starting at that address with the read write access.
0:000> dx -r1 @$cursession.TTD.Memory(0xddf800,0xddf804, "rw")
@$cursession.TTD.Memory(0x1bf7d0,0x1bf7d4, "rw")
    [0x0]
    [0x1]
    [0x2]
    [0x3]
    [0x4]
    [0x5]
    [0x6]
    [0x7]
    [0x8]
    [0x9]
    [0xa]
    ...
Click on any of the occurrences to display more information about that occurrence of memory access.
0:000> dx -r1 @$cursession.TTD.Memory(0xddf800,0xddf804, "rw")[5]
@$cursession.TTD.Memory(0xddf800,0xddf804, "rw")[5]
    EventType        : MemoryAccess
    ThreadId         : 0x710
    UniqueThreadId   : 0x2
    TimeStart        : 27:3C1 [Time Travel]
    TimeEnd          : 27:3C1 [Time Travel]
    AccessType       : Write
    IP               : 0x6900432f
    Address          : 0xddf800
    Size             : 0x4
    Value            : 0xddf818
Click on [Time Travel] to position the trace at the point in time.
0:000> dx @$cursession.TTD.Memory(0xddf800,0xddf804, "rw")[5].TimeStart.SeekTo()
@$cursession.TTD.Memory(0xddf800,0xddf804, "rw")[5].TimeStart.SeekTo()
(1e5c.710): Break instruction exception - code 80000003 (first/second chance not available)
Time Travel Position: 27:3C1
eax=00ddf81c ebx=00fa2000 ecx=00ddf818 edx=ffffffff esi=00000000 edi=00b61046
eip=6900432f esp=00ddf804 ebp=00ddf810 iopl=0         nv up ei pl nz ac po nc
cs=0023  ss=002b  ds=002b  es=002b  fs=0053  gs=002b             efl=00000212
ucrtbased!_register_onexit_function+0xf:
6900432f 51              push    ecx
If we are interested in the last occurrence of read/write memory access in the trace we can click on the last item in the list or append the .Last() function to the end of the dx command.
0:000> dx -r1 @$cursession.TTD.Memory(0xddf800,0xddf804, "rw").Last()
@$cursession.TTD.Memory(0xddf800,0xddf804, "rw").Last()
    EventType        : MemoryAccess
    ThreadId         : 0x710
    UniqueThreadId   : 0x2
    TimeStart        : 53:100E [Time Travel]
    TimeEnd          : 53:100E [Time Travel]
    AccessType       : Read
    IP               : 0x690338e4
    Address          : 0xddf802
    Size             : 0x2
    Value            : 0x45
We could then click on [Time Travel] to move to that position in the trace and look further at the code execution at that point, using the techniques described earlier in this lab.
For more information about the TTD.Memory objects, see TTD.Memory Object.
Summary
In this very small sample the issue could have been determined by looking at the few lines of code, but in larger programs the techniques presented here can be used to decrease the time necessary to locate an issue.
Once a trace is recorded, the trace and repro steps can be shared, and the issue will be reproducible on demand on any PC.
See Also
Time Travel Debugging - Overview
Time Travel Debugging - Recording
Feedback
Coming soon: Throughout 2024 we will be phasing out GitHub Issues as the feedback mechanism for content and replacing it with a new feedback system. For more information see: https://aka.ms/ContentUserFeedback.
Submit and view feedback for