Set up a new OpenXR project with MRTK
The easiest way to get your Unity project set up for mixed reality is with the Mixed Reality Toolkit (MRTK). MRTK for Unity is an open-source, cross-platform development kit designed to make it easy to build amazing mixed reality applications.
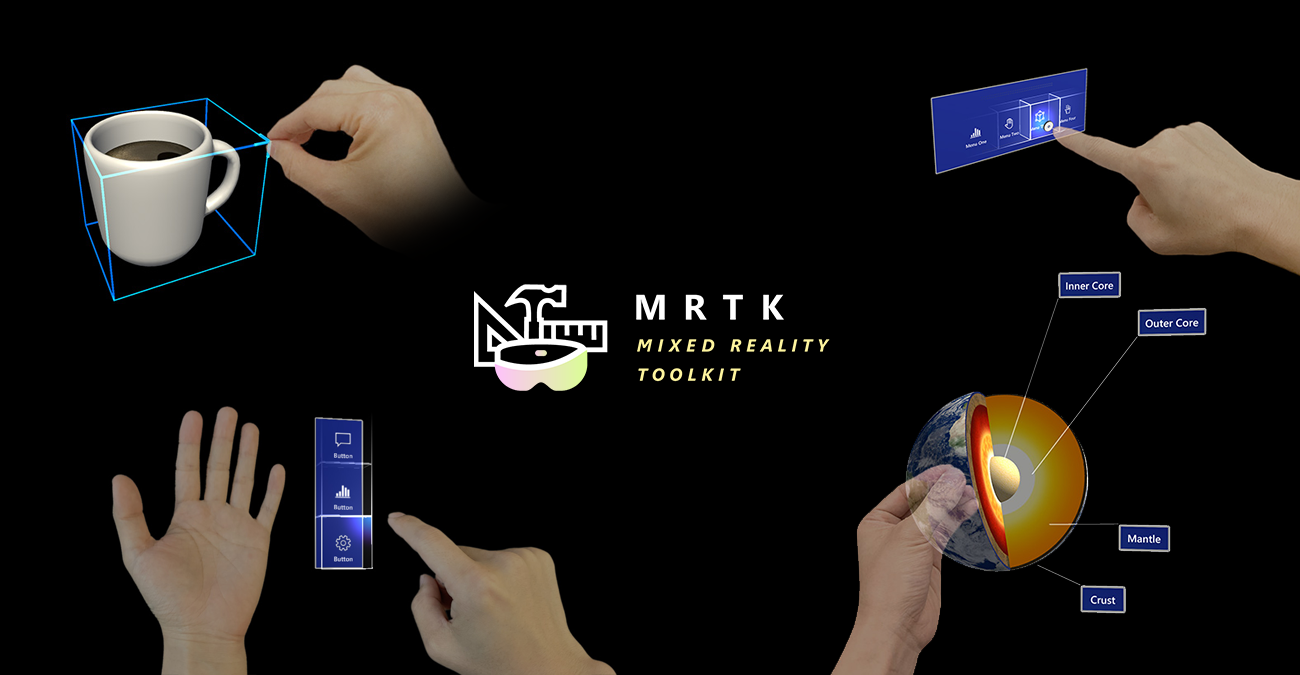
MRTK provides a cross-platform input system, foundational components, and common building blocks for spatial interactions. It can help you speed up your application development for Microsoft HoloLens, Windows Mixed Reality immersive (VR) headsets, and many other VR/AR devices. The project is aimed at reducing barriers to entry, enabling everyone to build mixed reality applications and contribute back to the community as we all grow.
MRTK supports a wide range of platforms, including:
Microsoft HoloLens
Microsoft HoloLens 2
Windows Mixed Reality headsets
OpenVR headsets (HTC Vive / Oculus Rift)
Ultraleap Hand Tracking
Android and iOS devices
Note
We recently introduced MRTK3, the third generation of Microsoft Mixed Reality Toolkit for Unity built on top of Unity's XR Management system and XR Interaction Toolkit, with better support for a variety of OpenXR-compliant devices and a new design language. For more information, see the MRTK3 documentation.
Note
You can also set up a new OpenXR project without MRTK.
Other non-OpenXR configuration options to consider
Windows XR: Microsoft doesn't recommend using the Windows XR plugin for any new projects in Unity 2020. Instead, you should use the Mixed Reality OpenXR plugin. However, if you're using Unity 2019 and you need AR Foundation 2.0 for compatibility with ARCore/ARKit devices, this plugin enables that support.
Important
Using this plugin in Unity 2019 is not compatible with Azure Spatial Anchors.
Legacy XR:
If you're still on Unity 2019 or earlier, Microsoft recommends using the Legacy Built-in XR support. While the Windows XR plugin is functional on Unity 2019, we don't recommend it because it's not compatible with Azure Spatial Anchors on Unity 2019.
If you're starting a new project, we recommend that you install Unity 2020 instead and use the Mixed Reality OpenXR plugin.
Getting started with OpenXR: Create a new Unity project
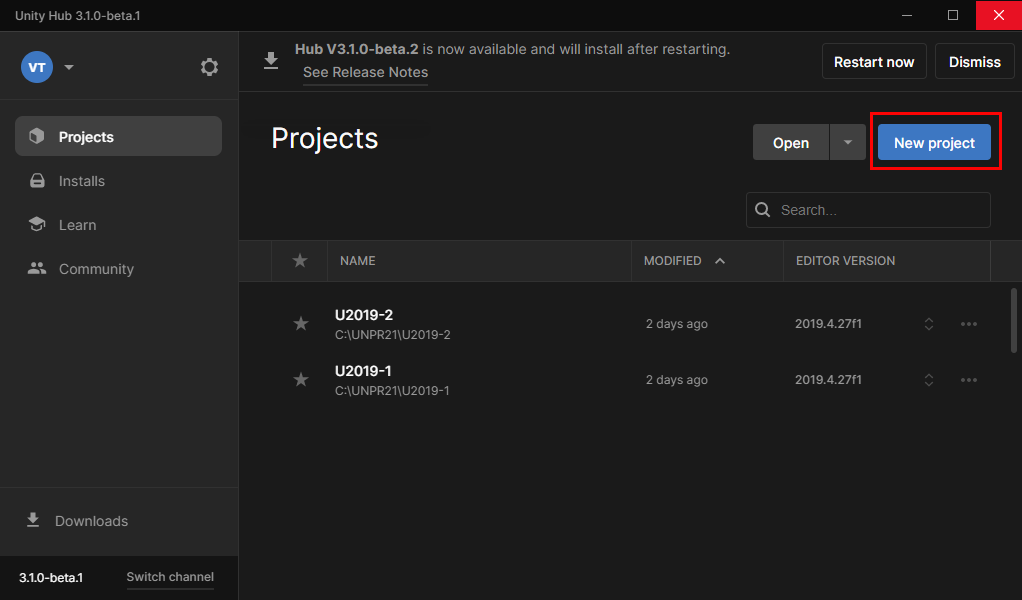
Launch the Unity Hub.
In the Projects tab, click New Project.
Click the drop-down underneath New project and then select the Editor version you want.
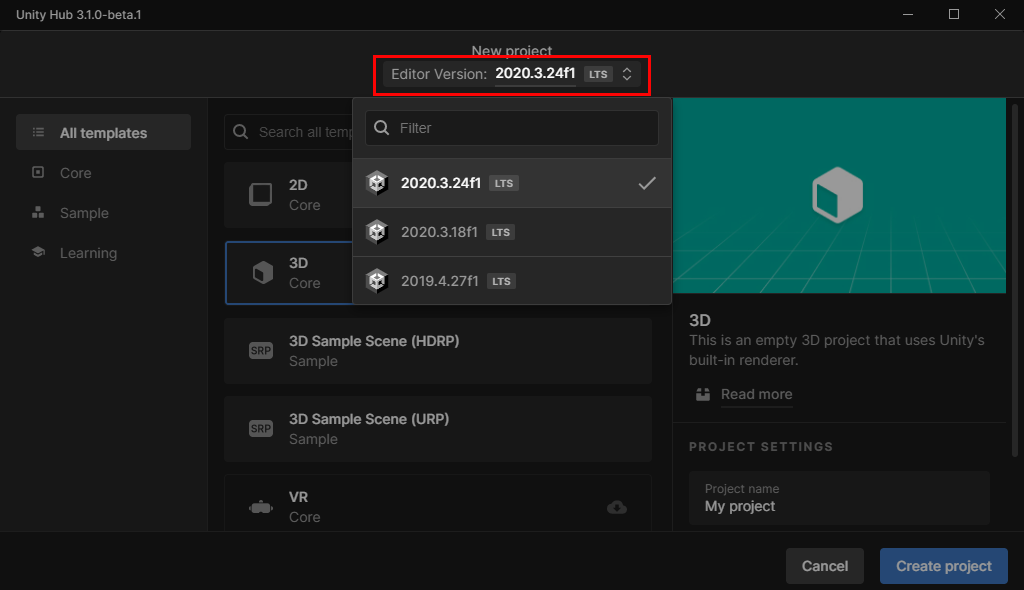
Ensure the chosen template is 3D Core.
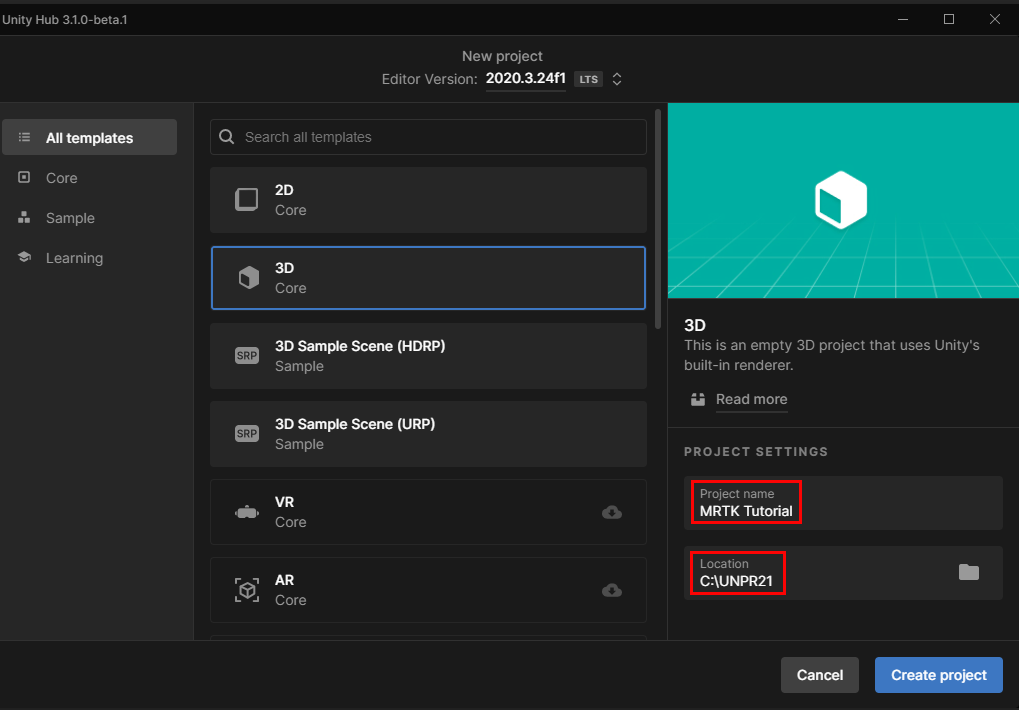
In the Project name box, enter a name for your project--for example, "MRTK Tutorial."
In the Location box, click the folder icon, and then navigate to the folder where you want to save your project and select it. You can also create a new folder.
Click Create Project. This opens your project in Unity.
Caution
When working on Windows, there is a MAX_PATH limit of 255 characters. Unity is affected by these limits and may fail to compile if any file path is longer than 255 characters. Therefore, we recommend that you store your Unity project as close to the root of the drive as possible.
Set your build target
On the menu bar, select File > Build Settings....
To build an app for Windows Mixed Reality, you must choose a build target. The build settings for Universal Windows Platform (UWP) target any device, including immersive headsets like the HP Reverb G2. This is the best choice if you're building for the HoloLens 2; however, if you're targeting desktop VR, we recommend that you use the PC, Mac & Linux Standalone platform.
Do one of the following:
If you're targeting Desktop VR:
- Keep the PC, Mac & Linux Standalone platform which is selected by default on a new Unity project:

If you're targeting the HoloLens 2:
- Under Platform, select Universal Windows Platform. Make sure the following settings are active:
Build Type: D3D Project
Target SDK Version: Latest Installed
Minimum Platform Version: 10.0.10240.0
Visual Studio Version: Latest installed
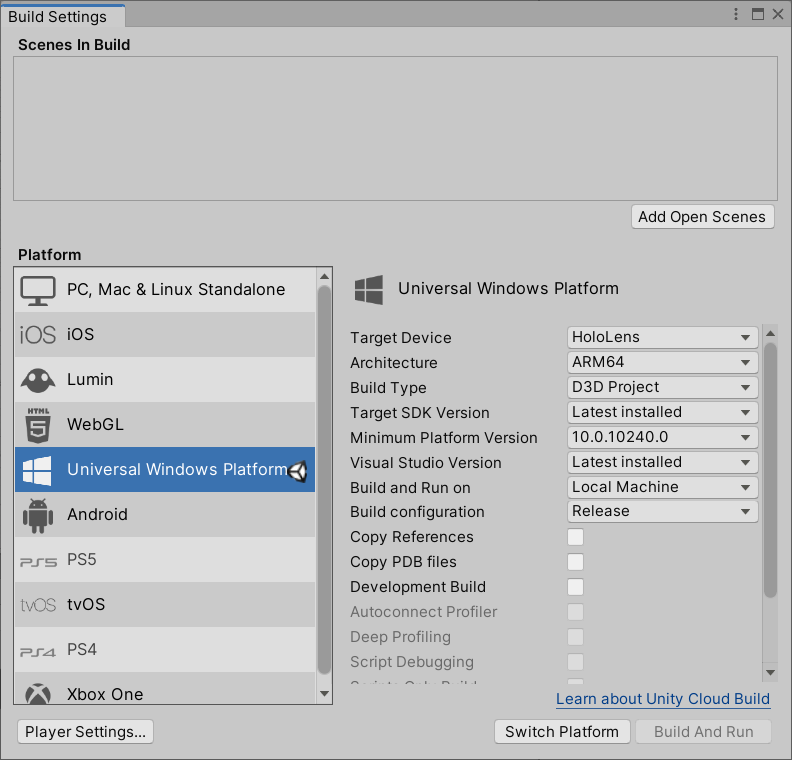
Click the Switch Platform button. Unity displays a progress bar while it switches platforms.
After the switch platform process is finished, close the Build Settings window.
Download and install the Mixed Reality Feature Tool
The Mixed Reality OpenXR Plugin comes in the form of a package for Unity. The best way to discover, update, and import feature packages is with the Mixed Reality Feature Tool. You can search packages by name or category, see their dependencies, and view proposed changes to your project's manifest file before importing.
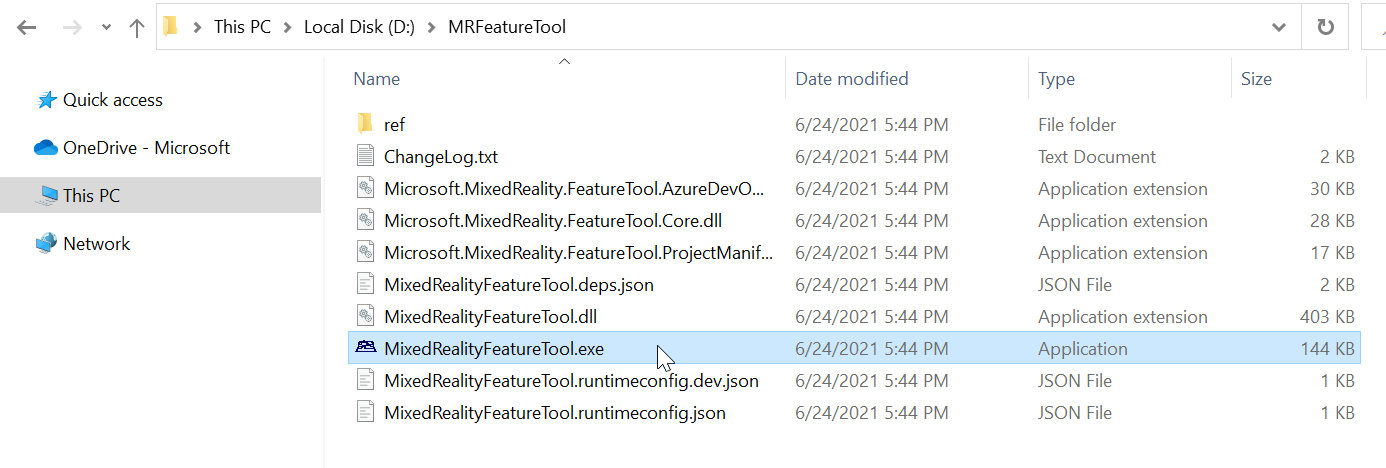
Download the latest version of the Mixed Reality Feature Tool from the Microsoft Download Center.
After the download finishes, navigate to the executable file MixedRealityFeatureTool.exe and then use it to launch the Mixed Reality Feature Tool.
Import the Mixed Reality Toolkit and OpenXR packages
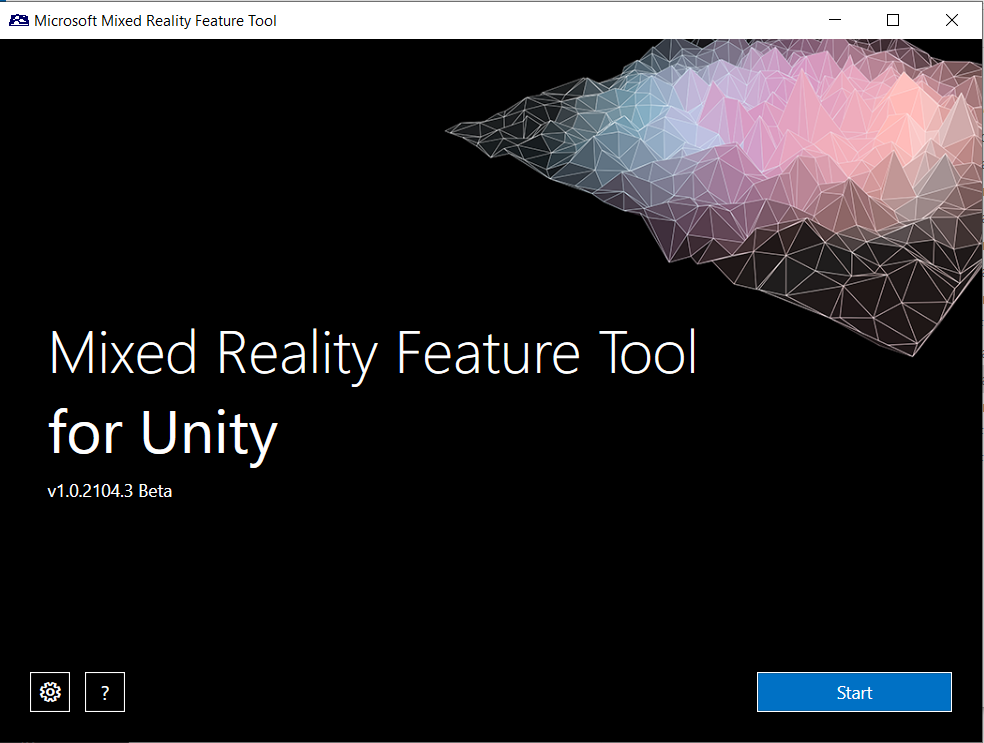
In the Mixed Reality Feature Tool, select Start.
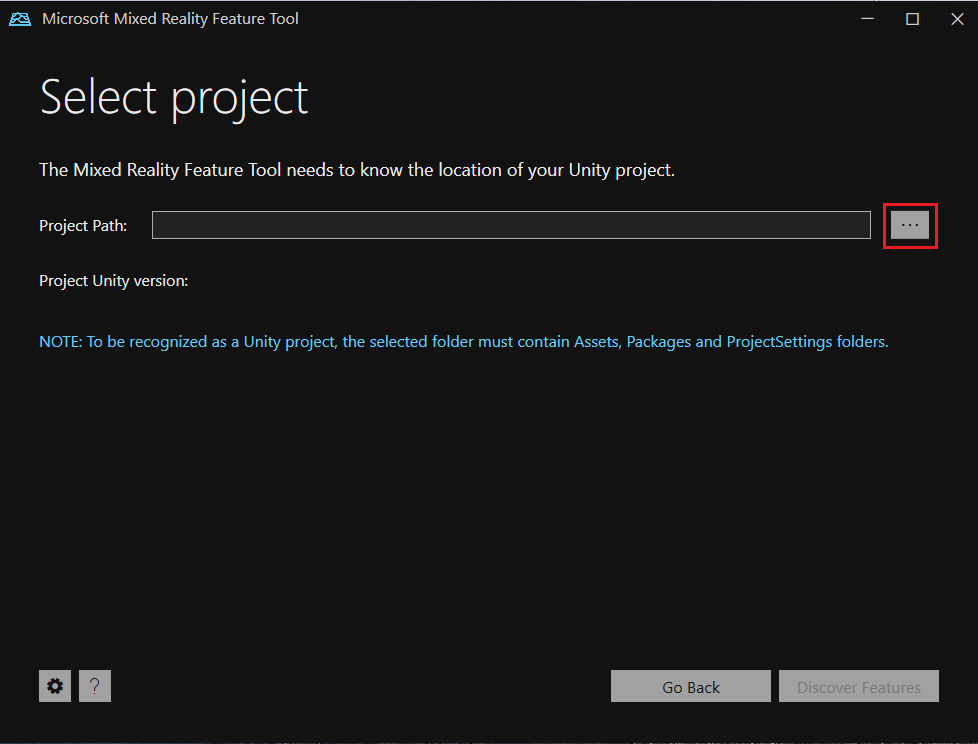
Select the Browse button (it's the "three-dot" button in the image below), then navigate to your project, and then open it.
Note
The Project Path box in the Tool must contain a value, so it inserts a backslash ("_") by default.
After you select a folder, the Tool checks to ensure that it's a valid Unity project folder.

Select Discover Features.
Note: You may need to wait a few seconds while the Tool refreshes the packages from the feeds.
On the Discover Features page, note that there is a list of six package groups.
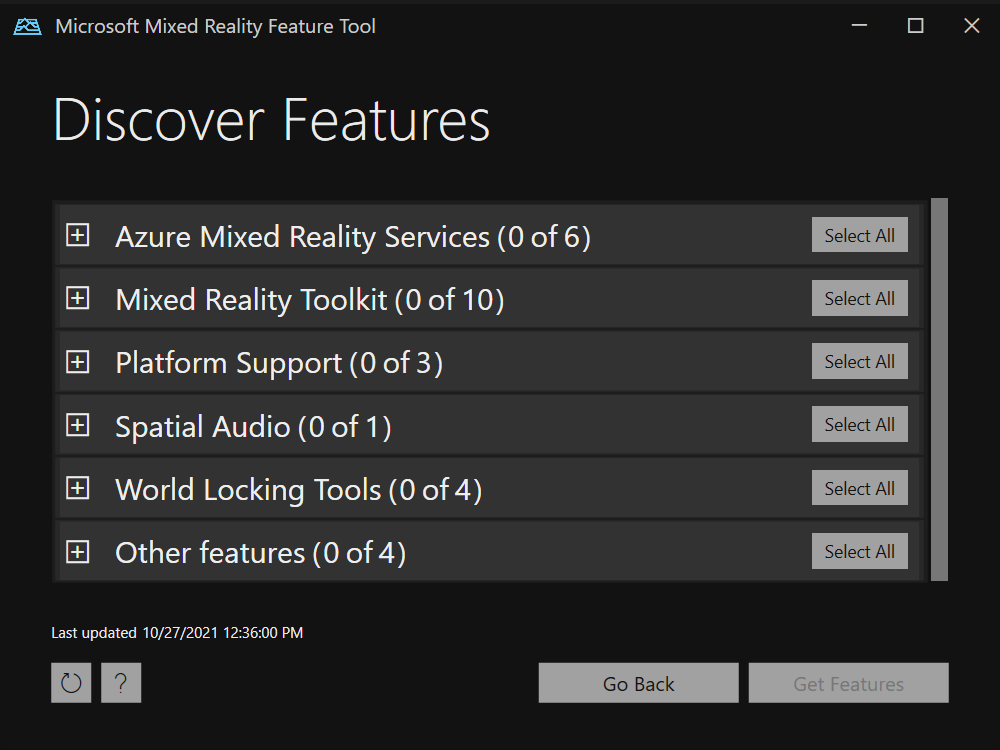
Click the "+" button to the left of Mixed Reality Toolkit (0 of 10) and then select the latest version of Mixed Reality Toolkit Foundation.
Note
The Mixed Reality Toolkit Foundation package is the only package that must be imported and configured in order to use MRTK with your project. This package includes the core components required to create a mixed reality application.
Click the "+" button to the left of Platform Support (0 of 5) and then select the latest version of Mixed Reality OpenXR Plugin.

After you've made your selection(s), click Get Features.
Select Validate to validate the packages you selected. You should see a dialog that says No validation issues were detected. When you do, click OK.
On the Import Features page, the left-side column, Features, displays the packages you just selected. The right-side column, Required dependencies, displays any dependencies. You can click the Details link for any of these items to learn more about them.
When you're ready to move on, select Import. On the Review and Approve page, you can review information about the packages.
Select Approve.
Return to the Unity Editor and click a blank area in the UI. You'll see a progress bar showing you that your packages are being imported.
Configure Input Backend settings
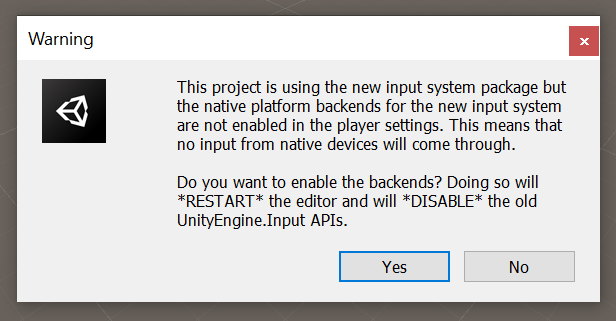
After Unity has imported the package, a warning appears asking if you want to enable the backends by restarting the editor. Select Yes.
Configure the project for the HoloLens 2 via Project Validation (MR OpenXR 1.6+)
If you're developing for desktop VR, skip this section and go to Configure the project for desktop VR.
- On the menu bar, click on Mixed Reality > Project Validation Settings > HoloLens 2 Application (UWP) to enable the validation rules for HoloLens 2. For MR OpenXR plugins before version 1.9, the menu item available is Mixed Reality > Project > Apply recommended project settings for HoloLens 2.
- In the project validation window that pops up, make sure you're on the UWP platform tab (indicated by the Windows logo), and click Fix all to resolve the validation issues. Note that there may be issues that remain after clicking on Fix all. In that case, try clicking on Fix all again, ignore any issues that are marked "scene specific" (if any), and go through the rest of the issues (if any) to see if there are any suggested changes that you want to make.
- The project is almost ready for HoloLens 2 deployment at this point. Proceed to Configure Player settings for the next step.
Configure the project for the HoloLens 2 manually
If you're developing for desktop VR, skip this section and go to Configure the project for desktop VR.
Make sure the Project Settings window is open. If not, on the menu bar, select Edit > Project Settings.
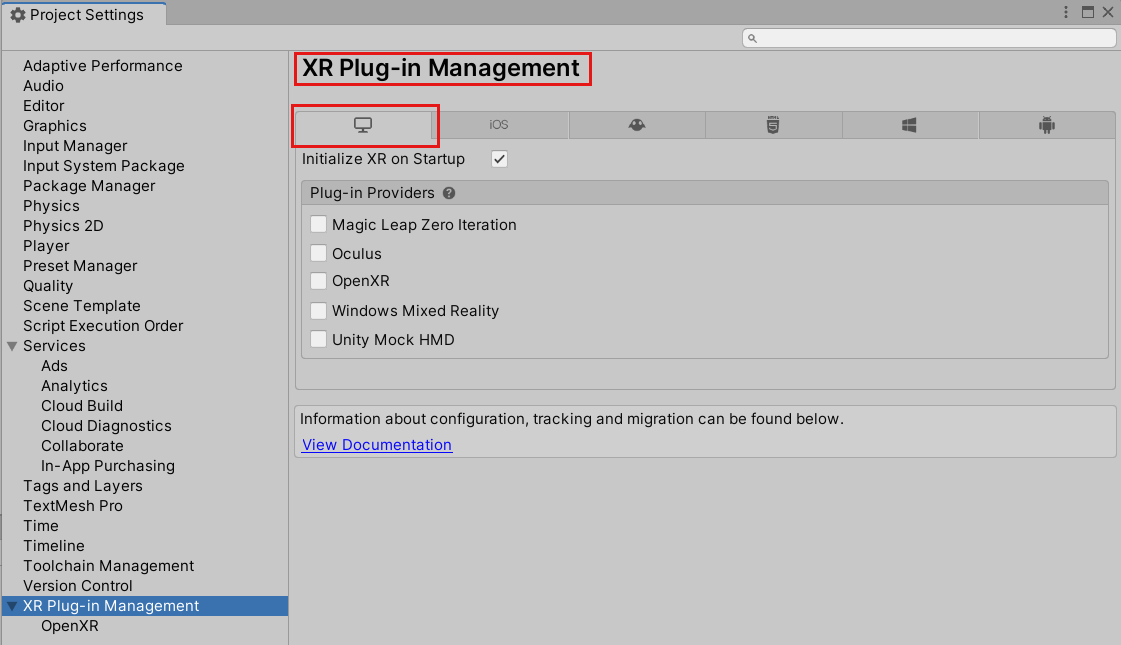
In the Project Settings window, ensure that you're on the XR Plug-in Management page and in the Universal Windows Platform tab.

Ensure that Initialize XR on Startup is selected, and then, under Plugin Providers, click OpenXR.
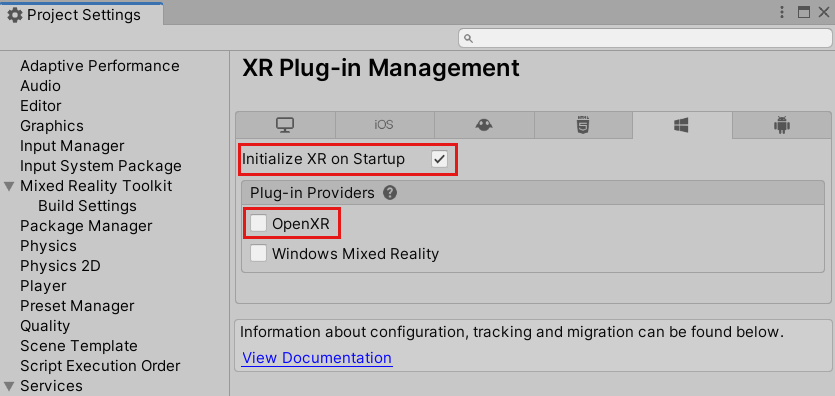
The OpenXR Plugin loads, and then multiple items appear underneath OpenXR. Select Microsoft HoloLens feature group.
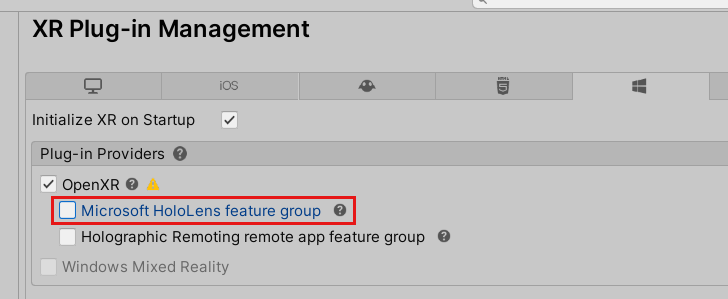
Note that there's a yellow warning triangle next to OpenXR. This indicates that you have incompatible settings that need to be resolved. To find out how to address this, skip the next section about configuring for VR and continue on with the following section, Resolving incompatible settings.
Configure the project for desktop VR via Project Validation (MR OpenXR 1.9+)
- On the menu bar, click on Mixed Reality > Project Validation Settings > Win32 Application (Standalone) to enable the validation rules for a desktop XR app.
- In the project validation window that pops up, make sure you're on the Standalone platform tab, and click Fix all to resolve the validation issues. Note that there may be issues that remain after clicking on Fix all. In that case, try clicking on Fix all again, ignore any issues that are marked "scene specific" (if any), and go through the rest of the issues (if any) to see if there are any suggested changes that you want to make.
Configure the project for desktop VR manually
Make sure the Project Settings window is open. If not, go to the menu bar, select Edit > Project Settings.
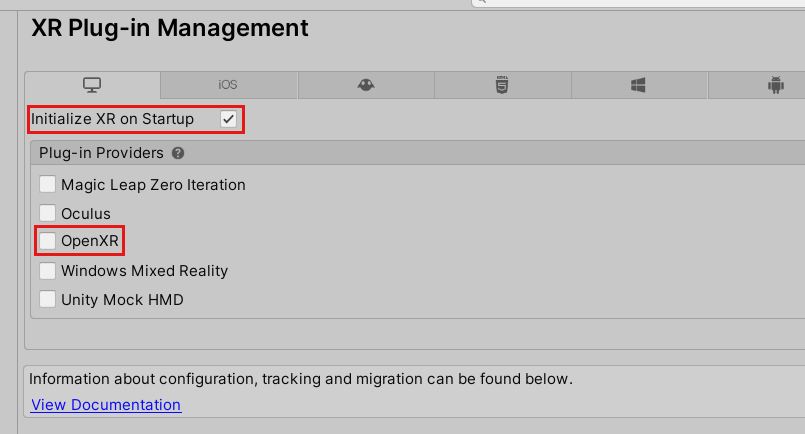
In the Project Settings window, ensure that you're on the XR Plug-in Management page and in the PC, Mac & Linux Standalone tab.
Ensure that Initialize XR on Startup is selected, and then, under Plugin Providers, click OpenXR.
The OpenXR Plugin loads, and then two items appear underneath OpenXR. Select the first one, Windows Mixed Reality feature group.

Note that there's now a yellow warning triangle next to OpenXR. This indicates that you have incompatible settings that need to be resolved. To find out how to address this, continue to the next section, Resolving incompatible settings.
Resolving incompatible settings
Important
The images in this section show the options in the Universal Windows Platform tab. However, the instructions are the same for the Desktop VR tab, except where noted.
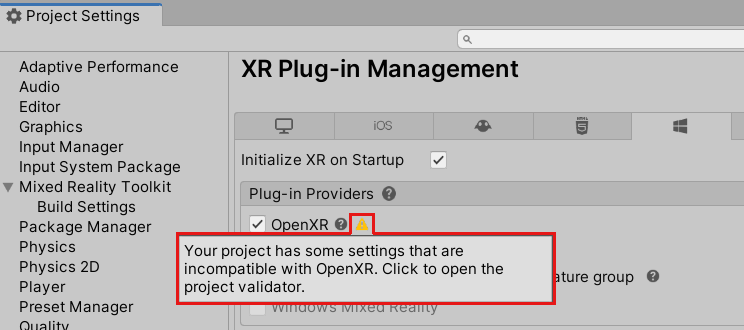
Hover your cursor over the yellow warning triangle next to OpenXR, then read the message in the popup, and then select the triangle.
In the OpenXR Project Validation window, there are several issues listed. Select the Fix All button. NOTE: This list may look different depending on which tab you're in.
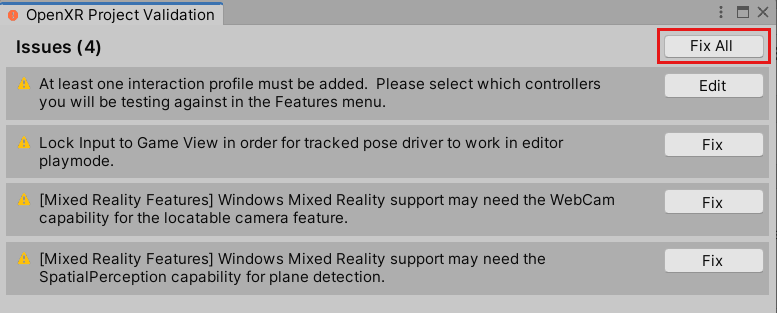
One issue remains and tells you that you must add at least one interaction profile. To do so, click Edit. This takes you to the settings for the OpenXR plugin in the Project Settings window.
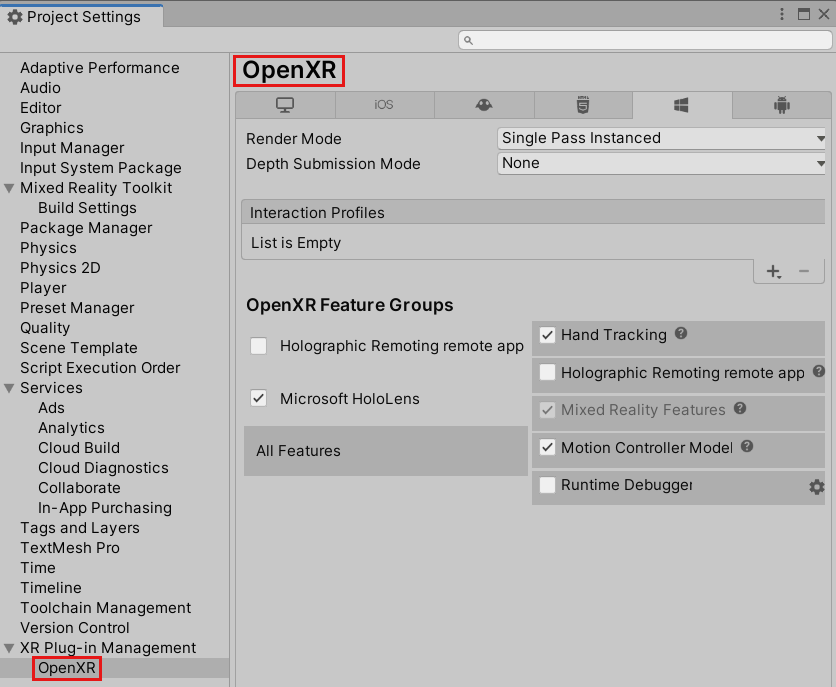
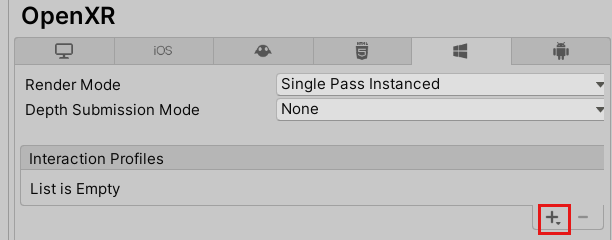
Underneath Interaction Profiles, note the plus sign (+) button.
Click the button three times, each time choosing a different profile:
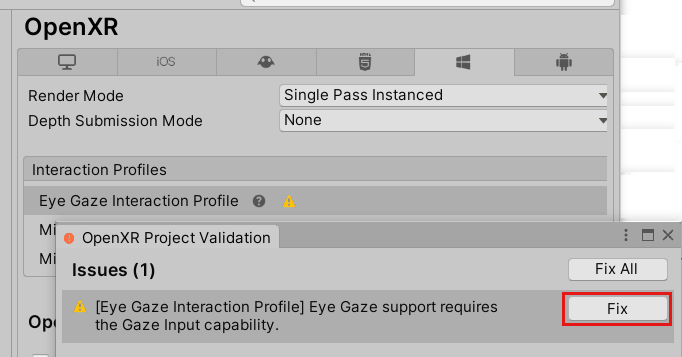
Eye Gaze Interaction Profile
Microsoft Hand Interaction Profile
Microsoft Motion Controller Profile
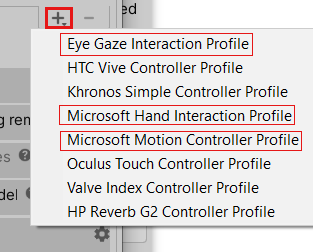
If the Eye Gaze Interaction Profile, or any other profile, appears with a yellow triangle next to it, select the triangle, and then in the OpenXR Project Validation window, click the Fix button. When you're finished, close the OpenXR Project Validation window.
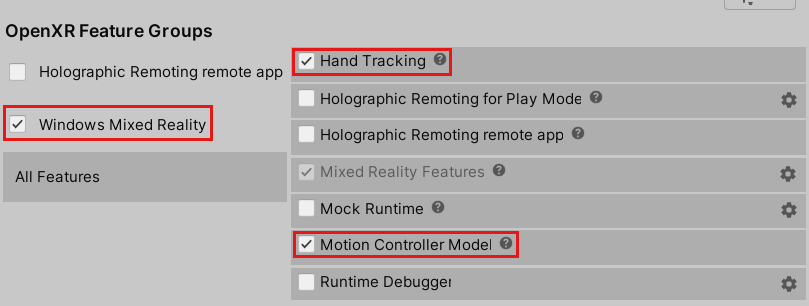
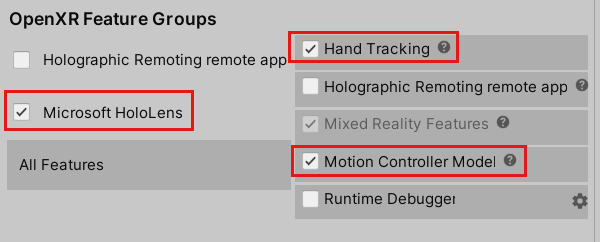
In the Project Settings window under OpenXR Feature Groups, ensure that the following are selected:
If you're in the Desktop VR tab:
Windows Mixed Reality
Hand Tracking
Motion Controller Model
If you're in the Universal Windows Platform tab:
Microsoft HoloLens
Hand Tracking
Motion Controller Model
Click the Depth Submission Mode drop down and then select Depth 16 Bit.

Tip
Reducing the Depth Format to 16-bit is optional, but it may improve graphics performance in your project. To learn more, see Depth buffer sharing (HoloLens).
Note
The Render Mode setting, located just above Depth Submission Mode, is set by default to Single Pass Instanced. In mixed reality apps, the scene is rendered twice: once for each eye. The result is "stereoscopic vision." This doubles the amount of necessary computing, so it's important to select the most efficient rendering path in Unity to save on both CPU and GPU time. Single pass instanced rendering is the best choice here--we recommend that you enable it by default for every project. To learn more about this, see the Unity documentation.
Configure Player settings
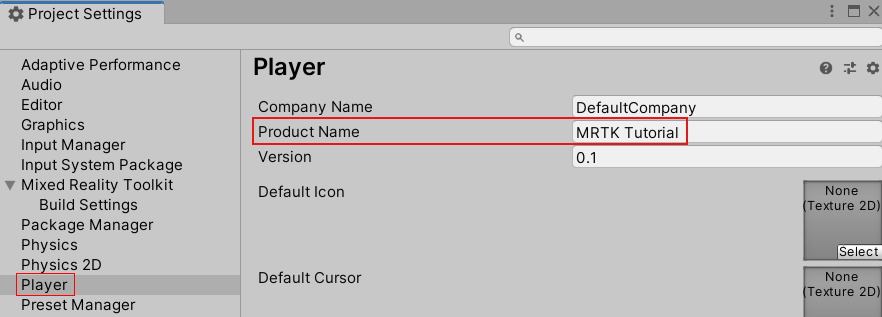
In the Project Settings window's left-side column, select Player.
Note that in the Player window, the Product Name box is already filled. This is taken from your project name and will be the name displayed in the HoloLens Start menu.
Tip
To make the app easier to locate during development, add an underscore in front of the name to sort it to the top of any list.
Click the Publishing Settings drop down, and then in the Package name field, enter a suitable name.

Note
The package name is the unique identifier for the app. If you want to avoid overwriting previously installed versions of the app with the same name, you should change this identifier before deploying the app.
Close the Project Settings window.
You're now ready to begin developing with OpenXR in Unity!
Unity sample projects
Check out the OpenXR Mixed Reality samples repo for sample unity projects showcasing how to build Unity applications for HoloLens 2 or Mixed Reality headsets using the Mixed Reality OpenXR plugin.
See also
Feedback
Coming soon: Throughout 2024 we will be phasing out GitHub Issues as the feedback mechanism for content and replacing it with a new feedback system. For more information see: https://aka.ms/ContentUserFeedback.
Submit and view feedback for