Hologram stabilization — MRTK2
Performance
In order for the underlying mixed reality platform and device to produce the best results, it is important to achieve performing frame rates. The target framerate (ex: 60 FPS or 90 FPS) will vary across platforms and devices. However, mixed reality applications meeting framerate will have stable holograms as well as efficient head tracking, hand tracking and more.
Environment tracking
Stable holographic rendering heavily relies on head-pose tracking by the platform & device. Unity will render the scene every frame from the camera pose estimated and supplied by the underlying platform. If this tracking does not correctly follow actual head movement, then holograms will appear visually inaccurate. This is especially evident and important for AR devices like HoloLens where users can relate virtual holograms to the real world. Performance is significant for reliable head tracking, but there can be other important features, as well. The types of environment elements impacting user experience will depend on the targeted platform specifics.
Windows Mixed Reality
The Windows Mixed Reality platform provides some reference material for stabilizing holograms on the platform. There are a handful of key tools though that developers can utilize to improve the hologram visual experience for users.
Depth buffer sharing
Unity developers have the option of sharing the application's depth buffer with the platform. This provides information, where holograms exist for a current frame, that the platform can utilize to stabilize holograms via a hardware-assisted process known as Late-Stage Reprojection.
Late-stage reprojection
At the end of rendering a frame, the Windows Mixed Reality platform takes the color & depth render targets produced by the application and transforms the final screen output to account for any slight head movement since the last head pose prediction. An application's game loop takes time to execute. For example, at 60 FPS, this means the application is taking ~16.667ms to render a frame. Even though this may seem like a miniscule amount of time, the user's position and orientation of their head will change resulting in new projection matrices for the camera in rendering. Late-stage reprojection transforms the pixels in the final image to account for this new perspective.
Per-pixel vs stabilization plane LSR
Depending on the device endpoint and OS version running on a Windows Mixed Reality device, the Late-Stage Reprojection algorithm will either be performed per-pixel or via a stabilization plane.
Per-pixel depth-based
Per-pixel depth-based reprojection involves utilizing the depth buffer to modify the image output per pixel and thus stabilize holograms at various distances. For example, a sphere 1m away may be in front of a pillar that is 10m away. The pixels representing the sphere will have a different transform than the far away pixels representing the pillar if the user has tilted their head slightly. Per-pixel reprojection will take into account this distance difference at every pixel for more accurate reprojection.
Stabilization plane
If it is not possible to create an accurate depth buffer to share with the platform, another form of LSR utilizes a stabilization plane. All holograms in a scene will receive some stabilization, but holograms lying in the desired plane will receive the maximum hardware stabilization. The point and normal for the plane can be supplied to the platform via the HolographicSettings.SetFocusPointForFrame API provided by Unity.
Depth buffer format
If targeting HoloLens for development, it is highly recommended to utilize the 16-bit depth buffer format compared to 24-bit. This can save tremendously on performance although depth values will have less precision. To compensate for the lower precision and avoid z-fighting, it is recommended to reduce the far clip plane from the 1000m default value set by Unity.
Note
If using 16-bit depth format, stencil buffer required effects will not work because Unity does not create a stencil buffer in this setting. Selecting 24-bit depth format conversely will generally create an 8-bit stencil buffer, if applicable on the endpoint graphics platform.
Depth buffer sharing in Unity
In order to utilize depth-based LSR, there are two important steps that developers need to take.
- Under Edit > Project Settings > Player > XR Settings > Virtual Reality SDKs > Enable Depth Buffer Sharing
- If targeting HoloLens, it is recommended to select 16-bit depth format as well.
- When rendering color on screen, render depth as well
Opaque GameObjects in Unity will generally write to depth automatically. However, transparent & text objects will generally not write to depth by default. If utilizing the MRTK Standard Shader or Text Mesh Pro, this can be easily remedied.
Note
To quickly determine which objects in a scene do not write to the depth buffer visually, one can use the Render Depth Buffer utility under the Editor Settings in the MRTK Configuration profile.
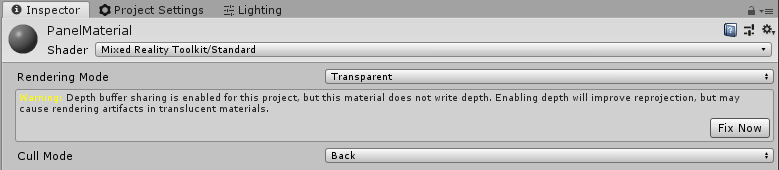
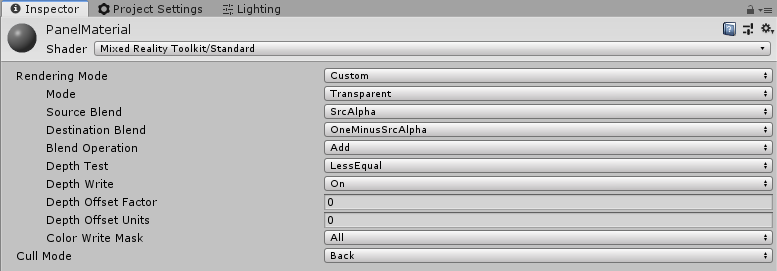
Transparent MRTK Standard shader
For transparent materials using the MRTK Standard shader, select the material to view it in the Inspector window. Then click the Fix Now button to convert the material to write to depth (i.e Z-Write On).
Before
After
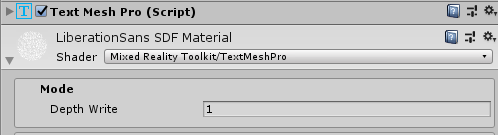
Text Mesh Pro
For Text Mesh Pro objects, select the TMP GameObject to view it in the inspector. Under the material component, switch the shader for the assigned material to use the MRTK TextMeshPro shader.
Custom shader
If writing a custom shader, add the ZWrite flag to the top of the Pass block definition to configure the shader to write to the depth buffer.
Shader "Custom/MyShader"
{
    SubShader
    {
        Pass
        {
            ...
            ZWrite On
            ...
        }
    }
}
Opaque backings
If the above methods do not work for a given scenario (i.e using Unity UI), it is possible to have another object write to the depth buffer. A common example is using Unity UI Text on a floating panel in a scene. By making the panel opaque or at least writing to depth, then both the text & the panel will be stabilized by the platform since their z-values are so close to each other.
WorldAnchors (HoloLens)
Along with ensuring the correct configurations are met to ensure visual stability, it is important to ensure holograms remain stable at their correct physical locations. To inform the platform on important locations in a physical space, developers can leverage WorldAnchors on GameObjects that need to stay in one place. A WorldAnchor is a component added to a GameObject that takes absolute control over that object's transform.
Devices such as HoloLens are constantly scanning and learning about the environment. Thus, as the HoloLens tracks movement & position in space, its estimates will be updated and the Unity coordinate system adjusted. For example, if a GameObject is placed 1m from the camera at start, as the HoloLens tracks the environment, it may realize the physical point where the GameObject is located is actually 1.1m away. This would result in the hologram drifting. Applying a WorldAnchor to a GameObject will enable the anchor to control the object's transform so that the object will remain at the correct physical location (i.e. update to 1.1m away instead of 1m at runtime). To persist WorldAnchors across app sessions, developers can employ the WorldAnchorStore to save and load WorldAnchors.
Note
Once a WorldAnchor component has been added to a GameObject, it is not possible to modify that GameObject's transform (i.e transform.position = x). A developer must remove the WorldAnchor to edit the transform.
WorldAnchor m_anchor;

public void AddAnchor()
{
    this.m_anchor = this.gameObject.AddComponent<WorldAnchor>();
}

public void RemoveAnchor()
{
    DestroyImmediate(m_anchor);
}
If you want an alternative to manually working with Anchors, check out the Microsoft World Locking Tools.
See also
Feedback
Coming soon: Throughout 2024 we will be phasing out GitHub Issues as the feedback mechanism for content and replacing it with a new feedback system. For more information see: https://aka.ms/ContentUserFeedback.
Submit and view feedback for