How-To Guide: Integrating with MS Graph Notifications (Windows UWP)
With the Graph Notifications client-side SDK on Windows, your Windows UWP app can perform the necessary registration steps to become a receiving endpoint that receives notifications published from your app server targeted at a user. The SDK is then used to manage the notifications on the client side including receiving new notification payloads arrived on this client, managing the state of notifications, and retrieving notification history. For more information about MS Graph Notifications and how it enables human-centric notification delivery, see Microsoft Graph Notifications Overview
See the API reference page for links to the reference docs relevant to notification scenarios.
Preliminary setup for accessing the Connected Devices Platform in order to use Graph Notifications
There are a few steps you must take to integrate with Graph Notifications
- MSA or AAD App Registration
- Dev Center Onboarding to Provide Cross-Platform App Identity and Push Notification Credentials
- Adding the SDK and Initializing the Connected Devices Platform
- Associate the Notification Service with Connected Devices Platform
First, you must complete the MSA and/or AAD App Registration. If you've done this already, skip to the next section.
MSA and AAD Authentication Registration
Microsoft Account (MSA) or Azure Active Directory (AAD) authentication registration is required for all features of the SDK including Notifications, except for the Nearby sharing APIs.
If you do not already have an MSA and wish to use one, register on account.microsoft.com.
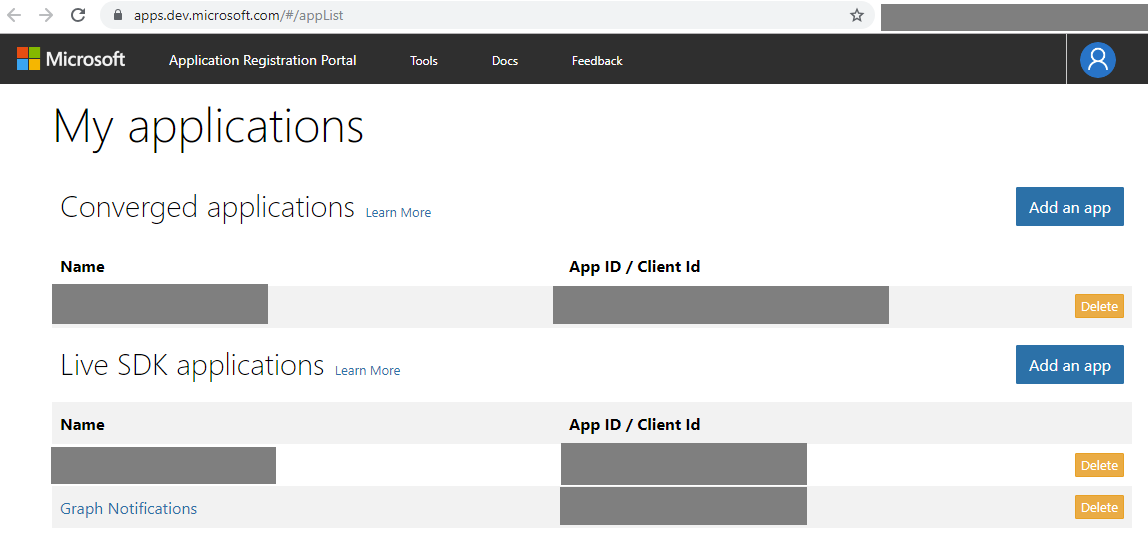
Next, if you are using MSA as the authentication and identity framework for your users, you must register your app with Microsoft by following the instructions on the Application Registration Portal (if you do not have a Microsoft developer account, you must create one first). You should receive a client ID string for your app; make sure to remember the location or save this. Later this will be used during Graph Notifications onboarding.
Note that an app using MSA authentication needs to be registered as a Live SDK application as shown below.
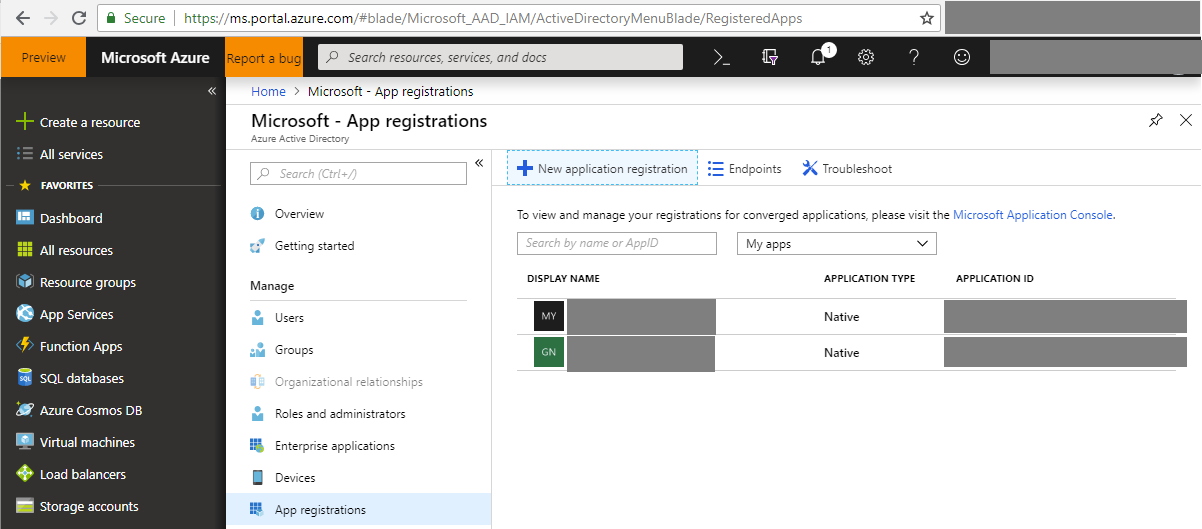
If you're writing an app that uses AAD as work account or school account authentication and identity framework, you must register your app via Azure Active Directory Authentication Libraries in order to get the client ID, as shown below.
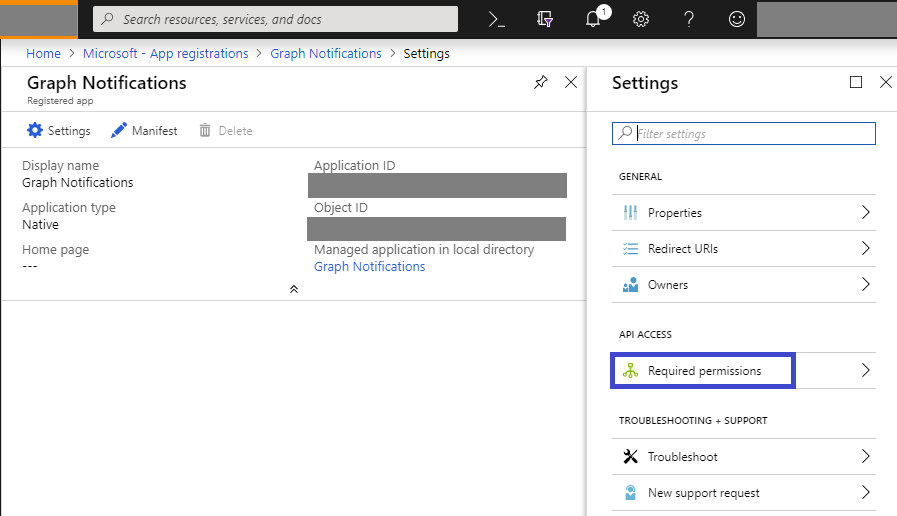
 When creating a new app registration, there are a few permissions required in order to use Graph Notifications and other connected device platform capabilities. Please see below.
- Add user sign-in permission shown as below.
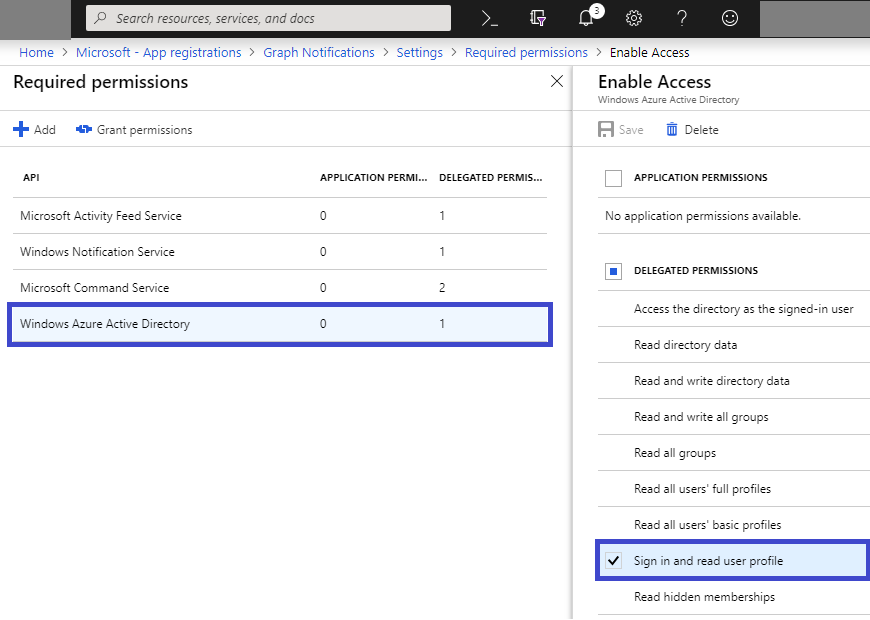
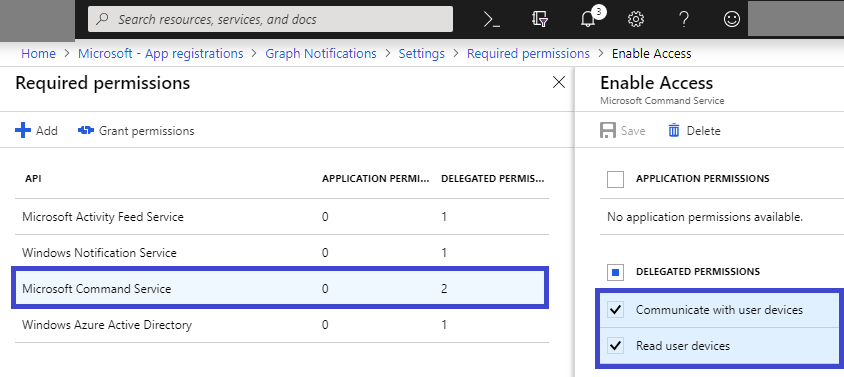
- Add Command Service permissions for device information, shown as below.
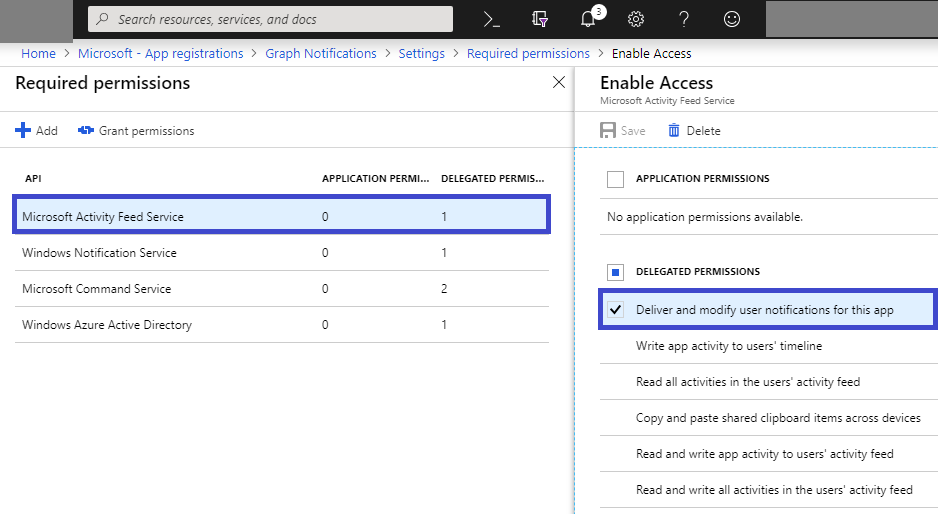
- Add Graph Notifications permission under Activity Feed Service APIs, shown as below.
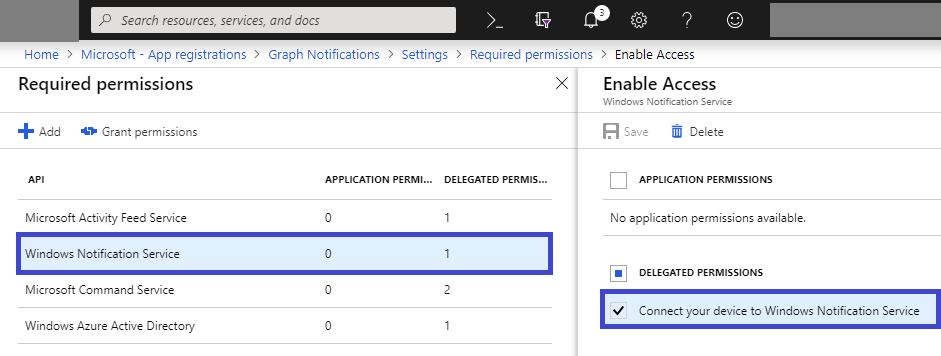
- At the end, if you are writing cross-platform application including an UWP app running on Windows, make sure to add Windows Notification Service permission, shown as below.
Next, you must onboard with Microsoft Windows Dev Center to get access to the Connected Device Platform in order to integrate with cross-device experiences including use of Graph Notifications. If you've done this already, skip to the next section.
Register your app in Microsoft Windows Dev Center for cross-device experiences
Next, you need to register your app for the cross-device experiences feature of the Microsoft Developer Dashboard. This is a different procedure from MSA and AAD app registration, which was covered in the steps above. The main goal for this process is to map the platform specific app identities with a cross-platform app identity that is recognized by Connected Devices Platform, and at the same time authorizes Microsoft Graph Notifications to send notifications using the native push notification services corresponding to each OS platform. In this case, it enables Graph Notifications to send notifications to Windows UWP app endpoints via WNS – Windows Notification Service.
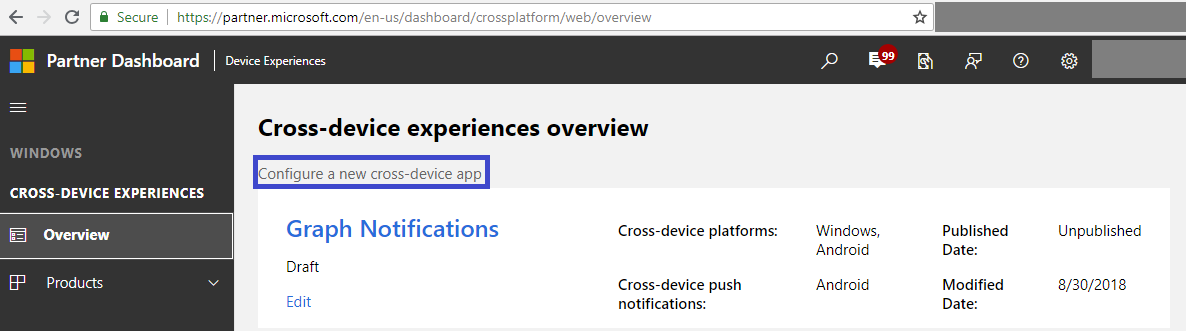
Go to Dev Center Dashboard, navigate to Cross-Device Experiences from the left side navigation pane, and select configuring a new cross-device app, shown as below.
The Dev Center on-boarding process require the following steps:
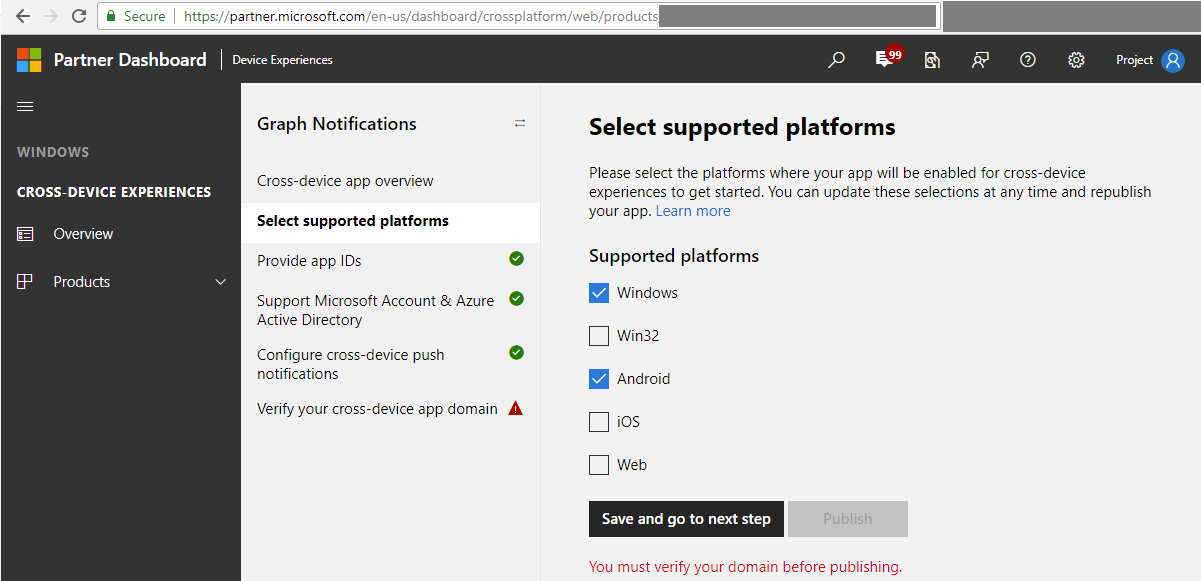
Select supported platforms – select the platforms where your app will have a presence and be enabled for cross-device experiences. In the case of Graph Notifications integration, you can select from Windows, Android, and/or iOS. Shown as below.
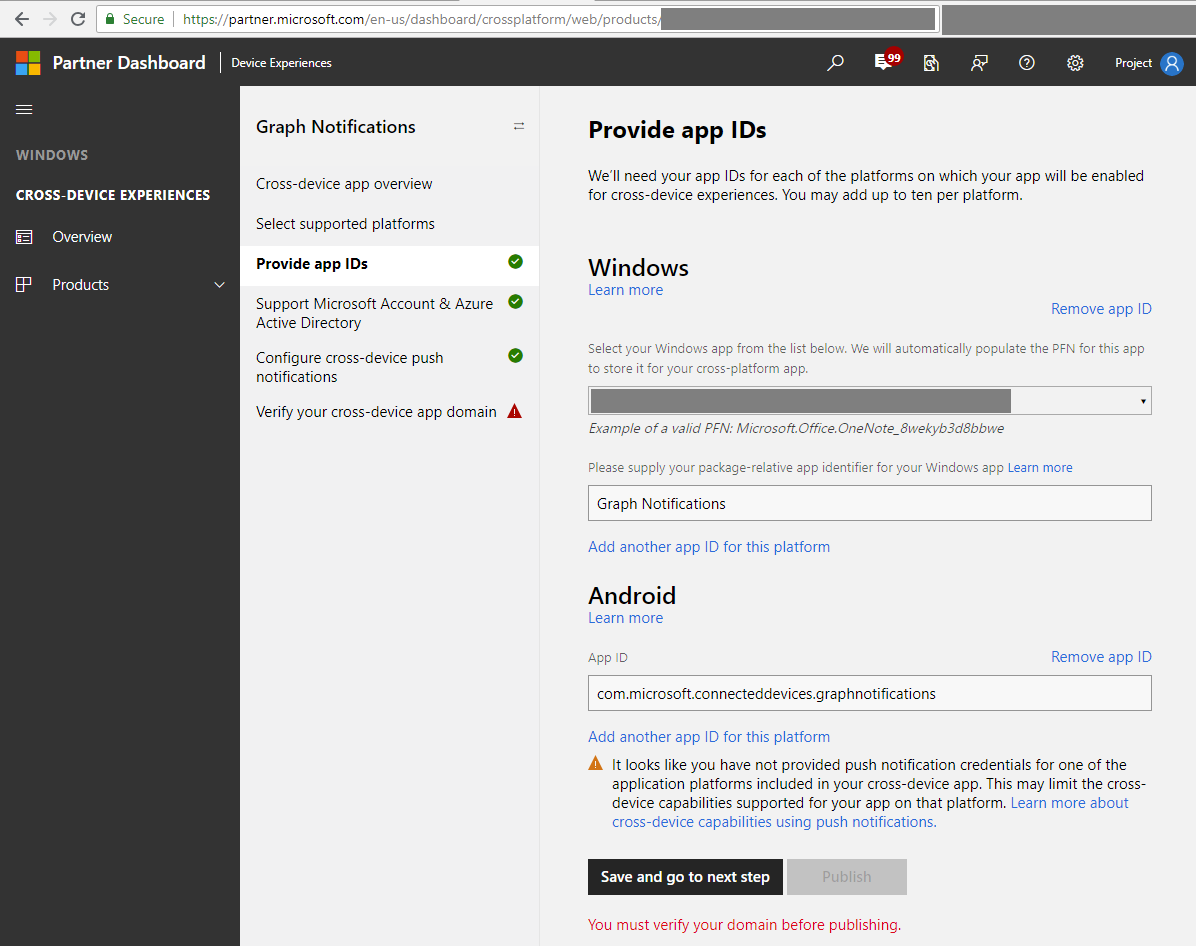
Provide app IDs – provide app IDs for each of the platform where your app has a presence. Shown as below.
Note
You may add different IDs (up to ten) per platform – this is in case you have multiple version of the same app, or even different apps, that want to be able to receive the same notifications sent by your app server targeted at the same user.
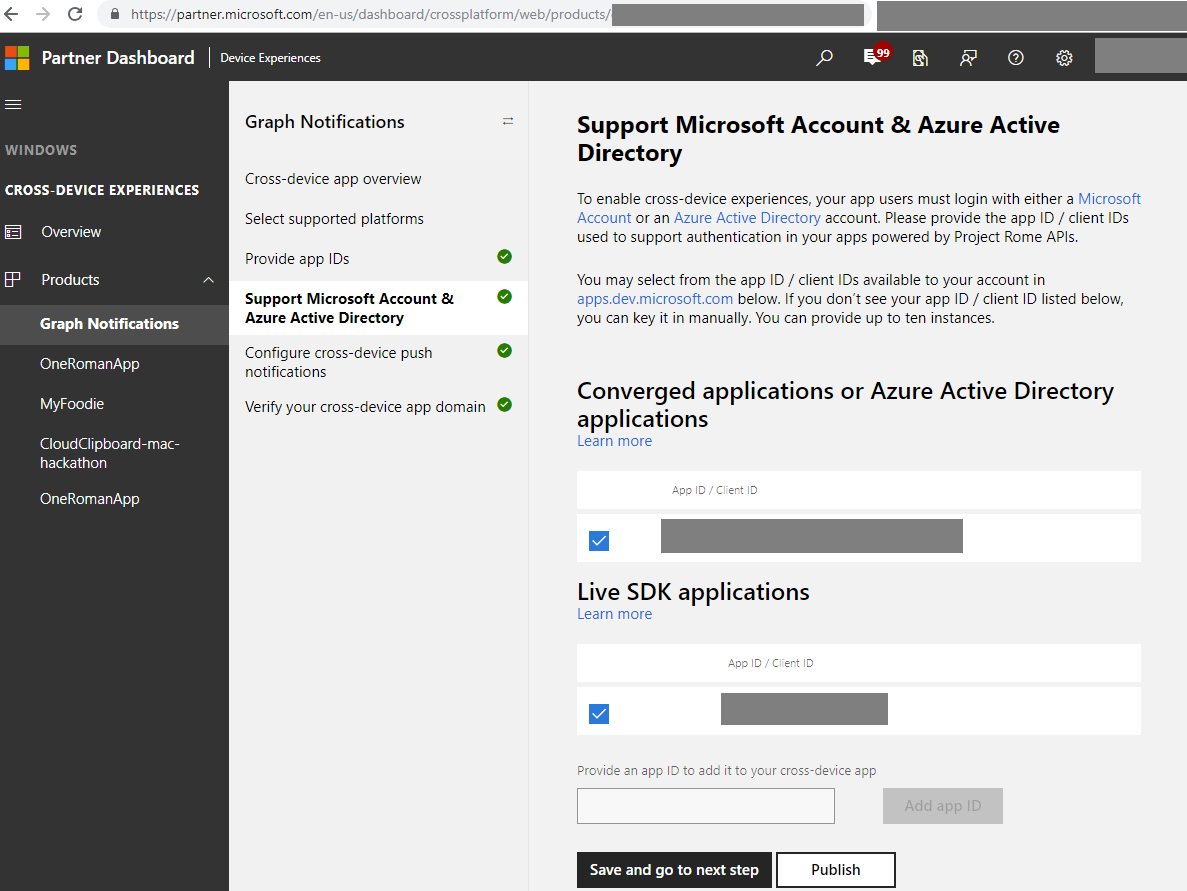
- Provide or select the app IDs from MSA and/or AAD app registrations. These client IDs corresponding to MSA or AAD app registration were obtained in the previous MSA/AAD app registration steps from above. Shown as below.
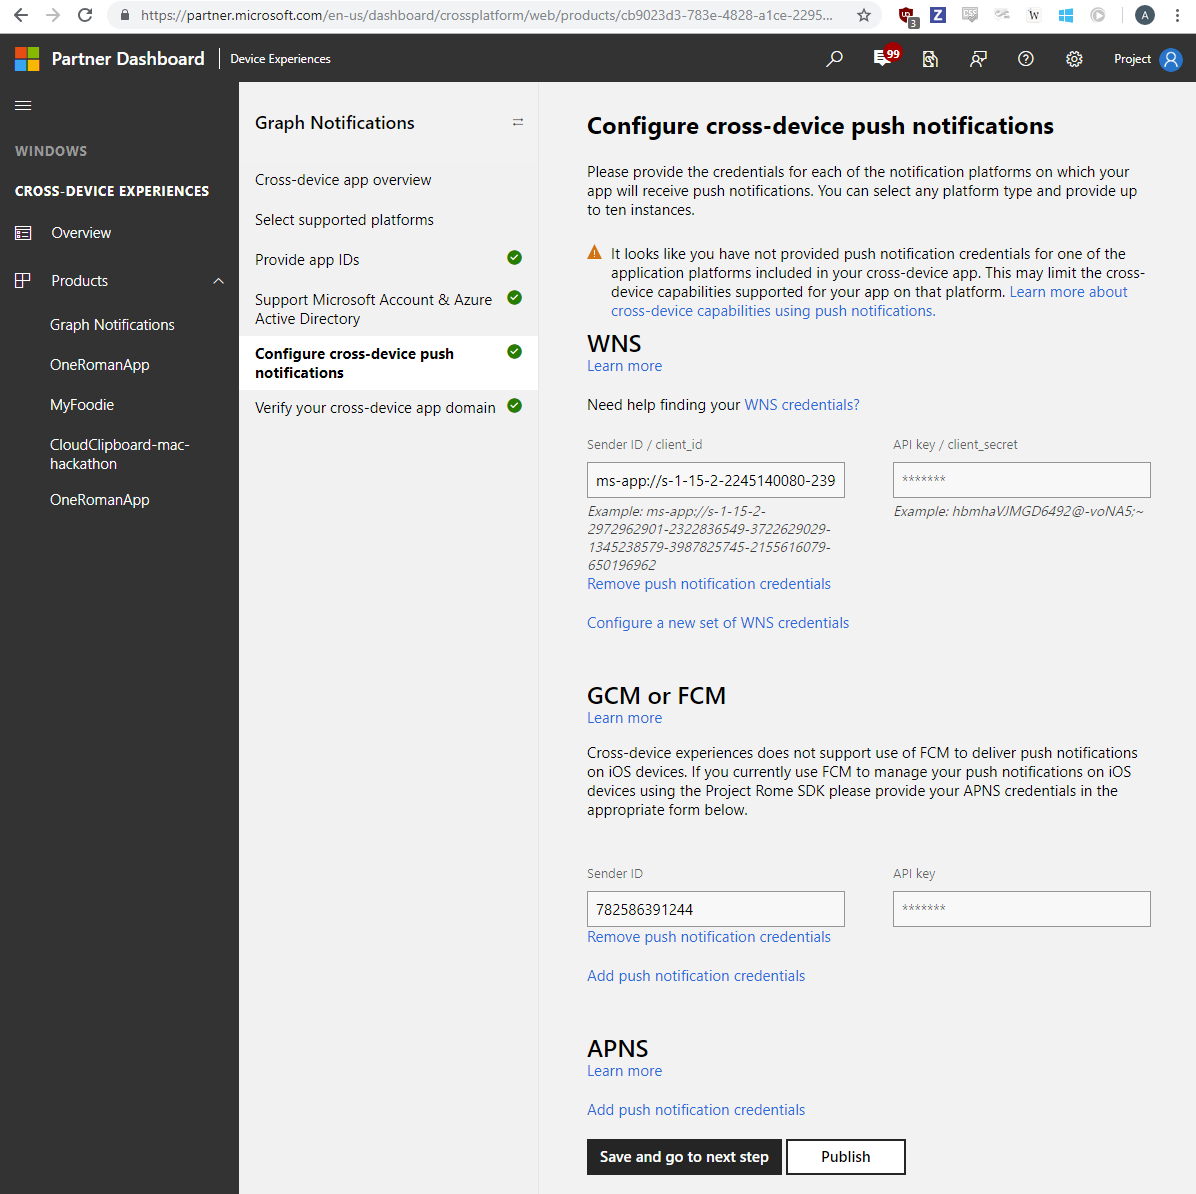
- Graph Notifications and other Connected Devices Platform capabilities leverages each of the native notification platforms on major platforms to send notifications down to the app client endpoints, namely, WNS (for Windows UWP), GCM (for Android) and APNS (for iOS). Provide your credentials for these notification platforms to enable Graph Notifications to deliver the notifications for your app server, when you publish user-targeted notifications. Shown as below.
Note
For Windows UWP apps, enabling WNS push notification is a prerequisite to use Microsoft Graph Notifications. See WNS Overview for more details. Once you complete the onboarding, you can then provide the push credentials via Windows Dev Center to the Connected Device Platform.
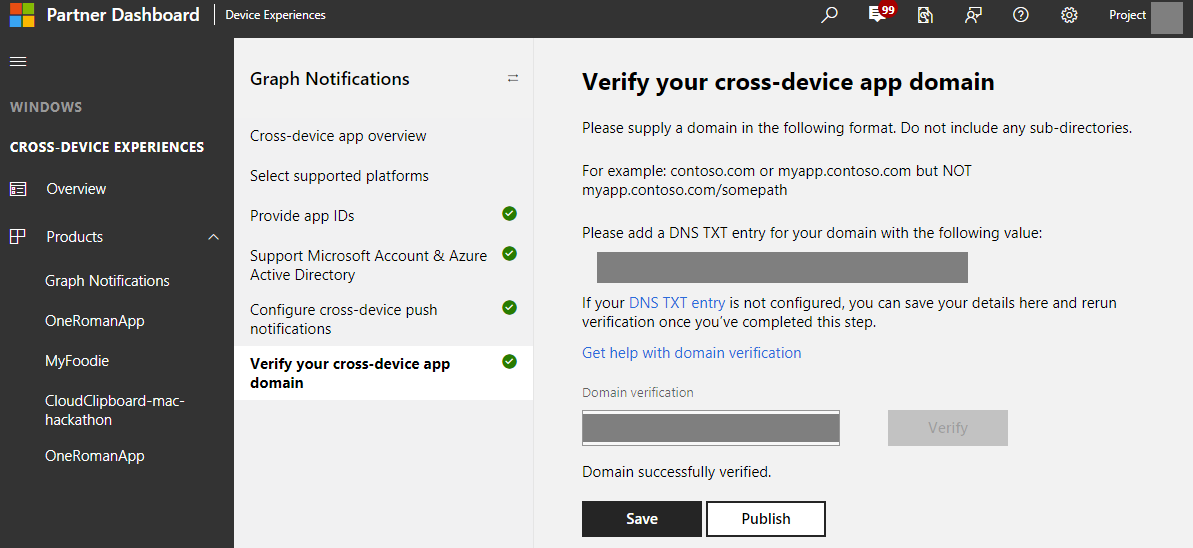
- The last step is to verify your cross-device app domain, which serves as a verification process to prove that your app has the ownership of this domain which acts like a cross-device app identity for the app you registered. Shown as below.
 Now you are all set with onboarding! Please proceed to next section.
Next, you must add the Project Rome SDK to your project and initialize the Connected Devices Platform. If you've done this already, skip to the next section.
Add the SDK
Insert the following repository references into the build.gradle file at the root of your project.
allprojects {
    repositories {
        jcenter()
        maven { url 'https://maven.google.com' }
        maven { url 'https://projectrome.bintray.com/maven/' }
    }
}
Then, insert the following dependency into the build.gradle file that is in your project folder.
dependencies {
    ...
    implementation 'com.microsoft.connecteddevices:connecteddevices-sdk:0.11.0'
}
If you wish to use ProGuard in your app, add the ProGuard Rules for these new APIs. Create a file called proguard-rules.txt in the App folder of your project, and paste in the contents of ProGuard_Rules_for_Android_Rome_SDK.txt.
In your project's AndroidManifest.xml file, add the following permissions inside the <manifest> element (if they are not already present). This gives your app permission to connect to the Internet and to enable Bluetooth discovery on your device.
<uses-permission android:name="android.permission.INTERNET" />
<uses-permission android:name="android.permission.BLUETOOTH" />
<uses-permission android:name="android.permission.BLUETOOTH_ADMIN" />
<uses-permission android:name="android.permission.ACCESS_COARSE_LOCATION" />
<uses-permission android:name="android.permission.ACCESS_NETWORK_STATE" />
Note
The Bluetooth-related permissions are only necessary for using Bluetooth discovery; they are not needed for the other features in the Connected Devices Platform. Additionally, ACCESS_COARSE_LOCATION is only required on Android SDKs 21 and later. On Android SDKs 23 and later, the developer must also prompt the user to grant location access at runtime.
Next, go to the activity class(es) where you would like to add the Connected Devices functionality. Import the connecteddevices namespaces.
import com.microsoft.connecteddevices.*;
Depending on which scenarios you implement, you many not need all of the namespaces. You may also need to add other Android-native namespaces as you progress.
Initialize the Connected Devices Platform
Before any Connected Devices features can be used, the platform must be initialized within your app. The initialization steps should occur in your main class' onCreate or onResume method, because they are required before other Connected Devices scenarios can take place.
You must instantiate the Platform class. The Platform constructor takes three parameters: the Context for the app, a NotificationProvider, and a UserAccountProvider.
The NotificationProvider parameter is only needed for certain scenarios. In the case of using Microsoft Graph Notifications, it is required. Leave it as null for now and find out how to enable the client SDK to handle incoming user-centric notifications via native push channels in next section.
The UserAccountProvider is needed to deliver an OAuth 2.0 access token for the current user's access to the Connected Devices Platform. It will be called the first time the app is run and upon the expiration of a platform-managed refresh token.
In order to help developers onboard with the platform more easily, we have provided account provider implementations for Android and iOS. These implementations, found in the authentication provider sample, can be used to obtain the OAuth 2.0 access token and refresh token for your app.
Set up authentication and account management
The Connected Devices Platform requires a valid OAuth token to be used in the registration process. You may use your preferred method of generating and managing the OAuth tokens. However, to help developers get started using the platform, we've included an authentication provider as a part of the Android sample app that generates and manages refresh tokens for your convenience.
If you wish to implement the ConnectedDevicesAccountManager interface yourself, take note of the following information:
If you're using an MSA, you will need to include the following scopes in your sign-in request: "wl.offline_access", "ccs.ReadWrite", "dds.read", "dds.register", "wns.connect", "asimovrome.telemetry", and "https://activity.windows.com/UserActivity.ReadWrite.CreatedByApp".
If you're using an AAD account, you'll need to request the following audiences: "https://cdpcs.access.microsoft.com", "https://cs.dds.microsoft.com", "https://wns.windows.com/", and "https://activity.microsoft.com".
Note
Azure Active Directory (AAD) accounts are not supported with the Device Relay APIs.
Whether you use the provided ConnectedDevicesAccountManager implementation or not, if you are using AAD you'll need to specify the following permissions in your app's registration on the Azure portal (portal.azure.com > Azure Active Directory > App registrations):
- Microsoft Activity Feed Service
- Deliver and modify user notifications for this app
- Read and write app activity to users' activity feed
- Windows Notification Service
- Connect your device to Windows Notification Service
- Microsoft Device Directory Service
- See your list of devices
- Be added to your list of devices and apps
- Microsoft Command Service
- Communicate with user devices
- Read user devices
In the code below, mSignInHelper references an MSAAccountProvider, also initialized below. This provided class implements the UserAccountProvider interface.
private MSAAccountProvider mSignInHelper;

// ...

// Create sign-in helper from helper lib, which does user account and access token management for us
// Takes two parameters: a client id for msa, and the Context
mSignInHelper = new MSAAccountProvider(Secrets.MSA_CLIENT_ID, getContext());

// add an event listener, which changes the button text when account state changes
mSignInHelper.addUserAccountChangedListener(new EventListener<UserAccountProvider, Void>() {
    @Override
    public void onEvent(UserAccountProvider provider, Void aVoid){
        if (mSignInHelper.isSignedIn()) {
            // update the UI indicating a user is signed in.
        }
        else
        {
            // update the UI indicating a user is not signed in.
        }
    }
});
Now you can construct a Platform instance. You may wish to put the following code in a separate helper class.
// Platform helper class:

private static Platform sPlatform;

//...

// This is the main Platform-generating method
public static synchronized Platform getOrCreatePlatform(Context context, UserAccountProvider accountProvider, NotificationProvider notificationProvider) {
    // check whether the local platform variable is already initialized.
    Platform platform = getPlatform();

    if (platform == null) {
        // if it is not initialized, do so:
        platform = createPlatform(context, accountProvider, notificationProvider);
    }
    return platform;
}

// gets the local platform variable
public static synchronized Platform getPlatform() {
        return sPlatform;
}

// creates and returns a new Platform instance
public static synchronized Platform createPlatform(Context context, UserAccountProvider accountProvider, NotificationProvider notificationProvider) {
    sPlatform = new Platform(context, accountProvider, notificationProvider);
    return sPlatform;
}
In your main class, where mSignInHelper is initialized, add the following code.
private Platform mPlatform;

//...

mPlatform = PlatformHelperClass.getOrCreatePlatform(this, mSignInHelper, null);
You should shut down the platform when your app exits the foreground.
mPlatform.shutdownAsync();
Lastly, you must enable your app to receive push notifications. If you've done this already, skip to the next section.
Associate the Connected Devices Platform with the native push notification for each mobile platform.
Like previously mentioned, the app clients need to provide knowledge about the native push notification pipeline being used for each mobile platform to the client-side SDK and the Connected Devices Platform during the registration process, to allow Graph notification service to fan-out notifications to each app client endpoint when your app server publishes a user-targeting notification via Microsoft Graph APIs.
In the steps above, you initialized the Platform with a null notificationProvider parameter. Here, you need to construct and pass in an object that implements NotificationProvider. The main thing to note is the getNotificationRegistrationAsync method, which must return a NotificationRegistration instance. The NotificationRegistration is responsible for supplying the Connected Devices Platform with an access token (and related information) for the notification service.
private NotificationRegistration mNotificationRegistration;

// ...

/**
* NotificationRegistration is constructed with four parameters:
* Type: This is the notification platform type.
* Token: This is the string that GCM or FCM sends to your registration intent service.
* SenderId: This is the numeric Sender ID that you received when you registered your app for push notifications.
* DisplayName: This should be the name of the app that you used when you registered it on the Microsoft dev portal.
*/
mNotificationRegistration = new NotificationRegistration(NotificationType.FCM, token, FCM_SENDER_ID, "MyAppName");
Deliver this registration in your implementation of NotificationProvider. Then, the Platform initialization call should provide the local Platform with access to the push notification service, allowing your app to receive data from the Microsoft Graph Notifications server-side.
Pass incoming push notifications to the client SDK
Now, extend your native listener service class (FirebaseMessagingService in this case, because this tutorial uses Firebase Cloud Messaging) with a special overload of the onMessageReceived method (the notification-handling method).
Due to compliance, security, and potential optimizations, the incoming Google Cloud Messaging notification coming from Graph Notifications server-side could be a shoulder tap, which doesn’t contain any data that is initially published by the app server. The retrieval of the actual notification content published by the app server is hidden behind client-side SDK APIs. Because of this, the SDK can provide a consistent programming pattern in which the app client always passes the incoming Google Cloud Messaging payload to the SDK. This allows the SDK to determine whether this is a notification for Connected Device Platform scenarios or not (in case Android’s native Google Cloud Messaging channel is used by the app client for other purposes), and which scenario/capability this incoming notification is corresponding to (Graph Notifications, User Activity, etc.). Specific logics on handling different type of scenarios can then be executed by the app client after that.
/**
* Check whether it's a Connected Devices Platform notification or not.
* If it is a Connected Devices Platform notification, it will notify the apps with the information in the notification.
* @param from describes message sender.
* @param data message data as String key/value pairs.
*/
@Override
public void onMessageReceived(String from, Bundle data) {
    Log.d(TAG, "From: " + from);

    // Ensure that the Platform is initialized here before going on
    // ...

    // This method passes the data to the Connected Devices Platform if is compatible.
    if (!NotificationReceiver.Receive(data)) {
        // a value of false indicates a non-Rome notification
        Log.d(TAG, "GCM client received a message that was not a Rome notification");
    }
}
Your app can now handle notifications from the Connected Devices Platform.
Initialize a Graph Notification channel
At a high level, the SDK allows your app to subscribe to different channels in order to receive and manage different types of User Data – including Graph Notifications, User Activities, and more. These are all stored and synced in UserDataFeed. UserNotification is the class and data type corresponding to a user-targeted notification sent via Graph Notifications. To integrate with Graph Notification and start receiving UserNotification published by your app server, you will first need to initialize the user data feed by creating a UserNotificationChannel. You should treat this like the platform initialization step above: it should be checked and possibly redone whenever the app comes to the foreground (but not before platform initialization).
Create a UserNotificationReader to receive incoming UserNotifications and access UserNotification history
Once you have a UserNotificationChannel reference, you need a UserNotificationReader in order to allow the SDK to fetch the actual notification content from the server. A UserNotificationReader in this case enables the app client’s access to this data feed – to receive latest notification payload via event listener, or to access the full UserNotification collection which can be used as view model of the user’s notification history.
The code below shows the steps to instantiate a user notification channel, create a user notification reader, and add an event handler on the user notification reader which gets triggered when the COnnected Device Platform completes each sync and has new changes to notify you about.
public async Task SetupChannel()
{
    var account = m_accoutProvider.SignedInAccount;

    if (m_feed == null)
    {
        await Task.Run(() =>
        {
            lock (this)
            {
                if (m_feed == null)
                {
                    m_platform = new ConnectedDevicesPlatform(m_accoutProvider, this);

                    Logger.Instance.LogMessage($"Create feed for {account.Id} {account.Type}");
                    m_feed = new UserDataFeed(account, m_platform, "graphnotifications.sample.windows.com");
                    m_feed.SyncStatusChanged += Feed_SyncStatusChanged;
                    m_feed.AddSyncScopes(new List<IUserDataFeedSyncScope>
                    {
                        UserNotificationChannel.SyncScope
                    });

                    m_channel = new UserNotificationChannel(m_feed);
                    m_reader = m_channel.CreateReader();
                    m_reader.DataChanged += Reader_DataChanged;
                }
            }
        });
    }
}
Receiving UserNotifications
In the above section we see that an event listner is added to the user notification reader. You should implement this event listener to read all the new notifications and notification updates from the reader, and implement your own business logic to handle each of these new changes.
Tip
This event listener is where you handle the main business logic and “consume” the content of your notification payload based on your scenarios. If you currently use WNS’s raw notification to construct a local toast notification in the OS-level Action Center, or if you use the content in the notification to update some in-app UI, this is the place to do that.
The code below shows you how the sample app chooses to raise a local toast notification for all the incoming UserNotification that are Active, and remove the corresponding notification UI in the in-app view if a notification is deleted.
private void Reader_DataChanged(UserNotificationReader sender, object args)
{
    ReadNotifications(sender, true);
}

private async void ReadNotifications(UserNotificationReader reader, bool showToast)
{
    var notifications = await reader.ReadBatchAsync(UInt32.MaxValue);

    foreach (var notification in notifications)
    {

        if (notification.Status == UserNotificationStatus.Active)
        {
            m_newNotifications.RemoveAll((n) => { return (n.Id == notification.Id); });
            if (notification.UserActionState == UserNotificationUserActionState.NoInteraction)
            {
                // new notification, show this to user using the Windows local toast notification APIs
                m_newNotifications.Add(notification);
                if (!string.IsNullOrEmpty(notification.Content) && showToast)
                {
                    ShowToastNotification(BuildToastNotification(notification.Id, notification.Content));
                }
            }

            m_historicalNotifications.RemoveAll((n) => { return (n.Id == notification.Id); });
            m_historicalNotifications.Insert(0, notification);
        }
        else
        {
            // Existing notification is marked as deleted, remove from display
            m_newNotifications.RemoveAll((n) => { return (n.Id == notification.Id); });
            m_historicalNotifications.RemoveAll((n) => { return (n.Id == notification.Id); });
            RemoveToastNotification(notification.Id);
        }
    }
}
Update the state of an existing UserNotification
In the previous section, we mentioned that sometimes a UserNotification change received through the reader could be a state update on an existing UserNotification – whether that’s being marked as dismissed or marked as read. In this case, the app client can choose what to do, such as enabling universal dismiss by removing the corresponding visual notification on this particular device. Taking a step back, your app client is often the one that initiated this UserNotification change update to begin with – from a different device. You can choose the time to update the state of your UserNotifications, but usually they get updated when the corresponding visual notification is handled by the user on that device, or the notification is further handled by the user in some in-app experience you enable. Here is an example of what the flow would look like: Your app server publishes a notification targeted at User A. User A receives this notification on both his PC and his phone where the app clients are installed. The user clicks on the notification on PC, and chases into the app to handles the corresponding task. The app client on this PC will then call into Connected Devices Platform SDK to update the state of the corresponding UserNotification in order to have this update synced across all this user’s devices. The other app clients, upon receiving this state update in real-time, will then remove the corresponding visual alert / message / toast notification from the device’s notification center / notification tray / Action Center. This is how notifications get universally dismissed across a user’s devices.
Tip
UserNotification class currently provides 2 types of state updates – you can modify the UserNotificationReadState or the UserNotificationUserActionState and define your own logic on what should happen when notifications are updated. For example, you can mark UserActionState to be Activated or Dismissed, and pivot on that value to implement universal dismiss. Alternatively, or at the same time you can mark ReadState as Read or Unread and based on that determine which notifications should show up in the in-app notification history view. Below code snippet shows how to mark the UserNotificationUserActionState of a notification as Dismissed.
public async void Dismiss(string id)
{
    var notification = m_newNotifications.Find((n) => { return (n.Id == id); });
    if (notification != null)
    {
        notification.UserActionState = UserNotificationUserActionState.Dismissed;
        await notification.SaveAsync();
    }
}
Feedback
Coming soon: Throughout 2024 we will be phasing out GitHub Issues as the feedback mechanism for content and replacing it with a new feedback system. For more information see: https://aka.ms/ContentUserFeedback.
Submit and view feedback for