Customer database app structure
Complex line-of-business apps often have many pages and features and a great many lines of code. Because of this, it's of vital importance that you design your app around a predictable structure. There are several application design patterns which are suitable for enterprise apps, but they are all built around the goal of making a large-scale application easier to understand and work with.
While the Customer database tutorial presents a single-page app for simplicity's sake, it implements the Model-View-ViewModel (MVVM) app design pattern to showcase these ideas in action. As the name implies, the MVVM design pattern separates the core app logic into three categories:
- Models are the classes that contain the application's data.
- Views are the UI of any given page.
- ViewModels provide the application logic. This can include handling user actions from the View and/or managing interactions with the Models.
While this app isn't a perfect and architypical example of MVVM, it does show the main principles of separation of concerns in action. Check out the app here.
Application structure
After you open the app, start by examining the Solution Explorer. Some of what you see there should be familiar if you've worked with a UWP app before, but you'll also see a collection of folders that hold the app's component parts.
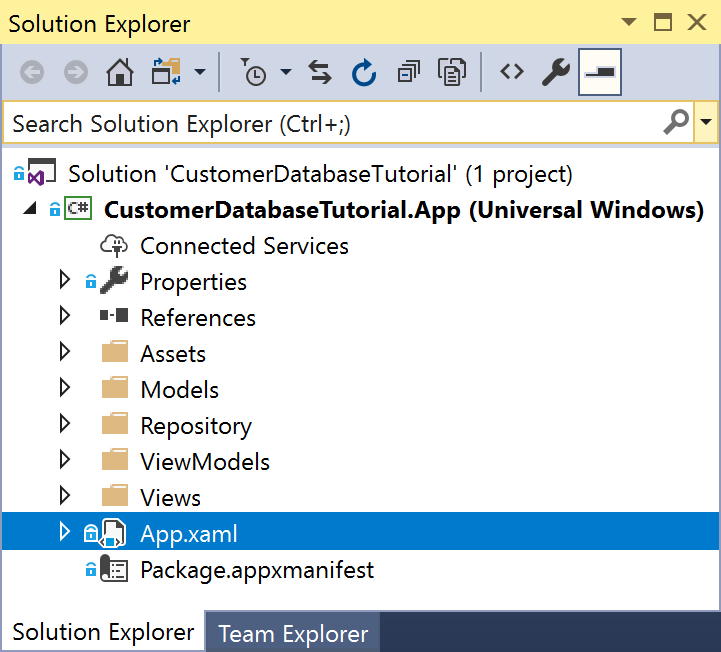
Views
All the app's UI is defined in the Views folder. Because our tutorial is a single-page app right now, this means there's only one view - CustomerListPage. It has both XAML UI markup and xaml.cs code-behind - these two files make up one View. You'll be adding UI elements to CustomerListPage.xaml.
Note
You might notice that this app doesn't have a MainPage. That's because we specify in App.xaml.cs that the app should launch CustomerListPage upon launching.
ViewModels
Though this app only has one View, is has two ViewModels. Why is this?
CustomerListPageViewModel.cs is a standard ViewModel in the MVVM pattern. It's where the fundamental logic of the app's page is located, and the page you'll be working with the most in the tutorial. Every UI action taken by the user is passed through the View to this ViewModel for processing.
CustomerViewModel.cs, however, isn't associated with any specific View. Instead, it associates a programmatic concept (which properties have been edited) with the data contained in an individual customer's Model.
Models
This app contains three Models, which store the app's data and provide interfaces for interacting with the repository. While these are critical parts of the app, they aren't something that you'll be directly editing in the tutorial.
Most important is Customer.cs, which describes the Customer data structure which you'll be using in the tutorial.
Note
The tutorial ignores the Email and Phone properties of the Customer object. If you want to go beyond what's presented here, adding these two properties into the UI of the app is a good first step.
Repository
The Repository folder contains classes that construct and interact with the local SQLite database. For the tutorial, the SQLite database is presented as-is. While you'll be adding in code to CustomerListPageViewModel.cs to call methods defined by these classes, you won't need to make any changes in order to set them up.
For more information on SQLite in UWP, see this article.
If you try the "Going further" section of the tutorial, this is where you'll create a class to connect to the remote REST database. It will also implement the ICustomerRepository interface defined in the Models section, but it will look very different than its SQLite counterpart.
Other elements
As is usual for UWP apps, the application launch behavior is defined in the App.xaml.cs class. Most of the code here is the default code for any UWP app. But we've already made a few small changes:
- We've specified that the app should display CustomerListPage on launch.
- We've created a Repository object, which will hold the data source we're using.
- We've added a SQLiteDatabase method, which initializes the local database and sets it as the specified Repository.
If you try the "Going further" section, you'll add a similar method to initialize a REST Respository object. Because we've separated our concerns and are using the same defined interface for both SQLite and REST operations, this will be the only existing code you'll need to change to use REST instead of SQLite in your app.
Next steps
If you've already completed the tutorial, then you can check out the full sample app to see how these features are implemented on a larger scale.
Otherwise, now that you know why everything is where it is, you should return to the tutorial and work with the structure that we've just covered.
Feedback
Coming soon: Throughout 2024 we will be phasing out GitHub Issues as the feedback mechanism for content and replacing it with a new feedback system. For more information see: https://aka.ms/ContentUserFeedback.
Submit and view feedback for