About the Input Panel
[PenInputPanel has been replaced by TextInput. For more information, see Programming the Text Input Panel.]
Starting with the Microsoft Windows XP Tablet PC Edition Software Development Kit (SDK) version 1.0, the system-level Tablet PC Input Panel provides a universal mechanism to accomplish text input across the Windows platform, although it does not provide programmatic access. The Tablet PC SDK version 1.5 PenInputPanel object integrates text input tools into applications.
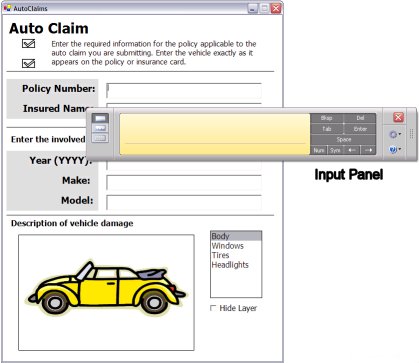
The following graphic shows the pen input panel displayed over the Auto Claims Form Sample sample.
The PenInputPanel object is convenient for application developers. There is no need to replace controls on existing forms. You can simply attach PenInputPanel objects to existing controls that receive text input, and they can begin receiving input from the PenInputPanel object.
The PenInputPanel object adopts the settings from the Input Panel for the following properties:
- Layout
- Ink thickness
- Recognition timeout
- Box size, send mode, and other settings specific to East Asian boxed input
The PenInputPanel object does not provide access to the underlying ink. To get the ink, use the InkPicture control.
The PenInputPanel object provides an in-place user interface (UI) that is easily discoverable by end users of your applications. It is automatically activated when the user taps on a window with a PenInputPanel object using the tablet pen. The pen input panel appears automatically when the system detects a CursorButtonUp event for the window to which the PenInputPanel object is attached. Automatic activation can be disabled by setting the AutoShow property to FALSE.
The pen input panel does not appear automatically on mouse events. Pen events are converted to mouse events when using Terminal Services. The PenInputPanel object does not work over a Terminal Services connection.
Pen Input Panel Input Modes
The PenInputPanel object allows either keyboard functionality or handwriting input, with additional keypads to assist input. The UI to the pen input panel includes:
- Writing pad
- Writing pad for East Asian languages
- QuickKeys keypads
- In-place keyboard
The availability of the writing pad versus the writing pad for East Asian languages depends on the user's default locale setting in the operating system.
Writing Pad
The writing pad resembles the familiar Input Panel UI.
The writing pad collects handwriting from the end user. The basic UI includes a single writing line on which the user can write text with a digital pen. When the user finishes writing and either taps the Send button or waits for a timeout to occur, handwriting is sent to the recognizer.
Ink is recognized after a specified amount of time has elapsed since the time the last ink stroke was collected. When the timeout occurs, ink is removed from the collection surface and recognition occurs. The recognized text is then inserted into the control to which the PenInputPanel object is attached.
East Asian Multibox Pad
The East Asian version of the pen input panel displays a multibox interface for entering Asian characters. It provides alternatives and is similar to the Input Panel UI. Users can correct misrecognized characters by tapping on a writing box and selecting the correct character from a list of alternates in the bar across the top of the pen input panel. Filter buttons are available to narrow the list of recognition alternates to specified types of characters, such as symbols.
The Korean and Japanese versions of the writing pad have a conversion key in addition to the mini quick keys that are common to all language skins.
To get Latin characters in the writing pad for East Asian languages, set the Factoid property to increase the accuracy of Latin character recognition. Set the Digit member of the Factoid object for numeric characters or the OneChar member of the Factoid object for alphabetic and numeric characters.
QuickKeys Keypads
The pen input panel provides two small keypads for entering symbols and numbers.
In-place Keyboard
The pen input panel provides a keyboard mode for situations where handwriting recognition is not sufficient. For instance, when entering a password or part number, users are likely to have more success using the pen input panel keyboard than they would the writing pad. This is because passwords or part numbers are unlikely to be in the writing pad's recognizer dictionary.
Recognizer Support
The PenInputPanel object supports shipping recognizers for Windows XP Tablet PC Edition version 1.0 and the Tablet PC SDK version 1.5.
Automatic Positioning
By default, the pen input panel is automatically positioned relative to the control to which it is attached. It does not overlap the control unless there is not enough screen real estate for both the pen input panel and the control, or unless the developer sets the pen input panel's position explicitly.
Automatic positioning functions only when the developer has not explicitly set the position using the MoveTo method. To override automatic positioning, change the values of the Top and Left properties in a PanelMoving event handler.
The position of the pen input panel is constrained by the edges of the screen. No edge of the pen input panel can be closer than 0.25 inches from any border of the screen.
By default, the top of the pen input panel appears at the bottom of the control to which it is attached and is separated from the control by the value of the VerticalOffset property. If there is not enough room below the control, the bottom of the pen input panel appears at the top of the control to which it is attached and is separated from the control by the value of the VerticalOffset property. If there is still not enough room, as in the case of a full-screen edit control, the pen input panel overlaps the control.
The left edge pen input panel appears at the left edge of the control to which it is attached and is separated from the control by the value of the HorizontalOffset property, except as bounded by the screen. If the desired position places the pen input panel beyond the available screen boundaries, the pen input panel assumes the nearest possible horizontal position.
Forced Overlap
It is sometimes necessary for the pen input panel to overlap the attached control, as in the case of a full-screen edit control. In such cases, automatic positioning of the pen input panel is determined using the following rules:
- When the insertion point is in the top half of the attached control, the vertical position of the pen input panel is at the bottom of the screen, possibly placing it over the lower portion of the control.
- When the insertion point is in the lower half of the attached control, the vertical position of the pen input panel is at the top of the screen, possibly placing it over the top half of the control.
Windowless Controls
In the case where a PenInputPanel object is attached to a windowless control, the pen input panel is positioned relative to the parent of the windowless control. Set the Top and Left properties in a PanelMoving event handler or use the MoveTo method to manually position the pen input panel.
Feedback
Coming soon: Throughout 2024 we will be phasing out GitHub Issues as the feedback mechanism for content and replacing it with a new feedback system. For more information see: https://aka.ms/ContentUserFeedback.
Submit and view feedback for