Obtaining a Google Maps API Key
To use the Google Maps functionality in Android, you need to register for a Maps API key with Google. Until you do this, you will just see a blank grid instead of a map in your applications. You must obtain a Google Maps Android API v2 key - keys from the older Google Maps Android API key v1 will not work.
Obtaining a Maps API v2 key involves the following steps:
- Retrieve the SHA-1 fingerprint of the keystore that is used to sign the application.
- Create a project in the Google APIs console.
- Obtaining the API key.
Obtaining your Signing Key Fingerprint
To request a Maps API key from Google, you need to know the SHA-1 fingerprint of the keystore that is used to sign the application. Typically, this means you will have to determine the SHA-1 fingerprint for the debug keystore, and then the SHA-1 fingerprint for the keystore that is used to sign your application for release.
By default the keystore that is used to sign debug versions of a Xamarin.Android application can be found at the following location:
C:\Users\[USERNAME]\AppData\Local\Xamarin\Mono for Android\debug.keystore
Information about a keystore is obtained by running the keytool
command from the JDK. This tool is typically found in the Java bin
directory:
C:\Program Files\Android\jdk\microsoft_dist_openjdk_[VERSION]\bin\keytool.exe
Run keytool using the following command (using the file paths shown above):
keytool -list -v -keystore [STORE FILENAME] -alias [KEY NAME] -storepass [STORE PASSWORD] -keypass [KEY PASSWORD]
Debug.keystore Example
For the default debug key (which is automatically created for you for debugging), use this command:
keytool.exe -list -v -keystore "C:\Users\[USERNAME]\AppData\Local\Xamarin\Mono for Android\debug.keystore" -alias androiddebugkey -storepass android -keypass android
Production Keys
When deploying an app to Google Play, it must be
signed with a private key.
The keytool will need to be run with the private key details, and the
resulting SHA-1 fingerprint used to create a production Google Maps API
key. Remember to update the AndroidManifest.xml file with the
correct Google Maps API key before deployment.
Keytool Output
You should see something like the following output in your console window:
Alias name: androiddebugkey
Creation date: Jan 01, 2016
Entry type: PrivateKeyEntry
Certificate chain length: 1
Certificate[1]:
Owner: CN=Android Debug, O=Android, C=US
Issuer: CN=Android Debug, O=Android, C=US
Serial number: 4aa9b300
Valid from: Mon Jan 01 08:04:04 UTC 2013 until: Mon Jan 01 18:04:04 PST 2033
Certificate fingerprints:
    MD5:  AE:9F:95:D0:A6:86:89:BC:A8:70:BA:34:FF:6A:AC:F9
    SHA1: BB:0D:AC:74:D3:21:E1:43:07:71:9B:62:90:AF:A1:66:6E:44:5D:75
    Signature algorithm name: SHA1withRSA
    Version: 3
You will use the SHA-1 fingerprint (listed after SHA1) later in this guide.
Creating an API project
After you have retrieved the SHA-1 fingerprint of the signing keystore, it is necessary to create a new project in the Google APIs console (or add the Google Maps Android API v2 service to an existing project).
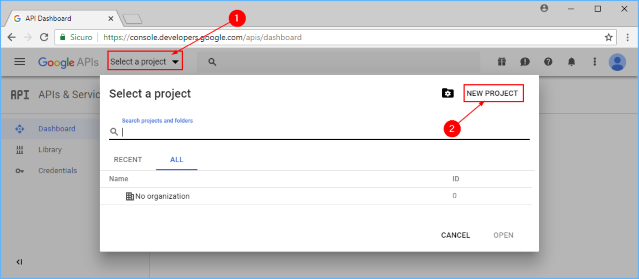
In a browser, navigate to the Google Developers Console API & Services Dashboard and click Select a project. Click on a project name or create a new one by clicking NEW PROJECT:
If you created a new project, enter the project name in the New Project dialog that is displayed. This dialog will manufacture a unique project ID that is based on your project name. Next, click the Create button as shown in this example:

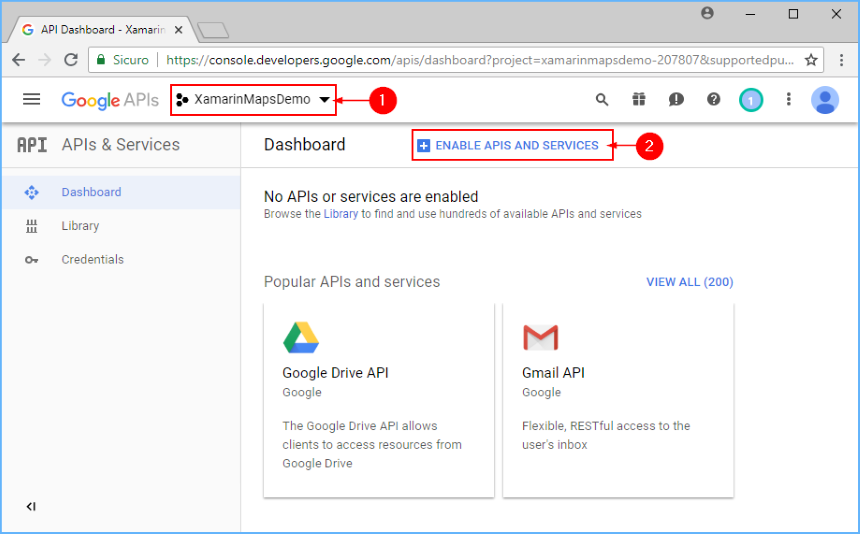
After a minute or so, the project is created and you are taken to the Dashboard page of the project. From there, click ENABLE APIS AND SERVICES:
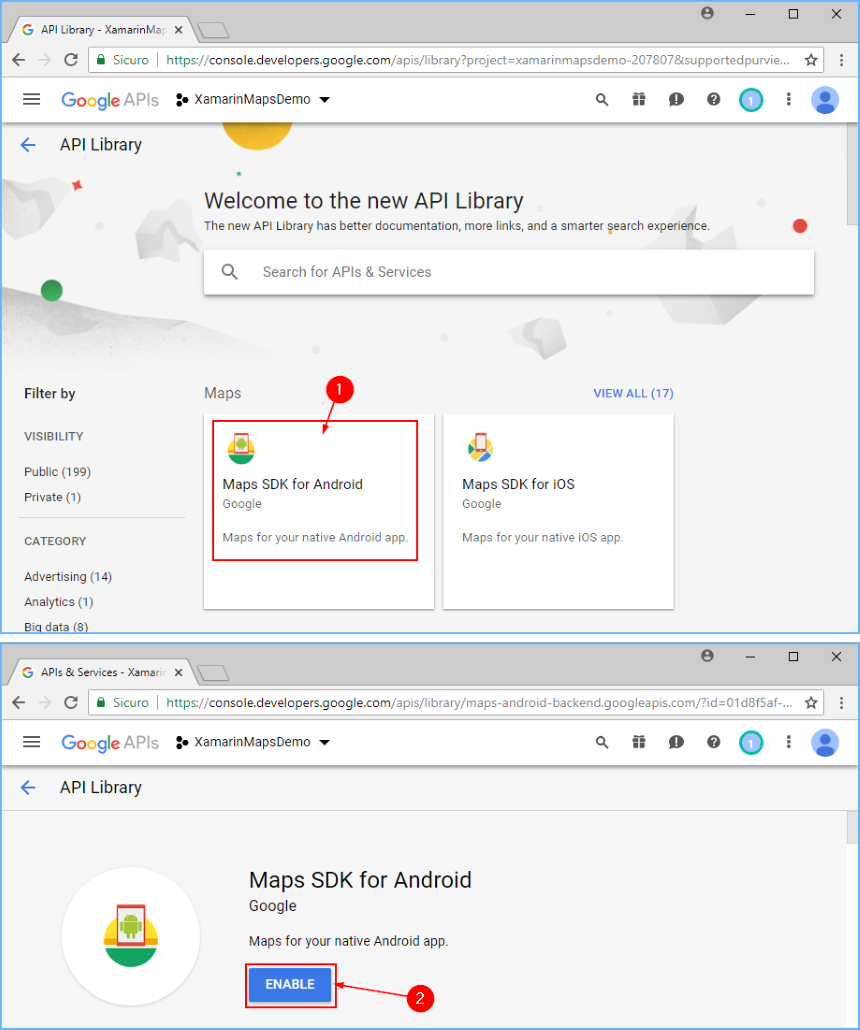
From the API Library page, click Maps SDK for Android. On the next page, click ENABLE to turn on the service for this project:


At this point the API project has been created and Google Maps Android API v2 has been added to it. However, you cannot use this API in your project until you create credentials for it. The next section explains how to create an API key and authorize a Xamarin.Android application to use this key.
Obtaining the API Key
After the Google Developer Console API project has been created, it is necessary to create an Android API key. Xamarin.Android applications must have an API key before they are granted access to Android Map API v2.
In the Maps SDK for Android page that is displayed (after clicking ENABLE in the previous step), go to the Credentials tab and click the Create credentials button:

Click API key:

After this button is clicked, the API key is generated. Next it is necessary to restrict this key so that only your app can call APIs with this key. Click RESTRICT KEY:

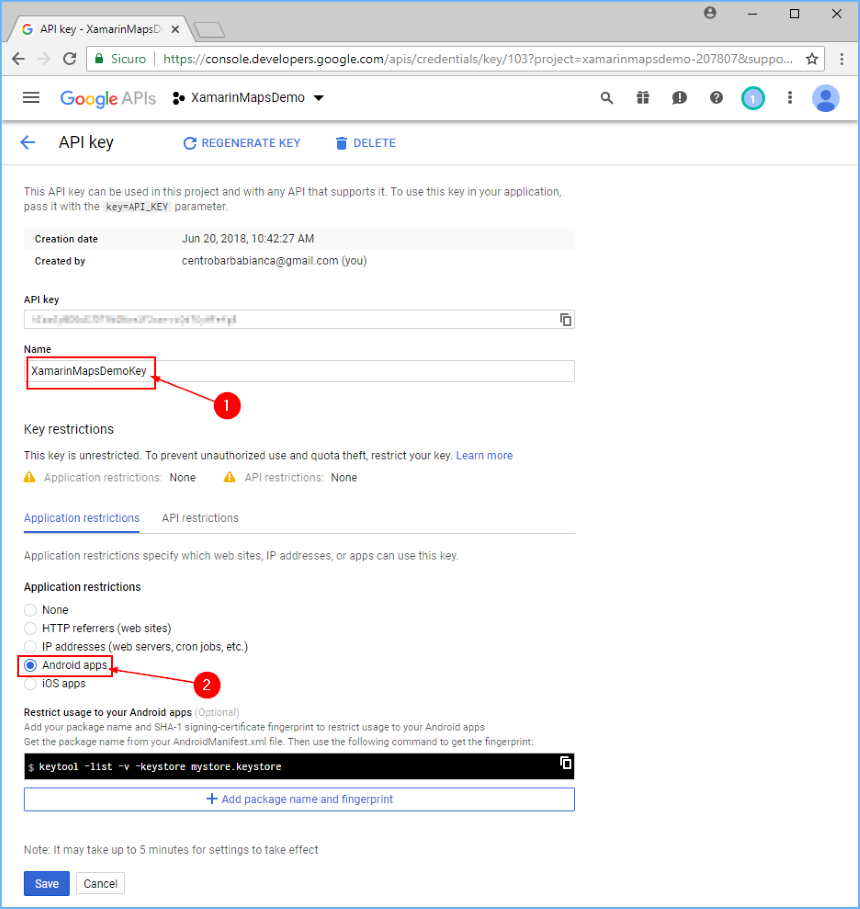
Change the Name field from API Key 1 to a name that will help you remember what the key is used for (XamarinMapsDemoKey is used in this example). Next, click the Android apps radio button:
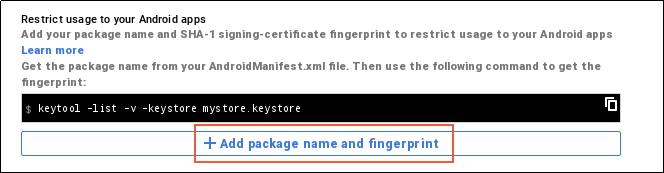
To add the SHA-1 fingerprint, click + Add package name and fingerprint:
Enter your app's package name and enter the SHA-1 certificate fingerprint (obtained via
keytoolas explained earlier in this guide). In the following example, the package name forXamarinMapsDemois entered, followed by the SHA-1 certificate fingerprint obtained from debug.keystore: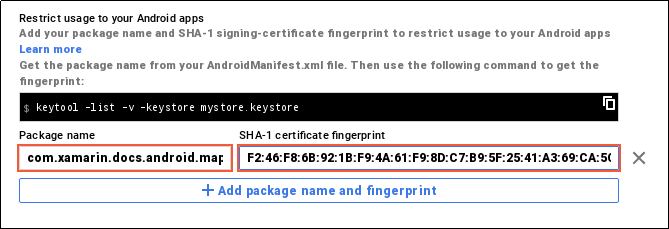
Note that, in order for your APK to access Google Maps, you must include SHA-1 fingerprints and package names for every keystore (debug and release) that you use to sign your APK. For example, if you use one computer for debug and another computer for generating the release APK, you should include the SHA-1 certificate fingerprint from the debug keystore of the first computer and the SHA-1 certificate fingerprint from the release keystore of the second computer. Click + Add package name and fingerprint to add another fingerprint and package name as shown in this example:

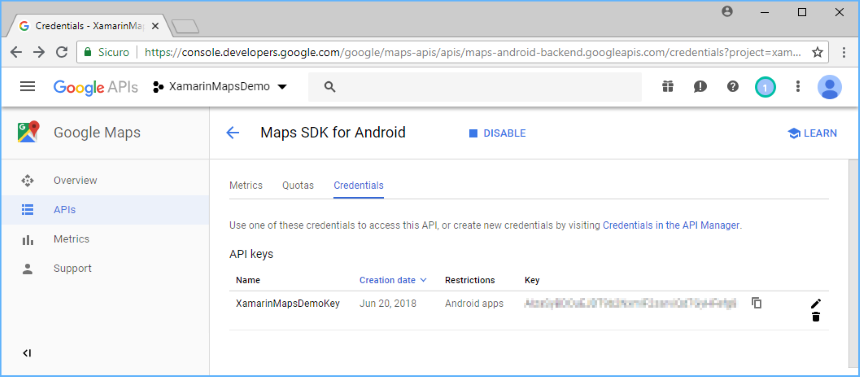
Click the Save button to save your changes. Next, you are returned to the list of your API keys. If you have other API keys that you have created earlier, they will also be listed here. In this example, only one API key (created in the previous steps) is listed:


Connect the project to a billable account
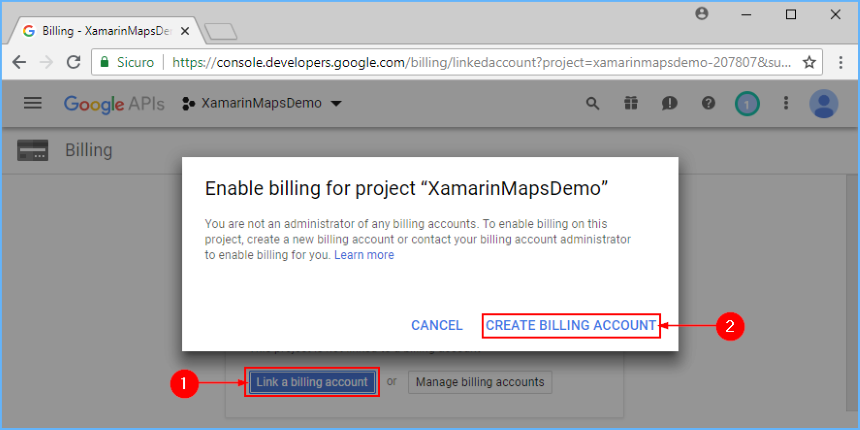
Beginning June,11 2018, the API key will not work if the project is not connected to a billable account (even if the service is still free for mobile apps).
Click the hamburger menu button and select the Billing page:

Link the project to a billing account by clicking Link a billing account followed by CREATE BILLING ACCOUNT on the displayed popup (if you don't have an account, you will be guided to create a new one):


Adding the Key to Your Project
Finally, add this API key to the AndroidManifest.XML file of your Xamarin.Android app. In the following example, YOUR_API_KEY is to be replaced with the API key generated in the previous steps:
<manifest xmlns:android="http://schemas.android.com/apk/res/android"
    android:versionName="4.10" package="com.xamarin.docs.android.mapsandlocationdemo"
    android:versionCode="10">
...
  <application android:label="@string/app_name">
    <!-- Put your Google Maps V2 API Key here. -->
    <meta-data android:name="com.google.android.maps.v2.API_KEY" android:value="YOUR_API_KEY" />
    <meta-data android:name="com.google.android.gms.version" android:value="@integer/google_play_services_version" />
  </application>
</manifest>