DrawingGroup.ClipGeometry Propiedad
Definición
Importante
Parte de la información hace referencia a la versión preliminar del producto, que puede haberse modificado sustancialmente antes de lanzar la versión definitiva. Microsoft no otorga ninguna garantía, explícita o implícita, con respecto a la información proporcionada aquí.
Obtiene o establece la región de recorte de este objeto DrawingGroup.
public:
 property System::Windows::Media::Geometry ^ ClipGeometry { System::Windows::Media::Geometry ^ get(); void set(System::Windows::Media::Geometry ^ value); };
public System.Windows.Media.Geometry ClipGeometry { get; set; }member this.ClipGeometry : System.Windows.Media.Geometry with get, setPublic Property ClipGeometry As GeometryValor de propiedad
Geometry que se utiliza para recortar este objeto DrawingGroup. De manera predeterminada, es null.
Ejemplos
En este ejemplo se muestra cómo definir una región de recorte para un .Drawing
Use para DrawingGroup definir un clip para .Drawing La DrawingGroup clase es el único tipo de Drawing objeto que permite definir su propia región de recorte.
Use para Geometry describir el clip y aplicarlo a la ClipGeometry propiedad del DrawingGroup objeto .
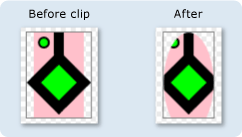
En la ilustración se muestra el DrawingGroup antes y después de aplicar el clip elíptico.

En el ejemplo siguiente se usa un DrawingGroup para aplicar un ClipGeometry objeto a varios GeometryDrawing objetos .
using System;
using System.Windows;
using System.Windows.Controls;
using System.Windows.Media;
using System.Windows.Media.Animation;
using System.Windows.Shapes;

namespace SDKSample
{
    /// <summary>
    /// Shows how to define a clip region for a DrawingGroup.
    /// </summary>
    public class ClipExample : Page
    {
        public ClipExample()
        {

            //
            // Create several GeometryDrawing objects.
            //

            // Create a rectangle.
            GeometryDrawing drawing1 = new GeometryDrawing(
                Brushes.Pink,
                null,
                new RectangleGeometry(new Rect(0,0,50,85))
                );

            //
            // Create a polygon.
            //
            PathFigure pLineFigure = new PathFigure();
            pLineFigure.StartPoint = new Point(25, 25);
            PolyLineSegment pLineSegment = new PolyLineSegment();
            pLineSegment.Points.Add(new Point(0, 50));
            pLineSegment.Points.Add(new Point(25, 75));
            pLineSegment.Points.Add(new Point(50, 50));
            pLineSegment.Points.Add(new Point(25, 25));
            pLineSegment.Points.Add(new Point(25, 0));
            pLineFigure.Segments.Add(pLineSegment);
            PathGeometry pGeometry = new PathGeometry();
            pGeometry.Figures.Add(pLineFigure);

            GeometryDrawing drawing2 = new GeometryDrawing(
                    Brushes.Lime,
                    new Pen(Brushes.Black, 10),
                    pGeometry
                );

            //
            // Create a circle.
            //
            GeometryDrawing drawing3 = new GeometryDrawing(
                    Brushes.Lime,
                    new Pen(Brushes.Black, 2),
                    new EllipseGeometry(new Point(10, 10), 5, 5)
                );

            // Create the DrawingGroup and add the
            // geometry drawings.
            DrawingGroup aDrawingGroup = new DrawingGroup();
            aDrawingGroup.Children.Add(drawing1);
            aDrawingGroup.Children.Add(drawing2);
            aDrawingGroup.Children.Add(drawing3);

            //
            // Create an EllipseGeometry and use it to
            // clip the DrawingGroup.
            //
            EllipseGeometry clipGeometry =
                new EllipseGeometry(new Point(25,50), 25, 50);
            aDrawingGroup.ClipGeometry = clipGeometry;

            // Use an Image control and a DrawingImage to
            // display the drawing.
            DrawingImage aDrawingImage = new DrawingImage(aDrawingGroup);

            // Freeze the DrawingImage for performance benefits.
            aDrawingImage.Freeze();

            Image anImage = new Image();
            anImage.Source = aDrawingImage;
            anImage.Stretch = Stretch.None;
            anImage.HorizontalAlignment = HorizontalAlignment.Left;

            // Create a border around the images and add it to the
            // page.
            Border imageBorder = new Border();
            imageBorder.BorderBrush = Brushes.Gray;
            imageBorder.BorderThickness = new Thickness(1);
            imageBorder.VerticalAlignment = VerticalAlignment.Top;
            imageBorder.HorizontalAlignment = HorizontalAlignment.Left;
            imageBorder.Margin = new Thickness(20);
            imageBorder.Child = anImage;

            this.Background = Brushes.White;
            this.Margin = new Thickness(20);
            this.Content = imageBorder;
        }
    }
}
<Page
  xmlns="http://schemas.microsoft.com/winfx/2006/xaml/presentation"
  xmlns:x="http://schemas.microsoft.com/winfx/2006/xaml"
  xmlns:PresentationOptions="http://schemas.microsoft.com/winfx/2006/xaml/presentation/options"
  xmlns:mc="http://schemas.openxmlformats.org/markup-compatibility/2006"
  mc:Ignorable="PresentationOptions"
  Background="White" Margin="20">

  <Border BorderBrush="Gray" BorderThickness="1"
    HorizontalAlignment="Left" VerticalAlignment="Top"
    Margin="20">
    <Image Stretch="None" HorizontalAlignment="Left">
      <Image.Source>
        <DrawingImage PresentationOptions:Freeze="True">
          <DrawingImage.Drawing>

            <!-- A DrawingGeometry with an elliptical clip region. -->
            <DrawingGroup>
              <GeometryDrawing Brush="Pink">
                <GeometryDrawing.Geometry>
                  <RectangleGeometry Rect="0,0,50,85" />
                </GeometryDrawing.Geometry>
              </GeometryDrawing>
              <GeometryDrawing Brush="Lime"
                Geometry="M 25,25 L 0,50 25,75 50,50 25,25 25,0">
                <GeometryDrawing.Pen>
                  <Pen Thickness="10" Brush="Black" />
                </GeometryDrawing.Pen>
              </GeometryDrawing>
              <GeometryDrawing Brush="Lime">
                <GeometryDrawing.Geometry>
                  <EllipseGeometry Center="10,10" RadiusX="5" RadiusY="5" />
                </GeometryDrawing.Geometry>
                <GeometryDrawing.Pen>
                  <Pen Thickness="2" Brush="Black" />
                </GeometryDrawing.Pen>
              </GeometryDrawing>

              <DrawingGroup.ClipGeometry>
                <EllipseGeometry Center="25,50" RadiusX="25" RadiusY="50" />
              </DrawingGroup.ClipGeometry>
            </DrawingGroup>
          </DrawingImage.Drawing>
        </DrawingImage>
      </Image.Source>
    </Image>
  </Border>


</Page>
Comentarios
Los dibujos fuera de la geometría se recortan de DrawingGroup cuando se representa. La geometría no tiene que ser rectangular; por ejemplo, puede usar un EllipseGeometry para recortar en una forma elíptica.
DrawingGroup Las operaciones se aplican en el orden siguiente:
Información sobre propiedades de dependencia
| Campo identificador | ClipGeometryProperty |
Propiedades de metadatos establecidas en true |
Ninguno |