How to: Create a basic texture shader
Applies to: ![]() Visual Studio
Visual Studio ![]() Visual Studio for Mac
Visual Studio for Mac
Note
This article applies to Visual Studio 2017. If you're looking for the latest Visual Studio documentation, see Visual Studio documentation. We recommend upgrading to the latest version of Visual Studio. Download it here
This article demonstrates how to use the Shader Designer and the Directed Graph Shader Language (DGSL) to create a single-texture shader. This shader sets the final color directly to the RGB and alpha values that are sampled from the texture.
Create a basic texture shader
You can implement a basic, single-texture shader by writing the color and alpha values of a texture sample directly to the final output color.
Before you begin, make sure that the Properties window and the Toolbox are displayed.
Create a DGSL shader to work with. For information about how to add a DGSL shader to your project, see the Getting Started section in Shader Designer.
Delete the Point Color node. In Select mode, select the Point Color node, and then on the menu bar, choose Edit > Delete. This makes room for the node that's added in the next step.
Add a Texture Sample node to the graph. In the Toolbox, under Texture, select Texture Sample and move it to the design surface.
Add a Texture Coordinate node to the graph. In the Toolbox, under Texture, select Texture Coordinate and move it to the design surface.
Choose a texture to apply. In Select mode, select the Texture Sample node, and then in the Properties window, specify the texture that you want to use by using the Filename property.
Make the texture publicly accessible. Select the Texture Sample node, and then in the Properties window, set the Access property to Public. Now you can set the texture from another tool, such as the Model Editor.
Connect the texture coordinates to the texture sample. In Select mode, move the Output terminal of the Texture Coordinate node to the UV terminal of the Texture Sample node. This connection samples the texture at the specified coordinates.
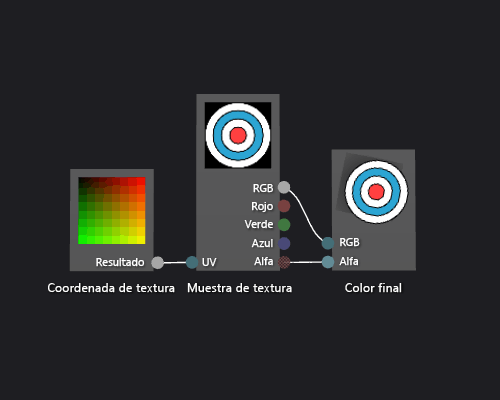
Connect the texture sample to the final color. Move the RGB terminal of the Texture Sample node to the RGB terminal of the Final Color node, and then move the Alpha terminal of the Texture Sample node to the Alpha terminal of the Final Color node.
The following illustration shows the completed shader graph and a preview of the shader applied to a cube.
Note
In this illustration, a plane is used as the preview shape, and a texture has been specified to better demonstrate the effect of the shader.
Certain shapes might provide better previews for some shaders. For more information about how to preview shaders in the Shader Designer, see Shader Designer