Create a cloud-based archive in an Exchange hybrid deployment
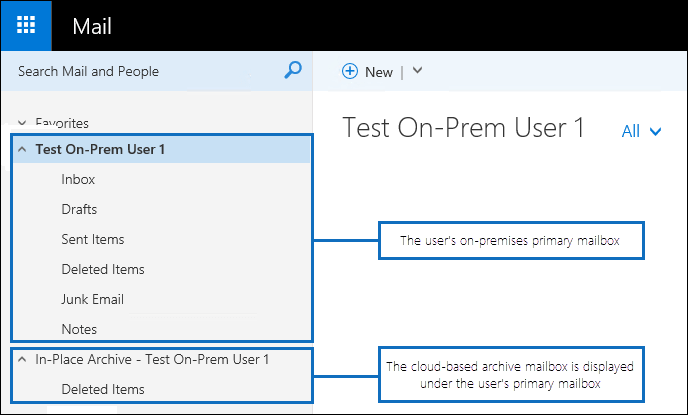
In an Exchange hybrid deployment, you can configure an on-premises primary mailbox or an online mailbox with a cloud-based archive mailbox in Exchange Online.
Before you begin
The user with the on-premises primary mailbox must have a user account in your Microsoft 365 or Office 365 organization.
The user account must be assigned an Exchange Online Archiving license. For more information about the different options, see Exchange Online Archiving service description. The steps for assigning a license are included in the procedures in Step 1.
After you enable the cloud-based archive mailbox in Step 1, it might take up to 30 minutes for the cloud-based archive mailbox to be provisioned. This is because the cloud-base archive mailbox is created by the process of directory synchronization, where your on-premises Active Directory is synchronized with Microsoft Entra ID in Microsoft 365 or Office 365. By default, directory synchronization runs once every 30 minutes.
Step 1: Enable a cloud-based archive mailbox for a primary on-premises mailbox or an online mailbox
Use one of the following procedures to enable a cloud-based archive mailbox for an on-premises primary mailbox or an online mailbox. Perform these steps in the Exchange admin center or Exchange Management Shell in your on-premises Exchange organization and in the Microsoft 365 admin center.
Use the EAC to create a cloud-based archive mailbox for a new user
In the EAC in your on-premises organization, go to Recipients > Mailboxes.
Click New
 > User mailbox or Office 365 mailbox depending on where you want to create the mailbox.
On the New user mailbox page, create a mailbox for a new or existing user. For more information about creating a user mailbox, see Create User Mailboxes.
If you want to create an online mailbox:
- Click the Create an archive mailbox check box.
If you want to create an on-premises mailbox:
Click More options to enable a cloud-based archive mailbox.
Under Archive, click the Create an in-place archive for this user check box, and then click Cloud-based archive. The name of the domain that the archive mailbox will be provisioned in is displayed.
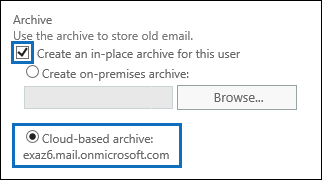
Click Save to create the mailbox and the cloud-based archive.
Note on the Mailboxes page, the value User (Archive) is displayed in the Mailbox type column for the selected mailbox.
Wait up to 30 minutes for directory synchronization to create a corresponding user account in Microsoft 365 or Office 365.
Tip
In the Microsoft 365 admin center, go to Health > Directory sync status to see the last time that directory synchronization occurred.
After verifying that directory synchronization has occurred after you created the new mailbox, in the Microsoft 365 admin center, go to Users > Active users, and then select the new user account that was created for the new on-premises mailbox.
On the user properties page that's displayed, click Edit in the Product licenses section.

Under the Location drop-down menu, select a location for the user.
Expand the list of Microsoft 365 or Office 365 Enterprise licenses, and then assign an Exchange Online Archiving license, and then save the changes.
In the Status column in the list of users, notice that a license is assigned to the user.
Once again, wait up to 30 minutes for directory synchronization to provision a cloud-based archive mailbox. Go to Step 2 to see how to verify that the cloud-based archive mailbox has been created. After the archive mailbox is created, the user can access it by using Outlook or Outlook on the web.
Use the Exchange Management Shell to create a cloud-based archive mailbox for a new user
The following example creates a new primary on-premises mailbox and Active Directory user account for Pilar Pinilla with a cloud-based archive mailbox. You're prompted to enter the password:
New-Mailbox -Name "Pilar Pinilla" -UserPrincipalName pilarp@contoso.com -Password (Read-Host "Enter password" -AsSecureString) -ArchiveDomain <tenant_domain>.mail.onmicrosoft.com -RemoteArchive -FirstName Pilar -LastName Pinilla
For detailed syntax and parameter information, see New-Mailbox.
The following example creates a new primary online mailbox and Active Directory user account for Kim Akers with a cloud-based archive mailbox. You're prompted to enter the password:
New-RemoteMailbox -Name "Kim Akers" -UserPrincipalName kima@contoso.com -Password (Read-Host "Enter password" -AsSecureString) -Archive -FirstName Kim -LastName Akers
For detailed syntax and parameter information, see New-RemoteMailbox.
After you create the primary and cloud-based archive mailboxes, wait up to 30 minutes for directory synchronization to create a corresponding user account in Microsoft 365 or Office 365. Then assign the product license as we described in Steps 8 to 10 of Use the EAC to create a cloud-based archive mailbox for a new user. To use PowerShell to assign the license, see Assign Microsoft 365 licenses to user accounts with PowerShell. Once again, wait up to 30 minutes for directory synchronization to provision a cloud-based archive mailbox. Go to Step 2 to see how to verify that the cloud-based archive mailbox has been created. After the archive mailbox is created, the user can access it by using Outlook or Outlook on the web.
Tip
In the Microsoft 365 admin center, go to Health > Directory sync status to see the last time that directory synchronization occurred.
Use the EAC to create a cloud-based archive mailbox for an existing user
In the Microsoft 365 admin center, go to Users > Active users, and then select the user account that you want to create a cloud-base archive mailbox for.
On the user properties page that's displayed, click Edit in the Product licenses section.
Under the Location drop-down menu, select a location for the user.
Expand the list of Microsoft 365 or Office 365 Enterprise licenses, and then assign an Exchange Online Archiving license, and then save the changes.
In the Status column in the list of users, notice that a license is now assigned to the user.
In the EAC in your on-premises organization, go to Recipients > Mailboxes.
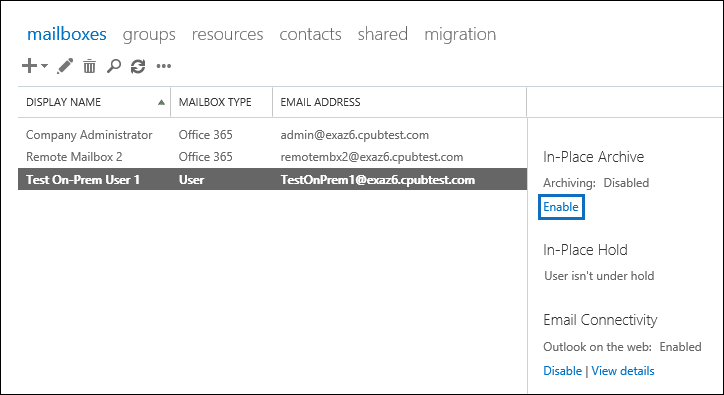
In the list of mailboxes, select the user that you assigned the license to.
In the details pane, under In-Place Archive, click Enable.
If it's an online mailbox:
- Click yes to enable the In-Place Archive.
If it's an on-premises mailbox:
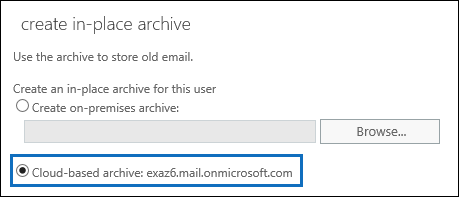
On the Create in-place archive page, click Cloud-based archive, and then click Ok. The name of the domain that the archive mailbox will be provisioned in is displayed.
Note on the Mailboxes page, the value User (Archive) is displayed in the Mailbox type column for the selected mailbox.
Wait up to 30 minutes for directory synchronization to create the cloud-based archive mailbox. Go to Step 2 to see how to verify that the cloud-based archive mailbox has been created. After the archive mailbox is created, the user can access it by using Outlook or Outlook on the web.
Tip
In the admin center, go to Health > Directory sync status to see the last time that directory synchronization occurred.
Use the Exchange Management Shell to create a cloud-based archive mailbox for an existing user
Before you create the cloud-based archive mailbox, you need to assign the product license as we described in Steps 1 to 4 of Use the EAC to create a cloud-based archive mailbox for an existing user. To use PowerShell to assign the license, see Assign Microsoft 365 licenses to user accounts with PowerShell.
The following example creates a cloud-based archive mailbox for Ayla who has a primary on-premises mailbox:
Enable-Mailbox -Identity ayla@contoso.com -RemoteArchive -ArchiveDomain "contoso.mail.onmicrosoft.com"
For detailed syntax and parameter information, see Enable-Mailbox.
The following example creates a cloud-based archive mailbox for Laura who has a primary online mailbox:
Enable-RemoteMailbox -Identity laura@contoso.com -Archive
For detailed syntax and parameter information, see Enable-RemoteMailbox.
Wait up to 30 minutes for directory synchronization to create the cloud-based archive mailbox. Go to Step 2 to see how to verify that the cloud-based archive mailbox has been created. After the archive mailbox is created, the user can access it by using Outlook or Outlook on the web.
Tip
In the admin center, go to Health > Directory sync status to see the last time that directory synchronization occurred.
Step 2: Verify that the cloud-based archive mailbox is created
As previously explained, there might be a delay between the time that you enable a cloud-based archive mailbox and when the cloud-based archive mailbox is created. This is because directory synchronization has to run to create the cloud-based archive mailbox. Here are some ways to verify that the cloud-based archive mailbox has been created.
In your Exchange Online organization, run the following PowerShell command to display properties related to an on-premises user's cloud-based archive mailbox. To connect to Exchange Online PowerShell, see Connect to Exchange Online PowerShell.
If it's an on-premises mailbox:
Get-MailUser <cloud mail user> | FL *archive*
If it's an online mailbox:
Get-Mailbox <cloud mailbox> | FL *archive*
The following screenshots show the properties that are returned when the provisioning of the cloud-based archive mailbox is pending and after the cloud-based archive mailbox has been created.
Properties before the cloud-based archive mailbox is provisioned by directory synchronization

Before directory synchronization provisions the cloud-based archive, the ArchiveStatus property is set to None. Also note that the ArchiveGuid and ArchiveName properties are empty.
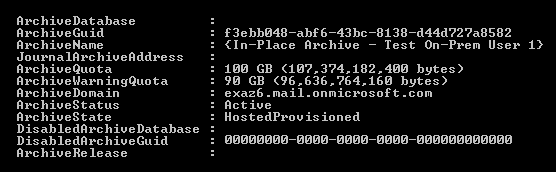
Properties after the cloud-based archive mailbox is provisioned by directory synchronization
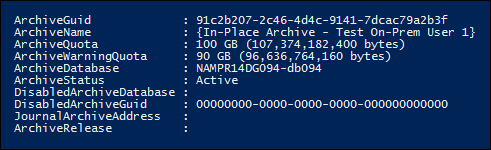
After directory synchronization provisions the cloud-based archive, the ArchiveStatus property is set to Active, and the ArchiveGuid and ArchiveName properties are populated. At this point, the user is able to access their cloud-based archive mailbox in Outlook or Outlook on the web.
You can also run the following PowerShell command in your on-premises Exchange organization to display properties related to the cloud-based archive mailbox of an on-premises user.
If it's an on-premises mailbox:
Get-Mailbox <on-premises user mailbox> | FL *archive*
If it's an online mailbox:
Get-MailUser <on-premises mail user> | FL *archive*
Properties before the cloud-based archive mailbox is provisioned by directory synchronization

Before directory synchronization provisions the cloud-based archive, the ArchiveStatus property is set to None and the ArchiveState property is set to HostedPending.
Properties after the cloud-based archive mailbox is provisioned by directory synchronization
After directory synchronization provisions the cloud-based archive, the ArchiveStatus property is set to Active and the ArchiveState property is set to HostedProvisioned. At this point, the user is able to access their cloud-based archive mailbox in Outlook or Outlook on the web.
(Optional) Run directory synchronization
As previously explained, the cloud-base archive mailbox is created by the process of directory synchronization. By default, your on-premises Active Directory is synchronized with Microsoft Entra ID in Microsoft 365 or Office 365 once every 30 minutes. You can see when the last time directory synchronization occurred by going to Health > Directory sync status in the Microsoft 365 admin center.
Sometimes you may want to start directory synchronization to provision the cloud-based archive mailbox before the next scheduled synchronization. You can do this by running the following PowerShell command on the server where cloud sync or Microsoft Entra Connect is installed.
Start-ADSyncSyncCycle -PolicyType Delta
For more information, see Microsoft Entra Connect Sync: Scheduler.