Personnalisation de Web Chat
S’APPLIQUE À : SDK v4
Cet article explique comment adapter les exemples Web Chat à votre bot.
Intégrer Web Chat à votre site web
La vue d’ensemble Chat Web décrit comment intégrer le contrôle Chat Web à votre site web.
Personnalisation des styles
Le contrôle Chat Web fournit des options de personnalisation riches : vous pouvez modifier les couleurs, les tailles, le placement des éléments, ajouter des éléments personnalisés et interagir avec la page web d’hébergement. Vous trouverez ci-dessous plusieurs exemples de personnalisation de l’interface utilisateur Chat Web.
Vous trouverez la liste complète de tous les paramètres que vous pouvez modifier dans Chat Web dans le StyleOptions.ts fichier. Les valeurs par défaut de Chat Web se trouvent dans le fichier defaultStyleOptions.ts
Ces paramètres vont permettre de générer un ensemble de styles, qui est un ensemble de règles CSS amélioré avec glamor. Vous trouverez la liste complète des styles CSS générés dans le jeu de styles dans le createStyleSet.ts fichier .
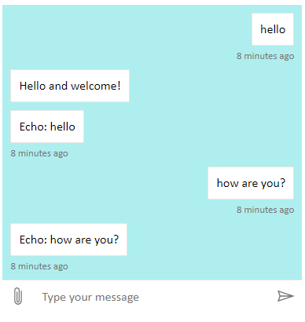
Définir la taille du conteneur Web Chat
Pour ajuster la taille du conteneur Chat Web, utilisez les propriétés et rootWidthdu jeu derootHeight style. L’exemple suivant définit également la couleur d’arrière-plan du conteneur pour afficher la taille du contrôleur.
<!DOCTYPE html>
<head>
    <script src="https://cdn.botframework.com/botframework-webchat/latest/webchat.js"></script>
</head>
<body>
  <div style="height: 60%; width: 40%; margin-top:5%; margin-left:10%" id="webchat" role="main"></div>
  <script>
     // Set  the CSS rules.
     const styleSet = window.WebChat.createStyleSet({
         rootHeight: '100%',
         rootWidth: '50%',
         backgroundColor: 'paleturquoise'
      });

    window.WebChat.renderWebChat({
      directLine: window.WebChat.createDirectLine({
          token: '<Your Direct Line token>'}),
      styleSet
    }, document.getElementById('webchat'));

  </script>
</body>
Avertissement
Dans la page web d’hébergement, n’utilisez pas votre clé Direct Line en clair. Utilisez un jeton, comme expliqué dans la section Option d’incorporation en production pour savoir comment connecter un bot à Chat Web.
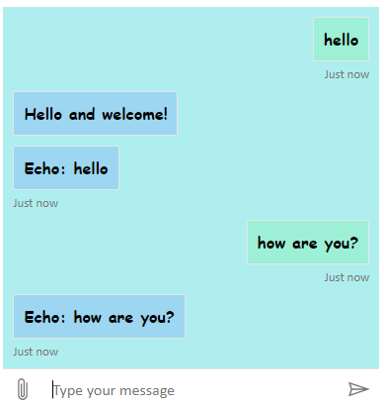
Modifier la police et la couleur des bulles de conversation
Vous pouvez personnaliser la couleur d’arrière-plan et les polices utilisées dans les bulles de conversation pour qu’elles correspondent au style de la page web hébergeant le contrôle Chat Web. L’extrait de code ci-dessous montre comment procéder.
<!DOCTYPE html>
<head>
    <script src="https://cdn.botframework.com/botframework-webchat/latest/webchat.js"></script>
</head>
<body>
  <div style="height: 60%; width: 40%; margin-top:5%; margin-left:10%" id="webchat" role="main"></div>
  <script>

     // Set  the CSS rules.
     const styleSet = window.WebChat.createStyleSet({
         bubbleBackground: 'rgba(0, 0, 255, .1)',
         bubbleFromUserBackground: 'rgba(0, 255, 0, .1)',
         rootHeight: '100%',
         rootWidth: '50%',
         backgroundColor: 'paleturquoise'
      });

      // After generated, you can modify the CSS rules.
      // Change font family and weight.
      styleSet.textContent = {
         ...styleSet.textContent,
         fontFamily: "'Comic Sans MS', 'Arial', sans-serif",
         fontWeight: 'bold'
      };
    window.WebChat.renderWebChat({
      directLine: window.WebChat.createDirectLine({
          token: '<Your Direct Line token>'}),
      styleSet
    }, document.getElementById('webchat'));

  </script>
</body>
Modifier les avatars de bot et d’utilisateur
Chat Web prend en charge les avatars, que vous pouvez personnaliser en définissant botAvatarInitials et userAvatarInitials dans la styleOptions propriété .
![]()
<!DOCTYPE html>
<head>
    <script src="https://cdn.botframework.com/botframework-webchat/latest/webchat.js"></script>
</head>
<body>
  <div style="height: 60%; width: 40%; margin-top:5%; margin-left:10%" id="webchat" role="main"></div>
  <script>

     // Set  the CSS rules.
     const styleSet = window.WebChat.createStyleSet({
         bubbleBackground: 'rgba(0, 0, 255, .1)',
         bubbleFromUserBackground: 'rgba(0, 255, 0, .1)',
         rootHeight: '100%',
         rootWidth: '50%',
         backgroundColor: 'paleturquoise'
      });

      // After generated, you can modify the CSS rules.
      // Change font family and weight.
      styleSet.textContent = {
         ...styleSet.textContent,
         fontFamily: "'Comic Sans MS', 'Arial', sans-serif",
         fontWeight: 'bold'
      };

    // Set the avatar options.
     const avatarOptions = {
         botAvatarInitials: 'BF',
         userAvatarInitials: 'WC'
         };

    window.WebChat.renderWebChat({
      directLine: window.WebChat.createDirectLine({
          token: '<Your Direct Line token>'}),
      styleSet,
      styleOptions: avatarOptions
    }, document.getElementById('webchat'));

  </script>
</body>
Utilisez la botAvatarInitials propriété pour définir les initiales d’avatar du bot, qui s’affichent sur le côté gauche du contrôle.
Utilisez la userAvatarInitials propriété pour définir les initiales d’avatar pour l’utilisateur, qui s’affichent sur le côté droit.
Utilisez les botAvatarImage propriétés et userAvatarImage pour fournir des URL d’image pour le bot et les avatars utilisateur. Le contrôle les affiche à la place des initiales, comme indiqué ci-dessous.
const avatarOptions = {
   botAvatarImage: '<URL to your bot avatar image>',
   botAvatarInitials: 'BF',
   userAvatarImage: '<URL to your user avatar image>',
   userAvatarInitials: 'WC'
};
![]()
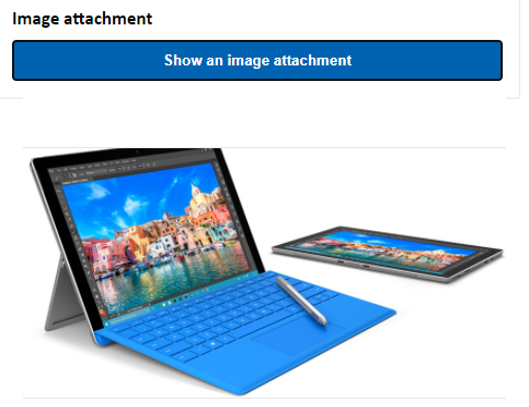
Rendu personnalisé d’activités ou de pièces jointes
Avec la dernière version de Chat Web, vous pouvez également afficher des activités ou des pièces jointes que Chat Web ne prend pas en charge prêtes à l’emploi. Le rendu des activités et des pièces jointes est envoyé via un pipeline personnalisable modélisé d’après le middleware Redux. Le pipeline est suffisamment flexible pour que vous puissiez facilement effectuer les tâches suivantes :
- Décorer les activités et pièces jointes existantes
- Ajouter de nouvelles activités et pièces jointes
- Remplacer les activités et pièces jointes existantes (ou les supprimer)
- Connecter les middleware ensemble
Afficher le dépôt GitHub en tant que pièce jointe
Par exemple, si vous souhaitez afficher un jeu de cartes de dépôt GitHub, vous pouvez créer un composant React pour le dépôt GitHub et l’ajouter en tant qu’intergiciel (middleware). Les extraits de code et d’image suivants proviennent de l’exemple de personnalisation-card-components.
Voici la sortie lorsque vous entrez le message par défaut : sample:github-repository.

Si vous entrez aide , vous obtenez la sélection de toutes les cartes que vous pouvez choisir. Il s’agit de l’un des nombreux exemples suivants :
import ReactWebChat from 'botframework-webchat';
import ReactDOM from 'react-dom';

// Create a new React component that accept render a GitHub repository attachment
const GitHubRepositoryAttachment = props => (
   <div
      style={{
         fontFamily: "'Calibri', 'Helvetica Neue', Arial, sans-serif",
         margin: 20,
         textAlign: 'center'
      }}
   >
      <svg
         height="64"
         viewBox="0 0 16 16"
         version="1.1"
         width="64"
         aria-hidden="true"
      >
         <path
            fillRule="evenodd"
            d="M8 0C3.58 0 0 3.58 0 8c0 3.54 2.29 6.53 5.47 7.59.4.07.55-.17.55-.38 0-.19-.01-.82-.01-1.49-2.01.37-2.53-.49-2.69-.94-.09-.23-.48-.94-.82-1.13-.28-.15-.68-.52-.01-.53.63-.01 1.08.58 1.23.82.72 1.21 1.87.87 2.33.66.07-.52.28-.87.51-1.07-1.78-.2-3.64-.89-3.64-3.95 0-.87.31-1.59.82-2.15-.08-.2-.36-1.02.08-2.12 0 0 .67-.21 2.2.82.64-.18 1.32-.27 2-.27.68 0 1.36.09 2 .27 1.53-1.04 2.2-.82 2.2-.82.44 1.1.16 1.92.08 2.12.51.56.82 1.27.82 2.15 0 3.07-1.87 3.75-3.65 3.95.29.25.54.73.54 1.48 0 1.07-.01 1.93-.01 2.2 0 .21.15.46.55.38A8.013 8.013 0 0 0 16 8c0-4.42-3.58-8-8-8z"
         />
      </svg>
      <p>
         <a
            href={`https://github.com/${encodeURI(props.owner)}/${encodeURI(
               props.repo
            )}`}
            target="_blank"
         >
            {props.owner}/<br />
            {props.repo}
         </a>
      </p>
   </div>
);

// Creating a new middleware pipeline that will render <GitHubRepositoryAttachment> for specific type of attachment
const attachmentMiddleware = () => next => card => {
   switch (card.attachment.contentType) {
      case 'application/vnd.microsoft.botframework.samples.github-repository':
         return (
            <GitHubRepositoryAttachment
               owner={card.attachment.content.owner}
               repo={card.attachment.content.repo}
            />
         );

      default:
         return next(card);
   }
};

ReactDOM.render(
   <ReactWebChat
      // Prepending the new middleware pipeline
      attachmentMiddleware={attachmentMiddleware}
      directLine={window.WebChat.createDirectLine({ token })}
   />,
   document.getElementById('webchat')
);
Dans cet exemple, nous ajoutons un nouveau composant React appelé GitHubRepositoryAttachment :
const GitHubRepositoryAttachment = props => (
   <div
      style={{
         fontFamily: "'Calibri', 'Helvetica Neue', Arial, sans-serif",
         margin: 20,
         textAlign: 'center'
      }}
   >
      <svg
         height="64"
         viewBox="0 0 16 16"
         version="1.1"
         width="64"
         aria-hidden="true"
      >
         <path
            fillRule="evenodd"
            d="M8 0C3.58 0 0 3.58 0 8c0 3.54 2.29 6.53 5.47 7.59.4.07.55-.17.55-.38 0-.19-.01-.82-.01-1.49-2.01.37-2.53-.49-2.69-.94-.09-.23-.48-.94-.82-1.13-.28-.15-.68-.52-.01-.53.63-.01 1.08.58 1.23.82.72 1.21 1.87.87 2.33.66.07-.52.28-.87.51-1.07-1.78-.2-3.64-.89-3.64-3.95 0-.87.31-1.59.82-2.15-.08-.2-.36-1.02.08-2.12 0 0 .67-.21 2.2.82.64-.18 1.32-.27 2-.27.68 0 1.36.09 2 .27 1.53-1.04 2.2-.82 2.2-.82.44 1.1.16 1.92.08 2.12.51.56.82 1.27.82 2.15 0 3.07-1.87 3.75-3.65 3.95.29.25.54.73.54 1.48 0 1.07-.01 1.93-.01 2.2 0 .21.15.46.55.38A8.013 8.013 0 0 0 16 8c0-4.42-3.58-8-8-8z"
         />
      </svg>
      <p>
         <a
            href={`https://github.com/${encodeURI(props.owner)}/${encodeURI(
               props.repo
            )}`}
            target="_blank"
         >
            {props.owner}/<br />
            {props.repo}
         </a>
      </p>
   </div>
);
Ensuite, nous créons un middleware qui affiche le nouveau composant React lorsque le bot envoie une pièce jointe du type de contenu application/vnd.microsoft.botframework.samples.github-repository. Sinon, il continue sur le middleware en appelant next(card).
const attachmentMiddleware = () => next => card => {
   switch (card.attachment.contentType) {
      case 'application/vnd.microsoft.botframework.samples.github-repository':
         return (
            <GitHubRepositoryAttachment
               owner={card.attachment.content.owner}
               repo={card.attachment.content.repo}
            />
         );

      default:
         return next(card);
   }
};
L’activité envoyée à partir du bot ressemble à ceci :
{
   "type": "message",
   "from": {
      "role": "bot"
   },
   "attachmentLayout": "carousel",
   "attachments": [
      {
         "contentType": "application/vnd.microsoft.botframework.samples.github-repository",
         "content": {
            "owner": "Microsoft",
            "repo": "BotFramework-WebChat"
         }
      },
      {
         "contentType": "application/vnd.microsoft.botframework.samples.github-repository",
         "content": {
            "owner": "Microsoft",
            "repo": "BotFramework-Emulator"
         }
      },
      {
         "contentType": "application/vnd.microsoft.botframework.samples.github-repository",
         "content": {
            "owner": "Microsoft",
            "repo": "BotFramework-DirectLineJS"
         }
      }
   ]
}