Démarrage rapide : Créer un assistant vocal personnalisée
Dans ce guide de démarrage rapide, vous allez utiliser le SDK Speech pour créer une application d’assistant vocal personnalisé qui se connecte à un bot que vous avez déjà créé et configuré. Si vous avez besoin de créer un bot, consultez le tutoriel associé pour obtenir un guide plus complet.
Une fois les quelques prérequis satisfaits, la connexion de votre assistant vocal personnalisé ne nécessite que quelques étapes :
- Créez un objet
BotFrameworkConfigà partir de votre clé d’abonnement et de votre région. - Créez un objet
DialogServiceConnectorà l’aide de l’objetBotFrameworkConfigci-dessus. - À l’aide de l’objet
DialogServiceConnector, démarrez le processus d’écoute pour un énoncé unique. - Inspectez le
ActivityReceivedEventArgsretourné.
Notes
Le kit SDK Speech pour C++, JavaScript, Objective-C, Python et Swift prend en charge les assistants vocaux personnalisés, mais nous n’avons pas encore inclus de guide ici.
Vous pouvez consulter ou télécharger tous les Exemples C# du kit SDK Speech sur GitHub.
Prérequis
Avant de commencer, assurez-vous de :
- Créer une ressource Speech
- Configurer votre environnement de développement et créer un projet vide
- Créer un bot connecté au canal Direct Line Speech
- Veiller à avoir accès à un microphone pour la capture audio
Notes
Reportez-vous à la liste des régions prises en charge pour les assistants vocaux et vérifiez que vos ressources sont déployées dans une de ces régions.
Ouvrez votre projet dans Visual Studio.
La première étape consiste à vérifier que votre projet est ouvert dans Visual Studio.
Commencer avec du code réutilisable
Nous allons ajouter du code qui servira de squelette à notre projet
Dans l’Explorateur de solutions, ouvrez
MainPage.xaml.Dans la vue XAML du concepteur, remplacez tout le contenu par l’extrait de code suivant qui définit une interface utilisateur rudimentaire :
<Page
    x:Class="helloworld.MainPage"
    xmlns="http://schemas.microsoft.com/winfx/2006/xaml/presentation"
    xmlns:x="http://schemas.microsoft.com/winfx/2006/xaml"
    xmlns:local="using:helloworld"
    xmlns:d="http://schemas.microsoft.com/expression/blend/2008"
    xmlns:mc="http://schemas.openxmlformats.org/markup-compatibility/2006"
    mc:Ignorable="d"
    Background="{ThemeResource ApplicationPageBackgroundThemeBrush}">

    <Grid>
        <StackPanel Orientation="Vertical" HorizontalAlignment="Center"
                    Margin="20,50,0,0" VerticalAlignment="Center" Width="800">
            <Button x:Name="EnableMicrophoneButton" Content="Enable Microphone"
                    Margin="0,0,10,0" Click="EnableMicrophone_ButtonClicked"
                    Height="35"/>
            <Button x:Name="ListenButton" Content="Talk to your bot"
                    Margin="0,10,10,0" Click="ListenButton_ButtonClicked"
                    Height="35"/>
            <StackPanel x:Name="StatusPanel" Orientation="Vertical"
                        RelativePanel.AlignBottomWithPanel="True"
                        RelativePanel.AlignRightWithPanel="True"
                        RelativePanel.AlignLeftWithPanel="True">
                <TextBlock x:Name="StatusLabel" Margin="0,10,10,0"
                           TextWrapping="Wrap" Text="Status:" FontSize="20"/>
                <Border x:Name="StatusBorder" Margin="0,0,0,0">
                    <ScrollViewer VerticalScrollMode="Auto"
                                  VerticalScrollBarVisibility="Auto" MaxHeight="200">
                        <!-- Use LiveSetting to enable screen readers to announce
                             the status update. -->
                        <TextBlock
                            x:Name="StatusBlock" FontWeight="Bold"
                            AutomationProperties.LiveSetting="Assertive"
                            MaxWidth="{Binding ElementName=Splitter, Path=ActualWidth}"
                            Margin="10,10,10,20" TextWrapping="Wrap"  />
                    </ScrollViewer>
                </Border>
            </StackPanel>
        </StackPanel>
        <MediaElement x:Name="mediaElement"/>
    </Grid>
</Page>
Le mode Création est mis à jour pour afficher l’interface utilisateur de l’application.
- Dans l’Explorateur de solutions, ouvrez le fichier source code-behind
MainPage.xaml.cs. (Il se trouve sousMainPage.xaml.) Remplacez le contenu de ce fichier par le contenu ci-dessous, qui comprend :
Des instructions
usingpour les espaces de nomsSpeechetSpeech.DialogUne implémentation simple pour garantir l’accès au microphone, couplé à un gestionnaire de bouton
Des assistances d’interface utilisateur de base pour présenter des messages et des erreurs dans l’application
Un point d’arrivée du chemin du code d’initialisation qui sera rempli plus tard
Une assistance pour lire la synthèse vocale (sans prise en charge de la diffusion en continu)
Un gestionnaire de bouton vide pour commencer l’écoute qui sera rempli plus tard
using Microsoft.CognitiveServices.Speech;
using Microsoft.CognitiveServices.Speech.Audio;
using Microsoft.CognitiveServices.Speech.Dialog;
using System;
using System.Diagnostics;
using System.IO;
using System.Text;
using Windows.Foundation;
using Windows.Storage.Streams;
using Windows.UI.Xaml;
using Windows.UI.Xaml.Controls;
using Windows.UI.Xaml.Media;

namespace helloworld
{
    public sealed partial class MainPage : Page
    {
        private DialogServiceConnector connector;

        private enum NotifyType
        {
            StatusMessage,
            ErrorMessage
        };

        public MainPage()
        {
            this.InitializeComponent();
        }

        private async void EnableMicrophone_ButtonClicked(
            object sender, RoutedEventArgs e)
        {
            bool isMicAvailable = true;
            try
            {
                var mediaCapture = new Windows.Media.Capture.MediaCapture();
                var settings =
                    new Windows.Media.Capture.MediaCaptureInitializationSettings();
                settings.StreamingCaptureMode =
                    Windows.Media.Capture.StreamingCaptureMode.Audio;
                await mediaCapture.InitializeAsync(settings);
            }
            catch (Exception)
            {
                isMicAvailable = false;
            }
            if (!isMicAvailable)
            {
                await Windows.System.Launcher.LaunchUriAsync(
                    new Uri("ms-settings:privacy-microphone"));
            }
            else
            {
                NotifyUser("Microphone was enabled", NotifyType.StatusMessage);
            }
        }

        private void NotifyUser(
            string strMessage, NotifyType type = NotifyType.StatusMessage)
        {
            // If called from the UI thread, then update immediately.
            // Otherwise, schedule a task on the UI thread to perform the update.
            if (Dispatcher.HasThreadAccess)
            {
                UpdateStatus(strMessage, type);
            }
            else
            {
                var task = Dispatcher.RunAsync(
                    Windows.UI.Core.CoreDispatcherPriority.Normal,
                    () => UpdateStatus(strMessage, type));
            }
        }

        private void UpdateStatus(string strMessage, NotifyType type)
        {
            switch (type)
            {
                case NotifyType.StatusMessage:
                    StatusBorder.Background = new SolidColorBrush(
                        Windows.UI.Colors.Green);
                    break;
                case NotifyType.ErrorMessage:
                    StatusBorder.Background = new SolidColorBrush(
                        Windows.UI.Colors.Red);
                    break;
            }
            StatusBlock.Text += string.IsNullOrEmpty(StatusBlock.Text)
                ? strMessage : "\n" + strMessage;

            if (!string.IsNullOrEmpty(StatusBlock.Text))
            {
                StatusBorder.Visibility = Visibility.Visible;
                StatusPanel.Visibility = Visibility.Visible;
            }
            else
            {
                StatusBorder.Visibility = Visibility.Collapsed;
                StatusPanel.Visibility = Visibility.Collapsed;
            }
            // Raise an event if necessary to enable a screen reader
            // to announce the status update.
            var peer = Windows.UI.Xaml.Automation.Peers.FrameworkElementAutomationPeer.FromElement(StatusBlock);
            if (peer != null)
            {
                peer.RaiseAutomationEvent(
                    Windows.UI.Xaml.Automation.Peers.AutomationEvents.LiveRegionChanged);
            }
        }

        // Waits for and accumulates all audio associated with a given
        // PullAudioOutputStream and then plays it to the MediaElement. Long spoken
        // audio will create extra latency and a streaming playback solution
        // (that plays audio while it continues to be received) should be used --
        // see the samples for examples of this.
        private void SynchronouslyPlayActivityAudio(
            PullAudioOutputStream activityAudio)
        {
            var playbackStreamWithHeader = new MemoryStream();
            playbackStreamWithHeader.Write(Encoding.ASCII.GetBytes("RIFF"), 0, 4); // ChunkID
            playbackStreamWithHeader.Write(BitConverter.GetBytes(UInt32.MaxValue), 0, 4); // ChunkSize: max
            playbackStreamWithHeader.Write(Encoding.ASCII.GetBytes("WAVE"), 0, 4); // Format
            playbackStreamWithHeader.Write(Encoding.ASCII.GetBytes("fmt "), 0, 4); // Subchunk1ID
            playbackStreamWithHeader.Write(BitConverter.GetBytes(16), 0, 4); // Subchunk1Size: PCM
            playbackStreamWithHeader.Write(BitConverter.GetBytes(1), 0, 2); // AudioFormat: PCM
            playbackStreamWithHeader.Write(BitConverter.GetBytes(1), 0, 2); // NumChannels: mono
            playbackStreamWithHeader.Write(BitConverter.GetBytes(16000), 0, 4); // SampleRate: 16kHz
            playbackStreamWithHeader.Write(BitConverter.GetBytes(32000), 0, 4); // ByteRate
            playbackStreamWithHeader.Write(BitConverter.GetBytes(2), 0, 2); // BlockAlign
            playbackStreamWithHeader.Write(BitConverter.GetBytes(16), 0, 2); // BitsPerSample: 16-bit
            playbackStreamWithHeader.Write(Encoding.ASCII.GetBytes("data"), 0, 4); // Subchunk2ID
            playbackStreamWithHeader.Write(BitConverter.GetBytes(UInt32.MaxValue), 0, 4); // Subchunk2Size

            byte[] pullBuffer = new byte[2056];

            uint lastRead = 0;
            do
            {
                lastRead = activityAudio.Read(pullBuffer);
                playbackStreamWithHeader.Write(pullBuffer, 0, (int)lastRead);
            }
            while (lastRead == pullBuffer.Length);

            var task = Dispatcher.RunAsync(
                Windows.UI.Core.CoreDispatcherPriority.Normal, () =>
            {
                mediaElement.SetSource(
                    playbackStreamWithHeader.AsRandomAccessStream(), "audio/wav");
                mediaElement.Play();
            });
        }

        private void InitializeDialogServiceConnector()
        {
            // New code will go here
        }

        private async void ListenButton_ButtonClicked(
            object sender, RoutedEventArgs e)
        {
            // New code will go here
        }
    }
}
Ajoutez l’extrait de code suivant au corps de la méthode
InitializeDialogServiceConnector. Ce code crée leDialogServiceConnectoravec les informations de votre abonnement.// Create a BotFrameworkConfig by providing a Speech service subscription key // the botConfig.Language property is optional (default en-US) const string speechSubscriptionKey = "YourSpeechSubscriptionKey"; // Your subscription key const string region = "YourServiceRegion"; // Your subscription service region. var botConfig = BotFrameworkConfig.FromSubscription(speechSubscriptionKey, region); botConfig.Language = "en-US"; connector = new DialogServiceConnector(botConfig);Notes
Reportez-vous à la liste des régions prises en charge pour les assistants vocaux et vérifiez que vos ressources sont déployées dans une de ces régions.
Notes
Pour plus d’informations sur la configuration de votre bot, consultez la documentation de Bot Framework relative au canal Direct Line Speech.
Remplacez les chaînes
YourSpeechSubscriptionKeyetYourServiceRegionpar vos propres valeurs pour votre abonnement Speech et votre région.Ajoutez l’extrait de code suivant à la fin du corps de la méthode
InitializeDialogServiceConnector. Ce code définit des gestionnaires pour les événements sur lesquelsDialogServiceConnectors’appuie pour communiquer ses activités de bot, les résultats de la reconnaissance vocale et d’autres informations.// ActivityReceived is the main way your bot will communicate with the client // and uses bot framework activities connector.ActivityReceived += (sender, activityReceivedEventArgs) => { NotifyUser( $"Activity received, hasAudio={activityReceivedEventArgs.HasAudio} activity={activityReceivedEventArgs.Activity}"); if (activityReceivedEventArgs.HasAudio) { SynchronouslyPlayActivityAudio(activityReceivedEventArgs.Audio); } }; // Canceled will be signaled when a turn is aborted or experiences an error condition connector.Canceled += (sender, canceledEventArgs) => { NotifyUser($"Canceled, reason={canceledEventArgs.Reason}"); if (canceledEventArgs.Reason == CancellationReason.Error) { NotifyUser( $"Error: code={canceledEventArgs.ErrorCode}, details={canceledEventArgs.ErrorDetails}"); } }; // Recognizing (not 'Recognized') will provide the intermediate recognized text // while an audio stream is being processed connector.Recognizing += (sender, recognitionEventArgs) => { NotifyUser($"Recognizing! in-progress text={recognitionEventArgs.Result.Text}"); }; // Recognized (not 'Recognizing') will provide the final recognized text // once audio capture is completed connector.Recognized += (sender, recognitionEventArgs) => { NotifyUser($"Final speech to text result: '{recognitionEventArgs.Result.Text}'"); }; // SessionStarted will notify when audio begins flowing to the service for a turn connector.SessionStarted += (sender, sessionEventArgs) => { NotifyUser($"Now Listening! Session started, id={sessionEventArgs.SessionId}"); }; // SessionStopped will notify when a turn is complete and // it's safe to begin listening again connector.SessionStopped += (sender, sessionEventArgs) => { NotifyUser($"Listening complete. Session ended, id={sessionEventArgs.SessionId}"); };Ajoutez l’extrait de code suivant au corps de la méthode
ListenButton_ButtonClickeddans la classeMainPage. Ce code configureDialogServiceConnectorpour l’écoute, car vous avez déjà établi la configuration et inscrit les gestionnaires d’événements.if (connector == null) { InitializeDialogServiceConnector(); // Optional step to speed up first interaction: if not called, // connection happens automatically on first use var connectTask = connector.ConnectAsync(); } try { // Start sending audio to your speech-enabled bot var listenTask = connector.ListenOnceAsync(); // You can also send activities to your bot as JSON strings -- // Microsoft.Bot.Schema can simplify this string speakActivity = @"{""type"":""message"",""text"":""Greeting Message"", ""speak"":""Hello there!""}"; await connector.SendActivityAsync(speakActivity); } catch (Exception ex) { NotifyUser($"Exception: {ex.ToString()}", NotifyType.ErrorMessage); }
Générer et exécuter votre application
Vous êtes maintenant prêt à créer votre application et à tester votre assistant vocal personnalisé à l’aide du service Speech.
Dans la barre de menus, choisissez Générer>Générer la solution pour générer l’application. Le code doit maintenant se compiler sans erreurs.
Choisissez Déboguer>Démarrer le débogage (ou appuyez sur F5) pour démarrer l’application. La fenêtre helloworld s’affiche.
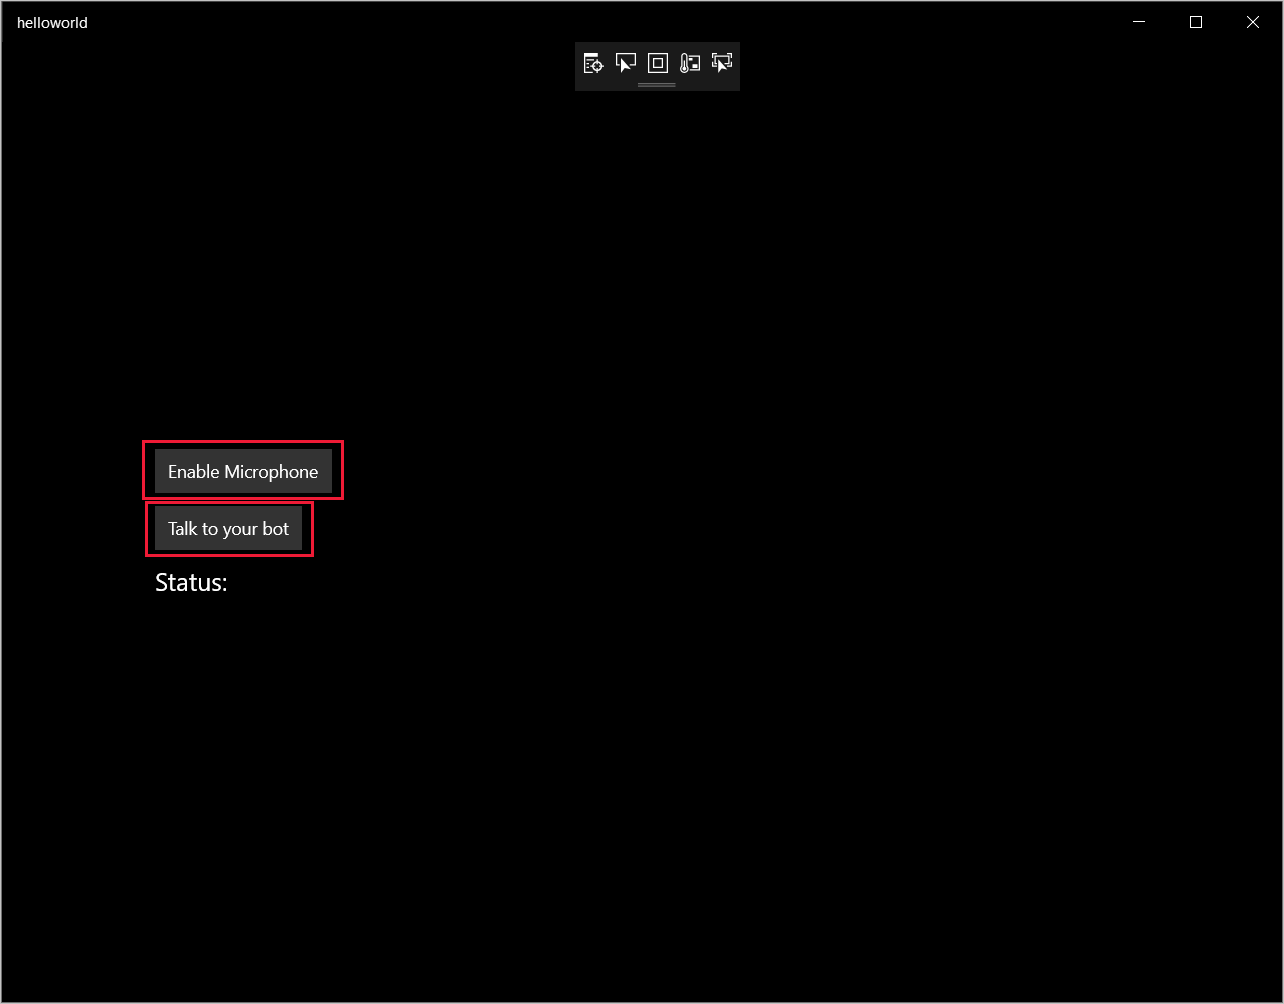
Sélectionnez Activer le microphone et, quand la demande d’autorisation d’accès apparaît, sélectionnez Oui.

Sélectionnez Talk to your bot (Parler à votre bot) et prononcez une phrase ou quelques mots en anglais dans le micro de votre appareil. Votre production orale est transmise au canal Direct Line Speech, et transcrite en texte qui apparaît dans la fenêtre.
Étapes suivantes
Vous pouvez consulter ou télécharger tous les Exemples Java du kit SDK Speech sur GitHub.
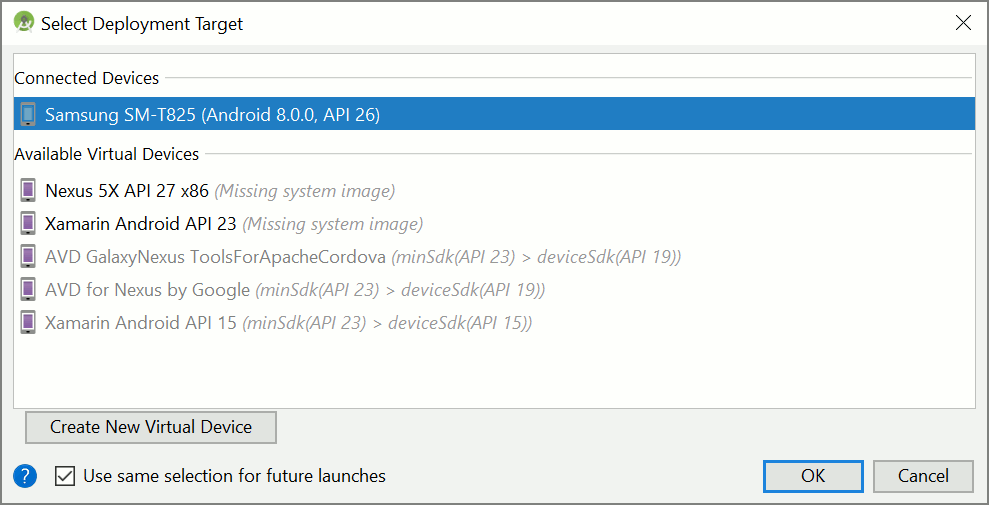
Choisir votre environnement cible
Prérequis
Avant de commencer, assurez-vous de :
- Créer une ressource Speech
- Configurer votre environnement de développement et créer un projet vide
- Créer un bot connecté au canal Direct Line Speech
- Veiller à avoir accès à un microphone pour la capture audio
Notes
Reportez-vous à la liste des régions prises en charge pour les assistants vocaux et vérifiez que vos ressources sont déployées dans une de ces régions.
Créer et configurer un projet
Créez un projet Eclipse et installer le Kit de développement logiciel (SDK) Speech.
En outre, pour activer la journalisation, mettez à jour le fichier pom.xml en y incluant la dépendance suivante :
 <dependency>
     <groupId>org.slf4j</groupId>
     <artifactId>slf4j-simple</artifactId>
     <version>1.7.5</version>
 </dependency>
Ajouter un exemple de code
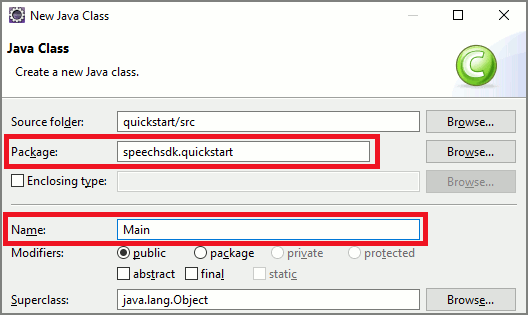
Pour ajouter une nouvelle classe vide dans votre projet Java, sélectionnez File (Fichier)>New (Nouvelle)>Classe (Classe) .
Dans la fenêtre New Java Class (Nouvelle classe Java), entrez speechsdk.quickstart dans le champ Package, et Main dans le champ Name (Nom).
Ouvrez la classe
Mainnouvellement créée et remplacez le contenu du fichierMain.javapar le code de démarrage suivant :package speechsdk.quickstart; import com.microsoft.cognitiveservices.speech.audio.AudioConfig; import com.microsoft.cognitiveservices.speech.audio.PullAudioOutputStream; import com.microsoft.cognitiveservices.speech.dialog.BotFrameworkConfig; import com.microsoft.cognitiveservices.speech.dialog.DialogServiceConnector; import org.slf4j.Logger; import org.slf4j.LoggerFactory; import javax.sound.sampled.AudioFormat; import javax.sound.sampled.AudioSystem; import javax.sound.sampled.DataLine; import javax.sound.sampled.SourceDataLine; import java.io.InputStream; public class Main { final Logger log = LoggerFactory.getLogger(Main.class); public static void main(String[] args) { // New code will go here } private void playAudioStream(PullAudioOutputStream audio) { ActivityAudioStream stream = new ActivityAudioStream(audio); final ActivityAudioStream.ActivityAudioFormat audioFormat = stream.getActivityAudioFormat(); final AudioFormat format = new AudioFormat( AudioFormat.Encoding.PCM_SIGNED, audioFormat.getSamplesPerSecond(), audioFormat.getBitsPerSample(), audioFormat.getChannels(), audioFormat.getFrameSize(), audioFormat.getSamplesPerSecond(), false); try { int bufferSize = format.getFrameSize(); final byte[] data = new byte[bufferSize]; SourceDataLine.Info info = new DataLine.Info(SourceDataLine.class, format); SourceDataLine line = (SourceDataLine) AudioSystem.getLine(info); line.open(format); if (line != null) { line.start(); int nBytesRead = 0; while (nBytesRead != -1) { nBytesRead = stream.read(data); if (nBytesRead != -1) { line.write(data, 0, nBytesRead); } } line.drain(); line.stop(); line.close(); } stream.close(); } catch (Exception e) { e.printStackTrace(); } } }Dans la méthode
main, vous configurez d’abord votreDialogServiceConfiget vous l’utilisez pour créer une instance deDialogServiceConnector. Cette instance se connecte au canal Direct Line Speech pour interagir avec votre bot. Une instanceAudioConfigest également utilisée pour spécifier la source d’entrée audio. Dans cet exemple, le microphone par défaut est utilisé avecAudioConfig.fromDefaultMicrophoneInput().- Remplacez la chaîne
YourSubscriptionKeypar votre clé de ressource Speech, que vous pouvez obtenir sur le portail Azure. - Remplacez la chaîne
YourServiceRegionpar la région associée à votre ressources Speech.
Notes
Reportez-vous à la liste des régions prises en charge pour les assistants vocaux et vérifiez que vos ressources sont déployées dans une de ces régions.
final String subscriptionKey = "YourSubscriptionKey"; // Your subscription key final String region = "YourServiceRegion"; // Your speech subscription service region final BotFrameworkConfig botConfig = BotFrameworkConfig.fromSubscription(subscriptionKey, region); // Configure audio input from a microphone. final AudioConfig audioConfig = AudioConfig.fromDefaultMicrophoneInput(); // Create a DialogServiceConnector instance. final DialogServiceConnector connector = new DialogServiceConnector(botConfig, audioConfig);- Remplacez la chaîne
Le connecteur
DialogServiceConnectors’appuie sur plusieurs événements pour communiquer ses activités de bot, les résultats de la reconnaissance vocale et d’autres informations. Ajoutez ensuite les écouteurs d’événements suivants.// Recognizing will provide the intermediate recognized text while an audio stream is being processed. connector.recognizing.addEventListener((o, speechRecognitionResultEventArgs) -> { log.info("Recognizing speech event text: {}", speechRecognitionResultEventArgs.getResult().getText()); }); // Recognized will provide the final recognized text once audio capture is completed. connector.recognized.addEventListener((o, speechRecognitionResultEventArgs) -> { log.info("Recognized speech event reason text: {}", speechRecognitionResultEventArgs.getResult().getText()); }); // SessionStarted will notify when audio begins flowing to the service for a turn. connector.sessionStarted.addEventListener((o, sessionEventArgs) -> { log.info("Session Started event id: {} ", sessionEventArgs.getSessionId()); }); // SessionStopped will notify when a turn is complete and it's safe to begin listening again. connector.sessionStopped.addEventListener((o, sessionEventArgs) -> { log.info("Session stopped event id: {}", sessionEventArgs.getSessionId()); }); // Canceled will be signaled when a turn is aborted or experiences an error condition. connector.canceled.addEventListener((o, canceledEventArgs) -> { log.info("Canceled event details: {}", canceledEventArgs.getErrorDetails()); connector.disconnectAsync(); }); // ActivityReceived is the main way your bot will communicate with the client and uses Bot Framework activities. connector.activityReceived.addEventListener((o, activityEventArgs) -> { final String act = activityEventArgs.getActivity().serialize(); log.info("Received activity {} audio", activityEventArgs.hasAudio() ? "with" : "without"); if (activityEventArgs.hasAudio()) { playAudioStream(activityEventArgs.getAudio()); } });Connectez
DialogServiceConnectorà Direct Line Speech en appelant la méthodeconnectAsync(). Pour tester votre bot, vous pouvez appeler la méthodelistenOnceAsyncafin d’envoyer l’entrée audio à partir de votre microphone. De plus, vous pouvez utiliser la méthodesendActivityAsyncpour envoyer une activité personnalisée sous forme de chaîne sérialisée. Ces activités personnalisées peuvent fournir des données supplémentaires que votre bot utilise dans la conversation.connector.connectAsync(); // Start listening. System.out.println("Say something ..."); connector.listenOnceAsync(); // connector.sendActivityAsync(...)Enregistrez les modifications dans le fichier
Main.Pour prendre en charge la lecture de la réponse, ajoutez une classe qui transforme l’objet PullAudioOutputStream retourné à partir de l’API getAudio() en un InputStream Java pour en faciliter la gestion.
ActivityAudioStreamest une classe spécialisée qui gère la réponse audio du canal Direct Line Speech. Elle fournit les accesseurs permettant d’extraire les informations du format audio nécessaires pour gérer la lecture. Pour cela, sélectionnez File (Fichier)>New (Nouveau)>Class (Classe) .Dans la fenêtre New Java Class (Nouvelle classe Java), entrez speechsdk.quickstart dans le champ Package, et ActivityAudioStream dans le champ Name (Nom).
Ouvrez la classe
ActivityAudioStreamnouvellement créée et remplacez le contenu par le code suivant :package com.speechsdk.quickstart; import com.microsoft.cognitiveservices.speech.audio.PullAudioOutputStream; import java.io.IOException; import java.io.InputStream; public final class ActivityAudioStream extends InputStream { /** * The number of samples played per second (16 kHz). */ public static final long SAMPLE_RATE = 16000; /** * The number of bits in each sample of a sound that has this format (16 bits). */ public static final int BITS_PER_SECOND = 16; /** * The number of audio channels in this format (1 for mono). */ public static final int CHANNELS = 1; /** * The number of bytes in each frame of a sound that has this format (2). */ public static final int FRAME_SIZE = 2; /** * Reads up to a specified maximum number of bytes of data from the audio * stream, putting them into the given byte array. * * @param b the buffer into which the data is read * @param off the offset, from the beginning of array <code>b</code>, at which * the data will be written * @param len the maximum number of bytes to read * @return the total number of bytes read into the buffer, or -1 if there * is no more data because the end of the stream has been reached */ @Override public int read(byte[] b, int off, int len) { byte[] tempBuffer = new byte[len]; int n = (int) this.pullStreamImpl.read(tempBuffer); for (int i = 0; i < n; i++) { if (off + i > b.length) { throw new ArrayIndexOutOfBoundsException(b.length); } b[off + i] = tempBuffer[i]; } if (n == 0) { return -1; } return n; } /** * Reads the next byte of data from the activity audio stream if available. * * @return the next byte of data, or -1 if the end of the stream is reached * @see #read(byte[], int, int) * @see #read(byte[]) * @see #available * <p> */ @Override public int read() { byte[] data = new byte[1]; int temp = read(data); if (temp <= 0) { // we have a weird situation if read(byte[]) returns 0! return -1; } return data[0] & 0xFF; } /** * Reads up to a specified maximum number of bytes of data from the activity audio stream, * putting them into the given byte array. * * @param b the buffer into which the data is read * @return the total number of bytes read into the buffer, or -1 if there * is no more data because the end of the stream has been reached */ @Override public int read(byte[] b) { int n = (int) pullStreamImpl.read(b); if (n == 0) { return -1; } return n; } /** * Skips over and discards a specified number of bytes from this * audio input stream. * * @param n the requested number of bytes to be skipped * @return the actual number of bytes skipped * @throws IOException if an input or output error occurs * @see #read * @see #available */ @Override public long skip(long n) { if (n <= 0) { return 0; } if (n <= Integer.MAX_VALUE) { byte[] tempBuffer = new byte[(int) n]; return read(tempBuffer); } long count = 0; for (long i = n; i > 0; i -= Integer.MAX_VALUE) { int size = (int) Math.min(Integer.MAX_VALUE, i); byte[] tempBuffer = new byte[size]; count += read(tempBuffer); } return count; } /** * Closes this audio input stream and releases any system resources associated * with the stream. */ @Override public void close() { this.pullStreamImpl.close(); } /** * Fetch the audio format for the ActivityAudioStream. The ActivityAudioFormat defines the sample rate, bits per sample, and the # channels. * * @return instance of the ActivityAudioFormat associated with the stream */ public ActivityAudioStream.ActivityAudioFormat getActivityAudioFormat() { return activityAudioFormat; } /** * Returns the maximum number of bytes that can be read (or skipped over) from this * audio input stream without blocking. * * @return the number of bytes that can be read from this audio input stream without blocking. * As this implementation does not buffer, this will be defaulted to 0 */ @Override public int available() { return 0; } public ActivityAudioStream(final PullAudioOutputStream stream) { pullStreamImpl = stream; this.activityAudioFormat = new ActivityAudioStream.ActivityAudioFormat(SAMPLE_RATE, BITS_PER_SECOND, CHANNELS, FRAME_SIZE, AudioEncoding.PCM_SIGNED); } private PullAudioOutputStream pullStreamImpl; private ActivityAudioFormat activityAudioFormat; /** * ActivityAudioFormat is an internal format which contains metadata regarding the type of arrangement of * audio bits in this activity audio stream. */ static class ActivityAudioFormat { private long samplesPerSecond; private int bitsPerSample; private int channels; private int frameSize; private AudioEncoding encoding; public ActivityAudioFormat(long samplesPerSecond, int bitsPerSample, int channels, int frameSize, AudioEncoding encoding) { this.samplesPerSecond = samplesPerSecond; this.bitsPerSample = bitsPerSample; this.channels = channels; this.encoding = encoding; this.frameSize = frameSize; } /** * Fetch the number of samples played per second for the associated audio stream format. * * @return the number of samples played per second */ public long getSamplesPerSecond() { return samplesPerSecond; } /** * Fetch the number of bits in each sample of a sound that has this audio stream format. * * @return the number of bits per sample */ public int getBitsPerSample() { return bitsPerSample; } /** * Fetch the number of audio channels used by this audio stream format. * * @return the number of channels */ public int getChannels() { return channels; } /** * Fetch the default number of bytes in a frame required by this audio stream format. * * @return the number of bytes */ public int getFrameSize() { return frameSize; } /** * Fetch the audio encoding type associated with this audio stream format. * * @return the encoding associated */ public AudioEncoding getEncoding() { return encoding; } } /** * Enum defining the types of audio encoding supported by this stream. */ public enum AudioEncoding { PCM_SIGNED("PCM_SIGNED"); String value; AudioEncoding(String value) { this.value = value; } } }Enregistrez les modifications dans le fichier
ActivityAudioStream.
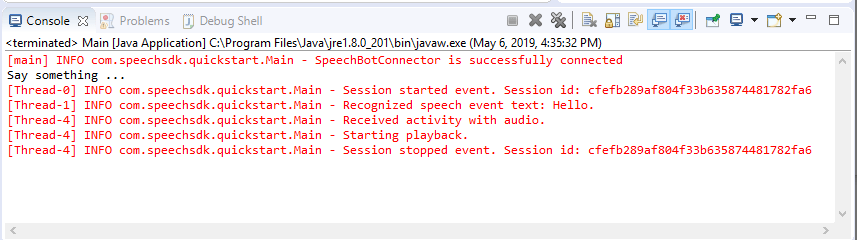
Générer et exécuter l’application
Sélectionnez F11 ou Run (Exécuter)>Debug (Déboguer) .
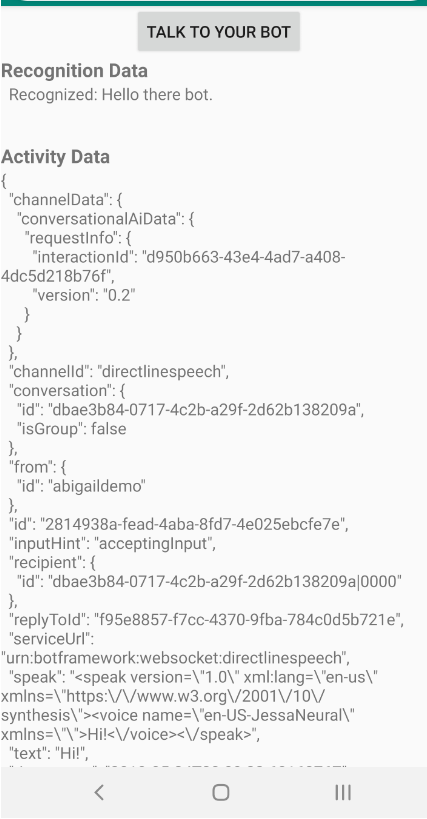
La console affiche un message « Say something » (Dites quelque chose) ; à ce stade, prononcez une phrase en anglais ou une phrase compréhensible par votre bot. Vos paroles sont transmises à votre bot via le canal Direct Line Speech, où elles sont reconnues et traitées par votre bot. La réponse est retournée sous la forme d’une activité. Si votre bot retourne des paroles en guise de réponse, les données audio sont lues en utilisant la classe AudioPlayer.
Étapes suivantes
Vous pouvez consulter ou télécharger tous les Exemples Go du kit SDK Speech sur GitHub.
Prérequis
Avant de commencer :
- Créer une ressource Speech
- Configurer votre environnement de développement et créer un projet vide
- Créer un bot connecté au canal Direct Line Speech
- Veiller à avoir accès à un microphone pour la capture audio
Notes
Reportez-vous à la liste des régions prises en charge pour les assistants vocaux et vérifiez que vos ressources sont déployées dans une de ces régions.
Configurer votre environnement
Mettez à jour le fichier go.mod avec la dernière version du Kit de développement logiciel (SDK) en ajoutant cette ligne
require (
    github.com/Microsoft/cognitive-services-speech-sdk-go v1.15.0
)
Commencer avec du code réutilisable
Remplacez le contenu de votre fichier source (par exemple quickstart.go) par le contenu ci-dessous, qui comprend :
- définition du package « main »
- importation des modules nécessaires à partir du Kit de développement logiciel (SDK) Speech
- variables pour le stockage des informations du bot qui seront remplacées ultérieurement dans ce guide de démarrage rapide
- implémentation simple utilisant le microphone pour l’entrée audio
- gestionnaires d’événements pour différents événements qui se produisent pendant une interaction vocale
package main

import (
    "fmt"
    "time"

    "github.com/Microsoft/cognitive-services-speech-sdk-go/audio"
    "github.com/Microsoft/cognitive-services-speech-sdk-go/dialog"
    "github.com/Microsoft/cognitive-services-speech-sdk-go/speech"
)

func main() {
    subscription :=  "YOUR_SUBSCRIPTION_KEY"
    region := "YOUR_BOT_REGION"

    audioConfig, err := audio.NewAudioConfigFromDefaultMicrophoneInput()
    if err != nil {
        fmt.Println("Got an error: ", err)
        return
    }
    defer audioConfig.Close()
    config, err := dialog.NewBotFrameworkConfigFromSubscription(subscription, region)
    if err != nil {
        fmt.Println("Got an error: ", err)
        return
    }
    defer config.Close()
    connector, err := dialog.NewDialogServiceConnectorFromConfig(config, audioConfig)
    if err != nil {
        fmt.Println("Got an error: ", err)
        return
    }
    defer connector.Close()
    activityReceivedHandler := func(event dialog.ActivityReceivedEventArgs) {
        defer event.Close()
        fmt.Println("Received an activity.")
    }
    connector.ActivityReceived(activityReceivedHandler)
    recognizedHandle := func(event speech.SpeechRecognitionEventArgs) {
        defer event.Close()
        fmt.Println("Recognized ", event.Result.Text)
    }
    connector.Recognized(recognizedHandle)
    recognizingHandler := func(event speech.SpeechRecognitionEventArgs) {
        defer event.Close()
        fmt.Println("Recognizing ", event.Result.Text)
    }
    connector.Recognizing(recognizingHandler)
    connector.ListenOnceAsync()
    <-time.After(10 * time.Second)
}
Remplacez les valeurs YOUR_SUBSCRIPTION_KEY et YOUR_BOT_REGION par les valeurs réelles provenant de la ressource Speech.
Accédez au portail Azure et ouvrez votre ressource Speech
Sous Clés et point de terminaison à gauche, se trouvent deux clés d’abonnement disponibles
- Utilisez l’une ou l’autre en guise de remplacement de la valeur
YOUR_SUBSCRIPTION_KEY
- Utilisez l’une ou l’autre en guise de remplacement de la valeur
Sous Vue d’ensemble à gauche, notez la région et mappez-la à l’identificateur de région
- Utilisez l’Identificateur de région en guise de remplacement de la valeur
YOUR_BOT_REGION, par exemple :"westus"pour USA Ouest
Notes
Reportez-vous à la liste des régions prises en charge pour les assistants vocaux et vérifiez que vos ressources sont déployées dans une de ces régions.
Notes
Pour plus d’informations sur la configuration de votre bot, consultez la documentation de Bot Framework relative au canal Direct Line Speech.
- Utilisez l’Identificateur de région en guise de remplacement de la valeur
Explication du code
La région et la clé de l’abonnement Speech sont nécessaires pour créer un objet de configuration Speech. L’objet de configuration est nécessaire pour instancier un objet de reconnaissance vocale.
Le module de reconnaissance vocale expose plusieurs façons de reconnaître la parole. Dans cet exemple, la parole est reconnue de façon continue. Cette fonctionnalité permet au service Speech de savoir que vous envoyez plusieurs phrases pour reconnaissance, et quand le programme arrête la reconnaissance. À mesure que les résultats sont générés, le code les écrit dans la console.
Créer et exécuter
Vous êtes maintenant prêt à créer votre projet et à tester votre assistant vocal personnalisé à l’aide du service Speech.
- Créez votre projet, par exemple. « go build »
- Exécutez le module et prononcez une phrase ou quelques mots dans le micro de votre appareil. Votre production orale est transmise au canal Direct Line Speech, puis transcrite en texte qui apparaît comme sortie.
Notes
Le SDK Speech reconnaît par défaut l’utilisation de la langue en-US. Consultez Comment effectuer la reconnaissance vocale pour plus d’informations sur le choix de la langue source.
Étapes suivantes
Prise en charge de langues et de plateformes supplémentaires
Si vous avez cliqué sur cet onglet, c’est que vous n’avez probablement pas vu de démarrage rapide dans votre langage de programmation favori. Ne vous inquiétez pas, nous proposons d’autres documents et exemples de code de démarrage rapide sur GitHub. Utilisez le tableau pour rechercher l’exemple convenant à votre langage de programmation, ainsi qu’à votre combinaison plateforme/système d’exploitation.
| Langage | Exemples de code |
|---|---|
| C# | .NET Framework, .NET Core, UWP, Unity, Xamarin |
| C++ | Windows, Linux, macOS |
| Java | Android, JRE |
| JavaScript | Browser, Node.js |
| Objective-C | iOS, macOS |
| Python | Windows, Linux, macOS |
| Swift | iOS, macOS |