Ledger translation (Russia)
Translation is used to transfer accounting transactions from one company to another and, at the same time, to transform the transactions so that they comply with standards for business or international reporting. During translation, ledger accounts are usually consolidated according to a specific rule. Sometimes, data must be recalculated from one currency to another, or financial dimensions must be changed. For example, the accounting in one company might be done in rubles, whereas the business reporting is done in dollars.
Translation can be done between one company and multiple other companies. For example, the company that does the accounting might translate data to one company for international reporting but another company for business reporting.
Translation can be done only for ledger transactions.
The following types of voucher translation are available:
- One-to-one – If the national currency and the reporting currency are the same, translate transactions from a source company to a target company that use the same currency.
- Historical – If the national currency and the reporting currency differ, do the voucher translation by using the exchange rate that is in effect on the date when the voucher is posted.
- Weighted – Do the voucher translation by using the weighted average exchange rate for the period.
- Current – Do the voucher translation by using the exchange rate that is in effect on the date of translation.
- Special – Do the voucher translation by using the exchange rate that is specified in the transaction instead of the exchange rate that is in effect on the voucher date or the translation date.
- User specified – Do the voucher translation by using the exchange rate that is specified by the user.
A company sets up translation rules based on its accounting policies. The translation rules describe which ledger account in the Russian chart of accounts transaction must be transferred, which ledger account in the International Financial Reporting Standards (IFRS) chart of accounts the transactions must be transferred to, which exchange rate must be used, and which financial dimensions the transactions must be transferred with. Transactions are transferred from the source company, which uses Russian accounting, to the target company, which uses international or managerial accounting.
You must create target companies that do the translation. Before you create target companies, complete the following prerequisites:
- Set up a chart of accounts.
- Create financial dimensions.
- Set up the currencies and exchange rates.
- Create fiscal periods.
You can translate the transactions together with or without the saved correspondence of the source company.
The translation procedure is done periodically. It transfers transactions from the source company (which is the database for Russian accounting) to a target company (which is either IFRS or a business company).
Preliminary setup
The translation parameters must be set in the source company.
Set up a translation group
You can create translation group rules to specify all translation settings.
- Go to General ledger > Translation setup > Translation groups.
- Create a line.
- In the Rule group field, enter a unique code for the translation rule group.
- In the Company field, enter the code for the source company.
- In the To company field, select the code for the target company.
Note
The value of the target company's standard currency is automatically updated in the To currency field.
In the Description field, enter a description of the translation rule group.
On the Translation methods FastTab, select Methods initialization to create a list of translation methods.
Select Add, and then, in the Method field, select Ledger translation.
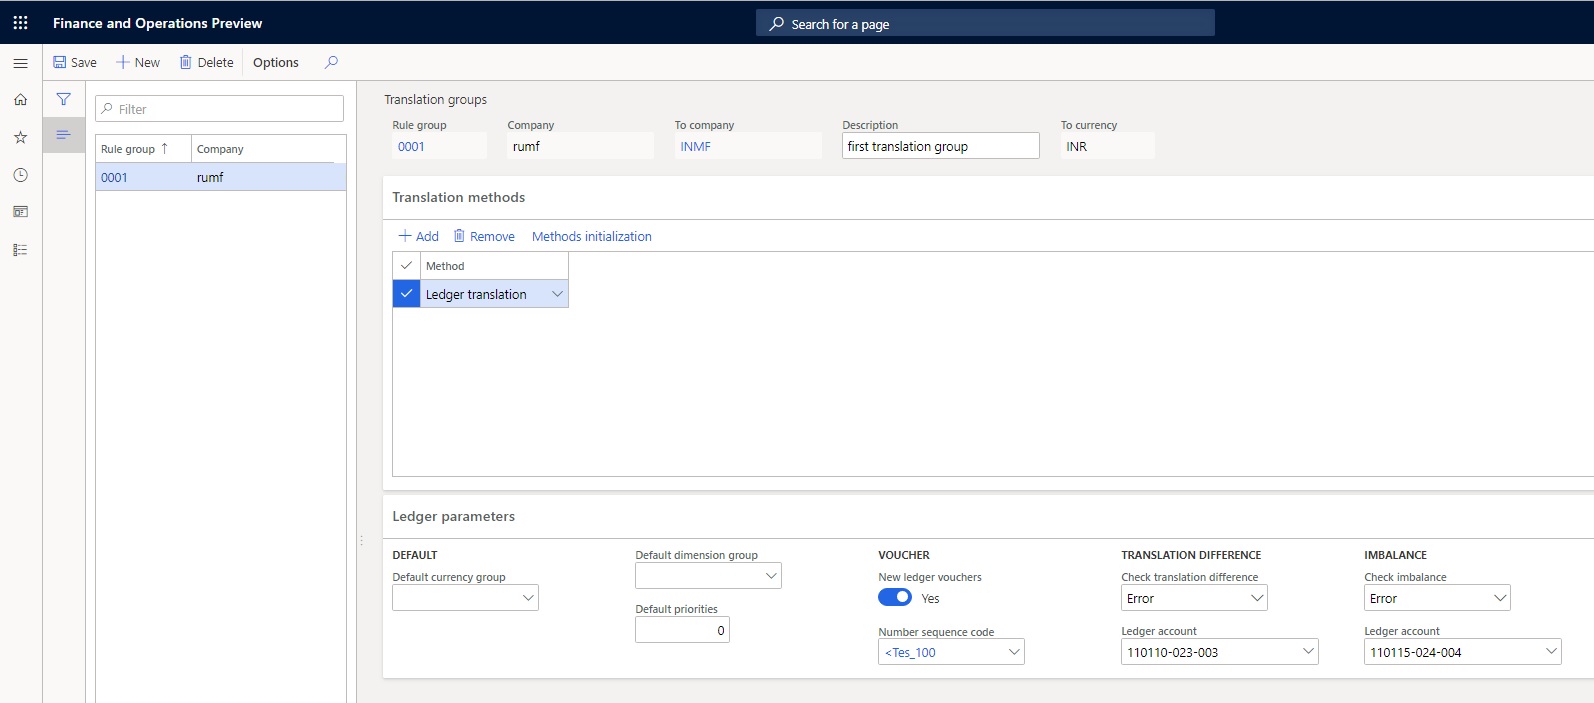
On the Ledger parameters FastTab, in the Default currency group field, select the currency group that should be used by default for the account translation rules.
In the Default dimension group field, select the dimension group that should be used by default for the account translation rules.
In the Default priorities field, enter the priority that should be used by default for the account translation rules.
Set the New ledger vouchers option to Yes to create new ledger voucher numbers when you do translations. If the New ledger vouchers option is set to No, ledger account transactions are translated to the ledger account of the target company by using the voucher number of the source company.
In the Number sequence code field, select the number sequence for the vouchers.
Note
The Number sequence code field is available only if you set the New ledger vouchers option to Yes.
In the Translation difference section, you define the level that the translation difference should be checked to and the account where translation difference amounts should be put. The translation difference is the imbalance that occurs in the target company's primary and secondary currencies because the valuation of the corresponding entries is done at different rates.
In the Check translation difference field, select one of the following validation methods for the translation difference:
- Error – When the transaction is posted to the translation difference account, an error message is shown, and the translation session is canceled.
- Warning – When the translation session is completed, a message about the amounts that are posted to the translation difference account is shown. All transactions are translated to the ledger account of the target company.
In the Ledger account field, select the main account number that should reflect the translation differences for the target company's default and secondary currencies.
Note
A translation difference can occur when the debit and credit lines of the transaction have been translated to the target company at different exchange rates. A translation difference can also occur because of rounding errors.
In the Imbalance section, you define the level that the imbalance should be checked to and the account where the imbalance amounts should be put. The imbalance is the difference that occurs in the transaction amount in the target company because the valuation of the corresponding transactions is done at different rates.
In the Check imbalance field, select the validate method for the imbalance:
- Error – When the transaction is posted to the imbalance account, an error message is shown, and the translation session is canceled.
- Warning – When the translation session is completed, a message about the amounts that are posted to the imbalance account is shown. All transactions are translated to the ledger account of the target company.
In the Ledger account field, select the account number that should be used to accumulate the imbalance amounts in the target company's transaction currency.
Note
An imbalance can occur during translation, when the debit side of the transaction is translated to the target company, but the credit side of the transaction isn't translated.
- Select Save, and then close the page.
Set up currency groups so that they have currency conversion rules
Set up currency groups to specify the currency conversion rules that are used during translation.
- Go to General ledger > Translation setup > Currency groups.
- In the left pane, in the Rule group field, select the rule group that you're setting up the currency conversion rule for.
Note
You can set up multiple currency conversion rules for one rule group.
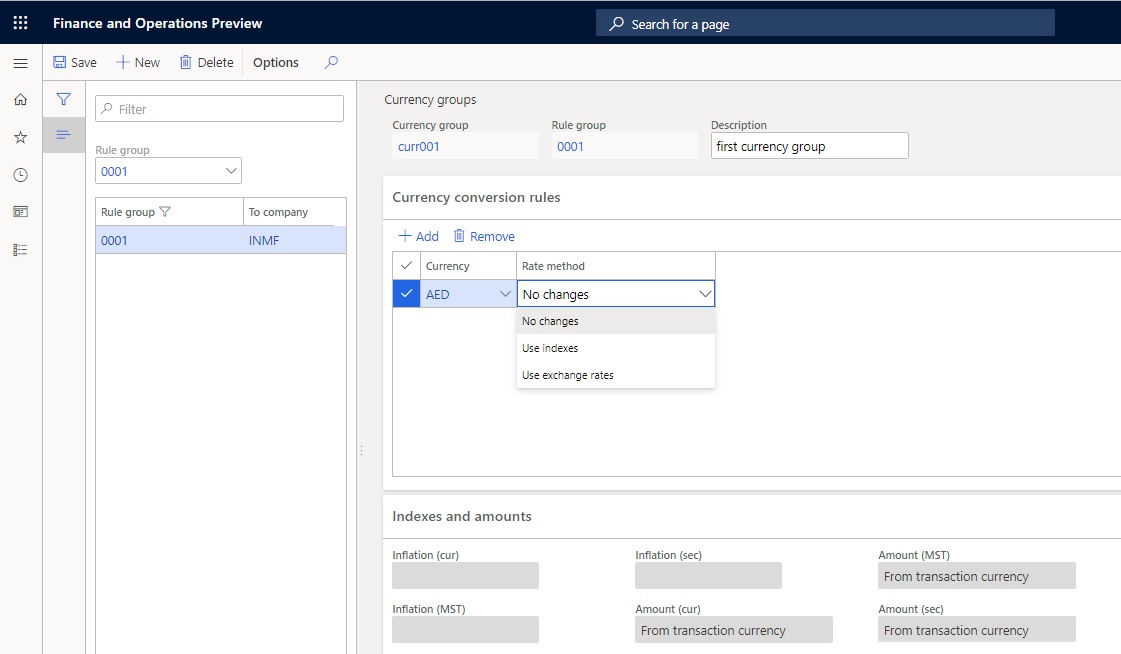
Create a currency group.
In the Currency group field, enter a unique code for the currency group.
In the Description field, enter a description of the currency group.
On the Currency conversion rules FastTab, select Add to create a line.
In the Currency field, select the code for the currency in the source company that the conversion method is being set up for.
In the Rate method field, select the currency conversion method that should be used when transactions are translated from the source company to the target company:
No changes – In the target company, a translated transaction is created, where the transaction amount and currency equal the transaction amount and currency in the source company. In the translated transaction, the amounts in the accounting and reporting currencies are calculated by using the exchange rate of the target company.
Use indexes – If you select this option, on the Indexes and amounts FastTab, define the rules for using indexes to determine the transaction amounts (in the transaction currency, default currency, and secondary currency) for the target company:
- In the Inflation (cur) field, select the conversion index for the transaction currency.
- In the Inflation (MST) field, select the conversion index for the accounting currency.
- In the Inflation (sec) field, select the conversion index for the reporting currency.
Use exchange rates – If you select this option, on the Indexes and amounts FastTab, define the rules for using exchange rates to determine the transaction amounts (in the transaction currency, default currency, and secondary currency) for the target company:
In the Amount (cur) field, select the rule for converting the transaction amount into the transaction currency.
In the Amount (MST) field, select the rule for converting the transaction amount into the accounting currency.
In the Amount (sec) field, select the rule for converting the transaction amount into the reporting currency.
In these three Amount... fields, you can select the following rules:
- From transaction currency – The amount is calculated from the amount of the source transaction through conversion at the exchange rate of the target company.
- Zero – The value 0 (zero) is substituted.
- Amount in transaction currency – The amount is copied from the amount in the transaction currency of the source transaction.
- The amount in the accounting currency – The amount is copied from the amount in the accounting currency of the source transaction.
- The amount in the reporting currency – The amount is copied from the amount in the reporting currency of the source transaction.
- 1 (one) – The value 1 (one) is substituted.
Select Save, and then close the page.
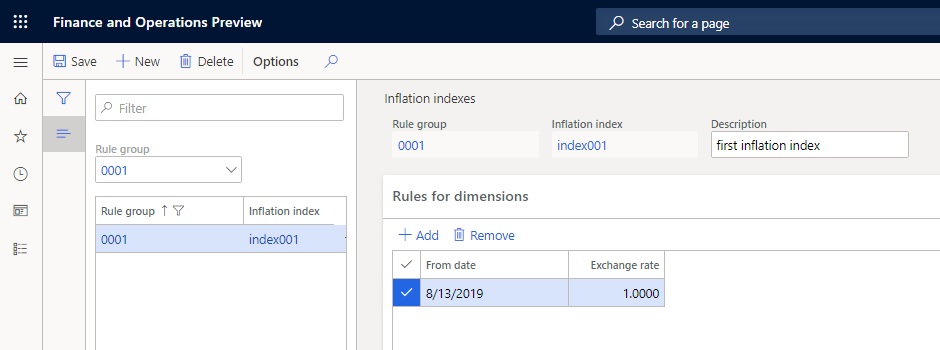
Set up an inflation index
- Go to General ledger > Translation setup > Inflation indexes.
- In the left pane, in the Rule group field, select the translation group that you're setting up the inflation index for.
Note
You can set up multiple inflation indexes for one rule group.
- Select New to create an inflation index.
- In the Inflation index field, enter a unique code for the inflation index.
- In the Description field, enter a description of the inflation index.
- On the Rules for dimensions FastTab, select Add to create a line.
- In the From date field, select the start date when the index becomes valid.
[!NOTE]
The configured index starts to work on the selected start date and continues to work until the next start date of another configured index. You can also set up an index without specifying a start date. In this case, the index works for all transactions before the start date of another index.
- In the Exchange rate field, enter the index value that should be used during the index validity period.
- Select Save, and then close the page.
Set up a dimension group and conversion rules for dimensions
You can use the Dimension groups page to set up rules for translating dimensions from the source company to the target company. A separate rule group is created to convert dimensions for each translation group, and then a set of dimension conversion options is specified for this group.
- Go to General ledger > Translation setup > Dimension groups.
- In the left pane, in the Rule group field, select the translation group that you're setting up dimension conversion rules for.
Note
You can set up multiple conversion rules for the dimensions of one rule group.
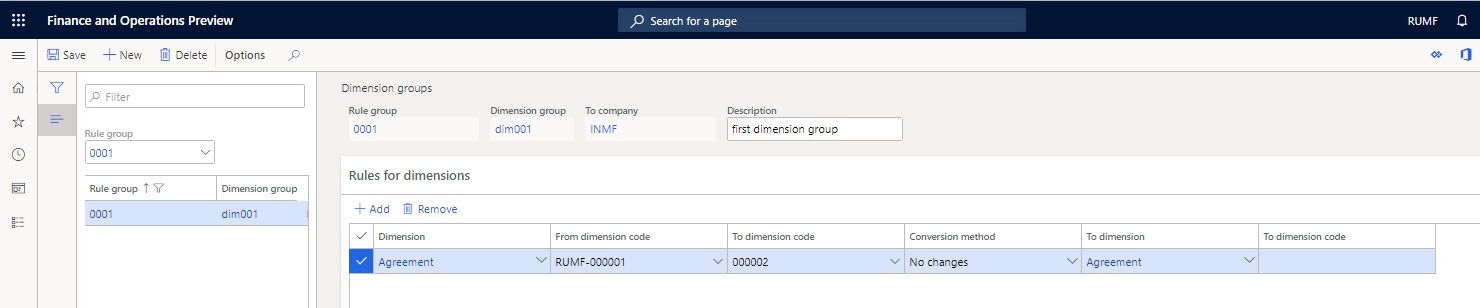
Select New to create a dimension group.
In the Dimension group field, enter a unique code for the dimension group.
In the To company field, enter the code for the target company that should be used for transactions during translation.
In the Description field, enter a description of the dimension group.
On the Rules for dimensions FastTab, select Add to create a line.
In the Dimension field, select the dimension in the source company that the conversion rule is being configured for.
In the From dimension code and To dimension code fields, define the range of dimension values.
In the Conversion method field, select the method that is used to convert the dimension of the translated transaction from the source company:
- No changes – The source dimension is transferred without changes.
- Company code – The current dimension is changed to the code for the source company.
- Value – The current dimension is replaced with the value that is entered in the To dimension code field.
- Customer/Vendor – The current dimension is replaced with the customer or vendor code.
In the To dimension field, select the type of dimension in the target company that the values should be transferred to.
In the To dimension code field, select the code for the dimension in the target company that the transaction dimension in the source company should be moved to during translation.
Note
This field is available only if you select Value in the Conversion method field.
- Select Save, and then close the page.
The following table shows examples of dimension conversion settings and their effects on translation.
| Dimension (in the source company) | Conversion method | To dimension (in the target company) | To dimension code | Result |
|---|---|---|---|---|
| Dimension type (Department) | No changes | Dimension type (Department) | None | The dimension value is transferred. The Department dimension is unchanged in the target company. |
| Dimension type (Department) | No changes | Dimension type (Purpose) | None | The dimension value is transferred. The Department dimension is transferred to the Purpose dimension in the target company. |
| Dimension type | Company code | Dimension type | None | Dimensions are converted to a value that equals the source company code. |
| Dimension type | Value | Dimension type | Dimension value | Dimensions are converted to the specified value. |
| Dimension type | Customer/Vendor | Dimension type | None | Dimension are converted to the specified customer/vendor code (that is, if the transaction went to the customer or vendor, the account number is substituted instead of the dimension). |
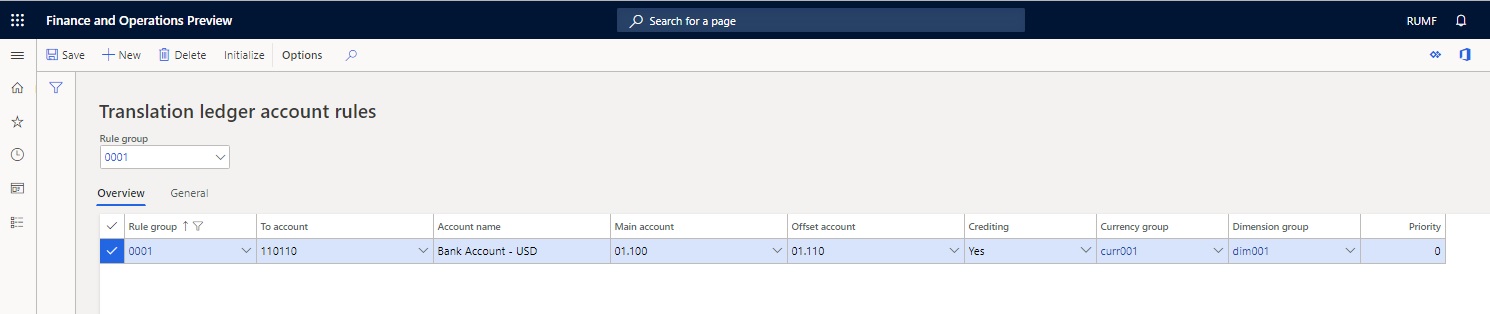
Set up account translation rules
Use the Translation ledger account rules page to set up translation rules for ledger accounts. These rules are used to correlate a source company's accounts to a target company's accounts, and they include conversion rules for currency and dimensions.
- Go to General ledger > Translation setup > Ledger account rules.
- In the upper part of the page, in the Rule group field, select the translation group that you're setting up the account conversion rules for.
Note
You can set up multiple conversion rules for one rule group.
Select New to create a line.
On the Overview tab, in the To account field, select the ledger account from the target company's chart of accounts that transactions in the source company should be translated to. After you save your changes to the line, the name of the target company is automatically selected in the Account name field.
In the Main account field, select the ledger account in the source company that should be used to translate transactions to the target company.
In the Offset account field, select the offset account in the source company that should be used to translate transactions that have the specified correspondence. Leave this field blank to select all transactions, regardless of the offset account.
In the Crediting field, select the type of transactions to translate:
- No – Translate only debit account transactions.
- Yes – Translate only credit account transactions.
Leave this field blank to translate both credit and debit transactions.
Depending on the values of the Offset account and Crediting fields, the following transactions are translated:
- All transactions
- Only debit transactions
- Only credit transactions
- Account transactions that correspond to the specified offset account
- Debit account transactions that correspond to the specified credit offset account
- Credit account transactions that correspond to the specified debit offset account
The following table shows examples for the various possible values of the Main account, Crediting, and Offset account fields.
| Main account | Crediting | Offset account | Result |
|---|---|---|---|
| А | Blank | Blank | All transactions on account А are translated. |
| А | No | Blank | Debit transactions on account А are translated. |
| А | Yes | Blank | Credit transactions on account А are translated. |
| А | Blank | В | Transactions on account А that correspond to account В are translated. |
| А | No | В | Debit transactions on account А that correspond to credit account В are translated. |
| А | Yes | В | Credit transactions on account А that correspond to debit account В are translated. |
Debit A, Credit *
Debit *, Credit A
Debit A, Credit *
Debit *, Credit A
Debit A, Credit B
Debit B, Credit A
Debit A, Credit B
Debit B, Credit A
- In the Currency group field, select the code for the currency conversion group. If a default currency group is configured for the translation rule group that is selected in the Rule group field, the value is automatically entered. However, you can change the value as you require.
- In the Dimension group field, select the code for the dimension conversion group. If a default dimension group is configured for the translation rule group that is selected in the Rule group field, the value is automatically entered. However, you can change the value as you require.
- In the Priority field, enter the priority of the rule. If a default priority is selected for the translation rule group that is selected in the Rule group field, the value is automatically entered. However, you can change the value as you require.
Note
The priority determines the order that rules are processed in during translation. The rule that has the lowest priority is processed first. We recommend that you specify the priority if there are several mutually exclusive rules.
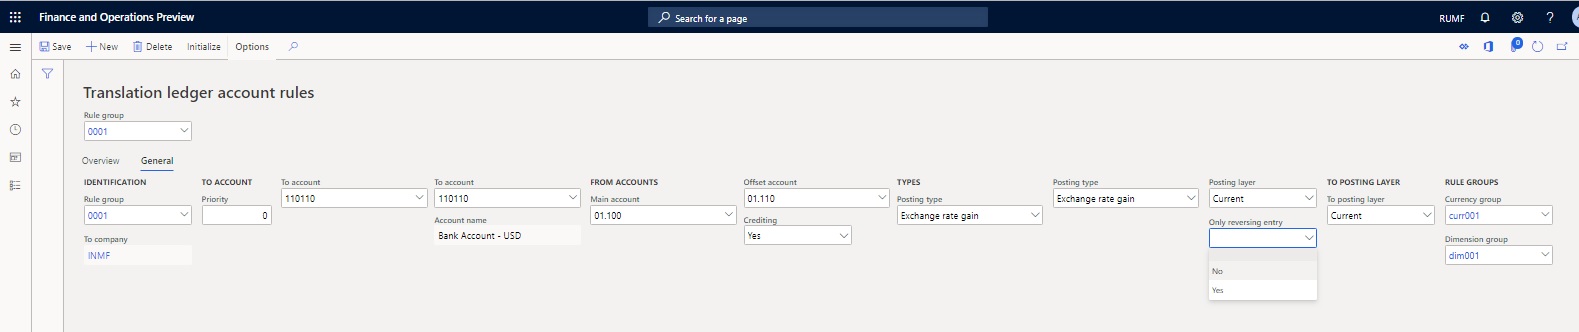
- On the General tab, in the first Posting type field, select a voucher type to translate only transactions that have that voucher type. For example, if you select Petty cash, only transactions in the bank module are translated.
- In the second Posting type field, select a voucher type to translate only transactions that have that voucher type for the offset account.
- In the Posting layer field, select a posting layer to translate only transactions that have that posting layer.
- In the Only reversing entry field, select Yes to translate only reversing transactions, or select No to translate only regular transactions. Leave this field blank to translate both regular transactions and reversing transactions.
- In the To posting layer field, select the posting layer that the translated transactions should be assigned to in the target company.
- Select Initialize to automatically create a line that has an account translation rule for all the ledger accounts in the target company. In the Initialize dialog box, you can select Filter to filter the required accounts.
- Select OK. The system creates a line that has a rule for each selected ledger account.
Set up translation parameters
- Go to General ledger > Ledger setup > General ledger parameters.
- On the Translation tab, set the Stop on the first error option toYes to interrupt the translation session when the first error is detected.
- In the Rule group field, select the translation rule group that should be used by default when the translation session is started.
- On the Number sequences tab, in the Number sequence code field, select a number sequence code for the Translation session reference.
- Close the page.
Do a single translation
When you create a new translation session, the Translation wizard is opened. Use this wizard to complete the following operations:
- Validate the correctness of the conversion parameters.
- Select translation dates.
- Apply translation rules to all operations in the specified period.
- Show the transaction conversion results on a Preview page.
- Save the translation results to the target company.
Follow these steps to use the Translation wizard to do a single translation.
- Go to General ledger > Periodic tasks > Translation sessions.
- In the upper part of the page, in the Rule group field, select a translation group.
- Select Translation wizard to open the Translation wizard.
- On the Welcome page, select Next.

- On the Consistency check page, select Consistency check to validate the conversion parameters.
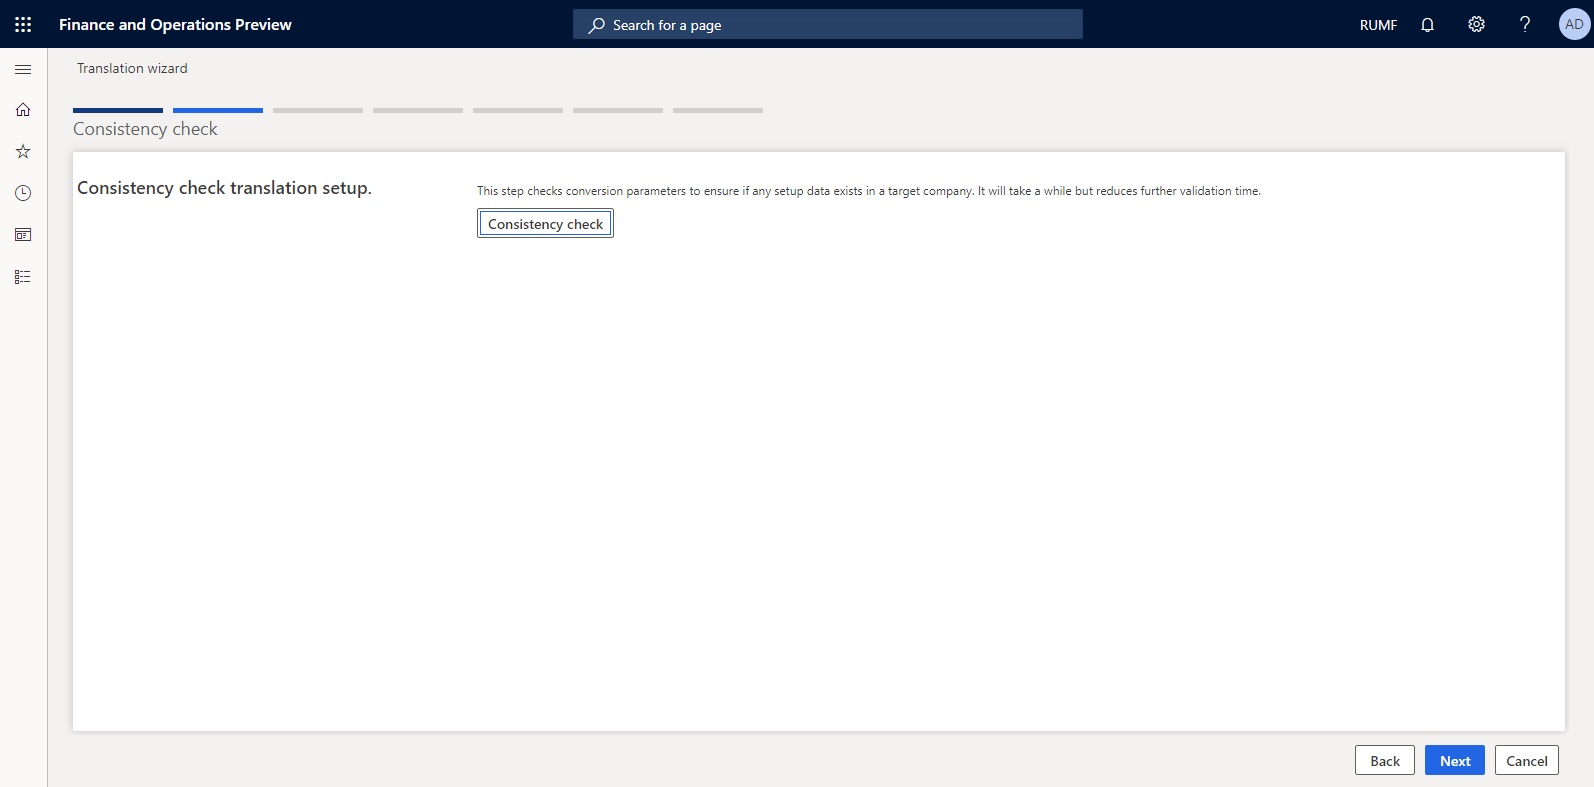
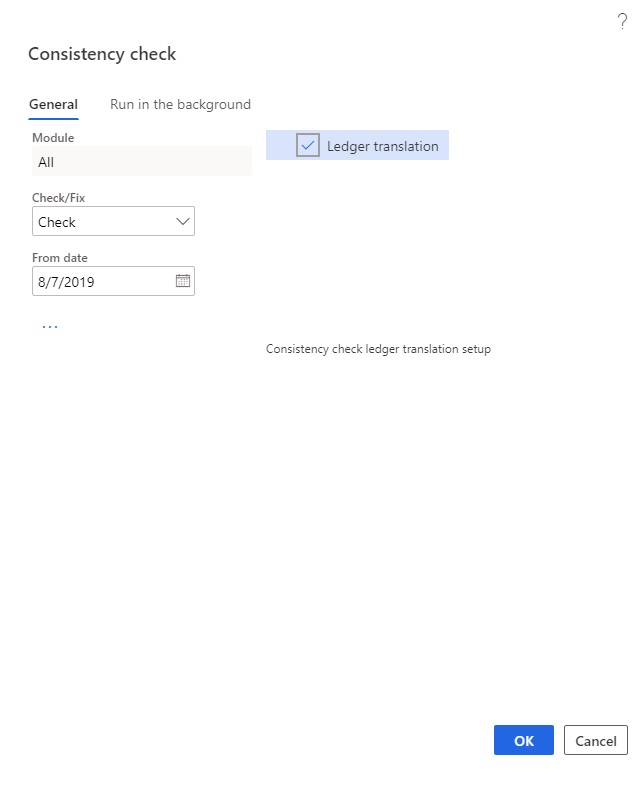
- In the Consistency check dialog box, specify the details, and then select OK.
Note
If the Stop on the first error option on the Translation tab of the General ledger parameters page is set to Yes, you can't move on to the next page of the wizard until the conversion parameters are checked for additional errors.
- Select Next.
- On the Selection page, in the From date and To date fields, define the period that the translation should be done for.
- Select Inquiry to specify additional transaction selection criteria.
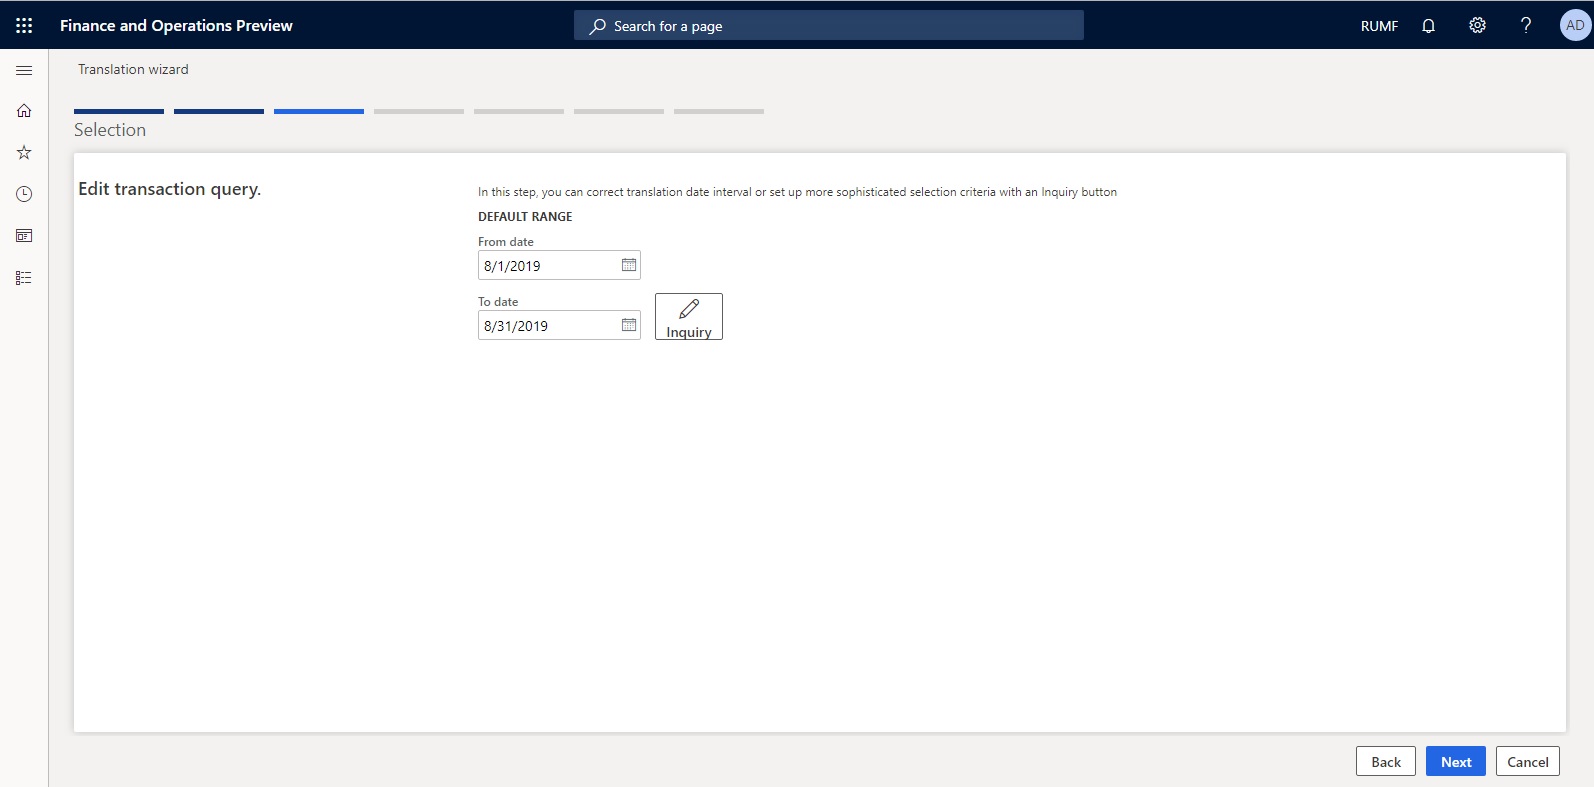
- Select Next.
- On the Transaction processing page, select Next to run the data conversion.

- Select Preview to view the conversion results.
- Select Next two times to import the translation data into the target company.
- After the translation is completed, select Finish.
When the translation session for the source company is successfully completed, the following actions occur:
- The Translation sessions page automatically creates a line for the status of the translation session. The Export status and Import status fields are automatically updated to Completed.
- The Translation session field is updated to the number of the translation session.
- The From date and To date fields are updated to the start and end dates of the period that the translation was done for.
- The Number of transactions field is updated to the number of vouchers that were successfully processed during the translation session.
- Go to the target company, and verify that the transactions have been successfully transferred. The date of the transactions that are transferred to the target company will be the date when the transactions were posted in the source company.
Note
In the target company, if Translation difference is selected in the Posting type field on the General tab of the Translation ledger account rules page (General ledger > Translation setup > Ledger account rules), the correspondence is saved when the transactions are translated. Otherwise, the transactions are translated without correspondence.
Batch translation
You can configure translation so that it's periodically run according to specific rules in batch mode.
- Go to General ledger > Periodic tasks > Translation sessions.
- In the upper part of the page, in the Rule group field, select a group for batch translation.
- Select Batch translation to open the Batch translation dialog box.
- On the Parameters FastTab, in the From date and To date fields, define the period that the batch translation should be done for.
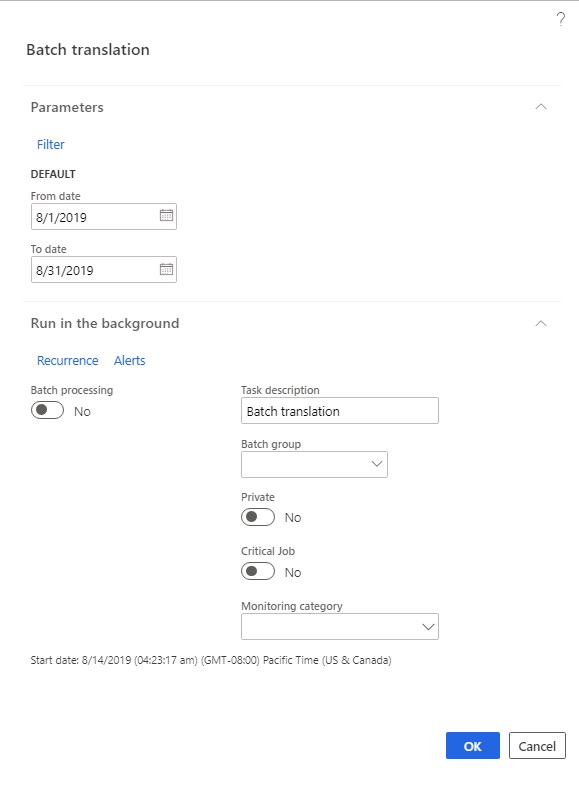
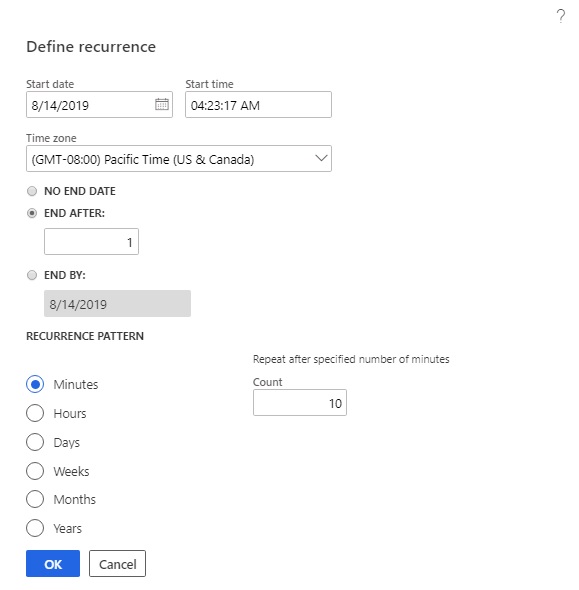
- On the Run in the background FastTab, select Recurrence to open the Define recurrence dialog box, where you can set up the recurrence of the batch translation.
- In the Batch translation dialog box, select OK to do the batch translation.
Translation cancellation
A completed translation can't be processed more than one time. To rerun translation, you must first cancel the processed translation.
- Go to General ledger > Periodic tasks > Translation sessions.
- In the lower part of the page, select the translation to cancel.
- Select Cancellation. The Export status and Import status fields are automatically updated to Canceled.
Commentaires
Bientôt disponible : Tout au long de 2024, nous allons supprimer progressivement GitHub Issues comme mécanisme de commentaires pour le contenu et le remplacer par un nouveau système de commentaires. Pour plus d’informations, consultez https://aka.ms/ContentUserFeedback.
Envoyer et afficher des commentaires pour