Créer des applications .NET avec Microsoft Graph
Ce tutoriel vous apprend à créer une application console .NET qui utilise microsoft API Graph pour accéder aux données pour le compte d’un utilisateur.
Remarque
Pour savoir comment utiliser Microsoft Graph pour accéder aux données à l’aide de l’authentification d’application uniquement, consultez ce tutoriel sur l’authentification d’application uniquement.
Dans ce didacticiel, vous allez :
- Obtenir l’utilisateur connecté
- Répertorier les messages de la boîte de réception de l’utilisateur
- Envoyer un courrier électronique
Conseil
Au lieu de suivre ce tutoriel, vous pouvez télécharger le code terminé via l’outil de démarrage rapide , qui automatise l’inscription et la configuration des applications. Le code téléchargé fonctionne sans aucune modification requise.
Vous pouvez également télécharger ou cloner le dépôt GitHub et suivre les instructions du fichier LISEZ-MOI pour inscrire une application et configurer le projet.
Prerequisites
Avant de commencer ce didacticiel, vous devez avoir installé le SDK .NET sur votre ordinateur de développement.
Vous devez également disposer d’un compte professionnel ou scolaire Microsoft avec une boîte aux lettres Exchange Online. Si vous n’avez pas de locataire Microsoft 365, vous pouvez être éligible pour un client via le Programme pour les développeurs Microsoft 365 ; Pour plus d’informations, consultez la FAQ. Vous pouvez également vous inscrire à un essai gratuit de 1 mois ou acheter un plan Microsoft 365.
Remarque
Ce didacticiel a été écrit avec la version 7.0.102 du Kit de développement logiciel (SDK) .NET. Les étapes décrites dans ce guide peuvent fonctionner avec d’autres versions, mais elles n’ont pas été testées.
Inscrire l’application sur le portail
Dans cet exercice, vous allez inscrire une nouvelle application dans Azure Active Directory pour activer l’authentification utilisateur. Vous pouvez inscrire une application à l’aide du Centre d’administration Azure Active Directory ou du Kit de développement logiciel (SDK) Microsoft Graph PowerShell.
Inscrire l’application pour l’authentification utilisateur
Dans cette section, vous allez inscrire une application qui prend en charge l’authentification utilisateur à l’aide du flux de code d’appareil.
Ouvrez un navigateur et accédez au Centre d’administration Azure Active Directory et connectez-vous à l’aide d’un compte professionnel ou scolaire.
Sélectionnez Azure Active Directory dans le volet de navigation gauche, puis sélectionnez Inscriptions d’applications sous Gérer.

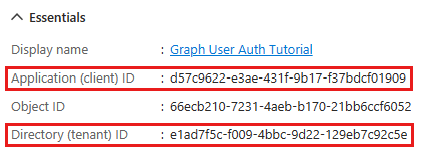
Sélectionnez Nouvelle inscription. Entrez un nom pour votre application, par exemple .
Graph User Auth TutorialDéfinissez types de comptes pris en charge comme vous le souhaitez. Les options disponibles sont les suivantes :
Option Qui peut se connecter ? Comptes dans cet annuaire organisationnel uniquement Seuls les utilisateurs de votre organization Microsoft 365 Comptes dans un annuaire organisationnel Utilisateurs de n’importe quel organization Microsoft 365 (comptes professionnels ou scolaires) Comptes dans n’importe quel annuaire organisationnel ... et comptes Microsoft personnels Utilisateurs d’un compte Microsoft 365 organization (comptes professionnels ou scolaires) et de comptes Microsoft personnels Laissez Redirect URI vide.
Sélectionner Inscription. Dans la page Vue d’ensemble de l’application, copiez la valeur de l’ID d’application (client) et enregistrez-la. Vous en aurez besoin à l’étape suivante. Si vous avez choisi Comptes dans cet annuaire organisationnel uniquement pour Types de comptes pris en charge, copiez également l’ID d’annuaire (locataire) et enregistrez-le.
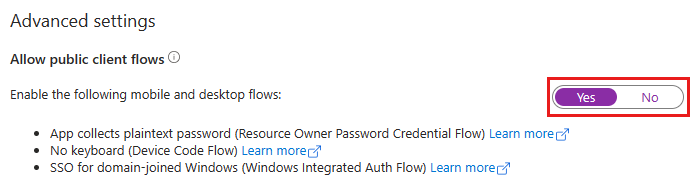
Sous Gérer, sélectionnez Authentification. Recherchez la section Paramètres avancés et modifiez le bouton bascule Autoriser les flux clients publics sur Oui, puis choisissez Enregistrer.
Remarque
Notez que vous n’avez configuré aucune autorisation Microsoft Graph sur l’inscription de l’application. Cela est dû au fait que l’exemple utilise le consentement dynamique pour demander des autorisations spécifiques pour l’authentification utilisateur.
Créer une application console .NET
Commencez par créer un projet de console .NET à l’aide de l’interface CLI .NET.
Ouvrez votre interface de ligne de commande (CLI) dans un répertoire dans lequel vous souhaitez créer le projet. Exécutez la commande suivante :
dotnet new console -o GraphTutorialUne fois le projet créé, vérifiez qu’il fonctionne en remplaçant le répertoire actif par le répertoire GraphTutorial et en exécutant la commande suivante dans votre interface CLI.
dotnet runSi cela fonctionne, l’application doit générer
Hello, World!.
Installer les dépendances
Avant de continuer, ajoutez des dépendances supplémentaires que vous utiliserez ultérieurement.
- Packages de configuration .NET pour lire la configuration de l’application à partir de appsettings.json.
- Bibliothèque de client Azure Identity pour .NET afin d’authentifier l’utilisateur et d’acquérir des jetons d’accès.
- Bibliothèque de client Microsoft Graph .NET pour effectuer des appels à Microsoft Graph.
Exécutez les commandes suivantes dans votre interface CLI pour installer les dépendances.
dotnet add package Microsoft.Extensions.Configuration.Binder
dotnet add package Microsoft.Extensions.Configuration.Json
dotnet add package Microsoft.Extensions.Configuration.UserSecrets
dotnet add package Azure.Identity
dotnet add package Microsoft.Graph
Charger les paramètres de l’application
Dans cette section, vous allez ajouter les détails de l’inscription de votre application au projet.
Créez un fichier dans le répertoire GraphTutorial nommé appsettings.json et ajoutez le code suivant.
{
  "settings": {
    "clientId": "YOUR_CLIENT_ID_HERE",
    "tenantId": "common",
    "graphUserScopes": [
      "user.read",
      "mail.read",
      "mail.send"
    ]
  }
}
Mettez à jour les valeurs en fonction du tableau suivant.
Paramètre Valeur clientIdID client de l’inscription de votre application tenantIdSi vous avez choisi l’option pour autoriser uniquement les utilisateurs de votre organization à se connecter, remplacez cette valeur par votre ID de locataire. Sinon, laissez comme common.Conseil
Si vous le souhaitez, vous pouvez définir ces valeurs dans un fichier distinct nommé appsettings. Development.json ou dans le Gestionnaire de secrets .NET.
Mettez à jour GraphTutorial.csproj pour copier appsettings.json dans le répertoire de sortie. Ajoutez le code suivant entre les
<Project>lignes et</Project>.<ItemGroup> <None Include="appsettings*.json"> <CopyToOutputDirectory>Always</CopyToOutputDirectory> </None> </ItemGroup>Créez un fichier dans le répertoire GraphTutorial nommé Settings.cs et ajoutez le code suivant.
using Microsoft.Extensions.Configuration;

public class Settings
{
    public string? ClientId { get; set; }
    public string? TenantId { get; set; }
    public string[]? GraphUserScopes { get; set; }

    public static Settings LoadSettings()
    {
        // Load settings
        IConfiguration config = new ConfigurationBuilder()
            // appsettings.json is required
            .AddJsonFile("appsettings.json", optional: false)
            // appsettings.Development.json" is optional, values override appsettings.json
            .AddJsonFile($"appsettings.Development.json", optional: true)
            // User secrets are optional, values override both JSON files
            .AddUserSecrets<Program>()
            .Build();

        return config.GetRequiredSection("Settings").Get<Settings>() ??
            throw new Exception("Could not load app settings. See README for configuration instructions.");
    }
}
Concevoir l’application
Dans cette section, vous allez créer un menu simple basé sur la console.
Ouvrez ./Program.cs et remplacez tout son contenu par le code suivant.
Console.WriteLine(".NET Graph Tutorial\n");

var settings = Settings.LoadSettings();

// Initialize Graph
InitializeGraph(settings);

// Greet the user by name
await GreetUserAsync();

int choice = -1;

while (choice != 0)
{
    Console.WriteLine("Please choose one of the following options:");
    Console.WriteLine("0. Exit");
    Console.WriteLine("1. Display access token");
    Console.WriteLine("2. List my inbox");
    Console.WriteLine("3. Send mail");
    Console.WriteLine("4. Make a Graph call");

    try
    {
        choice = int.Parse(Console.ReadLine() ?? string.Empty);
    }
    catch (System.FormatException)
    {
        // Set to invalid value
        choice = -1;
    }

    switch(choice)
    {
        case 0:
            // Exit the program
            Console.WriteLine("Goodbye...");
            break;
        case 1:
            // Display access token
            await DisplayAccessTokenAsync();
            break;
        case 2:
            // List emails from user's inbox
            await ListInboxAsync();
            break;
        case 3:
            // Send an email message
            await SendMailAsync();
            break;
        case 4:
            // Run any Graph code
            await MakeGraphCallAsync();
            break;
        default:
            Console.WriteLine("Invalid choice! Please try again.");
            break;
    }
}
Ajoutez les méthodes d’espace réservé suivantes à la fin du fichier. Vous les implémenterez dans les étapes ultérieures.
void InitializeGraph(Settings settings)
{
    // TODO
}

async Task GreetUserAsync()
{
    // TODO
}

async Task DisplayAccessTokenAsync()
{
    // TODO
}

async Task ListInboxAsync()
{
    // TODO
}

async Task SendMailAsync()
{
    // TODO
}

async Task MakeGraphCallAsync()
{
    // TODO
}
Cela implémente un menu de base et lit le choix de l’utilisateur à partir de la ligne de commande.
Ajouter l’authentification utilisateur
Dans cette section, vous allez étendre l’application de l’exercice précédent pour prendre en charge l’authentification avec Azure AD. Cela est nécessaire pour obtenir le jeton d’accès OAuth nécessaire pour appeler Microsoft Graph. Dans cette étape, vous allez intégrer la bibliothèque de client Azure Identity pour .NET dans l’application et configurer l’authentification pour la bibliothèque de client Microsoft Graph .NET.
La bibliothèque Azure Identity fournit un certain nombre de TokenCredential classes qui implémentent des flux de jetons OAuth2. La bibliothèque de client Microsoft Graph utilise ces classes pour authentifier les appels à Microsoft Graph.
Configurer le client Graph pour l’authentification utilisateur
Dans cette section, vous allez utiliser la DeviceCodeCredential classe pour demander un jeton d’accès à l’aide du flux de code de l’appareil.
Créez un fichier dans le répertoire GraphTutorial nommé GraphHelper.cs et ajoutez le code suivant à ce fichier.
using Azure.Core;
using Azure.Identity;
using Microsoft.Graph;
using Microsoft.Graph.Models;
using Microsoft.Graph.Me.SendMail;

class GraphHelper
{
}
Ajoutez ce code à la classe
GraphHelper.// Settings object private static Settings? _settings; // User auth token credential private static DeviceCodeCredential? _deviceCodeCredential; // Client configured with user authentication private static GraphServiceClient? _userClient; public static void InitializeGraphForUserAuth(Settings settings, Func<DeviceCodeInfo, CancellationToken, Task> deviceCodePrompt) { _settings = settings; var options = new DeviceCodeCredentialOptions { ClientId = settings.ClientId, TenantId = settings.TenantId, DeviceCodeCallback = deviceCodePrompt, }; _deviceCodeCredential = new DeviceCodeCredential(options); _userClient = new GraphServiceClient(_deviceCodeCredential, settings.GraphUserScopes); }Remplacez la fonction vide
InitializeGraphdans Program.cs par ce qui suit.void InitializeGraph(Settings settings) { GraphHelper.InitializeGraphForUserAuth(settings, (info, cancel) => { // Display the device code message to // the user. This tells them // where to go to sign in and provides the // code to use. Console.WriteLine(info.Message); return Task.FromResult(0); }); }
Ce code déclare deux propriétés privées, un DeviceCodeCredential objet et un GraphServiceClient objet . La InitializeGraphForUserAuth fonction crée un instance de DeviceCodeCredential, puis utilise cette instance pour créer un instance de GraphServiceClient. Chaque fois qu’un appel d’API est effectué à Microsoft Graph via , _userClientil utilise les informations d’identification fournies pour obtenir un jeton d’accès.
Tester deviceCodeCredential
Ensuite, ajoutez du code pour obtenir un jeton d’accès à partir de .DeviceCodeCredential
Ajoutez la fonction suivante à la classe
GraphHelper.public static async Task<string> GetUserTokenAsync() { // Ensure credential isn't null _ = _deviceCodeCredential ?? throw new System.NullReferenceException("Graph has not been initialized for user auth"); // Ensure scopes isn't null _ = _settings?.GraphUserScopes ?? throw new System.ArgumentNullException("Argument 'scopes' cannot be null"); // Request token with given scopes var context = new TokenRequestContext(_settings.GraphUserScopes); var response = await _deviceCodeCredential.GetTokenAsync(context); return response.Token; }Remplacez la fonction vide
DisplayAccessTokenAsyncdans Program.cs par ce qui suit.async Task DisplayAccessTokenAsync() { try { var userToken = await GraphHelper.GetUserTokenAsync(); Console.WriteLine($"User token: {userToken}"); } catch (Exception ex) { Console.WriteLine($"Error getting user access token: {ex.Message}"); } }Générez et exécutez l’application. Entrez
1lorsque vous êtes invité à entrer une option. L’application affiche une URL et un code d’appareil..NET Graph Tutorial Please choose one of the following options: 0. Exit 1. Display access token 2. List my inbox 3. Send mail 4. Make a Graph call 1 To sign in, use a web browser to open the page https://microsoft.com/devicelogin and enter the code RB2RUD56D to authenticate.Ouvrez un navigateur et accédez à l’URL affichée. Entrez le code fourni et connectez-vous.
Importante
Gardez à l’esprit tous les comptes Microsoft 365 existants qui sont connectés à votre navigateur lorsque vous accédez à
https://microsoft.com/devicelogin. Utilisez les fonctionnalités du navigateur telles que les profils, le mode invité ou le mode privé pour vous assurer que vous vous authentifiez en tant que compte que vous envisagez d’utiliser pour les tests.Une fois terminé, revenez à l’application pour voir le jeton d’accès.
Conseil
À des fins de validation et de débogage uniquement, vous pouvez décoder les jetons d’accès utilisateur (pour les comptes professionnels ou scolaires uniquement) à l’aide de l’analyseur de jetons en ligne de Microsoft à l’adresse https://jwt.ms. Cela peut être utile si vous rencontrez des erreurs de jeton lors de l’appel de Microsoft Graph. Par exemple, vérifier que la revendication dans le
scpjeton contient les étendues d’autorisation Microsoft Graph attendues.
Obtenir un utilisateur
Dans cette section, vous allez incorporer Microsoft Graph dans l’application. Pour cette application, vous allez utiliser la bibliothèque cliente Microsoft Graph .NET pour effectuer des appels à Microsoft Graph.
Ouvrez ./GraphHelper.cs et ajoutez la fonction suivante à la classe GraphHelper .
public static Task<User?> GetUserAsync()
{
    // Ensure client isn't null
    _ = _userClient ??
        throw new System.NullReferenceException("Graph has not been initialized for user auth");

    return _userClient.Me.GetAsync((config) =>
    {
        // Only request specific properties
        config.QueryParameters.Select = new[] {"displayName", "mail", "userPrincipalName" };
    });
}
Remplacez la fonction vide
GreetUserAsyncdans Program.cs par ce qui suit.async Task GreetUserAsync() { try { var user = await GraphHelper.GetUserAsync(); Console.WriteLine($"Hello, {user?.DisplayName}!"); // For Work/school accounts, email is in Mail property // Personal accounts, email is in UserPrincipalName Console.WriteLine($"Email: {user?.Mail ?? user?.UserPrincipalName ?? ""}"); } catch (Exception ex) { Console.WriteLine($"Error getting user: {ex.Message}"); } }
Si vous exécutez l’application maintenant, une fois que vous vous êtes connecté, l’application vous accueille par son nom.
Hello, Megan Bowen!
Email: MeganB@contoso.com
Explication du code
Considérez le code dans la GetUserAsync fonction . Il ne s’agit que de quelques lignes, mais il y a quelques détails clés à noter.
Accès à « moi »
La fonction utilise le générateur de _userClient.Me requêtes, qui génère une requête à l’API Get user . Cette API est accessible de deux façons :
GET /me
GET /users/{user-id}
Dans ce cas, le code appelle le point de terminaison d’API GET /me . Il s’agit d’une méthode de raccourci permettant d’obtenir l’utilisateur authentifié sans connaître son ID d’utilisateur.
Remarque
Étant donné que le point de GET /me terminaison d’API obtient l’utilisateur authentifié, il est disponible uniquement pour les applications qui utilisent l’authentification utilisateur. Les applications d’authentification d’application uniquement ne peuvent pas accéder à ce point de terminaison.
Demande de propriétés spécifiques
La fonction utilise la Select méthode sur la requête pour spécifier le jeu de propriétés dont elle a besoin. Cela ajoute le paramètre de requête $select à l’appel d’API.
Type de retour fortement typé
La fonction retourne un Microsoft.Graph.User objet désérialisé à partir de la réponse JSON de l’API. Étant donné que le code utilise Select, seules les propriétés demandées ont des valeurs dans l’objet retourné User . Toutes les autres propriétés ont des valeurs par défaut.
Boîte de réception de liste
Dans cette section, vous allez ajouter la possibilité de répertorier les messages dans la boîte de réception de messagerie de l’utilisateur.
Ouvrez ./GraphHelper.cs et ajoutez la fonction suivante à la classe GraphHelper .
public static Task<MessageCollectionResponse?> GetInboxAsync()
{
    // Ensure client isn't null
    _ = _userClient ??
        throw new System.NullReferenceException("Graph has not been initialized for user auth");

    return _userClient.Me
        // Only messages from Inbox folder
        .MailFolders["Inbox"]
        .Messages
        .GetAsync((config) =>
        {
            // Only request specific properties
            config.QueryParameters.Select = new[] { "from", "isRead", "receivedDateTime", "subject" };
            // Get at most 25 results
            config.QueryParameters.Top = 25;
            // Sort by received time, newest first
            config.QueryParameters.Orderby = new[] { "receivedDateTime DESC" };
        });
}
Remplacez la fonction vide
ListInboxAsyncdans Program.cs par ce qui suit.async Task ListInboxAsync() { try { var messagePage = await GraphHelper.GetInboxAsync(); if (messagePage?.Value == null) { Console.WriteLine("No results returned."); return; } // Output each message's details foreach (var message in messagePage.Value) { Console.WriteLine($"Message: {message.Subject ?? "NO SUBJECT"}"); Console.WriteLine($" From: {message.From?.EmailAddress?.Name}"); Console.WriteLine($" Status: {(message.IsRead!.Value ? "Read" : "Unread")}"); Console.WriteLine($" Received: {message.ReceivedDateTime?.ToLocalTime().ToString()}"); } // If NextPageRequest is not null, there are more messages // available on the server // Access the next page like: // var nextPageRequest = new MessagesRequestBuilder(messagePage.OdataNextLink, _userClient.RequestAdapter); // var nextPage = await nextPageRequest.GetAsync(); var moreAvailable = !string.IsNullOrEmpty(messagePage.OdataNextLink); Console.WriteLine($"\nMore messages available? {moreAvailable}"); } catch (Exception ex) { Console.WriteLine($"Error getting user's inbox: {ex.Message}"); } }Exécutez l’application, connectez-vous et choisissez l’option 2 pour répertorier votre boîte de réception.
Please choose one of the following options:
0. Exit
1. Display access token
2. List my inbox
3. Send mail
4. Make a Graph call
2
Message: Updates from Ask HR and other communities
  From: Contoso Demo on Yammer
  Status: Read
  Received: 12/30/2021 4:54:54 AM -05:00
Message: Employee Initiative Thoughts
  From: Patti Fernandez
  Status: Read
  Received: 12/28/2021 5:01:10 PM -05:00
Message: Voice Mail (11 seconds)
  From: Alex Wilber
  Status: Unread
  Received: 12/28/2021 5:00:46 PM -05:00
Message: Our Spring Blog Update
  From: Alex Wilber
  Status: Unread
  Received: 12/28/2021 4:49:46 PM -05:00
Message: Atlanta Flight Reservation
  From: Alex Wilber
  Status: Unread
  Received: 12/28/2021 4:35:42 PM -05:00
Message: Atlanta Trip Itinerary - down time
  From: Alex Wilber
  Status: Unread
  Received: 12/28/2021 4:22:04 PM -05:00

...

More messages available? True
Explication du code
Considérez le code dans la GetInboxAsync fonction .
Accès aux dossiers de courrier connus
La fonction utilise le générateur de _userClient.Me.MailFolders["Inbox"].Messages requêtes, qui génère une requête à l’API Répertorier les messages . Étant donné qu’elle inclut le MailFolders["Inbox"] générateur de demandes, l’API retourne uniquement les messages dans le dossier de courrier demandé. Dans ce cas, étant donné que la boîte de réception est un dossier par défaut connu dans la boîte aux lettres d’un utilisateur, elle est accessible via son nom connu. Les dossiers autres que les dossiers par défaut sont accessibles de la même façon, en remplaçant le nom connu par la propriété ID du dossier de messagerie. Pour plus d’informations sur les noms de dossiers connus disponibles, consultez Type de ressource mailFolder.
Accès à une collection
Contrairement à la GetUserAsync fonction de la section précédente, qui retourne un seul objet, cette méthode retourne une collection de messages. La plupart des API de Microsoft Graph qui retournent une collection ne retournent pas tous les résultats disponibles dans une seule réponse. Au lieu de cela, ils utilisent la pagination pour retourner une partie des résultats tout en fournissant une méthode permettant aux clients de demander la « page » suivante.
Tailles de page par défaut
Les API qui utilisent la pagination implémentent une taille de page par défaut. Pour les messages, la valeur par défaut est 10. Les clients peuvent demander plus (ou moins) à l’aide du paramètre de requête $top . Dans GetInboxAsync, cette opération s’effectue avec la .Top(25) méthode .
Remarque
La valeur passée à .Top() est une limite supérieure, et non un nombre explicite. L’API retourne un certain nombre de messages jusqu’à la valeur spécifiée.
Obtention des pages suivantes
Si d’autres résultats sont disponibles sur le serveur, les réponses de regroupement incluent une @odata.nextLink propriété avec une URL d’API pour accéder à la page suivante. La bibliothèque cliente .NET expose ce en tant que propriété sur les NextPageRequest objets de page de collection. Si cette propriété n’est pas null, d’autres résultats sont disponibles.
La NextPageRequest propriété expose une GetAsync méthode qui retourne la page suivante.
Tri des collections
La fonction utilise la OrderBy méthode sur la demande pour demander des résultats triés en fonction de la réception du message (ReceivedDateTime propriété ). Il inclut les DESC mot clé afin que les messages reçus plus récemment soient répertoriés en premier. Cela ajoute le paramètre de requête $orderby à l’appel d’API.
Envoyer un message
Dans cette section, vous allez ajouter la possibilité d’envoyer un e-mail en tant qu’utilisateur authentifié.
Ouvrez ./GraphHelper.cs et ajoutez la fonction suivante à la classe GraphHelper .
public static async Task SendMailAsync(string subject, string body, string recipient)
{
    // Ensure client isn't null
    _ = _userClient ??
        throw new System.NullReferenceException("Graph has not been initialized for user auth");

    // Create a new message
    var message = new Message
    {
        Subject = subject,
        Body = new ItemBody
        {
            Content = body,
            ContentType = BodyType.Text
        },
        ToRecipients = new List<Recipient>
        {
            new Recipient
            {
                EmailAddress = new EmailAddress
                {
                    Address = recipient
                }
            }
        }
    };

    // Send the message
    await _userClient.Me
        .SendMail
        .PostAsync(new SendMailPostRequestBody
        {
            Message = message
        });
}
Remplacez la fonction vide
SendMailAsyncdans Program.cs par ce qui suit.async Task SendMailAsync() { try { // Send mail to the signed-in user // Get the user for their email address var user = await GraphHelper.GetUserAsync(); var userEmail = user?.Mail ?? user?.UserPrincipalName; if (string.IsNullOrEmpty(userEmail)) { Console.WriteLine("Couldn't get your email address, canceling..."); return; } await GraphHelper.SendMailAsync("Testing Microsoft Graph", "Hello world!", userEmail); Console.WriteLine("Mail sent."); } catch (Exception ex) { Console.WriteLine($"Error sending mail: {ex.Message}"); } }Exécutez l’application, connectez-vous et choisissez l’option 3 pour vous envoyer un e-mail.
Please choose one of the following options:
0. Exit
1. Display access token
2. List my inbox
3. Send mail
4. Make a Graph call
3
Mail sent.
Remarque
Si vous effectuez des tests auprès d’un locataire développeur à partir du Programme pour développeurs Microsoft 365, l’e-mail que vous envoyez risque de ne pas être remis et vous pouvez recevoir un rapport de non-remise. Si cela vous arrive, contactez le support via le Centre d'administration Microsoft 365.
Pour vérifier que le message a été reçu, choisissez l’option 2 pour répertorier votre boîte de réception.
Explication du code
Considérez le code dans la SendMailAsync fonction .
Envoi de messages
La fonction utilise le générateur de _userClient.Me.SendMail requêtes, qui génère une requête à l’API Envoyer un courrier . Le générateur de requêtes prend un Message objet représentant le message à envoyer.
Création d’objets
Contrairement aux appels précédents à Microsoft Graph qui ne lisent que les données, cet appel crée des données. Pour ce faire avec la bibliothèque cliente, vous créez un instance de la classe représentant les données (dans ce cas, Microsoft.Graph.Message) à l’aide de la new mot clé, définissez les propriétés souhaitées, puis envoyez-la dans l’appel d’API. Étant donné que l’appel envoie des données, la PostAsync méthode est utilisée à la place de GetAsync.
Facultatif : ajouter votre propre code
Dans cette section, vous allez ajouter vos propres fonctionnalités Microsoft Graph à l’application. Il peut s’agir d’un extrait de code de la documentation Microsoft Graph, d’un Explorer Graph ou d’un code que vous avez créé. Cette section est facultative.
Mettre à jour l’application
Ouvrez ./GraphHelper.cs et ajoutez la fonction suivante à la classe GraphHelper .
// This function serves as a playground for testing Graph snippets
// or other code
public async static Task MakeGraphCallAsync()
{
    // INSERT YOUR CODE HERE
}
Remplacez la fonction vide
MakeGraphCallAsyncdans Program.cs par ce qui suit.async Task MakeGraphCallAsync() { await GraphHelper.MakeGraphCallAsync(); }
Choisir une API
Recherchez une API dans Microsoft Graph que vous souhaitez essayer. Par exemple, l’API Créer un événement . Vous pouvez utiliser l’un des exemples de la documentation de l’API, ou vous pouvez personnaliser une demande d’API dans Graph Explorer et utiliser l’extrait de code généré.
Configuration des autorisations
Consultez la section Autorisations de la documentation de référence de l’API choisie pour voir quelles méthodes d’authentification sont prises en charge. Certaines API ne prennent pas en charge les comptes Microsoft personnels ou d’application uniquement, par exemple.
- Pour appeler une API avec l’authentification utilisateur (si l’API prend en charge l’authentification utilisateur (déléguée), ajoutez l’étendue d’autorisation requise dans appsettings.json.
- Pour appeler une API avec une authentification d’application uniquement, consultez le tutoriel sur l’authentification d’application uniquement .
Ajouter votre code
Copiez votre code dans la MakeGraphCallAsync fonction dans GraphHelper.cs. Si vous copiez un extrait de code à partir d’une documentation ou d’un Explorer Graph, veillez à renommer en GraphServiceClient_userClient.
Félicitations !
Vous avez terminé le tutoriel Microsoft Graph .NET. Maintenant que vous disposez d’une application opérationnelle qui appelle Microsoft Graph, vous pouvez expérimenter et ajouter de nouvelles fonctionnalités.
- Découvrez comment utiliser l’authentification d’application uniquement avec le Kit de développement logiciel (SDK) .NET Microsoft Graph.
- Consultez la vue d’ensemble de Microsoft Graph pour voir toutes les données accessibles avec Microsoft Graph.
Exemples .NET
Vous avez un défi avec cette section ? Si c'est le cas, faites-nous part de vos commentaires pour que nous puissions l'améliorer.