Create a simple data application by using ADO.NET
Applies to: ![]() Visual Studio
Visual Studio ![]() Visual Studio for Mac
Visual Studio for Mac
Note
This article applies to Visual Studio 2017. If you're looking for the latest Visual Studio documentation, see Visual Studio documentation. We recommend upgrading to the latest version of Visual Studio. Download it here
When you create an application that manipulates data in a database, you perform basic tasks such as defining connection strings, inserting data, and running stored procedures. By following this topic, you can discover how to interact with a database from within a simple Windows Forms "forms over data" application by using Visual C# or Visual Basic and ADO.NET. All .NET data technologies—including datasets, LINQ to SQL, and Entity Framework—ultimately perform steps that are very similar to those shown in this article.
This article demonstrates a simple way to quickly get data out of a database. If your application needs to modify data in non-trivial ways and update the database, you should consider using Entity Framework and using data binding to automatically sync user interface controls to changes in the underlying data.
Important
To keep the code simple, it doesn't include production-ready exception handling.
Note
The complete code for this tutorial can be accessed in the Visual Studio docs GitHub repo in C# and Visual Basic.
Prerequisites
To create the application, you'll need:
Visual Studio.
SQL Server Express LocalDB. If you don't have SQL Server Express LocalDB, you can install it from the SQL Server download page.
This topic assumes that you're familiar with the basic functionality of the Visual Studio IDE and can create a Windows Forms application, add forms to the project, put buttons and other controls on the forms, set properties of the controls, and code simple events. If you aren't comfortable with these tasks, we suggest that you complete the Create a Windows Forms app in Visual Studio with Visual Basic tutorial or the Create a Windows Forms app in Visual Studio with C# tutorial before you start this walkthrough.
Set up the sample database
Create the sample database by following these steps:
In Visual Studio, open the Server Explorer window.
Right-click on Data Connections and choose Create New SQL Server Database.
In the Server name text box, enter (localdb)\mssqllocaldb.
In the New database name text box, enter Sales, then choose OK.
The empty Sales database is created and added to the Data Connections node in Server Explorer.
Right-click on the Sales data connection and select New Query.
A query editor window opens.
Copy the Sales Transact-SQL script to your clipboard.
Paste the T-SQL script into the query editor, and then choose the Execute button.
After a short time, the query finishes running and the database objects are created. The database contains two tables: Customer and Orders. These tables contain no data initially, but you can add data when you run the application that you'll create. The database also contains four simple stored procedures.
Create the forms and add controls
Create a project for a Windows Forms application, and then name it SimpleDataApp.
Visual Studio creates the project and several files, including an empty Windows form that's named Form1.
Add two Windows forms to your project so that it has three forms, and then give them the following names:
Navigation
NewCustomer
FillOrCancel
For each form, add the text boxes, buttons, and other controls that appear in the following illustrations. For each control, set the properties that the tables describe.
Note
The group box and the label controls add clarity but aren't used in the code.
Navigation form
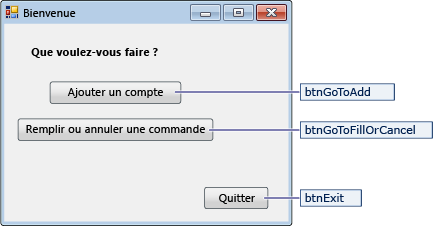
| Controls for the Navigation form | Properties |
|---|---|
| Button | Name = btnGoToAdd |
| Button | Name = btnGoToFillOrCancel |
| Button | Name = btnExit |
NewCustomer form
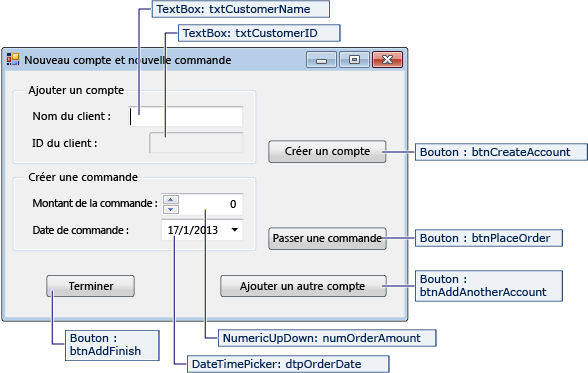
| Controls for the NewCustomer form | Properties |
|---|---|
| TextBox | Name = txtCustomerName |
| TextBox | Name = txtCustomerID Readonly = True |
| Button | Name = btnCreateAccount |
| NumericUpdown | DecimalPlaces = 0 Maximum = 5000 Name = numOrderAmount |
| DateTimePicker | Format = Short Name = dtpOrderDate |
| Button | Name = btnPlaceOrder |
| Button | Name = btnAddAnotherAccount |
| Button | Name = btnAddFinish |
FillOrCancel form
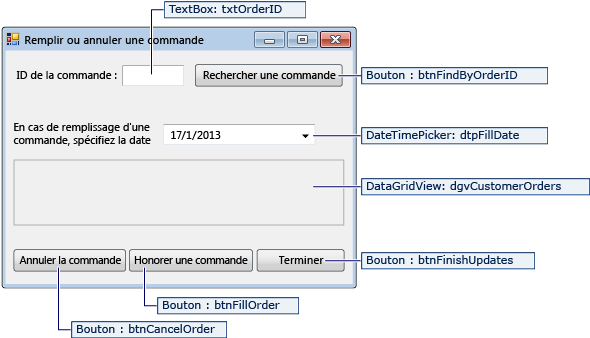
| Controls for the FillOrCancel form | Properties |
|---|---|
| TextBox | Name = txtOrderID |
| Button | Name = btnFindByOrderID |
| DateTimePicker | Format = Short Name = dtpFillDate |
| DataGridView | Name = dgvCustomerOrders Readonly = True RowHeadersVisible = False |
| Button | Name = btnCancelOrder |
| Button | Name = btnFillOrder |
| Button | Name = btnFinishUpdates |
Store the connection string
When your application tries to open a connection to the database, your application must have access to the connection string. To avoid entering the string manually on each form, store the string in the App.config file in your project, and create a method that returns the string when the method is called from any form in your application.
You can find the connection string by right-clicking on the Sales data connection in Server Explorer and choosing Properties. Locate the ConnectionString property, then use Ctrl+A, Ctrl+C to select and copy the string to the clipboard.
If you're using C#, in Solution Explorer, expand the Properties node under the project, and then open the Settings.settings file. If you're using Visual Basic, in Solution Explorer, click Show All Files, expand the My Project node, and then open the Settings.settings file.
In the Name column, enter
connString.In the Type list, select (Connection String).
In the Scope list, select Application.
In the Value column, enter your connection string (without any outside quotes), and then save your changes.


Note
In a real application, you should store the connection string securely, as described in Connection strings and configuration files.
Write the code for the forms
This section contains brief overviews of what each form does. It also provides the code that defines the underlying logic when a button on the form is clicked.
Navigation form
The Navigation form opens when you run the application. The Add an account button opens the NewCustomer form. The Fill or cancel orders button opens the FillOrCancel form. The Exit button closes the application.
Make the Navigation form the startup form
If you're using C#, in Solution Explorer, open Program.cs, and then change the Application.Run line to this: Application.Run(new Navigation());
If you're using Visual Basic, in Solution Explorer, open the Properties window, select the Application tab, and then select SimpleDataApp.Navigation in the Startup form list.
Create auto-generated event handlers
Double-click the three buttons on the Navigation form to create empty event handler methods. Double-clicking the buttons also adds auto-generated code in the Designer code file that enables a button click to raise an event.
Note
If you skip the double-click action in the designer and just copy the code and paste it into your code files, don't forget to set the event handler to the right method. You can do this in the Properties window. Switch to the Events tab (use the lightning bolt toolbar button) and look for the Click handler.
Add code for the Navigation form logic
In the code page for the Navigation form, complete the method bodies for the three button click event handlers as shown in the following code.
/// <summary>
/// Opens the NewCustomer form as a dialog box,
/// which returns focus to the calling form when it is closed.
/// </summary>
private void btnGoToAdd_Click(object sender, EventArgs e)
{
    Form frm = new NewCustomer();
    frm.Show();
}

/// <summary>
/// Opens the FillorCancel form as a dialog box.
/// </summary>
private void btnGoToFillOrCancel_Click(object sender, EventArgs e)
{
    Form frm = new FillOrCancel();
    frm.ShowDialog();
}

/// <summary>
/// Closes the application (not just the Navigation form).
/// </summary>
private void btnExit_Click(object sender, EventArgs e)
{
    this.Close();
}
''' <summary>
''' Opens the NewCustomer form as a dialog box, which returns focus to the calling form when it closes.
''' </summary>
Private Sub btnGoToAdd_Click(sender As Object, e As EventArgs) Handles btnGoToAdd.Click
    Dim frm As Form = New NewCustomer()
    frm.Show()
End Sub

''' <summary>
''' Opens the FillOrCancel form as a dialog box.
''' </summary>
Private Sub btnGoToFillOrCancel_Click(sender As Object, e As EventArgs) Handles btnGoToFillOrCancel.Click
    Dim frm As Form = New FillOrCancel()
    frm.ShowDialog()
End Sub

''' <summary>
''' Closes the application (not just the navigation form).
''' </summary>
Private Sub btnExit_Click(sender As Object, e As EventArgs) Handles btnExit.Click
    Me.Close()
End Sub
Note
The code for this tutorial is available in C# and Visual Basic. To switch the code language on this page between C# and Visual Basic, use the code language switcher at the top of the page on the right side.
NewCustomer form
When you enter a customer name and then select the Create Account button, the NewCustomer form creates a customer account, and SQL Server returns an IDENTITY value as the new customer ID. You can then place an order for the new account by specifying an amount and an order date and selecting the Place Order button.
Create auto-generated event handlers
Create an empty Click event handler for each button on the NewCustomer form by double-clicking on each of the four buttons. Double-clicking the buttons also adds auto-generated code in the Designer code file that enables a button click to raise an event.
Add code for the NewCustomer form logic
To complete the NewCustomer form logic, follow these steps.
Bring the
System.Data.SqlClientnamespace into scope so that you don't have to fully qualify the names of its members.using System.Data.SqlClient;Imports System.Data.SqlClientAdd some variables and helper methods to the class as shown in the following code.
// Storage for IDENTITY values returned from database.
private int parsedCustomerID;
private int orderID;

/// <summary>
/// Verifies that the customer name text box is not empty.
/// </summary>
private bool IsCustomerNameValid()
{
    if (txtCustomerName.Text == "")
    {
        MessageBox.Show("Please enter a name.");
        return false;
    }
    else
    {
        return true;
    }
}

/// <summary>
/// Verifies that a customer ID and order amount have been provided.
/// </summary>
private bool IsOrderDataValid()
{
    // Verify that CustomerID is present.
    if (txtCustomerID.Text == "")
    {
        MessageBox.Show("Please create customer account before placing order.");
        return false;
    }
    // Verify that Amount isn't 0.
    else if ((numOrderAmount.Value < 1))
    {
        MessageBox.Show("Please specify an order amount.");
        return false;
    }
    else
    {
        // Order can be submitted.
        return true;
    }
}

/// <summary>
/// Clears the form data.
/// </summary>
private void ClearForm()
{
    txtCustomerName.Clear();
    txtCustomerID.Clear();
    dtpOrderDate.Value = DateTime.Now;
    numOrderAmount.Value = 0;
    this.parsedCustomerID = 0;
}
' Storage for ID values returned from the database. Private parsedCustomerID As Integer Private orderID As Integer ''' <summary> ''' Verifies that the customer name text box is not empty. ''' </summary> Private ReadOnly Property IsCustomerNameValid As Boolean Get If txtCustomerName.Text = "" Then MessageBox.Show("Please enter a name.") Return False Else Return True End If End Get End Property ''' <summary> ''' Verifies the order data is valid. ''' </summary> Private Function IsOrderDataValid() As Boolean ' Verify that CustomerID is present. If txtCustomerID.Text = "" Then MessageBox.Show("Please create a customer account before placing order.") Return False ' Verify that order amount isn't 0. ElseIf (numOrderAmount.Value < 1) Then MessageBox.Show("Please specify an order amount.") Return False Else ' Order can be submitted. Return True End If End Function ''' <summary> ''' Clears values from controls. ''' </summary> Private Sub ClearForm() txtCustomerName.Clear() txtCustomerID.Clear() dtpOrderDate.Value = DateTime.Now numOrderAmount.Value = 0 Me.parsedCustomerID = 0 End SubComplete the method bodies for the four button click event handlers as shown in the following code.
/// <summary>
/// Creates a new customer by calling the Sales.uspNewCustomer stored procedure.
/// </summary>
private void btnCreateAccount_Click(object sender, EventArgs e)
{
    if (IsCustomerNameValid())
    {
        // Create the connection.
        using (SqlConnection connection = new SqlConnection(Properties.Settings.Default.connString))
        {
            // Create a SqlCommand, and identify it as a stored procedure.
            using (SqlCommand sqlCommand = new SqlCommand("Sales.uspNewCustomer", connection))
            {
                sqlCommand.CommandType = CommandType.StoredProcedure;

                // Add input parameter for the stored procedure and specify what to use as its value.
                sqlCommand.Parameters.Add(new SqlParameter("@CustomerName", SqlDbType.NVarChar, 40));
                sqlCommand.Parameters["@CustomerName"].Value = txtCustomerName.Text;

                // Add the output parameter.
                sqlCommand.Parameters.Add(new SqlParameter("@CustomerID", SqlDbType.Int));
                sqlCommand.Parameters["@CustomerID"].Direction = ParameterDirection.Output;

                try
                {
                    connection.Open();

                    // Run the stored procedure.
                    sqlCommand.ExecuteNonQuery();

                    // Customer ID is an IDENTITY value from the database.
                    this.parsedCustomerID = (int)sqlCommand.Parameters["@CustomerID"].Value;

                    // Put the Customer ID value into the read-only text box.
                    this.txtCustomerID.Text = Convert.ToString(parsedCustomerID);
                }
                catch
                {
                    MessageBox.Show("Customer ID was not returned. Account could not be created.");
                }
                finally
                {
                    connection.Close();
                }
            }
        }
    }
}

/// <summary>
/// Calls the Sales.uspPlaceNewOrder stored procedure to place an order.
/// </summary>
private void btnPlaceOrder_Click(object sender, EventArgs e)
{
    // Ensure the required input is present.
    if (IsOrderDataValid())
    {
        // Create the connection.
        using (SqlConnection connection = new SqlConnection(Properties.Settings.Default.connString))
        {
            // Create SqlCommand and identify it as a stored procedure.
            using (SqlCommand sqlCommand = new SqlCommand("Sales.uspPlaceNewOrder", connection))
            {
                sqlCommand.CommandType = CommandType.StoredProcedure;

                // Add the @CustomerID input parameter, which was obtained from uspNewCustomer.
                sqlCommand.Parameters.Add(new SqlParameter("@CustomerID", SqlDbType.Int));
                sqlCommand.Parameters["@CustomerID"].Value = this.parsedCustomerID;

                // Add the @OrderDate input parameter.
                sqlCommand.Parameters.Add(new SqlParameter("@OrderDate", SqlDbType.DateTime, 8));
                sqlCommand.Parameters["@OrderDate"].Value = dtpOrderDate.Value;

                // Add the @Amount order amount input parameter.
                sqlCommand.Parameters.Add(new SqlParameter("@Amount", SqlDbType.Int));
                sqlCommand.Parameters["@Amount"].Value = numOrderAmount.Value;

                // Add the @Status order status input parameter.
                // For a new order, the status is always O (open).
                sqlCommand.Parameters.Add(new SqlParameter("@Status", SqlDbType.Char, 1));
                sqlCommand.Parameters["@Status"].Value = "O";

                // Add the return value for the stored procedure, which is  the order ID.
                sqlCommand.Parameters.Add(new SqlParameter("@RC", SqlDbType.Int));
                sqlCommand.Parameters["@RC"].Direction = ParameterDirection.ReturnValue;

                try
                {
                    //Open connection.
                    connection.Open();

                    // Run the stored procedure.
                    sqlCommand.ExecuteNonQuery();

                    // Display the order number.
                    this.orderID = (int)sqlCommand.Parameters["@RC"].Value;
                    MessageBox.Show("Order number " + this.orderID + " has been submitted.");
                }
                catch
                {
                    MessageBox.Show("Order could not be placed.");
                }
                finally
                {
                    connection.Close();
                }
            }
        }
    }
}

/// <summary>
/// Clears the form data so another new account can be created.
/// </summary>
private void btnAddAnotherAccount_Click(object sender, EventArgs e)
{
    this.ClearForm();
}

/// <summary>
/// Closes the form/dialog box.
/// </summary>
private void btnAddFinish_Click(object sender, EventArgs e)
{
    this.Close();
}
''' <summary> ''' Creates a new account by executing the Sales.uspNewCustomer ''' stored procedure on the database. ''' </summary> Private Sub btnCreateAccount_Click(sender As Object, e As EventArgs) Handles btnCreateAccount.Click ' Ensure a customer name has been entered. If IsCustomerNameValid Then ' Create the SqlConnection object. Using connection As New SqlConnection(My.Settings.connString) ' Create a SqlCommand, and identify the command type as a stored procedure. Using sqlCommand As New SqlCommand("Sales.uspNewCustomer", connection) sqlCommand.CommandType = CommandType.StoredProcedure ' Add the customer name input parameter for the stored procedure. sqlCommand.Parameters.Add(New SqlParameter("@CustomerName", SqlDbType.NVarChar, 40)) sqlCommand.Parameters("@CustomerName").Value = txtCustomerName.Text ' Add the customer ID output parameter. sqlCommand.Parameters.Add(New SqlParameter("@CustomerID", SqlDbType.Int)) sqlCommand.Parameters("@CustomerID").Direction = ParameterDirection.Output Try ' Open the connection. connection.Open() ' Run the stored procedure. sqlCommand.ExecuteNonQuery() ' Convert the Customer ID value to an Integer. Me.parsedCustomerID = CInt(sqlCommand.Parameters("@CustomerID").Value) ' Insert the customer ID into the corresponding text box. Me.txtCustomerID.Text = Convert.ToString(parsedCustomerID) Catch MessageBox.Show("Customer ID was not returned. Account could not be created.") Finally ' Close the connection. connection.Close() End Try End Using End Using End If End Sub ''' <summary> ''' Places the order by executing the Sales.uspPlaceNewOrder ''' stored procedure on the database. ''' </summary> Private Sub btnPlaceOrder_Click(sender As Object, e As EventArgs) Handles btnPlaceOrder.Click If IsOrderDataValid() Then ' Create the connection. Using connection As New SqlConnection(My.Settings.connString) ' Create SqlCommand and identify it as a stored procedure. Using sqlCommand As New SqlCommand("Sales.uspPlaceNewOrder", connection) sqlCommand.CommandType = CommandType.StoredProcedure ' Add the @CustomerID parameter, which was an output parameter from uspNewCustomer. sqlCommand.Parameters.Add(New SqlParameter("@CustomerID", SqlDbType.Int)) sqlCommand.Parameters("@CustomerID").Value = Me.parsedCustomerID ' Add the @OrderDate parameter. sqlCommand.Parameters.Add(New SqlParameter("@OrderDate", SqlDbType.DateTime, 8)) sqlCommand.Parameters("@OrderDate").Value = dtpOrderDate.Value ' Add the @Amount parameter. sqlCommand.Parameters.Add(New SqlParameter("@Amount", SqlDbType.Int)) sqlCommand.Parameters("@Amount").Value = numOrderAmount.Value ' Add the @Status parameter. For a new order, the status is always O (open). sqlCommand.Parameters.Add(New SqlParameter("@Status", SqlDbType.[Char], 1)) sqlCommand.Parameters("@Status").Value = "O" ' Add a return value parameter for the stored procedure, which is the orderID. sqlCommand.Parameters.Add(New SqlParameter("@RC", SqlDbType.Int)) sqlCommand.Parameters("@RC").Direction = ParameterDirection.ReturnValue Try ' Open connection. connection.Open() ' Run the stored procedure. sqlCommand.ExecuteNonQuery() ' Display the order number. Me.orderID = CInt(sqlCommand.Parameters("@RC").Value) MessageBox.Show("Order number " & (Me.orderID).ToString & " has been submitted.") Catch ' A simple catch. MessageBox.Show("Order could not be placed.") Finally ' Always close a connection after you finish using it, ' so that it can be released to the connection pool. connection.Close() End Try End Using End Using End If End Sub ''' <summary> ''' Resets the form for another new account. ''' </summary> Private Sub btnAddAnotherAccount_Click(sender As Object, e As EventArgs) Handles btnAddAnotherAccount.Click Me.ClearForm() End Sub ''' <summary> ''' Closes the NewCustomer form and returns focus to the Navigation form. ''' </summary> Private Sub btnAddFinish_Click(sender As Object, e As EventArgs) Handles btnAddFinish.Click Me.Close() End Sub
FillOrCancel form
The FillOrCancel form runs a query to return an order when you enter an order ID and then click the Find Order button. The returned row appears in a read-only data grid. You can mark the order as canceled (X) if you select the Cancel Order button, or you can mark the order as filled (F) if you select the Fill Order button. If you select the Find Order button again, the updated row appears.
Create auto-generated event handlers
Create empty Click event handlers for the four buttons on the FillOrCancel form by double-clicking the buttons. Double-clicking the buttons also adds auto-generated code in the Designer code file that enables a button click to raise an event.
Add code for the FillOrCancel form logic
To complete the FillOrCancel form logic, follow these steps.
Bring the following two namespaces into scope so that you don't have to fully qualify the names of their members.
using System.Data.SqlClient;
using System.Text.RegularExpressions;
Imports System.Data.SqlClient Imports System.Text.RegularExpressionsAdd a variable and helper method to the class as shown in the following code.
// Storage for the order ID value.
private int parsedOrderID;

/// <summary>
/// Verifies that an order ID is present and contains valid characters.
/// </summary>
private bool IsOrderIDValid()
{
    // Check for input in the Order ID text box.
    if (txtOrderID.Text == "")
    {
        MessageBox.Show("Please specify the Order ID.");
        return false;
    }

    // Check for characters other than integers.
    else if (Regex.IsMatch(txtOrderID.Text, @"^\D*$"))
    {
        // Show message and clear input.
        MessageBox.Show("Customer ID must contain only numbers.");
        txtOrderID.Clear();
        return false;
    }
    else
    {
        // Convert the text in the text box to an integer to send to the database.
        parsedOrderID = Int32.Parse(txtOrderID.Text);
        return true;
    }
}
' Storage for OrderID. Private parsedOrderID As Integer ''' <summary> ''' Verifies that OrderID is valid. ''' </summary> Private Function IsOrderIDValid() As Boolean ' Check for input in the Order ID text box. If txtOrderID.Text = "" Then MessageBox.Show("Please specify the Order ID.") Return False ' Check for characters other than integers. ElseIf Regex.IsMatch(txtOrderID.Text, "^\D*$") Then ' Show message and clear input. MessageBox.Show("Please specify integers only.") txtOrderID.Clear() Return False Else ' Convert the text in the text box to an integer to send to the database. parsedOrderID = Int32.Parse(txtOrderID.Text) Return True End If End FunctionComplete the method bodies for the four button click event handlers as shown in the following code.
/// <summary>
/// Executes a t-SQL SELECT statement to obtain order data for a specified
/// order ID, then displays it in the DataGridView on the form.
/// </summary>
private void btnFindByOrderID_Click(object sender, EventArgs e)
{
    if (IsOrderIDValid())
    {
        using (SqlConnection connection = new SqlConnection(Properties.Settings.Default.connString))
        {
            // Define a t-SQL query string that has a parameter for orderID.
            const string sql = "SELECT * FROM Sales.Orders WHERE orderID = @orderID";

            // Create a SqlCommand object.
            using (SqlCommand sqlCommand = new SqlCommand(sql, connection))
            {
                // Define the @orderID parameter and set its value.
                sqlCommand.Parameters.Add(new SqlParameter("@orderID", SqlDbType.Int));
                sqlCommand.Parameters["@orderID"].Value = parsedOrderID;

                try
                {
                    connection.Open();

                    // Run the query by calling ExecuteReader().
                    using (SqlDataReader dataReader = sqlCommand.ExecuteReader())
                    {
                        // Create a data table to hold the retrieved data.
                        DataTable dataTable = new DataTable();

                        // Load the data from SqlDataReader into the data table.
                        dataTable.Load(dataReader);

                        // Display the data from the data table in the data grid view.
                        this.dgvCustomerOrders.DataSource = dataTable;

                        // Close the SqlDataReader.
                        dataReader.Close();
                    }
                }
                catch
                {
                    MessageBox.Show("The requested order could not be loaded into the form.");
                }
                finally
                {
                    // Close the connection.
                    connection.Close();
                }
            }
        }
    }
}

/// <summary>
/// Cancels an order by calling the Sales.uspCancelOrder
/// stored procedure on the database.
/// </summary>
private void btnCancelOrder_Click(object sender, EventArgs e)
{
    if (IsOrderIDValid())
    {
        // Create the connection.
        using (SqlConnection connection = new SqlConnection(Properties.Settings.Default.connString))
        {
            // Create the SqlCommand object and identify it as a stored procedure.
            using (SqlCommand sqlCommand = new SqlCommand("Sales.uspCancelOrder", connection))
            {
                sqlCommand.CommandType = CommandType.StoredProcedure;

                // Add the order ID input parameter for the stored procedure.
                sqlCommand.Parameters.Add(new SqlParameter("@orderID", SqlDbType.Int));
                sqlCommand.Parameters["@orderID"].Value = parsedOrderID;

                try
                {
                    // Open the connection.
                    connection.Open();

                    // Run the command to execute the stored procedure.
                    sqlCommand.ExecuteNonQuery();
                }
                catch
                {
                    MessageBox.Show("The cancel operation was not completed.");
                }
                finally
                {
                    // Close connection.
                    connection.Close();
                }
            }
        }
    }
}

/// <summary>
/// Fills an order by calling the Sales.uspFillOrder stored
/// procedure on the database.
/// </summary>
private void btnFillOrder_Click(object sender, EventArgs e)
{
    if (IsOrderIDValid())
    {
        // Create the connection.
        using (SqlConnection connection = new SqlConnection(Properties.Settings.Default.connString))
        {
            // Create command and identify it as a stored procedure.
            using (SqlCommand sqlCommand = new SqlCommand("Sales.uspFillOrder", connection))
            {
                sqlCommand.CommandType = CommandType.StoredProcedure;

                // Add the order ID input parameter for the stored procedure.
                sqlCommand.Parameters.Add(new SqlParameter("@orderID", SqlDbType.Int));
                sqlCommand.Parameters["@orderID"].Value = parsedOrderID;

                // Add the filled date input parameter for the stored procedure.
                sqlCommand.Parameters.Add(new SqlParameter("@FilledDate", SqlDbType.DateTime, 8));
                sqlCommand.Parameters["@FilledDate"].Value = dtpFillDate.Value;

                try
                {
                    connection.Open();

                    // Execute the stored procedure.
                    sqlCommand.ExecuteNonQuery();
                }
                catch
                {
                    MessageBox.Show("The fill operation was not completed.");
                }
                finally
                {
                    // Close the connection.
                    connection.Close();
                }
            }
        }
    }
}

/// <summary>
/// Closes the form.
/// </summary>
private void btnFinishUpdates_Click(object sender, EventArgs e)
{
    this.Close();
}
''' <summary> ''' Executes a t-SQL SELECT query on the database to ''' obtain order data for a specified order ID. ''' </summary> Private Sub btnFindByOrderID_Click(sender As Object, e As EventArgs) Handles btnFindByOrderID.Click ' Prepare the connection and the command. If IsOrderIDValid() Then ' Create the connection. Using connection As New SqlConnection(My.Settings.connString) ' Define the query string that has a parameter for orderID. Const sql As String = "select * from Sales.Orders where orderID = @orderID" ' Create a SqlCommand object. Using sqlCommand As New SqlCommand(sql, connection) ' Define the @orderID parameter and its value. sqlCommand.Parameters.Add(New SqlParameter("@orderID", SqlDbType.Int)) sqlCommand.Parameters("@orderID").Value = parsedOrderID Try ' Open connection. connection.Open() ' Execute the query. Dim dataReader As SqlDataReader = sqlCommand.ExecuteReader() ' Create a data table to hold the retrieved data. Dim dataTable As New DataTable() ' Load the data from SqlDataReader into the data table. dataTable.Load(dataReader) ' Display the data from the data table in the data grid view. Me.dgvCustomerOrders.DataSource = dataTable ' Close the SqlDataReader. dataReader.Close() Catch MessageBox.Show("The requested order could not be loaded into the form.") Finally ' Close the connection. connection.Close() End Try End Using End Using End If End Sub ''' <summary> ''' Fills an order by running the Sales.uspFillOrder stored procedure on the database. ''' </summary> Private Sub btnFillOrder_Click(sender As Object, e As EventArgs) Handles btnFillOrder.Click ' Set up and run stored procedure only if OrderID is valid. If IsOrderIDValid() Then ' Create the connection. Using connection As New SqlConnection(My.Settings.connString) ' Create command and identify it as a stored procedure. Using sqlCommand As New SqlCommand("Sales.uspFillOrder", connection) sqlCommand.CommandType = CommandType.StoredProcedure ' Add input parameter for the stored procedure. sqlCommand.Parameters.Add(New SqlParameter("@orderID", SqlDbType.Int)) sqlCommand.Parameters("@orderID").Value = parsedOrderID ' Add second input parameter. sqlCommand.Parameters.Add(New SqlParameter("@FilledDate", SqlDbType.DateTime, 8)) sqlCommand.Parameters("@FilledDate").Value = dtpFillDate.Value Try ' Open the connection. connection.Open() ' Run the SqlCommand. sqlCommand.ExecuteNonQuery() Catch ' A simple catch. MessageBox.Show("The fill operation was not completed.") Finally ' Close the connection. connection.Close() End Try End Using End Using End If End Sub ''' <summary> ''' Cancels an order by running the Sales.uspCancelOrder stored procedure on the database. ''' </summary> Private Sub btnCancelOrder_Click(sender As Object, e As EventArgs) Handles btnCancelOrder.Click ' Set up and run the stored procedure only if OrderID is ready. If IsOrderIDValid() Then ' Create the connection. Using connection As New SqlConnection(My.Settings.connString) ' Create the command and identify it as a stored procedure. Using sqlCommand As New SqlCommand("Sales.uspCancelOrder", connection) sqlCommand.CommandType = CommandType.StoredProcedure ' Add input parameter for the stored procedure. sqlCommand.Parameters.Add(New SqlParameter("@orderID", SqlDbType.Int)) sqlCommand.Parameters("@orderID").Value = parsedOrderID Try ' Open the connection. connection.Open() ' Run the SqlCommand. sqlCommand.ExecuteNonQuery() Catch ' A simple catch. MessageBox.Show("The cancel operation was not completed.") Finally ' Close connection. connection.Close() End Try End Using End Using End If End Sub ''' <summary> ''' Closes the form and returns focus to the Navigation form. ''' </summary> Private Sub btnFinishUpdates_Click(sender As Object, e As EventArgs) Handles btnFinishUpdates.Click Me.Close() End Sub
Test your application
Run the application and try creating a few customers and orders to verify that everything is working as expected. To verify that the database is updated with your changes, open the Tables node in Server Explorer, right-click on the Customers and Orders nodes, and choose Show Table Data.