Save data with the TableAdapter DBDirect methods
Applies to: ![]() Visual Studio
Visual Studio ![]() Visual Studio for Mac
Visual Studio for Mac
Note
This article applies to Visual Studio 2017. If you're looking for the latest Visual Studio documentation, see Visual Studio documentation. We recommend upgrading to the latest version of Visual Studio. Download it here
This tutorial provides detailed instructions for running SQL statements directly against a database by using the DBDirect methods of a TableAdapter. The DBDirect methods of a TableAdapter provide a fine level of control over your database updates. You can use them to run specific SQL statements and stored procedures by calling the individual Insert, Update, and Delete methods as needed by your application (as opposed to the overloaded Update method that performs the UPDATE, INSERT, and DELETE statements all in one call).
During this tutorial, you will learn how to:
Create and configure a dataset with the Data Source Configuration Wizard.
Select the control to be created on the form when dragging items from the Data Sources window. For more information, see Set the control to be created when dragging from the Data Sources window.
Create a data-bound form by dragging items from the Data Sources window onto the form.
Add methods to directly access the database and perform inserts, updates, and deletes.
Prerequisites
The steps in this tutorial work with .NET Framework Windows Forms Applications.
This tutorial uses SQL Server Express LocalDB and the Northwind sample database.
If you don't have SQL Server Express LocalDB, install it either from the SQL Server Express download page, or through the Visual Studio Installer. In the Visual Studio Installer, you can install SQL Server Express LocalDB as part of the Data storage and processing workload, or as an individual component.
Install the Northwind sample database by following these steps:
In Visual Studio, open the SQL Server Object Explorer window. (SQL Server Object Explorer is installed as part of the Data storage and processing workload in the Visual Studio Installer.) Expand the SQL Server node. Right-click on your LocalDB instance and select New Query.
A query editor window opens.
Copy the Northwind Transact-SQL script to your clipboard. This T-SQL script creates the Northwind database from scratch and populates it with data.
Paste the T-SQL script into the query editor, and then choose the Execute button.
After a short time, the query finishes running and the Northwind database is created.
Create a Windows Forms application
The first step is to create a Windows Forms Application. Create a project using the Windows Forms App project type, using C# or Visual Basic.
Note
The code for this tutorial is available in C# and Visual Basic. To switch the code language on this page between C# and Visual Basic, use the code language switcher at the top of the page on the right side.
Create a data source from your database
This step uses the Data Source Configuration Wizard to create a data source based on the Region table in the Northwind sample database. You must have access to the Northwind sample database to create the connection. For information about setting up the Northwind sample database, see How to: Install sample databases.
To create the data source
On the Data menu, select Show Data Sources.
The Data Sources window opens.
In the Data Sources window, select Add New Data Source to start the Data Source Configuration Wizard.
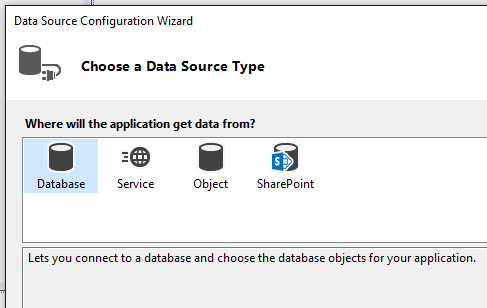
On the Choose a Data Source Type screen, select Database, and then select Next.
On the Choose your Data Connection screen, do one of the following:
If a data connection to the Northwind sample database is available in the drop-down list, select it.
-or-
Select New Connection to launch the Add/Modify Connection dialog box.
If your database requires a password, select the option to include sensitive data, and then select Next.
On the Save connection string to the Application Configuration file screen, select Next.
On the Choose your Database Objects screen, expand the Tables node.
Select the
Regiontable, and then select Finish.The NorthwindDataSet is added to your project and the
Regiontable appears in the Data Sources window.
Add controls to the form to display the data
Create the data-bound controls by dragging items from the Data Sources window onto your form.
To create data bound controls on the Windows form, drag the main Region node from the Data Sources window onto the form.
A DataGridView control and a tool strip (BindingNavigator) for navigating records appear on the form. A NorthwindDataSet, RegionTableAdapter, BindingSource, and BindingNavigator appear in the component tray.
To add buttons that will call the individual TableAdapter DbDirect methods
Drag three Button controls from the Toolbox onto Form1 (below the RegionDataGridView).
Set the following Name and Text properties on each button.
Name Text InsertButtonInsert UpdateButtonUpdate DeleteButtonDelete
To add code to insert new records into the database
Select InsertButton to create an event handler for the click event and open your form in the code editor.
Replace the
InsertButton_Clickevent handler with the following code:Private Sub InsertButton_Click() Handles InsertButton.Click Dim newRegionID As Integer = 5 Dim newRegionDescription As String = "NorthEastern" Try RegionTableAdapter1.Insert(newRegionID, newRegionDescription) Catch ex As Exception MessageBox.Show("Insert Failed") End Try RefreshDataset() End Sub Private Sub RefreshDataset() Me.RegionTableAdapter1.Fill(Me.NorthwindDataSet1._Region) End Subprivate void InsertButton_Click(object sender, EventArgs e) { Int32 newRegionID = 5; String newRegionDescription = "NorthEastern"; try { regionTableAdapter1.Insert(newRegionID, newRegionDescription); } catch (Exception ex) { MessageBox.Show("Insert Failed"); } RefreshDataset(); } private void RefreshDataset() { this.regionTableAdapter1.Fill(this.northwindDataSet1.Region); }Note
Depending on your Visual Studio version and the project templates you used, the variable names like
regionTableAdapterorregionTableAdapter1used in this code might or might not have a trailing 1 in the generated code. Make any corrections in your code to ensure that the correct name is used everywhere. Visual Studio shows a red squiggle where the name is incorrect.
To add code to update records in the database
Double-click the UpdateButton to create an event handler for the click event and open your form in the code editor.
Replace the
UpdateButton_Clickevent handler with the following code:Private Sub UpdateButton_Click() Handles UpdateButton.Click Dim newRegionID As Integer = 5 Try RegionTableAdapter1.Update(newRegionID, "Updated Region Description", 5, "NorthEastern") Catch ex As Exception MessageBox.Show("Update Failed") End Try RefreshDataset() End Subprivate void UpdateButton_Click(object sender, EventArgs e) { Int32 newRegionID = 5; try { regionTableAdapter1.Update(newRegionID, "Updated Region Description", 5, "NorthEastern"); } catch (Exception ex) { MessageBox.Show("Update Failed"); } RefreshDataset(); }
To add code to delete records from the database
Select DeleteButton to create an event handler for the click event and open your form in the code editor.
Replace the
DeleteButton_Clickevent handler with the following code:Private Sub DeleteButton_Click() Handles DeleteButton.Click Try RegionTableAdapter1.Delete(5, "Updated Region Description") Catch ex As Exception MessageBox.Show("Delete Failed") End Try RefreshDataset() End Subprivate void DeleteButton_Click(object sender, EventArgs e) { try { regionTableAdapter1.Delete(5, "Updated Region Description"); } catch (Exception ex) { MessageBox.Show("Delete Failed"); } RefreshDataset(); }
Run the application
Select F5 to run the application.
Select the Insert button, and verify that the new record appears in the grid.
Select the Update button, and verify that the record is updated in the grid.
Select the Delete button, and verify that the record is removed from the grid.
Next steps
Depending on your application requirements, there are several steps you might want to perform after creating a data-bound form. Some enhancements you could make to this tutorial include:
Adding search functionality to the form.
Adding additional tables to the dataset by selecting Configure DataSet with Wizard from within the Data Sources window. You can add controls that display related data by dragging the related nodes onto the form. For more information, see Relationships in Datasets.