Python
Python est un langage de script populaire pour l’automatisation système et le Machine Learning (ML). Vous pouvez en savoir plus sur Python sur python.org.
Utilisation de Python sur x64 ou x86
Pour installer Python sur Windows IoT Core :
Téléchargez le package NuGet Python, puis installez les fichiers à l’aide de PowerShell.
$python_zip = "https://globalcdn.nuget.org/packages/python.3.7.4.nupkg"
if($env:PROCESSOR_ARCHITECTURE -ieq "x86") {
    $python_zip = "https://www.nuget.org/api/v2/package/pythonx86/3.7.4"
}
Invoke-WebRequest $python_zip -OutFile c:\data\python.zip
Expand-Archive C:\data\python.zip -DestinationPath c:\python_temp
move C:\python_temp\tools c:\python
rd C:\python_temp -Recurse -Force
del C:\data\python.zip
Ajoutez Python au chemin d’accès système.
cmd /c 'setx PATH "%PATH%";c:\python;c:\python\scripts /M'
$env:Path += ";c:\python;c:\python\scripts"
Vérifiez que la version actuelle de pip est installée
python -m pip install --upgrade pip
Utilisation de Python sur Windows IoT Core ARM32
Pour obtenir Python pour Windows, vous devez générer les fichiers binaires vous-même.
Générez Python pour ARM32. La branche doit être supérieure ou égale à 3.8.
git clone https://github.com/python/cpython
cd cpython
git checkout 3.8
pcbuild\build.bat -p ARM --no-tkinter
Générez un fichier .zip Python pour Windows IoT Core ARM32. La même version de Python doit être utilisée pour exécuter le PC/la disposition. Cette étape génère Python pour x86 et l’utilise pour générer le ou les fichiers .zip. Si vous voulez les tests de bibliothèque standard dans votre fichier .zip, ajoutez le paramètre
--include-tests.REM Build Python for x86 to use for building the .zip file. pcbuild\build.bat pcbuild\win32\python.exe PC/layout -vv -s "." -b ".\PCBuild\arm32" -t ".\PCBuild\temp" --preset-iot --include-venv --zip ".\PCBuild\arm32\zip\python.zip" net use P: \\[ip address]\c$ /user:administrator copy .\PCBuild\arm32\zip\python.zip P:\dataUtilisez PowerShell pour extraire le fichier .zip sur l’appareil et ajoutez Python au chemin d’accès système.
Expand-Archive C:\data\python.zip -DestinationPath c:\python
cmd /c 'setx PATH "%PATH%";c:\python;c:\python\scripts /M'
$env:Path += ";c:\python;c:\python\scripts"
Vérifiez que
print('Hello World')fonctionne.python -c "print('Hello World!');quit()"
Utilisation de Python sur Windows IoT Core ARM64
Pour obtenir Python pour Windows, vous devez générer les fichiers binaires vous-même.
Clonez Python pour ARM32 et exécutez
get_externals. La branche doit être supérieure ou égale à 3.8.git clone https://github.com/python/cpython cd cpython git checkout 3.8 pcbuild\get_externals.bat cd ..Clonez et créez libffi.
git clone https://github.com/libffi/libffi
set LIBFFI_SOURCE=%CD%\libffi

REM Visual Studio 2015 or greater with ARM64 tools installed is required to build Python
REM the location of VCVARSALL may differ on your machine
set VCVARSALL="C:\Program Files (x86)\Microsoft Visual Studio\2019\Enterprise\VC\Auxiliary\Build\vcvarsall.bat"

cd cpython
if exist c:\cygwin\bin\sh.exe (
    call pcbuild\prepare_libffi.bat -arm64
) else (
    call pcbuild\prepare_libffi.bat -arm64 --install-cygwin
)
if not exist externals\libffi\arm64\libffi-7.dll echo ERROR: libffi not built! & exit /b 1
Générez Python pour ARM64.
pcbuild\build.bat -p ARM64 --no-tkinterGénérez un fichier .zip Python pour Windows IoT Core ARM64. La même version de Python doit être utilisée pour exécuter le PC/la disposition. Cette étape génère Python pour x86 et l’utilise pour générer le ou les fichiers .zip. Si vous voulez les tests de bibliothèque standard dans votre fichier .zip, ajoutez le paramètre
--include-tests.REM Build Python for x86 to use for building the .zip file. pcbuild\build.bat REM Map drive to device and copy files using PC/layout net use P: \\[ip address]\c$ /user:administrator pcbuild\win32\python.exe PC/layout -vv -s "." -b ".\PCBuild\arm64" -t ".\PCBuild\temp" --preset-iot --include-venv --copy P:\pythonAjoutez Python au chemin d’accès système.
setx PATH "%PATH%";c:\python;c:\python\scripts /M
set PATH=%PATH%;c:\python;c:\python\scripts
Vérifiez que
print('Hello World')fonctionne.python -c "print('Hello World!');quit()"
Essayez les SDK Azure IoT Hub Python v2 - PRÉVERSION
Installez tout d’abord le SDK.
python -m pip install azure-iot-deviceDans la sortie de
pip install, il peut y avoir des erreurs :Download error on https://pypi.org/simple/pbr/. Dans ce cas, passez àSet up an IoT Hub and create a Device Identity:Accédez à
https://pypi.org/simple/pbr/dans votre navigateur préféré. Inspectez le certificat du site web et notez qu’il a été émis parDigiCert.Créez un répertoire nommé
c:\test.Exécutez
certmgr.mscà partir d’une invite de commandes sur un ordinateur Windows de bureau.Accédez à
Trusted Root Certification Authoritiesdans l’arborescence. Développez le nœud et choisissezCertificates.Dans le volet droit, recherchez
DigiCert High Assurance EV Root, cliquez avec le bouton droit et sélectionnezAll Tasks>Export. Notez qu’il existe plusieurs certificatsDigiCertet que j’ai identifié celui-ci en les essayant tous, un à la fois.Dans la boîte de dialogue qui s’ouvre, cliquez sur
Next.Sélectionnez
DER encoded binary X.509 (.CER)(il doit s’agir de la valeur par défaut), puis cliquez surNext.Dans la zone de modification
File name:, tapezc:\test\DigiCert High Assurance EV Root.cer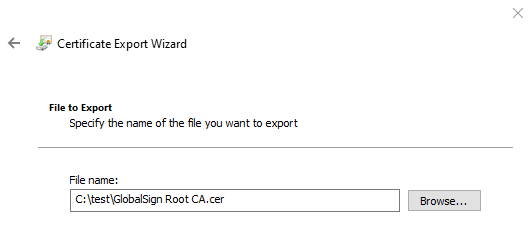
Cliquez sur
Next.Cliquez sur
Finish.Copiez
c:\test\DigiCert High Assurance EV Root.cersur l’appareil en exécutant la commande suivante sur votre ordinateur de bureau :net use X: \\host\c$ /user:host\administrator md X:\test copy "c:\test\GlobalSign Root CA.cer" X:\testSur l’appareil, importez le certificat dans le magasin racine à l’aide de PowerShell.
certmgr -add "c:\test\DigiCert High Assurance EV Root.cer" -s root -r localMachine -c
certmgr -add "c:\test\GlobalSign Root CA.cer" -s root -r localMachine -c
Essayez de réinstaller
azure-iot-devicepython -m pip install azure-iot-device --no-colorDans la sortie de
pip install, il peut y avoir des erreurs :Download error for https://files.pythonhosted.org/. Si vous ne le voyez pas, passez àSet up an IoT Hub and create a Device IdentityAccédez à
https://files.pythonhosted.org/dans votre navigateur préféré. Inspectez le certificat du site web et notez qu’il a été émis parGlobalSign.Répétez les étapes pour exporter le certificat
GlobalSign Root CAà partir de votre ordinateur de bureau, puis importez-le sur l’appareil.Essayez de réinstaller
azure-iot-device.
Configurer un IoT Hub et créer une identité d’appareil
Installez Azure CLI (ou utilisez Azure Cloud Shell) et utilisez-la pour créer un Azure IoT Hub.
az iot hub create --resource-group <your resource group> --name <your IoT Hub name>- Notez que cette opération peut prendre quelques minutes.
Ajoutez l’extension IoT à Azure CLI, puis inscrivez une identité d’appareil
az extension add --name azure-cli-iot-ext
az iot hub device-identity create --hub-name <your IoT Hub name> --device-id <your device id>
Récupérez la chaîne de connexion de votre appareil à l’aide d’Azure CLI
az iot hub device-identity show-connection-string --device-id <your device id> --hub-name <your IoT Hub name>Elle doit respecter le format :
HostName=<your IoT Hub name>.azure-devices.net;DeviceId=<your device id>;SharedAccessKey=<some value>
Envoyer un message de télémétrie simple
Commencez à surveiller la télémétrie sur votre IoT Hub à l’aide d’Azure CLI
az iot hub monitor-events --hub-name <your IoT Hub name> --output tableSur votre appareil, définissez la chaîne de connexion d’appareil en tant que variable d’environnement appelée
IOTHUB_DEVICE_CONNECTION_STRING.REM NOTE: there are no quotes set IOTHUB_DEVICE_CONNECTION_STRING=<your connection string here>Copiez simple_send_d2c_message.py et exécutez-le sur l’appareil.
cmd /c "if not exist c:\test md c:\test"
REM copy simple_send_d2c_message.py from https://github.com/Azure/azure-iot-sdk-python-preview/blob/master/azure-iot-device/samples/simple_send_d2c_message.py to c:\test on the device
python c:\test\simple_send_d2c_message.py
Utilisation de Python dans un conteneur Docker x64 sur Windows IoT Core
Téléchargez la version Docker la plus récente et installez les fichiers.
Invoke-WebRequest https://master.dockerproject.org/windows/x86_64/docker.zip -OutFile c:\data\docker.zip
Expand-Archive c:\data\docker.zip -DestinationPath c:\data
move c:\data\docker\docker*exe c:\windows\system32
Remove-Item c:\data\docker -Recurse -Force
dockerd --register-service
net start docker
Créer fichier Dockerfile
# escape = `
FROM mcr.microsoft.com/windows/nanoserver:1809-amd64

# Get Python
ADD "https://globalcdn.nuget.org/packages/python.3.7.4.nupkg" .\temp\py.zip

COPY test test
COPY certmgr.exe c:\windows\system32

# need admin for setx and certmgr
USER ContainerAdministrator

# Extract Python
RUN tar -xf c:\temp\py.zip -C c:\temp && `
    move c:\temp\tools c:\ && `
    ren tools python && `
    RD c:\temp /s/q && `
    setx PATH "%PATH%";c:\python;c:\python\scripts /M

RUN dir c:\test\*.cer /s/b > c:\test\certs.txt && `
    for /f "delims==" %i in (c:\test\certs.txt) do certmgr -add "%i" -s root -r localMachine -c < c:\test\1.txt

USER ContainerUser

RUN python -m pip install --upgrade pip && `
    python -m pip install azure-iot-device

CMD cmd /k c:\test\start.cmd
Copiez le Dockerfile sous c:\docker sur l’appareil. Copiez également les certificats sous P:\docker\test. 1.txt est un fichier avec le numéro 1 et un retour chariot.
net use P: \\[device IP address]\c$ /user:administrator
md P:\docker\test
copy Dockerfile P:\docker
copy AppCertificates\*.cer P:\docker\test
copy 1.txt P:\docker\test
Connectez-vous à l’appareil à l’aide de SSH. PowerShell à distance ne fonctionne pas pour une session Docker interactive.
docker build --isolation==process . -t python
docker run --isolation==process python
Imprimer Hello World
python -c "print('Hello Python in Containers!')"Consultez les instructions du SDK Azure IoT ci-dessus pour tester les messages cloud à appareil.