Build a unique cloud game development workstation by customizing Game Dev VM
Important
Azure Game Development Virtual Machine is scheduled for retirement on February 1st, 2024. Learn more.
While the Azure Game Development VM bundles many common tools used in game production, it’s understandable that each game studio and individual game developer usually has their unique toolset as well. The Game Development VM is a starting point from which users build their customized cloud development workstation. That way, they don’t need to worry about the common tooling, and only focus on the delta that produces the desired outcome.
The high-level flow for producing a customized image based on the Game Development VM comprises of the following tasks:
- Deploy a Game Dev VM into Azure.
- Access the Game Dev VM and customize it.
- Generalize Game Dev VM by using Sysprep.
- Capture the customized Game Dev VM image.
- Deploy the customized image and build your unique cloud workstation.
Prerequisites
- An Azure account with an active subscription.
- Understand what Sysprep is and its process: Sysprep (System Preparation) Overview
Step 1: Deploy a Game Dev VM into Azure
There are two main methods of deploying a Game Dev VM:
- Using the Azure Marketplace/Portal UI as per the tutorial on creating a Game Development Virtual Machine with Unreal Engine, or with other game engines, or
- Leverage ARM and CLI to deploy from the Azure Quickstart Templates library.
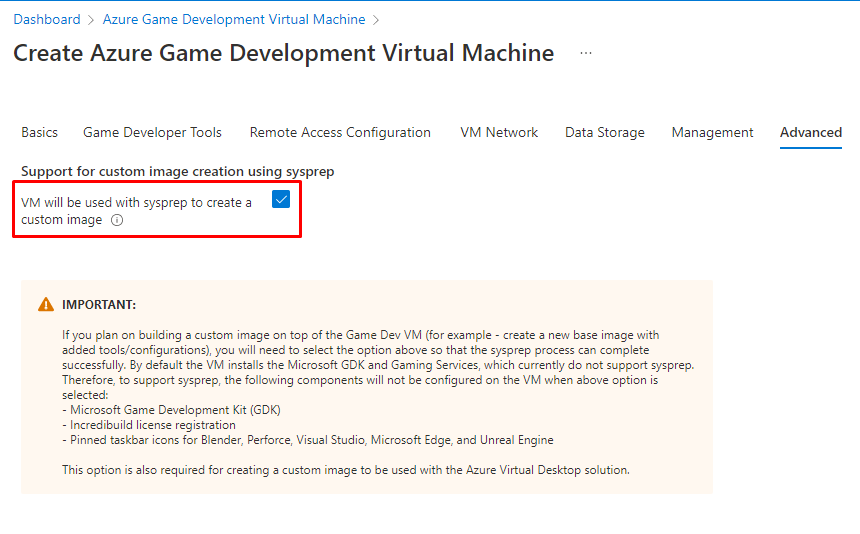
Note
When deploying via the Azure Portal, you must check this box . The VM will be used with sysprep to create a custom image in the Advanced tab. Otherwise, the following steps will fail.
Step 2: Access the Game Dev VM and customize it
Once the Game Dev VM is deployed, you can begin to build your own standard image. For example, you can:
- Install and set up any software you or your team need that is not already included in the standard list of tools.
- Uninstall the software you don’t need to free more space on the disk.
- Configure the operating system to the desired state you need. Update registry or group policy.
Step 3: Generalize Game Dev VM by using Sysprep
After the customization of your own Game Dev VM is finished, you can follow the instructions to Sysprep the Game Dev VM: Generalize a VM before creating an image.
Sysprep removes user specific information so your customized Game Dev VM image can be used as a template to create multiple VMs in the future.
Warning
Once VM is generalized, it cannot be restarted. The process of generalizing a VM is not reversible. If you need to keep the original VM functioning, you should create a copy of the VM and generalize its copy.
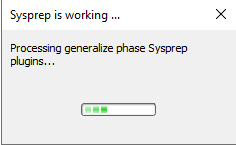
You can expect the following pop-up window after running the Sysprep command. After a few minutes, the VM will be shut down and you'll lose the connection to the VM. These are all the expected results.
Note
Shortly after you lose the connection, the VM status on Azure portal will turn to Stopped. If not, please refresh the portal. You must wait for the VM Status to be Stopped before moving into the next step. And please do NOT click the Stop button to manually change the VM status. Wait for the change to happen automatically.
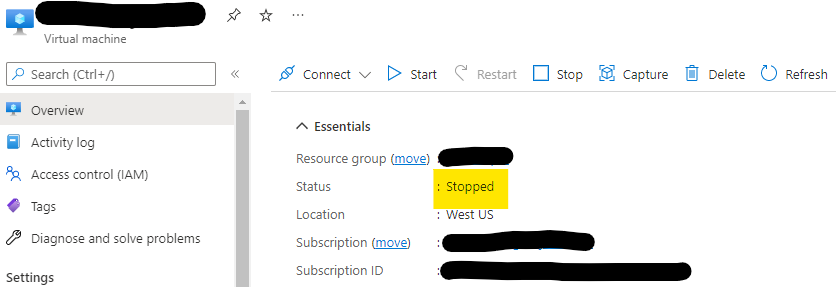
Once you see VM in the Stopped status, run the Azure PowerShell command Set-AzVM, as shown in step 5 of how-to generalize a VM before creating an image, to set the status of the VM to Generalized. Now you’re ready to move to the next step.
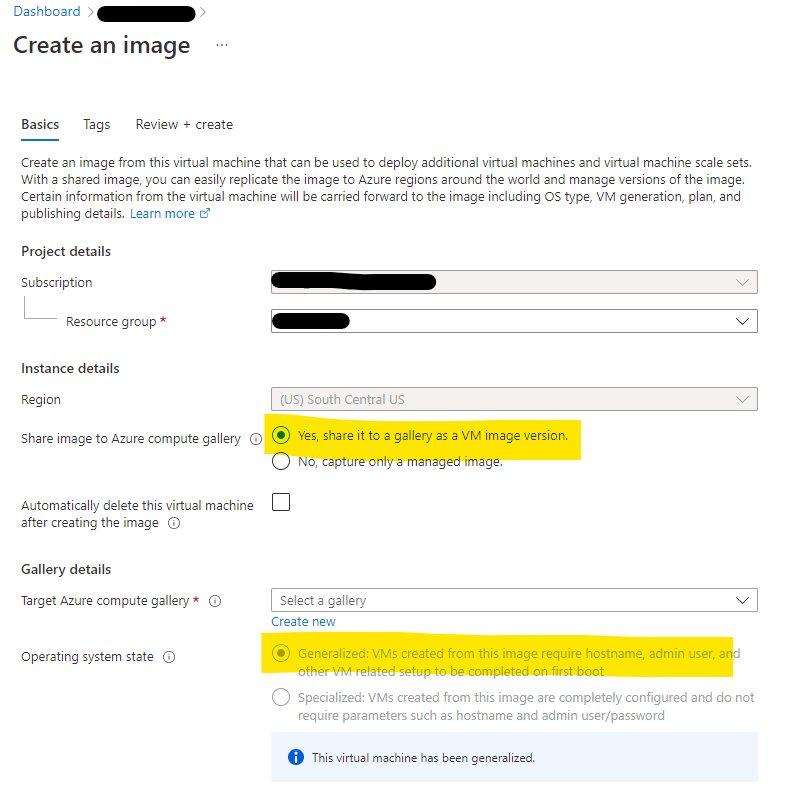
Step 4: Capture the customized Game Dev VM image
The Game Dev VM image has been generalized, and now you're ready to follow the instructions below to capture your own VM image. Please choose Yes, share it to a gallery as an image version in step 5 of the linked instructions, and you should see Generalized is selected.
Capture an image of a VM using the portal - Azure Virtual Machines
After all the required information is filled out and validation passes, you can go ahead and create the image. It will take about 15 minutes for this deployment.
Step 5: Deploy the customized image and build your unique cloud workstation
Now that you have successfully captured the image and exported it to your Azure Compute Gallery, it’s time to use this image as a template to build one of your own game development cloud workstations.
Follow the steps documented in the article to create a VM from your gallery, and you’ll be good to go. You can also use a script on CLI or PowerShell to reference your customized image and automate the VM deployment process if you have multiple VMs to spin up at the same time.
Next steps
With your new Azure Game Dev VM up and running, you can access the VM to verify the customization you made still exists. And get ready to deploy more identical cloud game development workstations by repeating Step 5.
Feedback
Coming soon: Throughout 2024 we will be phasing out GitHub Issues as the feedback mechanism for content and replacing it with a new feedback system. For more information see: https://aka.ms/ContentUserFeedback.
Submit and view feedback for