Tutorial: Basic Active Directory environment
This tutorial walks you through creating a basic Active Directory environment.
You can use the environment you create in the tutorial to test various aspects of hybrid identity scenarios and will be a prerequisite for some of the tutorials. If you already have an existing Active Directory environment you can use that as a substitute. This information is provided for individuals who may be starting from nothing.
This tutorial consists of
Prerequisites
The following are prerequisites required for completing this tutorial
- A computer with Hyper-V installed. It's suggested to do this on either a Windows 10 or a Windows Server 2016 computer.
- An external network adapter to allow the virtual machine to communicate with the internet.
- An Azure subscription
- A copy of Windows Server 2016
- Microsoft .NET framework 4.7.1
Note
This tutorial uses PowerShell scripts so that you can create the tutorial environment in the quickest amount of time. Each of the scripts uses variables that are declared at the beginning of the scripts. You can and should change the variables to reflect your environment.
The scripts used create a general Active Directory environment prior to installing the Microsoft Entra Connect cloud provisioning agent. They are relevant for all of the tutorials.
Copies of the PowerShell scripts that are used in this tutorial are available on GitHub here.
Create a virtual machine
The first thing that you need to do, in order to get our hybrid identity environment up and running is to create a virtual machine that will be used as our on-premises Active Directory server. Do the following:
Open up the PowerShell ISE as Administrator.
Run the following script.
#Declare variables
$VMName = 'DC1'
$Switch = 'External'
$InstallMedia = 'D:\ISO\en_windows_server_2016_updated_feb_2018_x64_dvd_11636692.iso'
$Path = 'D:\VM'
$VHDPath = 'D:\VM\DC1\DC1.vhdx'
$VHDSize = '64424509440'

#Create New Virtual Machine
New-VM -Name $VMName -MemoryStartupBytes 16GB -BootDevice VHD -Path $Path -NewVHDPath $VHDPath -NewVHDSizeBytes $VHDSize  -Generation 2 -Switch $Switch

#Set the memory to be non-dynamic
Set-VMMemory $VMName -DynamicMemoryEnabled $false

#Add DVD Drive to Virtual Machine
Add-VMDvdDrive -VMName $VMName -ControllerNumber 0 -ControllerLocation 1 -Path $InstallMedia

#Mount Installation Media
$DVDDrive = Get-VMDvdDrive -VMName $VMName

#Configure Virtual Machine to Boot from DVD
Set-VMFirmware -VMName $VMName -FirstBootDevice $DVDDrive
Complete the operating system deployment
In order to finish building the virtual machine, you need to finish the operating system installation.
- Hyper-V Manager, double-click on the virtual machine
- Click on the Start button.
- You'll be prompted to ‘Press any key to boot from CD or DVD’. Go ahead and do so.
- On the Windows Server start up screen select your language and click Next.
- Click Install Now.
- Enter your license key and click Next.
- Check **I accept the license terms and click Next.
- Select Custom: Install Windows Only (Advanced)
- Click Next
- Once the installation has completed, restart the virtual machine, sign-in and run Windows updates to ensure the VM is the most up-to-date. Install the latest updates.
Install Active Directory prerequisites
Now that you have a virtual machine up, you need to do a few things prior to installing Active Directory. That is, you need to rename the virtual machine, set a static IP address and DNS information, and install the Remote Server Administration tools. Do the following:
Open up the PowerShell ISE as Administrator.
Run the following script.
#Declare variables
$ipaddress = "10.0.1.117"
$ipprefix = "24"
$ipgw = "10.0.1.1"
$ipdns = "10.0.1.117"
$ipdns2 = "8.8.8.8"
$ipif = (Get-NetAdapter).ifIndex
$featureLogPath = "c:\poshlog\featurelog.txt"
$newname = "DC1"
$addsTools = "RSAT-AD-Tools"

#Set static IP address
New-NetIPAddress -IPAddress $ipaddress -PrefixLength $ipprefix -InterfaceIndex $ipif -DefaultGateway $ipgw

# Set the DNS servers
Set-DnsClientServerAddress -InterfaceIndex $ipif -ServerAddresses ($ipdns, $ipdns2)

#Rename the computer
Rename-Computer -NewName $newname -force

#Install features
New-Item $featureLogPath -ItemType file -Force
Add-WindowsFeature $addsTools
Get-WindowsFeature | Where installed >>$featureLogPath

#Restart the computer
Restart-Computer
Create a Windows Server AD environment
Now that you have the VM created and it has been renamed and has a static IP address, you can go ahead and install and configure Active Directory Domain Services. Do the following:
Open up the PowerShell ISE as Administrator.
Run the following script.
#Declare variables
$DatabasePath = "c:\windows\NTDS"
$DomainMode = "WinThreshold"
$DomainName = "contoso.com"
$DomaninNetBIOSName = "CONTOSO"
$ForestMode = "WinThreshold"
$LogPath = "c:\windows\NTDS"
$SysVolPath = "c:\windows\SYSVOL"
$featureLogPath = "c:\poshlog\featurelog.txt"
$Password = "Pass1w0rd"
$SecureString = ConvertTo-SecureString $Password -AsPlainText -Force

#Install AD DS, DNS and GPMC
start-job -Name addFeature -ScriptBlock {
Add-WindowsFeature -Name "ad-domain-services" -IncludeAllSubFeature -IncludeManagementTools
Add-WindowsFeature -Name "dns" -IncludeAllSubFeature -IncludeManagementTools
Add-WindowsFeature -Name "gpmc" -IncludeAllSubFeature -IncludeManagementTools }
Wait-Job -Name addFeature
Get-WindowsFeature | Where installed >>$featureLogPath

#Create New AD Forest
Install-ADDSForest -CreateDnsDelegation:$false -DatabasePath $DatabasePath -DomainMode $DomainMode -DomainName $DomainName -SafeModeAdministratorPassword $SecureString -DomainNetbiosName $DomainNetBIOSName -ForestMode $ForestMode -InstallDns:$true -LogPath $LogPath -NoRebootOnCompletion:$false -SysvolPath $SysVolPath -Force:$true
Create a Windows Server AD user
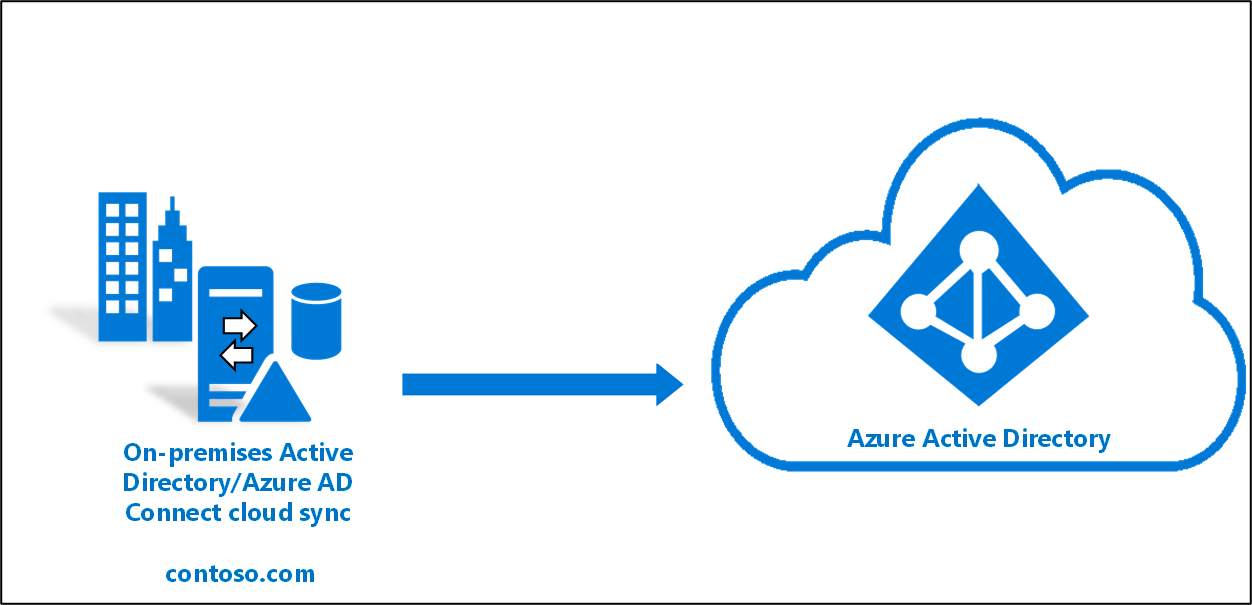
Now that you have our Active Directory environment, you need to a test account. This account will be created in our on-premises AD environment and then synchronized to Microsoft Entra ID. Do the following:
Open up the PowerShell ISE as Administrator.
Run the following script.
# Filename:    4_CreateUser.ps1
# Description: Creates a user in Active Directory.  This is part of
#              the Azure AD Connect password hash sync tutorial.
#
# DISCLAIMER:
# Copyright (c) Microsoft Corporation. All rights reserved. This
# script is made available to you without any express, implied or
# statutory warranty, not even the implied warranty of
# merchantability or fitness for a particular purpose, or the
# warranty of title or non-infringement. The entire risk of the
# use or the results from the use of this script remains with you.
#
#
#
#
#Declare variables
$Givenname = "Allie"
$Surname = "McCray"
$Displayname = "Allie McCray"
$Name = "amccray"
$Password = "Pass1w0rd"
$Identity = "CN=ammccray,CN=Users,DC=contoso,DC=com"
$SecureString = ConvertTo-SecureString $Password -AsPlainText -Force


#Create the user
New-ADUser -Name $Name -GivenName $Givenname -Surname $Surname -DisplayName $Displayname -AccountPassword $SecureString

#Set the password to never expire
Set-ADUser -Identity $Identity -PasswordNeverExpires $true -ChangePasswordAtLogon $false -Enabled $true
Create a Microsoft Entra tenant
Tip
Steps in this article might vary slightly based on the portal you start from.
Now you need to create a Microsoft Entra tenant so that you can synchronize our users to the cloud. To create a new Microsoft Entra tenant, do the following.
- Sign in to the Microsoft Entra admin center and sign in with an account that has your Microsoft Entra subscription.
- Click Overview.
- Click Manage tenants.
- Select Create.
- Provide a name for the organization along with the initial domain name. Then select Create. This will create your directory.
- Once this has completed, click the here link, to manage the directory.
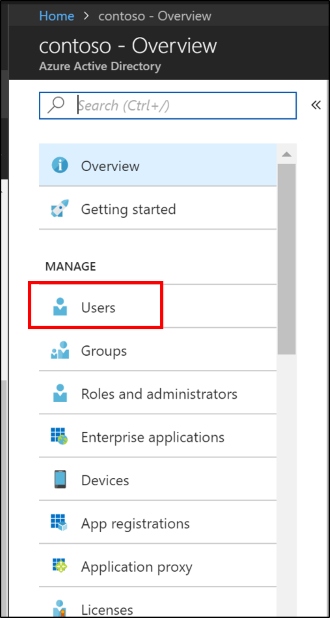
Create a global administrator in Microsoft Entra ID
Now that you have a Microsoft Entra tenant, you'll create a global administrator account. To create the global administrator account do the following.
- Under Manage, select Users.
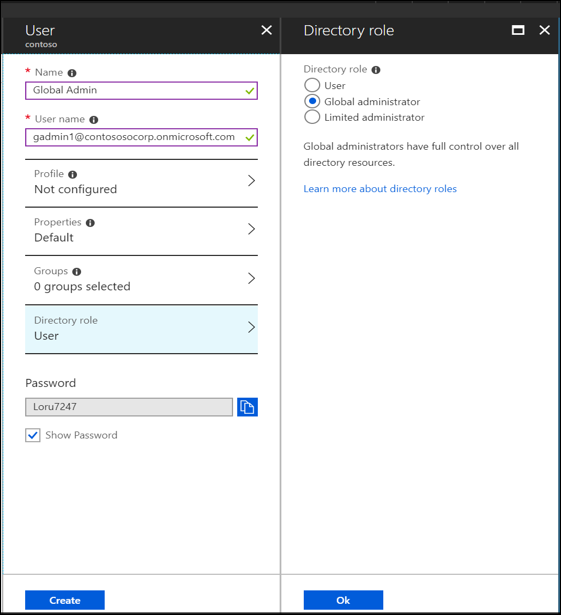
- Select All users and then select + New user.
- Provide a name and username for this user. This will be your Global Administrator for the tenant. You'll also want to change the Directory role to Global administrator. You can also show the temporary password. When you're done, select Create.
- Once this has completed, open a new web browser and sign-in to myapps.microsoft.com using the new global administrator account and the temporary password.
- Change the password for the global administrator to something that you'll remember.
Optional: Additional server and forest
The following is an optional section that provides steps to creating an additional server and or forest. This can be used in some of the more advanced tutorials such as Pilot for Microsoft Entra Connect to cloud sync.
If you only need an additional server, you can stop after the - Create the virtual machine step and join the server to the existing domain that was created above.
Create a virtual machine
Open up the PowerShell ISE as Administrator.
Run the following script.
# Filename:    1_CreateVM_CP.ps1
# Description: Creates a VM to be used in the tutorial.
#
# DISCLAIMER:
# Copyright (c) Microsoft Corporation. All rights reserved. #This script is made available to you without any express, implied or statutory warranty, not even the implied warranty of merchantability or fitness for a particular purpose, or the warranty of title or non-infringement. The entire risk of the use or the results from the use of this script remains with you.
#
#
#
#
#Declare variables
$VMName = 'CP1'
$Switch = 'External'
$InstallMedia = 'D:\ISO\en_windows_server_2016_updated_feb_2018_x64_dvd_11636692.iso'
$Path = 'D:\VM'
$VHDPath = 'D:\VM\CP1\CP1.vhdx'
$VHDSize = '64424509440'

#Create New Virtual Machine
New-VM -Name $VMName -MemoryStartupBytes 16GB -BootDevice VHD -Path $Path -NewVHDPath $VHDPath -NewVHDSizeBytes $VHDSize  -Generation 2 -Switch $Switch

#Set the memory to be non-dynamic
Set-VMMemory $VMName -DynamicMemoryEnabled $false

#Add DVD Drive to Virtual Machine
Add-VMDvdDrive -VMName $VMName -ControllerNumber 0 -ControllerLocation 1 -Path $InstallMedia

#Mount Installation Media
$DVDDrive = Get-VMDvdDrive -VMName $VMName

#Configure Virtual Machine to Boot from DVD
Set-VMFirmware -VMName $VMName -FirstBootDevice $DVDDrive
Complete the operating system deployment
In order to finish building the virtual machine, you need to finish the operating system installation.
- Hyper-V Manager, double-click on the virtual machine
- Click on the Start button.
- You'll be prompted to ‘Press any key to boot from CD or DVD’. Go ahead and do so.
- On the Windows Server start up screen select your language and click Next.
- Click Install Now.
- Enter your license key and click Next.
- Check **I accept the license terms and click Next.
- Select Custom: Install Windows Only (Advanced)
- Click Next
- Once the installation has completed, restart the virtual machine, sign-in and run Windows updates to ensure the VM is the most up-to-date. Install the latest updates.
Install Active Directory prerequisites
Now that you have a virtual machine up, you need to do a few things prior to installing Active Directory. That is, you need to rename the virtual machine, set a static IP address and DNS information, and install the Remote Server Administration tools. Do the following:
Open up the PowerShell ISE as Administrator.
Run the following script.
# Filename:    2_ADPrep_CP.ps1
# Description: Prepares your environment for Active Directory.  This is part of
#              the Azure AD Connect password hash sync tutorial.
#
# DISCLAIMER:
# Copyright (c) Microsoft Corporation. All rights reserved. This
# script is made available to you without any express, implied or
# statutory warranty, not even the implied warranty of
# merchantability or fitness for a particular purpose, or the
# warranty of title or non-infringement. The entire risk of the
# use or the results from the use of this script remains with you.
#
#
#
#
#Declare variables
$ipaddress = "10.0.1.118"
$ipprefix = "24"
$ipgw = "10.0.1.1"
$ipdns = "10.0.1.118"
$ipdns2 = "8.8.8.8"
$ipif = (Get-NetAdapter).ifIndex
$featureLogPath = "c:\poshlog\featurelog.txt"
$newname = "CP1"
$addsTools = "RSAT-AD-Tools"

#Set static IP address
New-NetIPAddress -IPAddress $ipaddress -PrefixLength $ipprefix -InterfaceIndex $ipif -DefaultGateway $ipgw

#Set the DNS servers
Set-DnsClientServerAddress -InterfaceIndex $ipif -ServerAddresses ($ipdns, $ipdns2)

#Rename the computer
Rename-Computer -NewName $newname -force

#Install features
New-Item $featureLogPath -ItemType file -Force
Add-WindowsFeature $addsTools
Get-WindowsFeature | Where installed >>$featureLogPath

#Restart the computer
Restart-Computer
Create a Windows Server AD environment
Now that you have the VM created and it has been renamed and has a static IP address, you can go ahead and install and configure Active Directory Domain Services. Do the following:
Open up the PowerShell ISE as Administrator.
Run the following script.
# Filename:    3_InstallAD_CP.ps1
# Description: Creates an on-premises AD environment.  This is part of
#              the Azure AD Connect password hash sync tutorial.
#
# DISCLAIMER:
# Copyright (c) Microsoft Corporation. All rights reserved. This
# script is made available to you without any express, implied or
# statutory warranty, not even the implied warranty of
# merchantability or fitness for a particular purpose, or the
# warranty of title or non-infringement. The entire risk of the
# use or the results from the use of this script remains with you.
#
#
#
#
#Declare variables
$DatabasePath = "c:\windows\NTDS"
$DomainMode = "WinThreshold"
$DomainName = "fabrikam.com"
$DomaninNetBIOSName = "FABRIKAM"
$ForestMode = "WinThreshold"
$LogPath = "c:\windows\NTDS"
$SysVolPath = "c:\windows\SYSVOL"
$featureLogPath = "c:\poshlog\featurelog.txt"
$Password = "Pass1w0rd"
$SecureString = ConvertTo-SecureString $Password -AsPlainText -Force

#Install AD DS, DNS and GPMC
start-job -Name addFeature -ScriptBlock {
Add-WindowsFeature -Name "ad-domain-services" -IncludeAllSubFeature -IncludeManagementTools
Add-WindowsFeature -Name "dns" -IncludeAllSubFeature -IncludeManagementTools
Add-WindowsFeature -Name "gpmc" -IncludeAllSubFeature -IncludeManagementTools }
Wait-Job -Name addFeature
Get-WindowsFeature | Where installed >>$featureLogPath

#Create New AD Forest
Install-ADDSForest -CreateDnsDelegation:$false -DatabasePath $DatabasePath -DomainMode $DomainMode -DomainName $DomainName -SafeModeAdministratorPassword $SecureString -DomainNetbiosName $DomainNetBIOSName -ForestMode $ForestMode -InstallDns:$true -LogPath $LogPath -NoRebootOnCompletion:$false -SysvolPath $SysVolPath -Force:$true
Create a Windows Server AD user
Now that you have our Active Directory environment, you need to a test account. This account will be created in our on-premises AD environment and then synchronized to Microsoft Entra ID. Do the following:
Open up the PowerShell ISE as Administrator.
Run the following script.
# Filename:    4_CreateUser_CP.ps1
# Description: Creates a user in Active Directory.  This is part of
#              the Azure AD Connect password hash sync tutorial.
#
# DISCLAIMER:
# Copyright (c) Microsoft Corporation. All rights reserved. This
# script is made available to you without any express, implied or
# statutory warranty, not even the implied warranty of
# merchantability or fitness for a particular purpose, or the
# warranty of title or non-infringement. The entire risk of the
# use or the results from the use of this script remains with you.
#
#
#
#
#Declare variables
$Givenname = "Anna"
$Surname = "Ringdal"
$Displayname = "Anna Ringdal"
$Name = "aringdal"
$Password = "Pass1w0rd"
$Identity = "CN=aringdal,CN=Users,DC=fabrikam,DC=com"
$SecureString = ConvertTo-SecureString $Password -AsPlainText -Force


#Create the user
New-ADUser -Name $Name -GivenName $Givenname -Surname $Surname -DisplayName $Displayname -AccountPassword $SecureString

#Set the password to never expire
Set-ADUser -Identity $Identity -PasswordNeverExpires $true -ChangePasswordAtLogon $false -Enabled $true
Conclusion
Now you have an environment that can be used for existing tutorials and to test additional features cloud sync provides.
Next steps
משוב
בקרוב: במהלך 2024, נפתור בעיות GitHub כמנגנון המשוב לתוכן ונחליף אותו במערכת משוב חדשה. לקבלת מידע נוסף, ראה: https://aka.ms/ContentUserFeedback.
שלח והצג משוב עבור