Add copilot to mobile and custom apps
Important
Power Virtual Agents capabilities and features are now part of Microsoft Copilot Studio following significant investments in generative AI and enhanced integrations across Microsoft Copilot.
Some articles and screenshots may refer to Power Virtual Agents while we update documentation and training content.
You can connect your copilot to a custom app so that the app's users can interact with the copilot directly from within your app.
In most cases, your custom app is a mobile-device app that is either a web-based app or a native app or adapter to other services that your business requires.
There are different procedures for connecting to your mobile app, depending on whether your app is a web-based app or a native app.
Connecting your copilot to a web-based app is relatively straightforward as it involves copying a code snippet into your app. However, both web-based apps and native or custom apps still require considerable developer expertise to fully integrate the copilot into your app. Both procedures are described in this article.
Prerequisites
- .NET Core SDK version 2.1.
- Nuget package Microsoft.Bot.Connector.DirectLine.
- A copilot created in Copilot Studio that you want to connect to your app.
Connect your copilot to a web-based app
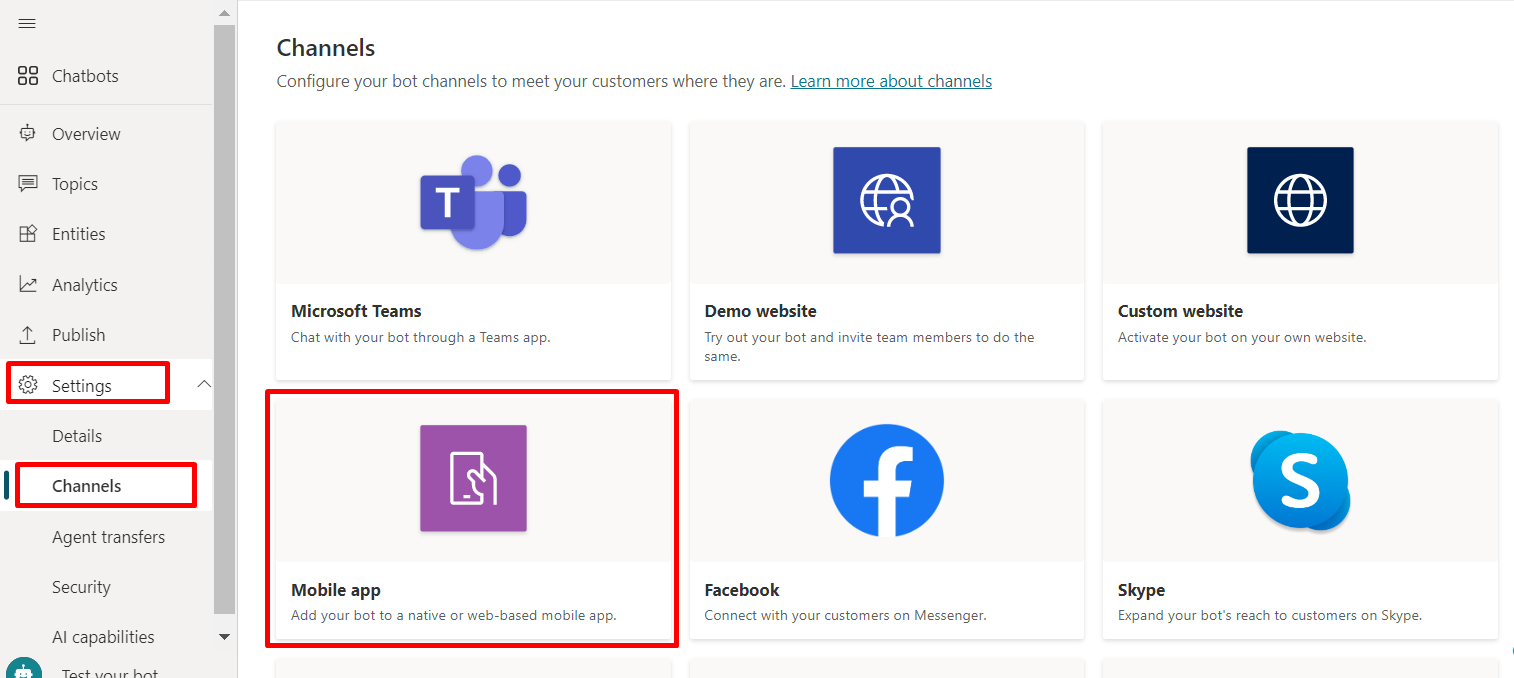
In Copilot Studio, in the navigation menu under Settings, select Channels.
Select the Mobile app tile to open the configuration window.
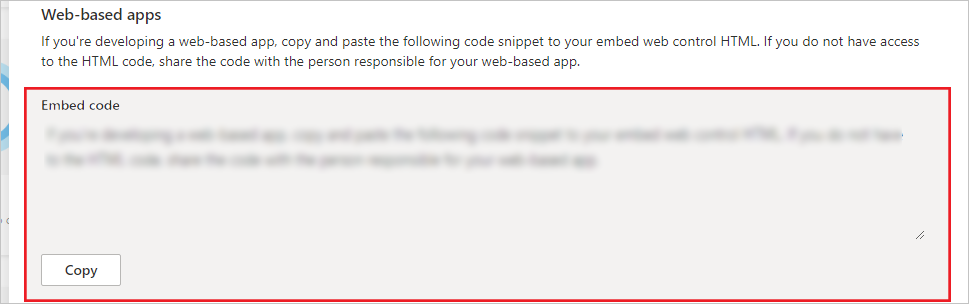
Copy the code under the Web-based apps section and provide it to your app developers to add to your web-based app.
Connect your copilot to a native or custom app
Tip
While this section describes how to connect to a mobile app, the same process could be applied for custom or native apps, such as IoT (Internet of things) apps.
If your goal is to connect to Azure Bot Service channels, besides following the instructions here, your developers can learn more at Connect your bot to Azure Bot Service channels.
Important
Instructions in this section require software development from you or your developers. It is intended for experienced IT professionals, such as IT admins or developers who have a solid understanding of developer tools, utilities, and IDEs.
Code samples
Code snippets used in this document are from:
References
The instructions in this document reference the following source material:
- Bot Framework Direct Line API
- Direct Line Authentication
- Context variables available upon handoff
- Microsoft Bot Framework Activity
Retrieve your Copilot Studio copilot parameters
To connect to the copilot you built, you need to retrieve your copilot's name and token endpoint to identify it.
Copy your copilot's name in Copilot Studio.
In the navigation menu under Settings, select Channels.
Select Mobile app.
Next to Token Endpoint, select Copy. You need this endpoint for the Get Direct Line token step.

Get Direct Line token
To start a conversation with your copilot, you need a Direct Line token. This token can be obtained by making a GET request to the endpoint indicated within the Copilot Studio screen. This token must then be used as the header for subsequent calls to the directline API.
Example:
GET <BOT TOKEN ENDPOINT>
If the request is successful, will be returned a Direct Line token, expiration time and a conversationId for the requested copilot. Example:
{
    "token": "RCurR_XV9ZA.cwA.BKA.iaJrC8xpy8qbOF5xnR2vtCX7CZj0LdjAPGfiCpg4Fv0y8qbOF5xPGfiCpg4Fv0y8qqbOF5x8qbOF5xn",
    "expires_in": 3600,
    "conversationId": "abc123"
}
Sample code example
The following example uses samples from the Connector sample code to get a Direct Line token for a Copilot Studio copilot.
/// <summary>
/// Get directline token for connecting bot
/// </summary>
/// <returns>directline token as string</returns>
public async Task<DirectLineToken> GetTokenAsync(string url)
{
    try
    {
        return await _httpClient.GetFromJsonAsync<DirectLineToken>(url);
    }
    catch (HttpRequestException ex)
    {
        throw ex;
    }
}
/// <summary>
/// class for serialization/deserialization DirectLineToken
/// </summary>
public class DirectLineToken
{
  public string Token { get; set; }
  public int Expires_in { get; set; }
  public string ConversationId { get; set; }
}
The response object is the same as the GET request we saw earlier.
{
  "token": "RCurR_XV9ZA.cwA.BKA.iaJrC8xpy8qbOF5xnR2vtCX7CZj0LdjAPGfiCpg4Fv0y8qbOF5xPGfiCpg4Fv0y8qqbOF5x8qbOF5xn",
  "expires_in": 3600,
  "conversationId": "abc123"
}
Use Direct Line to communicate with the copilot
After retrieving the Direct Line token, you are ready to have a conversation with your Copilot Studio copilot with Direct Line. To start a conversation and send and receive messages, follow the instructions at Bot Framework Direct Line API.
The following example uses samples from the Connector sample code to start a conversation and send and receive messages from a Copilot Studio copilot.
Initialize a DirectLineClient instance with the Direct Line token and start a conversation:
   // Use the retrieved token to create a DirectLineClient instance
   using (var directLineClient = new DirectLineClient(token))
   {
       var conversation = await directLineClient.Conversations.StartConversationAsync();
       string conversationtId = conversation.ConversationId;
   }
Once started, each conversation can be identified and connected using the combination of
tokenandconversationtId. Send a user message to an existing conversation:// Use the retrieved token to create a DirectLineClient instance // Use the conversationId from above step // endConversationMessage is your predefined message indicating that user wants to quit the chat while (!string.Equals(inputMessage = /*Get_User_Input()*/, endConversationMessage, StringComparison.OrdinalIgnoreCase)) { using (var directLineClient = new DirectLineClient(token)) { // Send user message using directlineClient // Payload is a Microsoft.Bot.Connector.DirectLine.Activity await directLineClient.Conversations.PostActivityAsync(conversationtId, new Activity() { Type = ActivityTypes.Message, From = new ChannelAccount { Id = "userId", Name = "userName" }, Text = inputMessage, TextFormat = "plain", Locale = "en-Us", }); } }Retrieve the copilot's response using the same
tokenandconversationId. The retrieved Direct Line response activities contains both the user's and copilot's messages. You can filter response activities by your copilot's name to get only the copilot's response message.// Use the same token to create a directLineClient using (var directLineClient = new DirectLineClient(token)) { // To get the first response set string watermark = null // More information about watermark is available at // https://learn.microsoft.com/azure/bot-service/rest-api/bot-framework-rest-direct-line-1-1-receive-messages?view=azure-bot-service-4.0 // response from bot is of type Microsoft.Bot.Connector.DirectLine.ActivitySet ActivitySet response = await directLineClient.Conversations.GetActivitiesAsync(conversationtId, watermark); // update watermark from response watermark = response?.Watermark; // response contains set of Activity from both user and bot // To display bot response only, filter Activity.From.Name equals to your bot name List<Activity> botResponses = response?.Activities?.Where(x => x.Type == ActivityTypes.Message && string.Equals(x.From.Name, /*Bot_Name*/, StringComparison.Ordinal)).ToList(); // Display botResponses }
Refresh Direct Line token
You may need to add code to refresh the Direct Line token if your application has a lengthy conversation with the copilot. The token expires but can be refreshed before it expires; learn more at Direct Line Authentication.
The following example uses samples from the Connector sample code to refresh the token for an existing Copilot Studio conversation:
  // DirectLine provides a token refresh method
  // Requires the currentToken valid when refreshing
  string refreshToken = new DirectLineClient(currentToken).Tokens.RefreshToken().Token;
  // create a new directline client with refreshToken
  directLineClient = new DirectLineClient(refreshToken);
  // use new directLineClient to communicate to your bot
Parse conversation payload from the copilot
After starting a conversation with the copilot, the conversation JSON payload uses the standard Microsoft Bot Framework Direct Line activity. You can learn more at Bot Framework Direct Line API.
Handle handoff activity
If your application needs to hand off to a live agent provider, you need to handle the handoff activity. Handoff activity is sent when the "Transfer to agent" node is hit. You can learn more on the payload of the handoff activity.
Trigger a welcome message
If you want your copilot to send the Greeting system topic automatically when a user starts a conversation, you can send an activity with Type=event and Name=startConversation.
Povratne informacije
Stiže uskoro: Tijekom 2024. postupno ćemo ukinuti servis Problemi sa servisom GitHub kao mehanizam za povratne informacije za sadržaj i zamijeniti ga novim sustavom za povratne informacije. Dodatne informacije potražite u članku: https://aka.ms/ContentUserFeedback.
Pošaljite i pogledajte povratne informacije za