Account protection policy for endpoint security in Intune
Use Intune endpoint security policies for account protection to protect the identity and accounts of your users and manage the built-in group memberships on devices.
Find the endpoint security policies for Account protection under Manage in the Endpoint security node of the Microsoft Intune admin center.
Prerequisites for Account protection profiles
- To support the Account protection (preview) profile, devices must run Windows 10 or Windows 11.
- To support the Local user group membership (preview) profile, devices must run Windows 10 20H2 or later, or Windows 11.
Account protection profiles
Account protection profiles are in preview.
Windows 10/11 profiles:
Account protection (preview) – Settings for account protection policies help you protect user credentials.
The account protection policy is focused on settings for Windows Hello and Credential Guard, which is part of Windows identity and access management.
- Windows Hello for Business replaces passwords with strong two-factor authentication on PCs and mobile devices.
- Credential Guard helps protect credentials and secrets that you use with your devices.
To learn more, see Identity and access management in the Windows identity and access management documentation.
Local admin password solution (Windows LAPS) - Use this profile to configure Windows LAPS on devices. Windows LAPS allows for the management of a single local administrator account per device. Intune policy can specify which local admin account it applies to by use of the policy setting Administrator Account Name.
For more information in using Intune to manage Windows LAPS, see:
- Learn about Intune support for Windows LAPS.
- Manage LAPS policy
Local user group membership – Use this profile to add, remove, or replace members of the built-in local groups on Windows devices. For example, the Administrators local group has broad rights. You can use this policy to edit the Admin group's membership to lock it down to a set of exclusively defined members.
Use of this profile is detailed in the following section, Manage local groups on Windows devices.
Manage local groups on Windows devices
Use the Local user group membership profile to manage the users that are members of the built-in local groups on devices that run Windows 10 20H2 and later, and Windows 11 devices.
Tip
To learn more about support for managing administrator privileges using Microsoft Entra groups, see Manage administrator privileges using Microsoft Entra groups in the Microsoft Entra documentation.
Configure the profile
This profile manages the local group membership on devices through Policy CSP - LocalUsersAndGroups. The CSP documentation includes additional details on how configurations apply, and an FAQ about the use of the CSP.
When configuring this profile, on the Configuration settings page you can create multiple rules to manage which built-in local groups you want to change, the group action to take, and the method to select the users.
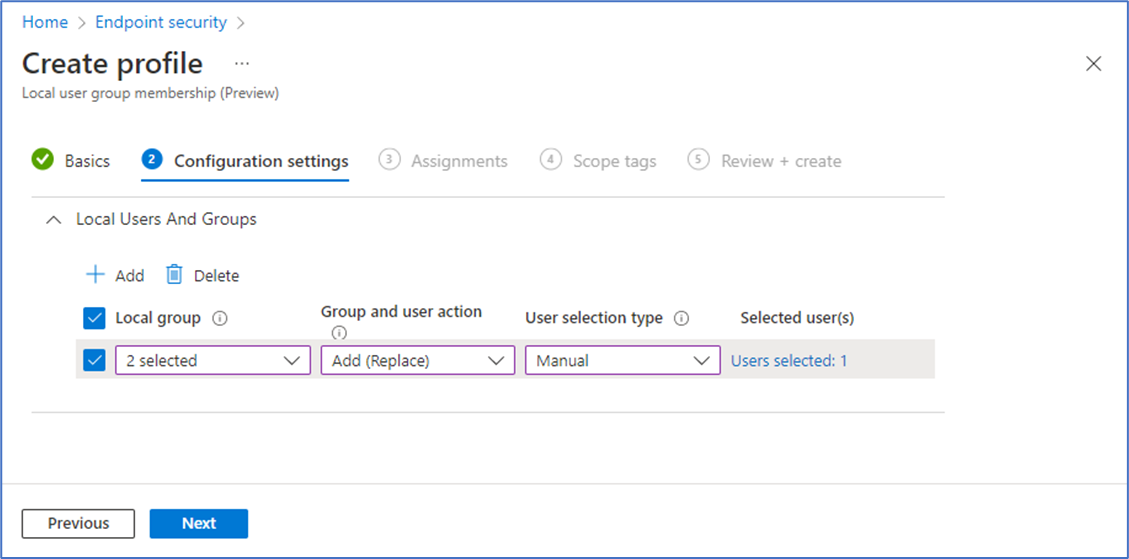
The following are the configurations you can make:
- Local group: Select one or more groups from the drop-down. These groups will all apply the same Group and user action to the users you assign. You can create more than one grouping of local groups in a single profile and assign different actions and groups of users to each grouping of local groups.
Note
The list of local groups is limited to the six built-in local groups which are guaranteed to be evaluated at logon, as referenced in the How to manage the local administrators group on Microsoft Entra joined devices documentation.
Group and user action: Configure the action to apply to the selected groups. This action will apply to the users you select for this same action and grouping of local accounts. Actions you can choose include:
- Add (Update): Adds members to the selected groups. The group membership for users that aren’t specified by the policy are not changed.
- Remove (Update): Remove members from the selected groups. The group membership for users that aren’t specified by the policy are not changed.
- Add (Replace): Replace the members of the selected groups with the new members you specify for this action. This option works in the same way as a Restricted Group and any group members that are not specified in the policy are removed.
Caution
If the same group is configured with both a Replace and Update action, the Replace action wins. This is not considered a conflict. Such a configuration can occur when you deploy multiple policies to the same device, or when this CSP is also configured by use of Microsoft Graph.
User selection type: Choose how to select users. Options include:
- Users: Select the users and user groups from Microsoft Entra ID. (Supported for Microsoft Entra joined devices only).
- Manual: Specify Microsoft Entra users and groups manually, by username, domain\username, or the groups security identifier (SID). (Supported for Microsoft Entra joined and Microsoft Entra hybrid joined devices).
Selected user(s): Depending on your selection for User selection type, you’ll use one of the following options:
Select user(s): Select the users and user groups from Microsoft Entra.
Add users(s): This opens the Add users pane where you can then specify one or more user identifiers as they appear on a device. You can specify the user by security identifier (SID), Domain\username, or by Username.
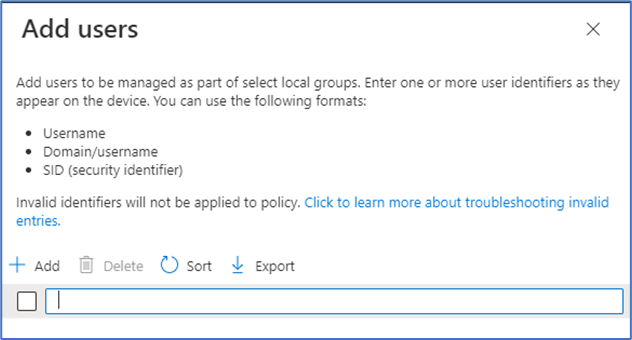
Choosing the Manual option can be helpful in scenarios where you want to manage your on-prem Active Directory users from Active Directory to a local group for a Microsoft Entra hybrid joined device. The supported formats of identifying the user selection in order of most to least preferred is through the SID, domain\username, or member’s username. Values from Active Directory must be used for hybrid joined devices, while values from Microsoft Entra ID must be used for Microsoft Entra join. Microsoft Entra group SIDs can be obtained using Graph API for Groups.
Conflicts
If policies create a conflict for a group membership, the conflicting settings from each policy are not sent to the device. Instead, the conflict is reported for those policies in the Microsoft Intune admin center. To resolve the conflict, reconfigure one or more policies.
Reporting
As devices check in and apply the policy, the admin center displays the status of the devices and users as successful or in error.
Because the policy can contain multiple rules, consider the following:
- When processing the policy for devices, the per-setting status view displays a status for the group of rules as if it’s a single setting.
- Each rule in the policy that results in an error is skipped, and not sent to devices.
- Each rule that is successful is sent to devices to be applied.
Next steps
Povratne informacije
Stiže uskoro: Tijekom 2024. postupno ćemo ukinuti servis Problemi sa servisom GitHub kao mehanizam za povratne informacije za sadržaj i zamijeniti ga novim sustavom za povratne informacije. Dodatne informacije potražite u članku: https://aka.ms/ContentUserFeedback.
Pošaljite i pogledajte povratne informacije za