Rövid útmutató: Csatlakozás szobahíváshoz
Előfeltételek
- Egy Azure-fiók, aktív előfizetéssel. Fiók ingyenes létrehozása.
- Aktív Communication Services-erőforrás és kapcsolati sztring. Hozzon létre egy Communication Services-erőforrást.
- Két vagy több kommunikációs felhasználói identitás. Hozzáférési jogkivonatok vagy gyorslétrehozású identitások létrehozása és kezelése teszteléshez.
- Egy létrehozott helyiség és résztvevő hozzáadva hozzá. Szobák létrehozása és kezelése
Felhasználói hozzáférési jogkivonat beszerzése
Ha már létrehozott felhasználókat, és felvette őket résztvevőkként a helyiségbe a lap "Helyiség résztvevőinek beállítása" szakasza után, akkor közvetlenül használhatja őket a helyiséghez való csatlakozáshoz.
Ellenkező esetben minden hívás résztvevője számára létre kell hoznia egy felhasználói hozzáférési jogkivonatot. Megtudhatja, hogyan hozhat létre és kezelhet felhasználói hozzáférési jogkivonatokat. Az Azure CLI használatával az alábbi parancsot is futtathatja a kapcsolati sztring egy felhasználó és egy hozzáférési jogkivonat létrehozásához. A felhasználók létrehozása után résztvevőkként fel kell vennie őket a helyiségbe, mielőtt beléphetnek a szobába.
az communication identity token issue --scope voip --connection-string "yourConnectionString"
További részletekért lásd: Hozzáférési jogkivonatok létrehozása és kezelése az Azure CLI használatával.
Feljegyzés
A szobák az Azure Communication Services felhasználói felületi kódtárával érhetők el. A felhasználói felületi kódtár lehetővé teszi a fejlesztők számára, hogy olyan hívásügyfélt adjanak hozzá az alkalmazásukhoz, amely csak néhány sornyi kóddal rendelkezik.
Csatlakozás szobahíváshoz
Ha követni szeretné ezt a rövid útmutatót, letöltheti a Szobahívás gyorsútmutatót a GitHubon.
Előfeltételek
- 18-Node.js kell. A telepítéshez használhatja az msi telepítőt.
Beállítás
Új Node.js-alkalmazás létrehozása
Nyissa meg a terminált vagy a parancsablakot, és hozzon létre egy új könyvtárat az alkalmazáshoz, és navigáljon hozzá.
mkdir calling-rooms-quickstart && cd calling-rooms-quickstart
Futtassa npm init -y az alapértelmezett beállításokkal rendelkező package.json fájl létrehozásához.
npm init -y
Telepítse a(z) csomagot
npm install A parancs használatával telepítse az Azure Communication Services Calling SDK for JavaScriptet.
Fontos
Ez a rövid útmutató az Azure Communication Services Calling SDK-verzióját 1.14.1használja. Az 1.13.1-es és újabb verziójú böngészőkhöz készült JavaScript SDK-ban lehetőség van a szobahívásokhoz való csatlakozásra és a hívás résztvevőinek szerepköreinek megjelenítésére.
npm install @azure/communication-common --save
npm install @azure/communication-calling@1.14.1 --save
Az alkalmazás-keretrendszer beállítása
Ez a rövid útmutató a Webpack használatával kötegeli az alkalmazásegységeket. Futtassa a következő parancsot az webpacknpm-csomagok webpack-cli telepítéséhez, webpack-dev-server és sorolja fel őket fejlesztési függőségekként a következőben package.json:
npm install copy-webpack-plugin@^11.0.0 webpack@^5.88.2 webpack-cli@^5.1.4 webpack-dev-server@^4.15.1 --save-dev
A kód a következő:
Hozzon létre egy index.html fájlt a projekt gyökérkönyvtárában. Ezzel a fájllal olyan alapszintű elrendezést konfigurálunk, amely lehetővé teszi a felhasználó számára, hogy csatlakozzon egy szobahíváshoz.
<!-- index.html-->
<!DOCTYPE html>
<html>
    <head>
        <title>Azure Communication Services - Rooms Call Sample</title>
        <link rel="stylesheet" type="text/css" href="styles.css"/>
    </head>
    <body>
        <h4>Azure Communication Services - Rooms Call Sample</h4>
        <input id="user-access-token"
            type="text"
            placeholder="User access token"
            style="margin-bottom:1em; width: 500px;"/>
        <button id="initialize-call-agent" type="button">Initialize Call Agent</button>
        <br>
        <br>
        <input id="acs-room-id"
            type="text"
            placeholder="Enter Room Id"
            style="margin-bottom:1em; width: 500px; display: block;"/>
        <button id="join-room-call-button" type="button" disabled="true">Join Room Call</button>
        <button id="hangup-call-button" type="button" disabled="true">Hang up Call</button>
        <button id="start-video-button" type="button" disabled="true">Start Video</button>
        <button id="stop-video-button" type="button" disabled="true">Stop Video</button>
        <br>
        <br>
        <div id="connectedLabel" style="color: #13bb13;" hidden>Room Call is connected!</div>
        <br>
        <div id="remoteVideosGallery" style="width: 40%;" hidden>Remote participants' video streams:</div>
        <br>
        <div id="localVideoContainer" style="width: 30%;" hidden>Local video stream:</div>
        <!-- points to the bundle generated from client.js -->
        <script src="./main.js"></script>
    </body>
</html>
Hozzon létre egy fájlt a projekt index.js gyökérkönyvtárában, amely a rövid útmutató alkalmazáslogikát tartalmazza. Adja hozzá a következő kódot a index.js:
// Make sure to install the necessary dependencies
const { CallClient, VideoStreamRenderer, LocalVideoStream } = require('@azure/communication-calling');
const { AzureCommunicationTokenCredential } = require('@azure/communication-common');
const { AzureLogger, setLogLevel } = require("@azure/logger");
// Set the log level and output
setLogLevel('verbose');
AzureLogger.log = (...args) => {
    console.log(...args);
};

// Calling web sdk objects
let callAgent;
let deviceManager;
let call;
let localVideoStream;
let localVideoStreamRenderer;

// UI widgets
let userAccessToken = document.getElementById('user-access-token');
let acsRoomId = document.getElementById('acs-room-id');
let initializeCallAgentButton = document.getElementById('initialize-call-agent');
let startCallButton = document.getElementById('join-room-call-button');
let hangUpCallButton = document.getElementById('hangup-call-button');
let startVideoButton = document.getElementById('start-video-button');
let stopVideoButton = document.getElementById('stop-video-button');
let connectedLabel = document.getElementById('connectedLabel');
let remoteVideosGallery = document.getElementById('remoteVideosGallery');
let localVideoContainer = document.getElementById('localVideoContainer');

/**
 * Using the CallClient, initialize a CallAgent instance with a CommunicationUserCredential which enable us to join a rooms call.
 */
initializeCallAgentButton.onclick = async () => {
    try {
        const callClient = new CallClient();
        tokenCredential = new AzureCommunicationTokenCredential(userAccessToken.value.trim());
        callAgent = await callClient.createCallAgent(tokenCredential)
        // Set up a camera device to use.
        deviceManager = await callClient.getDeviceManager();
        await deviceManager.askDevicePermission({ video: true });
        await deviceManager.askDevicePermission({ audio: true });

        startCallButton.disabled = false;
        initializeCallAgentButton.disabled = true;
    } catch(error) {
        console.error(error);
    }
}


startCallButton.onclick = async () => {
    try {
        const localVideoStream = await createLocalVideoStream();
        const videoOptions = localVideoStream ? { localVideoStreams: [localVideoStream] } : undefined;

        const roomCallLocator = { roomId: acsRoomId.value.trim() };
        call = callAgent.join(roomCallLocator, { videoOptions });

        // Subscribe to the call's properties and events.
        subscribeToCall(call);
    } catch (error) {
        console.error(error);
    }
}

/**
 * Subscribe to a call obj.
 * Listen for property changes and collection updates.
 */
subscribeToCall = (call) => {
    try {
        // Inspect the initial call.id value.
        console.log(`Call Id: ${call.id}`);
        //Subscribe to call's 'idChanged' event for value changes.
        call.on('idChanged', () => {
            console.log(`Call Id changed: ${call.id}`);
        });

        // Inspect the initial call.state value.
        console.log(`Call state: ${call.state}`);
        // Subscribe to call's 'stateChanged' event for value changes.
        call.on('stateChanged', async () => {
            console.log(`Call state changed: ${call.state}`);
            if(call.state === 'Connected') {
                connectedLabel.hidden = false;
                startCallButton.disabled = true;
                hangUpCallButton.disabled = false;
                startVideoButton.disabled = false;
                stopVideoButton.disabled = false;
                remoteVideosGallery.hidden = false;
            } else if (call.state === 'Disconnected') {
                connectedLabel.hidden = true;
                startCallButton.disabled = false;
                hangUpCallButton.disabled = true;
                startVideoButton.disabled = true;
                stopVideoButton.disabled = true;
                remoteVideosGallery.hidden = true;
                console.log(`Call ended, call end reason={code=${call.callEndReason.code}, subCode=${call.callEndReason.subCode}}`);
            }
        });
        call.on('isLocalVideoStartedChanged', () => {
            console.log(`isLocalVideoStarted changed: ${call.isLocalVideoStarted}`);
        });
        console.log(`isLocalVideoStarted: ${call.isLocalVideoStarted}`);
        call.localVideoStreams.forEach(async (lvs) => {
            localVideoStream = lvs;
            await displayLocalVideoStream();
        });
        call.on('localVideoStreamsUpdated', e => {
            e.added.forEach(async (lvs) => {
                localVideoStream = lvs;
                await displayLocalVideoStream();
            });
            e.removed.forEach(lvs => {
               removeLocalVideoStream();
            });
        });

        // Inspect the call's current remote participants and subscribe to them.
        call.remoteParticipants.forEach(remoteParticipant => {
            subscribeToRemoteParticipant(remoteParticipant);
        });
        // Subscribe to the call's 'remoteParticipantsUpdated' event to be
        // notified when new participants are added to the call or removed from the call.
        call.on('remoteParticipantsUpdated', e => {
            // Subscribe to new remote participants that are added to the call.
            e.added.forEach(remoteParticipant => {
                subscribeToRemoteParticipant(remoteParticipant)
            });
            // Unsubscribe from participants that are removed from the call
            e.removed.forEach(remoteParticipant => {
                console.log('Remote participant removed from the call.');
            });
        });
    } catch (error) {
        console.error(error);
    }
}

/**
 * Subscribe to a remote participant obj.
 * Listen for property changes and collection udpates.
 */
subscribeToRemoteParticipant = (remoteParticipant) => {
    try {
        // Inspect the initial remoteParticipant.state value.
        console.log(`Remote participant state: ${remoteParticipant.state}`);
        // Subscribe to remoteParticipant's 'stateChanged' event for value changes.
        remoteParticipant.on('stateChanged', () => {
            console.log(`Remote participant state changed: ${remoteParticipant.state}`);
        });

        // Inspect the remoteParticipants's current videoStreams and subscribe to them.
        remoteParticipant.videoStreams.forEach(remoteVideoStream => {
            subscribeToRemoteVideoStream(remoteVideoStream)
        });
        // Subscribe to the remoteParticipant's 'videoStreamsUpdated' event to be
        // notified when the remoteParticiapant adds new videoStreams and removes video streams.
        remoteParticipant.on('videoStreamsUpdated', e => {
            // Subscribe to new remote participant's video streams that were added.
            e.added.forEach(remoteVideoStream => {
                subscribeToRemoteVideoStream(remoteVideoStream)
            });
            // Unsubscribe from remote participant's video streams that were removed.
            e.removed.forEach(remoteVideoStream => {
                console.log('Remote participant video stream was removed.');
            })
        });
    } catch (error) {
        console.error(error);
    }
}

/**
 * Subscribe to a remote participant's remote video stream obj.
 * You have to subscribe to the 'isAvailableChanged' event to render the remoteVideoStream. If the 'isAvailable' property
 * changes to 'true', a remote participant is sending a stream. Whenever availability of a remote stream changes
 * you can choose to destroy the whole 'Renderer', a specific 'RendererView' or keep them, but this will result in displaying blank video frame.
 */
subscribeToRemoteVideoStream = async (remoteVideoStream) => {
    let renderer = new VideoStreamRenderer(remoteVideoStream);
    let view;
    let remoteVideoContainer = document.createElement('div');
    remoteVideoContainer.className = 'remote-video-container';

    const createView = async () => {
        // Create a renderer view for the remote video stream.
        view = await renderer.createView();
        // Attach the renderer view to the UI.
        remoteVideoContainer.appendChild(view.target);
        remoteVideosGallery.appendChild(remoteVideoContainer);
    }

    // Remote participant has switched video on/off
    remoteVideoStream.on('isAvailableChanged', async () => {
        try {
            if (remoteVideoStream.isAvailable) {
                await createView();
            } else {
                view.dispose();
                remoteVideosGallery.removeChild(remoteVideoContainer);
            }
        } catch (e) {
            console.error(e);
        }
    });

    // Remote participant has video on initially.
    if (remoteVideoStream.isAvailable) {
        try {
            await createView();
        } catch (e) {
            console.error(e);
        }
    }
}

/**
 * Start your local video stream.
 * This will send your local video stream to remote participants so they can view it.
 */
startVideoButton.onclick = async () => {
    try {
        const localVideoStream = await createLocalVideoStream();
        await call.startVideo(localVideoStream);
    } catch (error) {
        console.error(error);
    }
}

/**
 * Stop your local video stream.
 * This will stop your local video stream from being sent to remote participants.
 */
stopVideoButton.onclick = async () => {
    try {
        await call.stopVideo(localVideoStream);
    } catch (error) {
        console.error(error);
    }
}

/**
 * To render a LocalVideoStream, you need to create a new instance of VideoStreamRenderer, and then
 * create a new VideoStreamRendererView instance using the asynchronous createView() method.
 * You may then attach view.target to any UI element.
 */
createLocalVideoStream = async () => {
    const camera = (await deviceManager.getCameras())[0];
    if (camera) {
        return new LocalVideoStream(camera);
    } else {
        console.error(`No camera device found on the system`);
    }
}

/**
 * Display your local video stream preview in your UI
 */
displayLocalVideoStream = async () => {
    try {
        localVideoStreamRenderer = new VideoStreamRenderer(localVideoStream);
        const view = await localVideoStreamRenderer.createView();
        localVideoContainer.hidden = false;
        localVideoContainer.appendChild(view.target);
    } catch (error) {
        console.error(error);
    }
}

/**
 * Remove your local video stream preview from your UI
 */
removeLocalVideoStream = async() => {
    try {
        localVideoStreamRenderer.dispose();
        localVideoContainer.hidden = true;
    } catch (error) {
        console.error(error);
    }
}

/**
 * End current room call
 */
hangUpCallButton.addEventListener("click", async () => {
    await call.hangUp();
});
A webpack helyi kiszolgálókódjának hozzáadása
Hozzon létre egy fájlt a projekt gyökérkönyvtárában webpack.config.js , amely tartalmazza a helyi kiszolgáló logikáját ebben a rövid útmutatóban. Adja hozzá a következő kódot a webpack.config.js:
const path = require('path');
const CopyPlugin = require("copy-webpack-plugin");

module.exports = {
    mode: 'development',
    entry: './index.js',
    output: {
        filename: 'main.js',
        path: path.resolve(__dirname, 'dist'),
    },
    devServer: {
        static: {
            directory: path.join(__dirname, './')
        },
    },
    plugins: [
        new CopyPlugin({
            patterns: [
                './index.html'
            ]
        }),
    ]
};
A kód futtatása
Használja az webpack-dev-server alkalmazást az alkalmazás létrehozásához és futtatásához. Futtassa a következő parancsot az alkalmazás gazdagépének helyi webkiszolgálón való kötegeléséhez:
`npx webpack serve --config webpack.config.js`
- Nyissa meg a böngészőt, és keresse meg a következőt: http://localhost:8080/.
- Az első beviteli mezőben adjon meg egy érvényes felhasználói hozzáférési jogkivonatot.
- Kattintson a "Hívásügynök inicializálása" elemre, és adja meg a szobaazonosítót.
- Kattintson a "Csatlakozás szobahíváshoz" elemre
Sikeresen csatlakozott egy szobahíváshoz!
A Szobahíváshoz való csatlakozás ismertetése
A QuickStart alkalmazásban hozzáadott összes kód lehetővé tette, hogy sikeresen elindítson és csatlakozzon egy szobahíváshoz. Az alábbiakban további információt talál arról, hogy milyen további módszereket/kezelőket érhet el a Szobákhoz az alkalmazás funkcióinak kibővítéséhez.
A helyi vagy távoli hívás résztvevőinek szerepének megjelenítéséhez iratkozzon fel az alábbi kezelőre.
// Subscribe to changes for your role in a call
 const callRoleChangedHandler = () => {
 	console.log(call.role);
 };

 call.on('roleChanged', callRoleChangedHandler);

// Subscribe to role changes for remote participants
 const subscribeToRemoteParticipant = (remoteParticipant) => {
 	remoteParticipant.on('roleChanged', () => {
 	    console.log(remoteParticipant.role);
 	});
 }
A szobahívás résztvevőinek szerepköreiről a helyiségkoncepció dokumentációjában olvashat bővebben.
Csatlakozás szobahíváshoz
Ha követni szeretné ezt a rövid útmutatót, letöltheti a Szobahívás gyorsútmutatót a GitHubon.
Beállítás
Az Xcode-projekt létrehozása
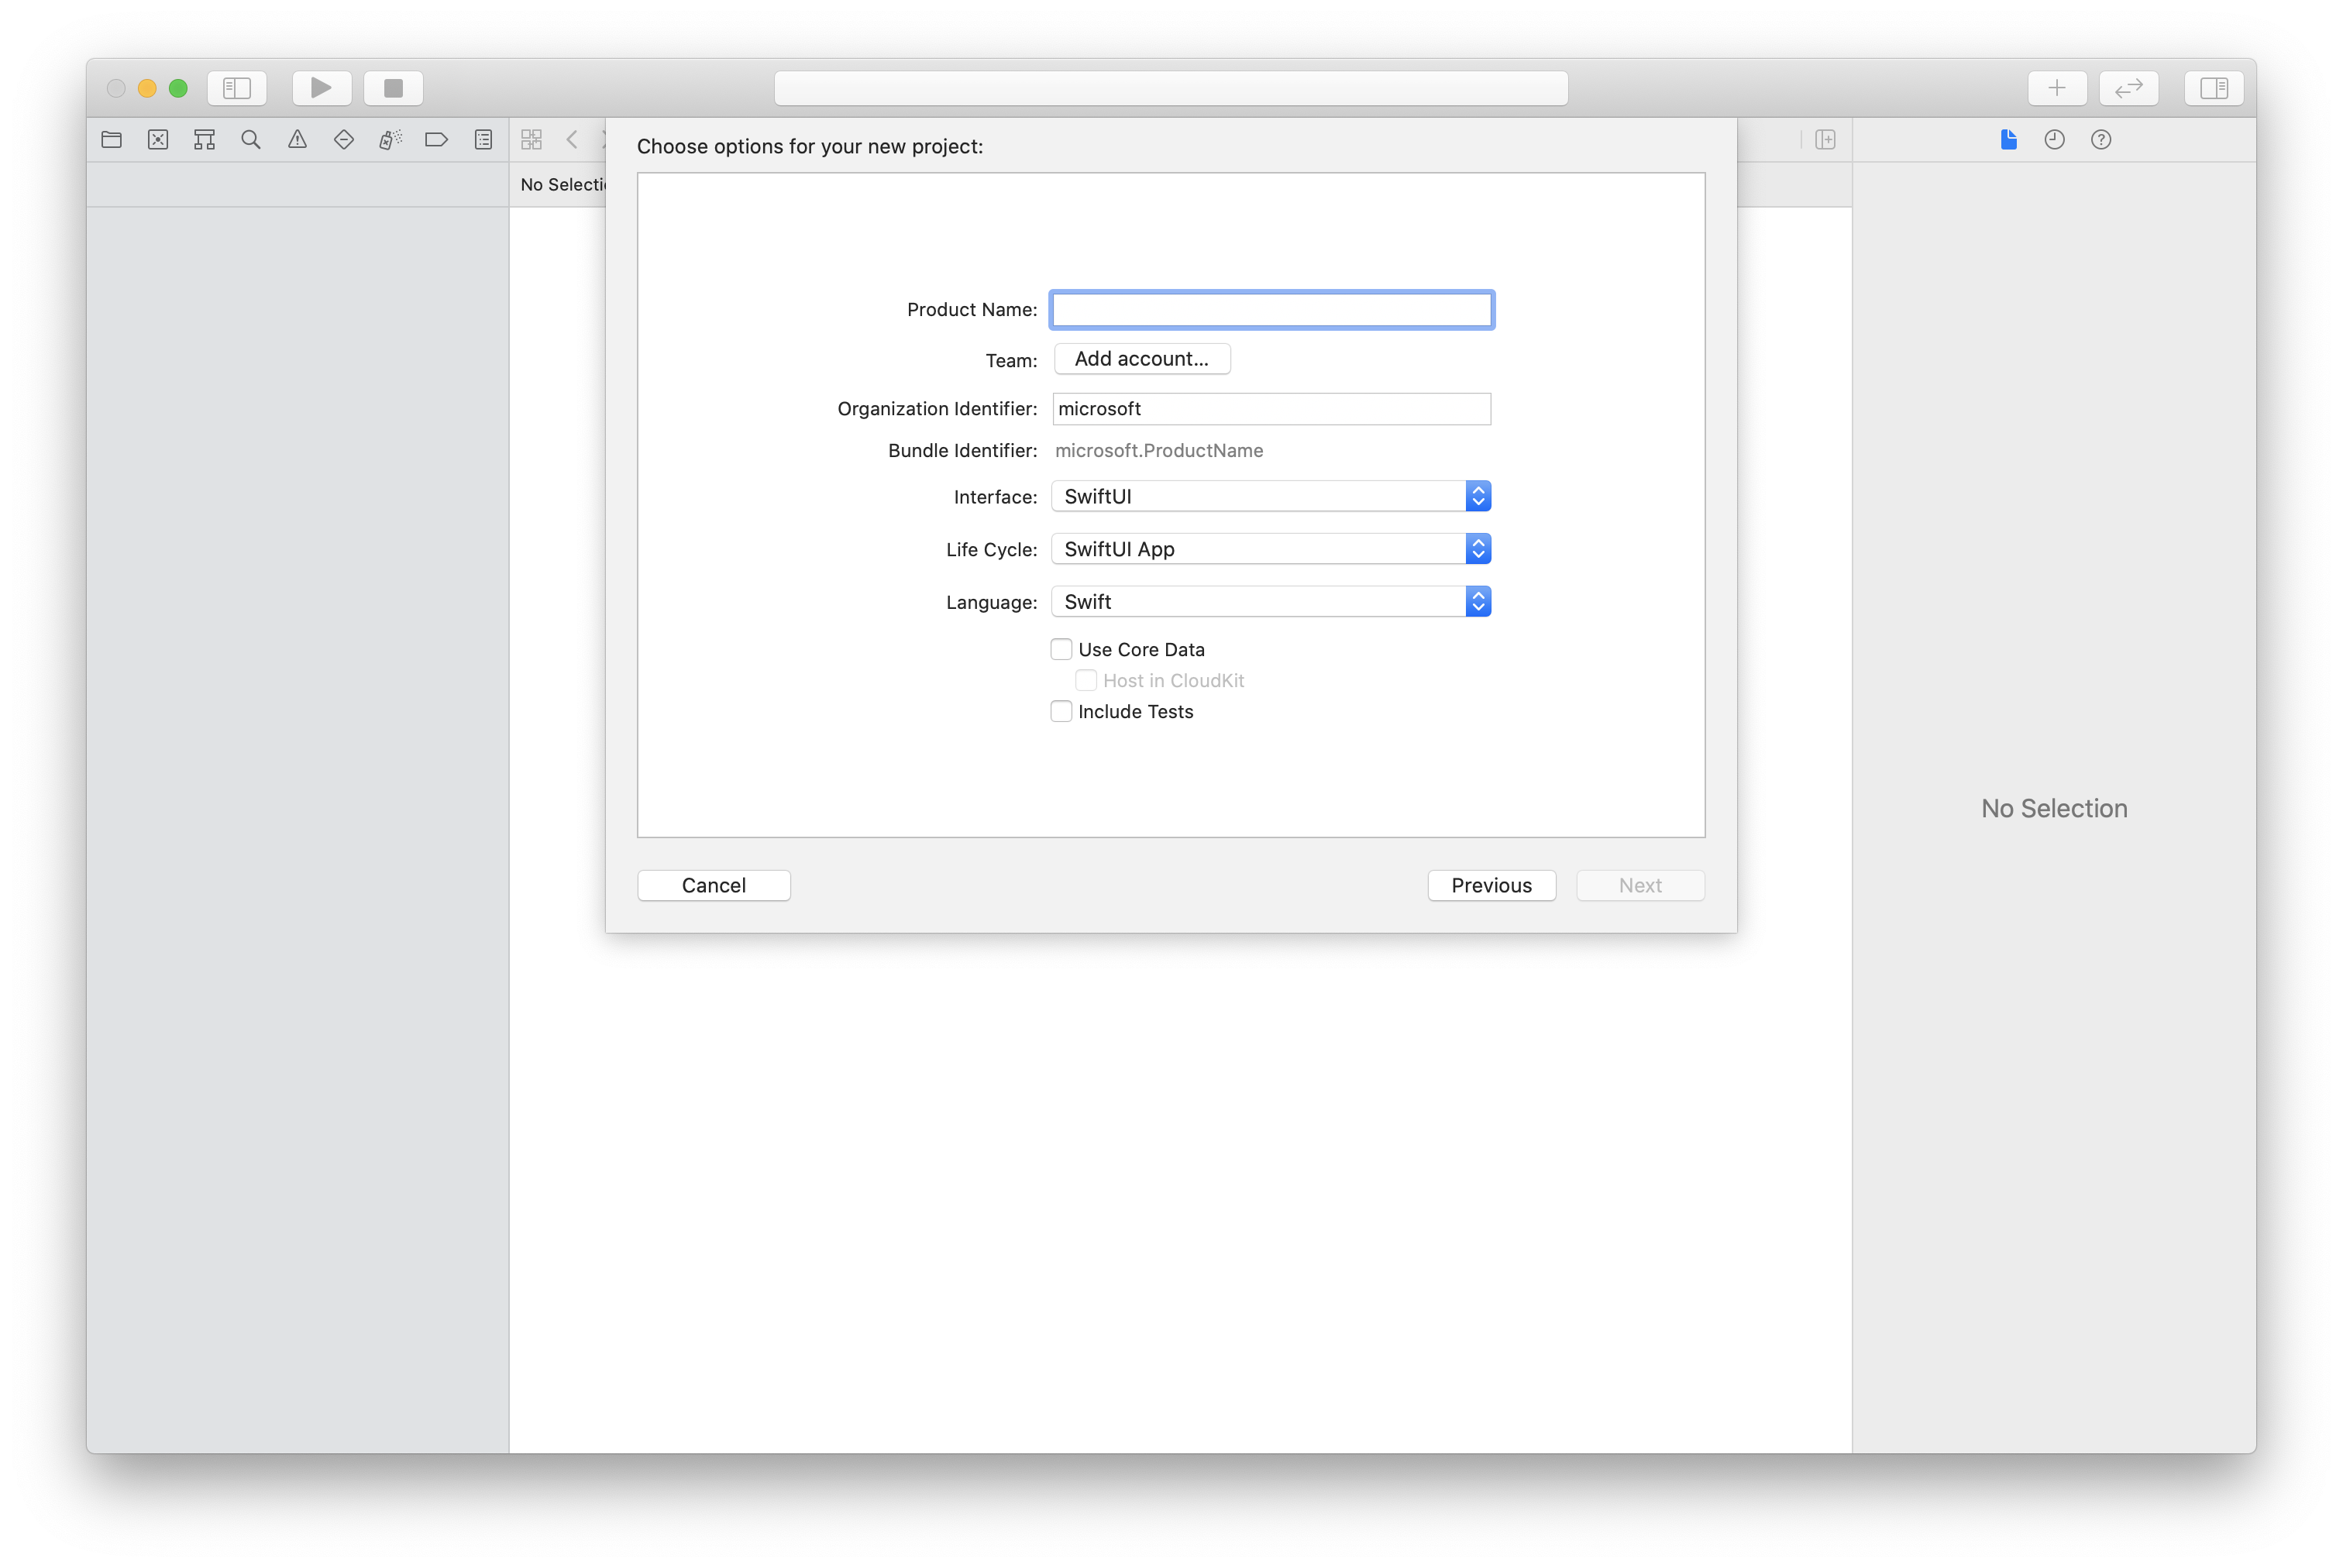
Az Xcode-ban hozzon létre egy új iOS-projektet, és válassza ki az egynézetes alkalmazássablont. Ez az oktatóanyag a SwiftUI keretrendszert használja, ezért a nyelvet Swiftre, a felhasználói felületet pedig SwiftUI-ra kell állítani.
A CocoaPods telepítése
Ebben az útmutatóban a CocoaPodsot telepítheti Mac gépére.
A csomag és a függőségek telepítése a CocoaPods használatával
Podfile létrehozásához nyissa meg a terminált, és keresse meg a projektmappát, és futtassa a pod init parancsot.
Adja hozzá a következő kódot a Podfile-hoz, és mentse:
platform :ios, '13.0'
use_frameworks!

target 'roomsquickstart' do
  pod 'AzureCommunicationCalling', '~> 2.5.0'
end
Futtassa a pod telepítését.
Nyissa meg a
.xcworkspacefájlt Xcode-tal.
Hozzáférés kérése a mikrofonhoz és a kamerához
Az eszköz mikrofonjának és kamerájának eléréséhez frissítenie kell az alkalmazás információs tulajdonságlistáját a következővel NSMicrophoneUsageDescription : és NSCameraUsageDescription. Állítsa a társított értéket egy sztringre, amely szerepelni fog abban a párbeszédpanelben, amellyel a rendszer hozzáférést kér a felhasználótól.
Kattintson a jobb gombbal a Info.plist projektfa bejegyzésére, és válassza a Megnyitás forráskódként > lehetőséget. Adja hozzá a következő sorokat a legfelső szintű <dict> szakaszhoz, majd mentse a fájlt.
<key>NSMicrophoneUsageDescription</key>
<string>Need microphone access for VOIP calling.</string>
<key>NSCameraUsageDescription</key>
<string>Need camera access for video calling</string>
Az alkalmazás-keretrendszer beállítása
Nyissa meg a projekt fájljátContentView.swift, és adjon hozzá egy importálási deklarációt a fájl tetejére a tár és AVFoundationa AzureCommunicationCalling . Az AVFoundation a kódból származó hangengedélyek rögzítésére szolgál.
import AzureCommunicationCalling
import AVFoundation
Objektummodell
Az alábbi osztályok és felületek az iOS-hez készült Azure Communication Services Calling SDK néhány fő funkcióját kezelik.
| Név | Leírás |
|---|---|
| CallClient | A CallClient a hívó SDK fő belépési pontja. |
| CallAgent | A CallAgent a hívások indítására és kezelésére szolgál. |
| CommunicationTokenCredential | A CommunicationTokenCredential a CallAgent példányosítására szolgáló token hitelesítőadat. |
| CommunicationIdentifier | A CommunicationIdentifier a felhasználó identitásának ábrázolására szolgál, és a következő értékek egyikével rendelkezhet: CommunicationUserIdentifier/Telefon NumberIdentifier/CallingApplication. |
| RoomCallLocator | A RoomCallLocatort a CallAgent használja egy szobahíváshoz való csatlakozáshoz |
A hívásügynök létrehozása
Cserélje le a ContentView-struktúra implementálását néhány egyszerű felhasználói felületi vezérlőre, amelyek lehetővé teszik a felhasználók számára a hívás kezdeményezését és befejezését. Ebben a rövid útmutatóban üzleti logikát csatolunk ezekhez a vezérlőkhöz.
struct ContentView: View {
    @State var roomId: String = ""
    @State var callObserver:CallObserver?
    @State var previewRenderer: VideoStreamRenderer? = nil
    @State var previewView: RendererView? = nil
    @State var sendingLocalVideo: Bool = false
    @State var speakerEnabled: Bool = false
    @State var muted: Bool = false
    @State var callClient: CallClient?
    @State var call: Call?
    @State var callHandler: CallHandler?
    @State var callAgent: CallAgent?
    @State var deviceManager: DeviceManager?
    @State var localVideoStreams: [LocalVideoStream]?
    @State var callState: String = "Unknown"
    @State var showAlert: Bool = false
    @State var alertMessage: String = ""
    @State var participants: [[Participant]] = [[]]

    var body: some View {
        NavigationView {
            ZStack {
                if (call == nil) {
                    Form {
                        Section {
                            TextField("Room ID", text: $roomId)
                            Button(action: joinRoomCall) {
                                Text("Join Room Call")
                            }
                        }
                    }
                    .navigationBarTitle("Rooms Quickstart")
                } else {
                    ZStack {
                        VStack {
                            ForEach(participants, id:\.self) { array in
                                HStack {
                                    ForEach(array, id:\.self) { participant in
                                        ParticipantView(self, participant)
                                    }
                                }
                                .frame(maxWidth: .infinity, maxHeight: 200, alignment: .topLeading)
                            }
                        }
                        .background(Color.black)
                        .frame(maxWidth: .infinity, maxHeight: .infinity, alignment: .topLeading)
                        VStack {
                            if (sendingLocalVideo) {
                                HStack {
                                    RenderInboundVideoView(view: $previewView)
                                        .frame(width:90, height:160)
                                        .padding(10)
                                        .background(Color.green)
                                }
                                .frame(maxWidth: .infinity, alignment: .trailing)
                            }
                            HStack {
                                Button(action: toggleMute) {
                                    HStack {
                                        Text(muted ? "Unmute" : "Mute")
                                    }
                                    .frame(width:80)
                                    .padding(.vertical, 10)
                                    .background(Color(.lightGray))
                                }
                                Button(action: toggleLocalVideo) {
                                    HStack {
                                        Text(sendingLocalVideo ? "Video-Off" : "Video-On")
                                    }
                                    .frame(width:80)
                                    .padding(.vertical, 10)
                                    .background(Color(.lightGray))
                                }
                            }
                            .frame(maxWidth: .infinity, alignment: .leading)
                            .padding(.horizontal, 10)
                            .padding(.vertical, 5)
                            HStack {
                                Button(action: leaveRoomCall) {
                                    HStack {
                                        Text("Leave Room Call")
                                    }
                                    .frame(width:80)
                                    .padding(.vertical, 10)
                                    .background(Color(.red))
                                }
                            }
                            .frame(maxWidth: .infinity, alignment: .leading)
                            .padding(.horizontal, 10)
                            .padding(.vertical, 5)
                            HStack {
                                Text("Status:")
                                Text(callState)
                            }
                            .padding(.vertical, 10)
                        }
                        .frame(maxWidth: .infinity, maxHeight: .infinity, alignment: .bottomLeading)
                    }
                }
            }
        }
        .onAppear{
            // Authenticate the client
            // Initialize the CallAgent and access Device Manager
            // Ask for permissions
        }
    }
}

//Functions and Observers

struct HomePageView_Previews: PreviewProvider {
    static var previews: some View {
        HomePageView()
    }
}
Az ügyfél hitelesítése
Egy CallAgent-példány inicializálásához szükségünk van egy felhasználói hozzáférési jogkivonatra, amely lehetővé teszi számunkra a szobahívásokhoz való csatlakozást.
Miután rendelkezik egy jogkivonattal, adja hozzá a következő kódot a visszahíváshoz a onAppear következőben ContentView.swift: . Az erőforráshoz érvényes felhasználói hozzáférési jogkivonatot kell lecserélnie <USER ACCESS TOKEN> :
var userCredential: CommunicationTokenCredential?
do {
    userCredential = try CommunicationTokenCredential(token: "<USER ACCESS TOKEN>")
} catch {
    print("ERROR: It was not possible to create user credential.")
    return
}
A CallAgent inicializálása és a Eszközkezelő elérése
CallAgent-példány CallClientből való létrehozásához használja azt a callClient.createCallAgent metódust, amely az inicializálás után aszinkron módon ad vissza egy CallAgent objektumot. A DeviceManager lehetővé teszi a hang- és videostreamek továbbítására használható helyi eszközök számbavételét. Azt is lehetővé teszi, hogy engedélyt kérjen a felhasználótól a mikrofon/kamera eléréséhez.
self.callClient = CallClient()
self.callClient?.createCallAgent(userCredential: userCredential!) { (agent, error) in
    if error != nil {
        print("ERROR: It was not possible to create a call agent.")
        return
    } else {
        self.callAgent = agent
        print("Call agent successfully created.")
        self.callAgent!.delegate = callHandler
        self.callClient?.getDeviceManager { (deviceManager, error) in
            if (error == nil) {
                print("Got device manager instance")
                self.deviceManager = deviceManager
            } else {
                print("Failed to get device manager instance")
            }
        }
    }
}
Engedélyek kérése
A visszahíváshoz hozzá kell adnunk a következő kódot a onAppear hang- és videóengedélyek kéréséhez.
AVAudioSession.sharedInstance().requestRecordPermission { (granted) in
    if granted {
        AVCaptureDevice.requestAccess(for: .video) { (videoGranted) in
            /* NO OPERATION */
        }
    }
}
Csatlakozás szobahíváshoz
A joinRoomCall metódus az a művelet lesz beállítva, amelyet a Beléptetési szoba hívása gomb leképezésekor hajt végre. Ebben a rövid útmutatóban a hívások csak alapértelmezés szerint hangalapúak, de a szoba csatlakoztatása után engedélyezve lehetnek a videók.
func joinRoomCall() {
    if self.callAgent == nil {
        print("CallAgent not initialized")
        return
    }

    if (self.roomId.isEmpty) {
        print("Room ID not set")
        return
    }

    // Join a call with a Room ID
    let options = JoinCallOptions()
    let audioOptions = AudioOptions()
    audioOptions.muted = self.muted

    options.audioOptions = audioOptions

    let roomCallLocator = RoomCallLocator(roomId: roomId)
    self.callAgent!.join(with: roomCallLocator, joinCallOptions: options) { (call, error) in
        self.setCallAndObserver(call: call, error: error)
    }
}
CallObserver a hívásközi események és a távoli résztvevők kezelésére szolgál. Be fogjuk állítani a megfigyelőket a setCallAndOberserver függvénybe.
func setCallAndObserver(call:Call!, error:Error?) {
    if (error == nil) {
        self.call = call
        self.callObserver = CallObserver(view:self)

        self.call!.delegate = self.callObserver

        if (self.call!.state == CallState.connected) {
            self.callObserver!.handleInitialCallState(call: call)
        }
    } else {
        print("Failed to get call object")
    }
}
Szobahívás elhagyása
A leaveRoomCall metódus a Szoba elhagyása gomb leképezésekor végrehajtandó műveletként van beállítva. Kezeli a hívás elhagyását, és megtisztítja a létrehozott erőforrásokat.
private func leaveRoomCall() {
    if (self.sendingLocalVideo) {
        self.call!.stopVideo(stream: self.localVideoStreams!.first!) { (error) in
            if (error != nil) {
                print("Failed to stop video")
            } else {
                self.sendingLocalVideo = false
                self.previewView = nil
                self.previewRenderer?.dispose()
                self.previewRenderer = nil
            }
        }
    }
    self.call?.hangUp(options: nil) { (error) in }
    self.participants.removeAll()
    self.call?.delegate = nil
    self.call = nil
}
Videó közvetítése
A szobahívások során használhatjuk startVideo , illetve stopVideo elindíthatjuk vagy leállíthatjuk a távoli résztvevőknek való küldést LocalVideoStream .
func toggleLocalVideo() {
    if (self.sendingLocalVideo) {
        self.call!.stopVideo(stream: self.localVideoStreams!.first!) { (error) in
            if (error != nil) {
                print("Cannot stop video")
            } else {
                self.sendingLocalVideo = false
                self.previewView = nil
                self.previewRenderer!.dispose()
                self.previewRenderer = nil
            }
        }
    } else {
        let availableCameras = self.deviceManager!.cameras
        let scalingMode:ScalingMode = .crop
        if (self.localVideoStreams == nil) {
            self.localVideoStreams = [LocalVideoStream]()
        }
        self.localVideoStreams!.append(LocalVideoStream(camera: availableCameras.first!))
        self.previewRenderer = try! VideoStreamRenderer(localVideoStream: self.localVideoStreams!.first!)
        self.previewView = try! previewRenderer!.createView(withOptions: CreateViewOptions(scalingMode:scalingMode))
        self.call!.startVideo(stream: self.localVideoStreams!.first!) { (error) in
            if (error != nil) {
                print("Cannot start video")
            }
            else {
                self.sendingLocalVideo = true
            }
        }
    }
}
Helyi hang elnémítása
Szobahívás közben használhatjuk mute a mikrofont, vagy unMute elnémíthatjuk vagy visszahangosíthatjuk a mikrofont.
func toggleMute() {
    if (self.muted) {
        call!.unmuteOutgoingAudio(completionHandler: { (error) in
            if error == nil {
                self.muted = false
            }
        })
    } else {
        call!.muteOutgoingAudio(completionHandler: { (error) in
            if error == nil {
                self.muted = true
            }
        })
    }
}
Hívásfrissítések kezelése
A hívásfrissítések kezeléséhez implementáljon egy CallHandler frissítést, amely kezeli a frissítési eseményeket. Tegye a következő implementációt a következőbe CallHandler.swift:
final class CallHandler: NSObject, CallAgentDelegate {
    public var owner: ContentView?

    private static var instance: CallHandler?
    static func getOrCreateInstance() -> CallHandler {
        if let c = instance {
            return c
        }
        instance = CallHandler()
        return instance!
    }

    private override init() {}

    public func callAgent(_ callAgent: CallAgent, didUpdateCalls args: CallsUpdatedEventArgs) {
        if let removedCall = args.removedCalls.first {
            owner?.call = nil
        }
    }
}
Létre kell hoznunk egy példányt CallHandler úgy, hogy hozzáadjuk a következő kódot a visszahíváshoz a onAppear következőben ContentView.swift:
self.callHandler = CallHandler.getOrCreateInstance()
self.callHandler.owner = self
A CallAgent sikeres létrehozása után állítson be egy meghatalmazottat a CallAgenthez:
self.callAgent!.delegate = callHandler
Távoli résztvevők kezelése
Minden távoli résztvevőt a RemoteParticipant típus jelöl, és a remoteParticipants híváspéldány gyűjteményén keresztül érhető el. Megvalósíthatunk egy osztályt Participant , amely többek között a távoli résztvevők távoli videóstreamjeinek frissítéseit kezeli.
class Participant: NSObject, RemoteParticipantDelegate, ObservableObject {
    private var videoStreamCount = 0
    private let innerParticipant:RemoteParticipant
    private let call:Call
    private var renderedRemoteVideoStream:RemoteVideoStream?

    @Published var state:ParticipantState = ParticipantState.disconnected
    @Published var isMuted:Bool = false
    @Published var isSpeaking:Bool = false
    @Published var hasVideo:Bool = false
    @Published var displayName:String = ""
    @Published var videoOn:Bool = true
    @Published var renderer:VideoStreamRenderer? = nil
    @Published var rendererView:RendererView? = nil
    @Published var scalingMode: ScalingMode = .fit

    init(_ call: Call, _ innerParticipant: RemoteParticipant) {
        self.call = call
        self.innerParticipant = innerParticipant
        self.displayName = innerParticipant.displayName

        super.init()

        self.innerParticipant.delegate = self

        self.state = innerParticipant.state
        self.isMuted = innerParticipant.isMuted
        self.isSpeaking = innerParticipant.isSpeaking
        self.hasVideo = innerParticipant.videoStreams.count > 0
        if(self.hasVideo) {
            handleInitialRemoteVideo()
        }
    }

    deinit {
        self.innerParticipant.delegate = nil
    }

    func getMri() -> String {
        Utilities.toMri(innerParticipant.identifier)
    }

    func set(scalingMode: ScalingMode) {
        if self.rendererView != nil {
            self.rendererView!.update(scalingMode: scalingMode)
        }
        self.scalingMode = scalingMode
    }

    func handleInitialRemoteVideo() {
        renderedRemoteVideoStream = innerParticipant.videoStreams[0]
        renderer = try! VideoStreamRenderer(remoteVideoStream: renderedRemoteVideoStream!)
        rendererView = try! renderer!.createView()
    }

    func toggleVideo() {
        if videoOn {
            rendererView = nil
            renderer?.dispose()
            videoOn = false
        }
        else {
            renderer = try! VideoStreamRenderer(remoteVideoStream: innerParticipant.videoStreams[0])
            rendererView = try! renderer!.createView()
            videoOn = true
        }
    }

    func remoteParticipant(_ remoteParticipant: RemoteParticipant, didUpdateVideoStreams args: RemoteVideoStreamsEventArgs) {
        let hadVideo = hasVideo
        hasVideo = innerParticipant.videoStreams.count > 0
        if videoOn {
            if hadVideo && !hasVideo {
                // Remote user stopped sharing
                rendererView = nil
                renderer?.dispose()
            } else if hasVideo && !hadVideo {
                // remote user started sharing
                renderedRemoteVideoStream = innerParticipant.videoStreams[0]
                renderer = try! VideoStreamRenderer(remoteVideoStream: renderedRemoteVideoStream!)
                rendererView = try! renderer!.createView()
            } else if hadVideo && hasVideo {
                if args.addedRemoteVideoStreams.count > 0 {
                    if renderedRemoteVideoStream?.id == args.addedRemoteVideoStreams[0].id {
                        return
                    }

                    // remote user added a second video, so switch to the latest one
                    guard let rendererTemp = renderer else {
                        return
                    }
                    rendererTemp.dispose()
                    renderedRemoteVideoStream = args.addedRemoteVideoStreams[0]
                    renderer = try! VideoStreamRenderer(remoteVideoStream: renderedRemoteVideoStream!)
                    rendererView = try! renderer!.createView()
                } else if args.removedRemoteVideoStreams.count > 0 {
                    if args.removedRemoteVideoStreams[0].id == renderedRemoteVideoStream!.id {
                        // remote user stopped sharing video that we were rendering but is sharing
                        // another video that we can render
                        renderer!.dispose()

                        renderedRemoteVideoStream = innerParticipant.videoStreams[0]
                        renderer = try! VideoStreamRenderer(remoteVideoStream: renderedRemoteVideoStream!)
                        rendererView = try! renderer!.createView()
                    }
                }
            }
        }
    }

    func remoteParticipant(_ remoteParticipant: RemoteParticipant, didChangeDisplayName args: PropertyChangedEventArgs) {
        self.displayName = innerParticipant.displayName
    }
}

class Utilities {
    @available(*, unavailable) private init() {}

    public static func toMri(_ id: CommunicationIdentifier?) -> String {

        if id is CommunicationUserIdentifier {
            let communicationUserIdentifier = id as! CommunicationUserIdentifier
            return communicationUserIdentifier.identifier
        } else {
            return "<nil>"
        }
    }
}
Távoli résztvevő videostreamjei
Létrehozhatunk egy, ParticipantView a távoli résztvevők videostreamjeinek renderelését kezelő megoldást. A megvalósítás üzembe helyezésének ParticipantView.swift
struct ParticipantView : View, Hashable {
    static func == (lhs: ParticipantView, rhs: ParticipantView) -> Bool {
        return lhs.participant.getMri() == rhs.participant.getMri()
    }

    private let owner: HomePageView

    @State var showPopUp: Bool = false
    @State var videoHeight = CGFloat(200)
    @ObservedObject private var participant:Participant

    var body: some View {
        ZStack {
            if (participant.rendererView != nil) {
                HStack {
                    RenderInboundVideoView(view: $participant.rendererView)
                }
                .background(Color(.black))
                .frame(height: videoHeight)
                .animation(Animation.default)
            } else {
                HStack {
                    Text("No incoming video")
                }
                .background(Color(.red))
                .frame(height: videoHeight)
            }
        }
    }

    func hash(into hasher: inout Hasher) {
        hasher.combine(participant.getMri())
    }

    init(_ owner: HomePageView, _ participant: Participant) {
        self.owner = owner
        self.participant = participant
    }

    func resizeVideo() {
        videoHeight = videoHeight == 200 ? 150 : 200
    }

    func showAlert(_ title: String, _ message: String) {
        DispatchQueue.main.asyncAfter(deadline: .now() + 0.1) {
            self.owner.alertMessage = message
            self.owner.showAlert = true
        }
    }
}

struct RenderInboundVideoView: UIViewRepresentable {
    @Binding var view:RendererView!

    func makeUIView(context: Context) -> UIView {
        return UIView()
    }

    func updateUIView(_ uiView: UIView, context: Context) {
        for view in uiView.subviews {
            view.removeFromSuperview()
        }
        if (view != nil) {
            uiView.addSubview(view)
        }
    }
}
Feliratkozás az eseményekre
Létrehozhatunk egy osztályt CallObserver , amely előfizet egy eseménygyűjteményre, hogy értesítést kapjon, amikor az értékek megváltoznak remoteParticipantsa hívás során.
public class CallObserver : NSObject, CallDelegate
{
    private var owner: ContentView
    private var firstTimeCallConnected: Bool = true

    init(view: ContentView) {
        owner = view
        super.init()
    }

    public func call(_ call: Call, didChangeState args: PropertyChangedEventArgs) {
        let state = CallObserver.callStateToString(state:call.state)
        owner.callState = state
        if (call.state == CallState.disconnected) {
            owner.leaveRoomCall()
        }
        else if (call.state == CallState.connected) {
            if(self.firstTimeCallConnected) {
                self.handleInitialCallState(call: call);
            }
            self.firstTimeCallConnected = false;
        }
    }

    public func handleInitialCallState(call: Call) {
        // We want to build a matrix with max 2 columns

        owner.callState = CallObserver.callStateToString(state:call.state)
        var participants = [Participant]()

        // Add older/existing participants
        owner.participants.forEach { (existingParticipants: [Participant]) in
            participants.append(contentsOf: existingParticipants)
        }
        owner.participants.removeAll()

        // Add new participants to the collection
        for remoteParticipant in call.remoteParticipants {
            let mri = Utilities.toMri(remoteParticipant.identifier)
            let found = participants.contains { (participant) -> Bool in
                participant.getMri() == mri
            }

            if !found {
                let participant = Participant(call, remoteParticipant)
                participants.append(participant)
            }
        }

        // Convert 1-D array into a 2-D array with 2 columns
        var indexOfParticipant = 0
        while indexOfParticipant < participants.count {
            var newParticipants = [Participant]()
            newParticipants.append(participants[indexOfParticipant])
            indexOfParticipant += 1
            if (indexOfParticipant < participants.count) {
                newParticipants.append(participants[indexOfParticipant])
                indexOfParticipant += 1
            }
            owner.participants.append(newParticipants)
        }
    }

    public func call(_ call: Call, didUpdateRemoteParticipant args: ParticipantsUpdatedEventArgs) {
        var participants = [Participant]()
        // Add older/existing participants
        owner.participants.forEach { (existingParticipants: [Participant]) in
            participants.append(contentsOf: existingParticipants)
        }
        owner.participants.removeAll()

        // Remove deleted participants from the collection
        args.removedParticipants.forEach { p in
            let mri = Utilities.toMri(p.identifier)
            participants.removeAll { (participant) -> Bool in
                participant.getMri() == mri
            }
        }

        // Add new participants to the collection
        for remoteParticipant in args.addedParticipants {
            let mri = Utilities.toMri(remoteParticipant.identifier)
            let found = participants.contains { (view) -> Bool in
                view.getMri() == mri
            }

            if !found {
                let participant = Participant(call, remoteParticipant)
                participants.append(participant)
            }
        }

        // Convert 1-D array into a 2-D array with 2 columns
        var indexOfParticipant = 0
        while indexOfParticipant < participants.count {
            var array = [Participant]()
            array.append(participants[indexOfParticipant])
            indexOfParticipant += 1
            if (indexOfParticipant < participants.count) {
                array.append(participants[indexOfParticipant])
                indexOfParticipant += 1
            }
            owner.participants.append(array)
        }
    }

    private static func callStateToString(state:CallState) -> String {
        switch state {
        case .connected: return "Connected"
        case .connecting: return "Connecting"
        case .disconnected: return "Disconnected"
        case .disconnecting: return "Disconnecting"
        case .none: return "None"
        default: return "Unknown"
        }
    }
}
A kód futtatása
Az alkalmazást iOS-szimulátoron is létrehozhatja és futtathatja a Termékfuttatás > vagy a (⌘-R) billentyűparanccsal.
Az iOS Mobile Calling SDK 2.5.0-s és újabb verziójában lehetőség van a szobahívásokhoz való csatlakozásra és a hívás résztvevőinek szerepköreinek megjelenítésére.
A szobahívás résztvevőinek szerepköreiről a helyiségkoncepció dokumentációjában olvashat bővebben.
Mintaalkalmazás
Ha követni szeretné ezt a rövid útmutatót, letöltheti a Szobahívás gyorsútmutatót a GitHubon.
Projekt beállítása
Android-alkalmazás létrehozása üres tevékenységgel
Hozzon létre egy új projektet az Android Studióban:

Nevezze el a projekt szobahívási rövid útmutatóját , és válassza a Kotlin lehetőséget.

Telepítse a(z) csomagot
A modul szintjén build.gradleadja hozzá a következő sort a dependencies szakaszhoz.
dependencies {
    ...
    //Ability to join a Rooms calls is available in 2.4.0 or above.
    implementation 'com.azure.android:azure-communication-calling:2.4.0'
    ...
}
Engedélyek hozzáadása az alkalmazásjegyzékhez
A híváshoz szükséges engedélyek lekéréséhez először deklarálnia kell az engedélyeket az alkalmazásjegyzékben (app/src/main/AndroidManifest.xml). Másolja a következőket a jegyzékfájlba:
<?xml version="1.0" encoding="utf-8"?>
<manifest xmlns:android="http://schemas.android.com/apk/res/android">

    <uses-feature
        android:name="android.hardware.camera"
        android:required="false" />

    <uses-permission android:name="android.permission.INTERNET" />
    <uses-permission android:name="android.permission.ACCESS_NETWORK_STATE" />
    <uses-permission android:name="android.permission.ACCESS_WIFI_STATE" />
    <uses-permission android:name="android.permission.RECORD_AUDIO" />
    <uses-permission android:name="android.permission.CAMERA" />

    <application
        android:allowBackup="true"
        android:icon="@mipmap/ic_launcher"
        android:label="@string/app_name"
        android:roundIcon="@mipmap/ic_launcher_round"
        android:supportsRtl="true"
        android:theme="@style/Theme.AppTheme">

        <!--Our Calling SDK depends on the Apache HTTP SDK.
    When targeting Android SDK 28+, this library needs to be explicitly referenced.
    See https://developer.android.com/about/versions/pie/android-9.0-changes-28#apache-p-->
        <uses-library android:name="org.apache.http.legacy" android:required="false"/>
        <activity
            android:name=".MainActivity"
            android:exported="true">
            <intent-filter>
                <action android:name="android.intent.action.MAIN" />

                <category android:name="android.intent.category.LAUNCHER" />
            </intent-filter>
        </activity>
    </application>

</manifest>
Az alkalmazás elrendezésének beállítása
Szüksége van egy szöveges bemenetre a szobaazonosítóhoz, egy gombra a hívás elhelyezéséhez, és további gombra a hívás felakasztásához.
Lépjen, app/src/main/res/layout/activity_main.xmlés cserélje le a fájl tartalmát a következő kódra:
<?xml version="1.0" encoding="utf-8"?>
<androidx.constraintlayout.widget.ConstraintLayout
    xmlns:android="http://schemas.android.com/apk/res/android"
    xmlns:app="http://schemas.android.com/apk/res-auto"
    xmlns:tools="http://schemas.android.com/tools"
    android:layout_width="match_parent"
    android:layout_height="match_parent"
    tools:context=".MainActivity">

    <TextView
        android:id="@+id/text_role"
        android:layout_width="wrap_content"
        android:layout_height="wrap_content"
        android:text="Role:"
        android:textSize="16sp"
        android:textStyle="bold"
        app:layout_constraintTop_toTopOf="parent"
        app:layout_constraintStart_toStartOf="parent"
        app:layout_constraintEnd_toEndOf="parent"
        android:layout_marginTop="16dp" />

    <TextView
        android:id="@+id/text_call_status"
        android:layout_width="wrap_content"
        android:layout_height="wrap_content"
        android:text="Call Status"
        android:textSize="16sp"
        android:textStyle="bold"
        app:layout_constraintTop_toTopOf="parent"
        app:layout_constraintStart_toStartOf="parent"
        app:layout_constraintEnd_toEndOf="parent"
        android:layout_marginTop="48dp" />

    <EditText
        android:id="@+id/room_id"
        android:layout_width="match_parent"
        android:layout_height="wrap_content"
        android:ems="10"
        android:hint="Room ID"
        android:inputType="textPersonName"
        android:layout_marginTop="100dp"
        android:layout_marginHorizontal="20dp"
        app:layout_constraintTop_toTopOf="parent"
        app:layout_constraintStart_toStartOf="parent"
        app:layout_constraintEnd_toEndOf="parent" />

    <LinearLayout
        android:layout_width="match_parent"
        android:layout_height="wrap_content"
        android:layout_marginBottom="260dp"
        android:gravity="center"
        app:layout_constraintBottom_toBottomOf="parent"
        app:layout_constraintEnd_toEndOf="parent"
        app:layout_constraintStart_toStartOf="parent">

        <Button
            android:id="@+id/call_button"
            android:layout_width="wrap_content"
            android:layout_marginEnd="32dp"
            android:layout_height="wrap_content"
            android:text="Start Call" />

        <Button
            android:id="@+id/hangup_button"
            android:layout_width="wrap_content"
            android:layout_height="wrap_content"
            android:text="Hangup" />

    </LinearLayout>

</androidx.constraintlayout.widget.ConstraintLayout>
A fő tevékenység létrehozása
A létrehozott elrendezéssel hozzáadhatja a logikát egy szobahívás indításához. A tevékenység kezeli a futásidejű engedélyek kérését, a hívásügynök létrehozását és a hívás indítását a gomb megnyomásakor.
A onCreate metódus meghívja getAllPermissions és createAgenthozzáadja a hívás gomb kötéseit.
Ez az esemény csak egyszer fordul elő a tevékenység létrehozásakor. További információt onCreatea tevékenység életciklusának ismertetése című útmutatóban talál.
Nyissa meg a MainActivity.kt fájlt, és cserélje le a tartalmat a következő kódra:
package com.contoso.roomscallquickstart

import android.Manifest
import android.annotation.SuppressLint
import android.content.pm.PackageManager
import android.media.AudioManager
import android.os.Bundle
import android.widget.Button
import android.widget.EditText
import android.widget.TextView
import android.widget.Toast
import androidx.appcompat.app.AppCompatActivity
import androidx.core.app.ActivityCompat
import com.azure.android.communication.calling.Call
import com.azure.android.communication.calling.CallAgent
import com.azure.android.communication.calling.CallClient
import com.azure.android.communication.calling.HangUpOptions
import com.azure.android.communication.calling.JoinCallOptions
import com.azure.android.communication.calling.RoomCallLocator
import com.azure.android.communication.common.CommunicationTokenCredential
import java.util.concurrent.ExecutionException

class MainActivity : AppCompatActivity() {
    private val allPermissions = arrayOf(
        Manifest.permission.RECORD_AUDIO,
        Manifest.permission.CAMERA,
        Manifest.permission.READ_PHONE_STATE
    )

    private val userToken = "<ACS_USER_TOKEN>"
    private lateinit var callAgent: CallAgent
    private var call: Call? = null

    private lateinit var roleTextView: TextView
    private lateinit var statusView: TextView

    override fun onCreate(savedInstanceState: Bundle?) {
        super.onCreate(savedInstanceState)
        setContentView(R.layout.activity_main)

        getAllPermissions()
        createCallAgent()

        val callButton: Button = findViewById(R.id.call_button)
        callButton.setOnClickListener { startCall() }

        val hangupButton: Button = findViewById(R.id.hangup_button)
        hangupButton.setOnClickListener { endCall() }

        roleTextView = findViewById(R.id.text_role)
        statusView = findViewById(R.id.text_call_status)

        volumeControlStream = AudioManager.STREAM_VOICE_CALL
    }

    /**
     * Start a call
     */
    private fun startCall() {
        if (userToken.startsWith("<")) {
            Toast.makeText(this, "Please enter token in source code", Toast.LENGTH_SHORT).show()
            return
        }

        val roomIdView: EditText = findViewById(R.id.room_id)
        val roomId = roomIdView.text.toString()
        if (roomId.isEmpty()) {
            Toast.makeText(this, "Please enter room ID", Toast.LENGTH_SHORT).show()
            return
        }

        val joinCallOptions = JoinCallOptions()

        val roomCallLocator = RoomCallLocator(roomId)
        call = callAgent.join(applicationContext, roomCallLocator, joinCallOptions)

        call?.addOnStateChangedListener { setCallStatus(call?.state.toString()) }

        call?.addOnRoleChangedListener { setRoleText(call?.callParticipantRole.toString()) }
    }

    /**
     * Ends the call previously started
     */
    private fun endCall() {
        try {
            call?.hangUp(HangUpOptions())?.get()
        } catch (e: ExecutionException) {
            Toast.makeText(this, "Unable to hang up call", Toast.LENGTH_SHORT).show()
        }
    }

    /**
     * Create the call callAgent
     */
    private fun createCallAgent() {
            try {
                val credential = CommunicationTokenCredential(userToken)
                callAgent = CallClient().createCallAgent(applicationContext, credential).get()
            } catch (ex: Exception) {
                Toast.makeText(
                    applicationContext,
                    "Failed to create call callAgent.",
                    Toast.LENGTH_SHORT
                ).show()
            }
    }

    /**
     * Request each required permission if the app doesn't already have it.
     */
    private fun getAllPermissions() {
        val permissionsToAskFor = mutableListOf<String>()
        for (permission in allPermissions) {
            if (ActivityCompat.checkSelfPermission(this, permission) != PackageManager.PERMISSION_GRANTED) {
                permissionsToAskFor.add(permission)
            }
        }
        if (permissionsToAskFor.isNotEmpty()) {
            ActivityCompat.requestPermissions(this, permissionsToAskFor.toTypedArray(), 1)
        }
    }

    /**
     * Ensure all permissions were granted, otherwise inform the user permissions are missing.
     */
    override fun onRequestPermissionsResult(
        requestCode: Int,
        permissions: Array<out String>,
        grantResults: IntArray
    ) {
        super.onRequestPermissionsResult(requestCode, permissions, grantResults)
        var allPermissionsGranted = true
        for (result in grantResults) {
            allPermissionsGranted = allPermissionsGranted && (result == PackageManager.PERMISSION_GRANTED)
        }
        if (!allPermissionsGranted) {
            Toast.makeText(this, "All permissions are needed to make the call.", Toast.LENGTH_LONG).show()
            finish()
        }
    }

    @SuppressLint("SetTextI18n")
    private fun setCallStatus(status: String?) {
        runOnUiThread {
            statusView.text = "Call Status: $status"
        }
    }
    @SuppressLint("SetTextI18n")
    private fun setRoleText(role: String?) {
        runOnUiThread {
            roleTextView.text = "Role: $role"
        }
    }
}
Feljegyzés
Az alkalmazás tervezésekor vegye figyelembe, hogy mikor kell ezeket az engedélyeket igényelni. Az engedélyeket szükség szerint, nem előre kell igényelni. További információ: Android-engedélyek útmutatója.
A projekt futtatása
A projekt futtatása előtt cserélje le <ACS_USER_TOKEN> az MainActivity.kt Azure Communication Services felhasználói hozzáférési jogkivonatát.
private val userToken = "<ACS_USER_TOKEN>"
Futtassa a projektet emulátoron vagy fizikai eszközön.
Ekkor megjelenik egy mező, amely megadja a szobaazonosítót és egy gombot a szobahívás indításához. Adja meg a szobaazonosítót, és ellenőrizze, hogy a hívás állapota megváltozott-e a szerepkörével együtt.
A Szobahíváshoz való csatlakozás ismertetése
A QuickStart alkalmazásban hozzáadott összes kód lehetővé tette, hogy sikeresen elindítson és csatlakozzon egy szobahíváshoz. Részletesen meg kell ismerkednünk azzal, hogyan működik mindez, és milyen további módszereket/kezelőket érhet el a Szobákhoz.
A szobahívások egy CallAgent érvényes felhasználói jogkivonattal jönnek létre:
private fun createCallAgent() {
    try {
        val credential = CommunicationTokenCredential(userToken)
        callAgent = CallClient().createCallAgent(applicationContext, credential).get()
    } catch (ex: Exception) {
        Toast.makeText(
            applicationContext,
            "Failed to create call callAgent.",
            Toast.LENGTH_SHORT
        ).show()
    }
}
Az andRoomCallLocator, használatával CallAgent csatlakozhatunk egy szobahíváshoz az CallAgent.join objektumot Call visszaadó metódussal:
 val joinCallOptions = JoinCallOptions()
 val roomCallLocator = RoomCallLocator(roomId)
 call = callAgent.join(applicationContext, roomCallLocator, joinCallOptions)
A fájlon túli további testreszabások MainActivity.ktközé tartozik az eseményekre való Call feliratkozás a frissítések lekéréséhez:
call.addOnRemoteParticipantsUpdatedListener { args: ParticipantsUpdatedEvent? ->
    handleRemoteParticipantsUpdate(
        args!!
    )
}

call.addOnStateChangedListener { args: PropertyChangedEvent? ->
    this.handleCallOnStateChanged(
        args!!
    )
}
Az alábbi módszerekkel és kezelőkkel tovább bővítheti MainActivity.kt a helyi vagy távoli hívás résztvevőinek szerepét.
// Get your role in the call
call.getCallParticipantRole();

// Subscribe to changes for your role in a call
private void isCallRoleChanged(PropertyChangedEvent propertyChangedEvent) {
    // handle self-role change
}

call.addOnRoleChangedListener(isCallRoleChanged);

// Subscribe to role changes for remote participants
private void isRoleChanged(PropertyChangedEvent propertyChangedEvent) {
    // handle remote participant role change
}

remoteParticipant.addOnRoleChangedListener(isRoleChanged);

// Get role of the remote participant
remoteParticipant.getCallParticipantRole();
A szobahívásokhoz való csatlakozás és a hívás résztvevőinek szerepköreinek megjelenítése az Android Mobile Calling SDK 2.4.0-s és újabb verziójában érhető el.
A szobahívás résztvevőinek szerepköreiről a helyiségkoncepció dokumentációjában olvashat bővebben.
Csatlakozás szobahíváshoz
Szobahíváshoz való csatlakozáshoz állítsa be a windowsos alkalmazást a Videohívás hozzáadása az ügyfélalkalmazás útmutatójában. Másik lehetőségként letöltheti a videóhívási rövid útmutatót a GitHubon.
Hozzon létre érvényes callAgent felhasználói jogkivonatot:
var creds = new CallTokenCredential("<user-token>");

CallAgentOptions callAgentOptions = new CallAgentOptions();
callAgentOptions.DisplayName = "<display-name>";
callAgent = await callClient.CreateCallAgentAsync(creds, callAgentOptions);
A metódus egy callAgent objektumot ad vissza, CallAgent.JoinAsync és RoomCallLocator a szobahíváshoz való csatlakozáshoz a következő objektumot CommunicationCall adja vissza:
RoomCallLocator roomCallLocator = new RoomCallLocator('<RoomId>');

CommunicationCall communicationCall = await callAgent.JoinAsync(roomCallLocator, joinCallOptions);
Iratkozzon fel az eseményekre CommunicationCall a frissítések lekéréséhez:
private async void CommunicationCall_OnStateChanged(object sender, PropertyChangedEventArgs args) {
	var call = sender as CommunicationCall;
	if (sender != null)
	{
		switch (call.State){
			// Handle changes in call state
		}
	}
}
A hívás résztvevőinek szerepének megjelenítéséhez iratkozzon fel a szerepkörváltozásokra:
private void RemoteParticipant_OnRoleChanged(object sender, Azure.Communication.Calling.WindowsClient.PropertyChangedEventArgs args)
{
    _ = Windows.ApplicationModel.Core.CoreApplication.MainView.CoreWindow.Dispatcher.RunAsync(CoreDispatcherPriority.Normal, () =>
    {
        System.Diagnostics.Trace.WriteLine("Raising Role change, new Role: " + remoteParticipant_.Role);
        PropertyChanged(this, new System.ComponentModel.PropertyChangedEventArgs("RemoteParticipantRole"));
    });
}
A szobahívásokhoz való csatlakozás és a hívás résztvevőinek szerepköreinek megjelenítése a Windows NuGet 1.1.0-s és újabb verziójában érhető el.
A szobahívás résztvevőinek szerepköreiről a helyiségkoncepció dokumentációjában olvashat bővebben.
Következő lépések
Ebben a szakaszban a következőket tanulta meg:
- Videohívás hozzáadása az alkalmazáshoz
- Adja át a szobaazonosítót a hívó SDK-nak
- Csatlakozás szobahíváshoz az alkalmazásból
A következőket is érdemes lehet elvégeznie:
- Tudnivalók a szobák fogalmáról
- A hang- és videohívással kapcsolatos fogalmak ismertetése
- Tudnivalók a hitelesítési fogalmakról