Set up Business process modeler libraries
Important
As part of the One Dynamics One Platform work effort, some Microsoft Dynamics 365 Lifecycle Services (LCS) features have been deprecated. For more information, see Removed or deprecated platform features.
This article explains how to create and work with Business process modeler (BPM) libraries.
Create a business process library
There are two ways to create a BPM library. You can create a new library that has no lines or task recordings, or you can copy an existing library.
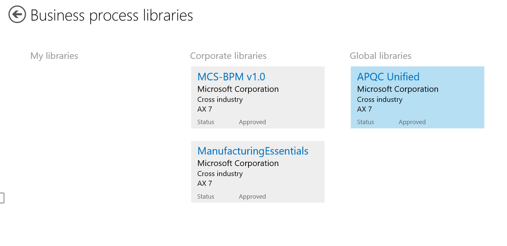
In Microsoft Dynamics Lifecycle Services (LCS), open a project, scroll to the right until you see the More tools section, and then select the Business process modeler tile. The Business process libraries page that appears has three sections, one for each type of library:
- My libraries – Business processes that users have created or added.
- Corporate libraries – Custom business processes that someone in your organization has uploaded.
- Global libraries – Cross-industry standard business processes.
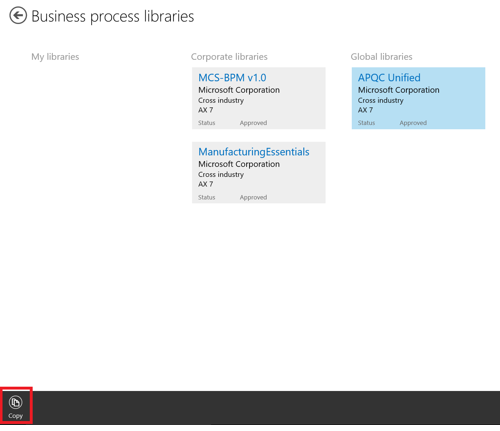
To create a new library, right-click any library, and then, in the lower-left corner of the window, select Create. To copy an existing library, right-click that library, and then, in the lower-left corner of the window, select Copy.
- Global libraries – Cross-industry standard business processes.
Enter a name for the library.
The library that you created now appears under My libraries.
Update, publish, or delete a business process library
You can change the name or description of a library, publish a library so that other people in your organization can view it, or delete a library.
On the Business process libraries page, right-click the library to update, publish, or delete. Then, in the lower-left corner of the window, select Edit, Publish, or Delete.
- Edit lets you change the name and description of the library.
- Publish creates a copy of the library under Corporate libraries. This library will be available to everyone in your organization.
- Delete deletes the library and any information that is stored in it.
Modify a business process library
Follow these steps to change or update the business process lines or hierarchy in your business process library.
Select and open the library to update.
In the left pane, under Core views, select Author and edit.
Follow one or more of these steps to make the required changes:
To rearrange the hierarchy of the business process lines, drag the processes in the hierarchy.
To delete a node, select a business process in the center pane, and then select Delete in the right pane.
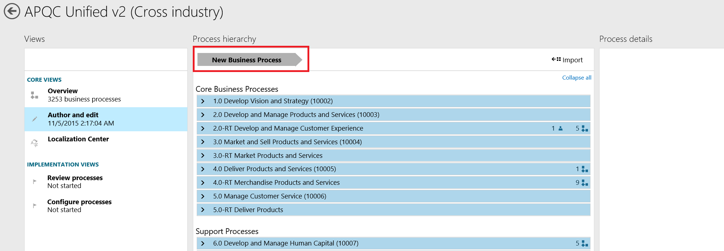
To create a new node, drag the New Business Process flag at the top of the center pane to the place in the hierarchy where the new node should appear.
To import business processes from existing business process libraries, follow these steps:
- Select Import in the center pane.
- On the right side of the page that appears, select the library to import business processes from.
- Drag the required business processes into the hierarchy on the left side of the page.
View and modify task recordings in a business process library
Open the library that you want to work in.
Navigate to the business process line that has a task recording associated with it, and select the link.
Drag the tiles under Activities to manually modify the flow chart.
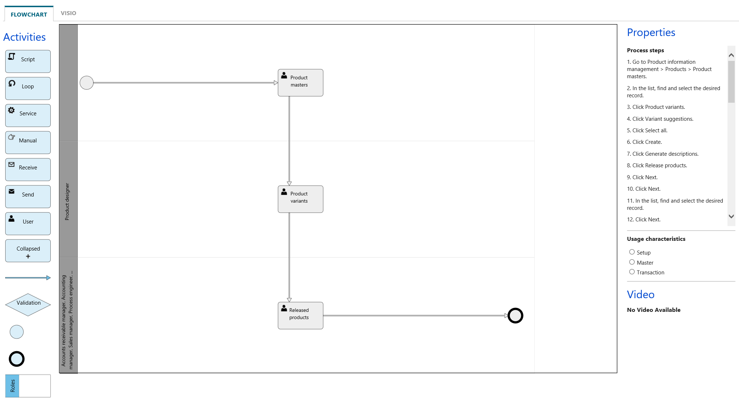
To upload a Microsoft Visio diagram of the modified flow chart, select the Visio tab.
Structure a business process library
There are two sections in business process libraries: Core Business Processes and Support Processes. The Core Business Processes section should include all custom business processes for your solution. All customizations and functionality should be covered in end-to-end scenarios. Task recordings should be created for all processes in this section. Import American Productivity & Quality Center (APQC) processes that are relevant to your solution into the Support Processes section. This section should not include any custom business processes. You don't have to create task recordings for processes in this section. Your business process library should be aligned with the descriptions and summaries in your methodology and your marketing material.
Create a task recording and associate it with a business process
Task recordings should be created in an environment that has your custom data and customizations. For reference information about Task recorder, see Task recorder resources.
Create a task recording
- In your application, select the Settings button in the upper-right corner, and then select Task recorder.
- Select Create recording.
- Enter a name and description for the recording.
- Perform the task that you want to record.
- When you've completed the task, select Stop.
- If you want to upload your new task recording to LCS, continue to the next section. To save your recording to your local computer or convert the recording to a Microsoft Word document, select the appropriate option.
Associate a task recording with a business process
- Select Save to LCS.
- Select a business process library.
- Select the business process line to associate with the recording.
- Select OK.
You can now view the task recording in the business process library in LCS.
Set up and use task guides
Task recordings can be played as task guides. Task guides are used to guide users through the steps for completing business processes. Before you set up and use task guides, create task recordings, and save them to a business process library in LCS.
Set up task guides
- In your application, select System administration > Setup > System parameters.
- On the Help tab, select the LCS project where the business process library that you want to work with is stored.
- Select the business process libraries that have the task recordings that you want to play as task guides.
- Adjust the order of the business process libraries as you require. The order of the business process libraries determines the order that the task guides appear in. Therefore, the task guides for the first business process library appear first when a user uses the task guide functionality.
Use task guides
- In your application, open the page where you want to run the task guide.
- In the upper-right corner, select the Settings button, and then select Task recorder.
- Select a task guide.
- Select Start Task guide.
- Follow the steps in the task guide. If you select Unlock, you can work without following the task guide.
- When you've finished, select Stop Task guide.
Additional resources
Visszajelzés
Hamarosan elérhető: 2024-ben fokozatosan kivezetjük a GitHub-problémákat a tartalom visszajelzési mechanizmusaként, és lecseréljük egy új visszajelzési rendszerre. További információ: https://aka.ms/ContentUserFeedback.
Visszajelzés küldése és megtekintése a következőhöz: