Gyakorlat – Változó- és kimeneti ciklusok használata
A játékvállalat számára virtuális hálózatokat kell üzembe helyeznie minden olyan országban/régióban, ahol a mackót elindítja. A fejlesztők azt is kérték, hogy adja meg nekik az üzembe helyezett regionális Azure SQL logikai kiszolgálók teljes tartományneveit (FQDN-eit).
Ebben a gyakorlatban hozzáadja a virtuális hálózatot és annak konfigurációját a Bicep-kódhoz, és ki fogja adni a logikai kiszolgáló teljes tartományneveit.
A folyamat során a következőt fogja elvégezni:
- Frissítse a Bicep-kódot, hogy paramétert adjon meg az egyes virtuális hálózatok alhálózataihoz.
- Adjon hozzá egy változóhurkot egy alhálózati tömb létrehozásához, amelyet a virtuális hálózati erőforrás-deklarációban fog használni.
- Adjon hozzá egy kimeneti hurkot a logikai kiszolgáló teljes tartományneveinek listájának létrehozásához.
- Telepítse a Bicep-fájlt, és ellenőrizze az üzembe helyezést.
A virtuális hálózat hozzáadása a Bicep-fájlhoz
Nyissa meg a main.bicep fájlt.
A paraméterdeklarációk alatt adja hozzá a következő paramétereket:
@description('The IP address range for all virtual networks to use.')
param virtualNetworkAddressPrefix string = '10.10.0.0/16'

@description('The name and IP address range for each subnet in the virtual networks.')
param subnets array = [
  {
    name: 'frontend'
    ipAddressRange: '10.10.5.0/24'
  }
  {
    name: 'backend'
    ipAddressRange: '10.10.10.0/24'
  }
]
A paraméterek alatt adjon hozzá egy üres sort, majd adja hozzá a
subnetPropertiesváltozóhurkot:var subnetProperties = [for subnet in subnets: { name: subnet.name properties: { addressPrefix: subnet.ipAddressRange } }]A fájl alján, a
databasesmodul hurok alatt adja hozzá a következő erőforráshurkot:resource virtualNetworks 'Microsoft.Network/virtualNetworks@2021-08-01' = [for location in locations: { name: 'teddybear-${location}' location: location properties:{ addressSpace:{ addressPrefixes:[ virtualNetworkAddressPrefix ] } subnets: subnetProperties } }]Megjegyzés:
Ez a példa ugyanazt a címteret használja az összes virtuális hálózat esetében. Általában több virtuális hálózat létrehozásakor különböző címtereket adna nekik abban az esetben, ha össze kell kapcsolni őket.
Mentse a fájl módosításait.
Kimenetek hozzáadása az adatbázismodulhoz
Nyissa meg a modules/database.bicep fájlt.
A fájl alján adja hozzá a következő kimeneteket:
output serverName string = sqlServer.name output location string = location output serverFullyQualifiedDomainName string = sqlServer.properties.fullyQualifiedDomainNameMentse a fájl módosításait.
A kimenetek átvitele a szülő Bicep-fájlon keresztül
Nyissa meg a main.bicep fájlt.
A fájl alján adja hozzá a következő kimeneti ciklust:
output serverInfo array = [for i in range(0, length(locations)): { name: databases[i].outputs.serverName location: databases[i].outputs.location fullyQualifiedDomainName: databases[i].outputs.serverFullyQualifiedDomainName }]Mentse a fájl módosításait.
A Bicep-fájl ellenőrzése
Miután elvégezte az összes fenti módosítást, a main.bicep fájlnak az alábbi példához hasonlóan kell kinéznie:
@description('The Azure regions into which the resources should be deployed.')
param locations array = [
'westeurope'
'eastus2'
'eastasia'
]
@secure()
@description('The administrator login username for the SQL server.')
param sqlServerAdministratorLogin string
@secure()
@description('The administrator login password for the SQL server.')
param sqlServerAdministratorLoginPassword string
@description('The IP address range for all virtual networks to use.')
param virtualNetworkAddressPrefix string = '10.10.0.0/16'
@description('The name and IP address range for each subnet in the virtual networks.')
param subnets array = [
{
name: 'frontend'
ipAddressRange: '10.10.5.0/24'
}
{
name: 'backend'
ipAddressRange: '10.10.10.0/24'
}
]
var subnetProperties = [for subnet in subnets: {
  name: subnet.name
  properties: {
    addressPrefix: subnet.ipAddressRange
  }
}]
module databases 'modules/database.bicep' = [for location in locations: {
name: 'database-${location}'
params: {
location: location
sqlServerAdministratorLogin: sqlServerAdministratorLogin
sqlServerAdministratorLoginPassword: sqlServerAdministratorLoginPassword
}
}]
resource virtualNetworks 'Microsoft.Network/virtualNetworks@2021-08-01' = [for location in locations: {
  name: 'teddybear-${location}'
  location: location
  properties:{
    addressSpace:{
      addressPrefixes:[
        virtualNetworkAddressPrefix
      ]
    }
    subnets: subnetProperties
  }
}]
output serverInfo array = [for i in range(0, length(locations)): {
name: databases[i].outputs.serverName
location: databases[i].outputs.location
fullyQualifiedDomainName: databases[i].outputs.serverFullyQualifiedDomainName
}]
A database.bicep fájlnak a következő példához hasonlóan kell kinéznie:
@description('The Azure region into which the resources should be deployed.')
param location string
@secure()
@description('The administrator login username for the SQL server.')
param sqlServerAdministratorLogin string
@secure()
@description('The administrator login password for the SQL server.')
param sqlServerAdministratorLoginPassword string
@description('The name and tier of the SQL database SKU.')
param sqlDatabaseSku object = {
name: 'Standard'
tier: 'Standard'
}
@description('The name of the environment. This must be Development or Production.')
@allowed([
'Development'
'Production'
])
param environmentName string = 'Development'
@description('The name of the audit storage account SKU.')
param auditStorageAccountSkuName string = 'Standard_LRS'
var sqlServerName = 'teddy${location}${uniqueString(resourceGroup().id)}'
var sqlDatabaseName = 'TeddyBear'
var auditingEnabled = environmentName == 'Production'
var auditStorageAccountName = take('bearaudit${location}${uniqueString(resourceGroup().id)}', 24)
resource sqlServer 'Microsoft.Sql/servers@2021-11-01-preview' = {
name: sqlServerName
location: location
properties: {
administratorLogin: sqlServerAdministratorLogin
administratorLoginPassword: sqlServerAdministratorLoginPassword
}
}
resource sqlDatabase 'Microsoft.Sql/servers/databases@2021-11-01-preview' = {
parent: sqlServer
name: sqlDatabaseName
location: location
sku: sqlDatabaseSku
}
resource auditStorageAccount 'Microsoft.Storage/storageAccounts@2021-09-01' = if (auditingEnabled) {
name: auditStorageAccountName
location: location
sku: {
name: auditStorageAccountSkuName
}
kind: 'StorageV2'
}
resource sqlServerAudit 'Microsoft.Sql/servers/auditingSettings@2021-11-01-preview' = if (auditingEnabled) {
parent: sqlServer
name: 'default'
properties: {
state: 'Enabled'
storageEndpoint: environmentName == 'Production' ? auditStorageAccount.properties.primaryEndpoints.blob : ''
storageAccountAccessKey: environmentName == 'Production' ? listKeys(auditStorageAccount.id, auditStorageAccount.apiVersion).keys[0].value : ''
}
}
output serverName string = sqlServer.name
output location string = location
output serverFullyQualifiedDomainName string = sqlServer.properties.fullyQualifiedDomainName
Ha nem, másolja ki a példákat, vagy módosítsa a sablonokat a példáknak megfelelően.
A Bicep-sablon üzembe helyezése az Azure-ban
A Visual Studio Code terminálon helyezze üzembe a Bicep-sablont az Azure-ban az alábbi kód futtatásával. Ez a folyamat eltarthat néhány percig, majd sikeres üzembe helyezéssel fog rendelkezni.
az deployment group create --template-file main.bicep
A Visual Studio Code terminálon telepítse a Bicep-sablont az Azure-ban az alábbi Azure PowerShell-parancs futtatásával. Ez a folyamat eltarthat néhány percig, majd sikeres üzembe helyezéssel fog rendelkezni.
New-AzResourceGroupDeployment -TemplateFile main.bicep
Figyelem
Ügyeljen arra, hogy ugyanazt a bejelentkezési és jelszót használja, amelyet korábban használt, vagy az üzembe helyezés nem fejeződik be sikeresen.
Várjon, amíg az üzembe helyezés befejeződik.
Az üzemelő példány ellenőrzése
Az üzembe helyezés befejezése után ellenőriznie kell, hogy az új virtuális hálózatok üzembe vannak-e helyezve, és hogy az alhálózatok a várt módon vannak-e konfigurálva.
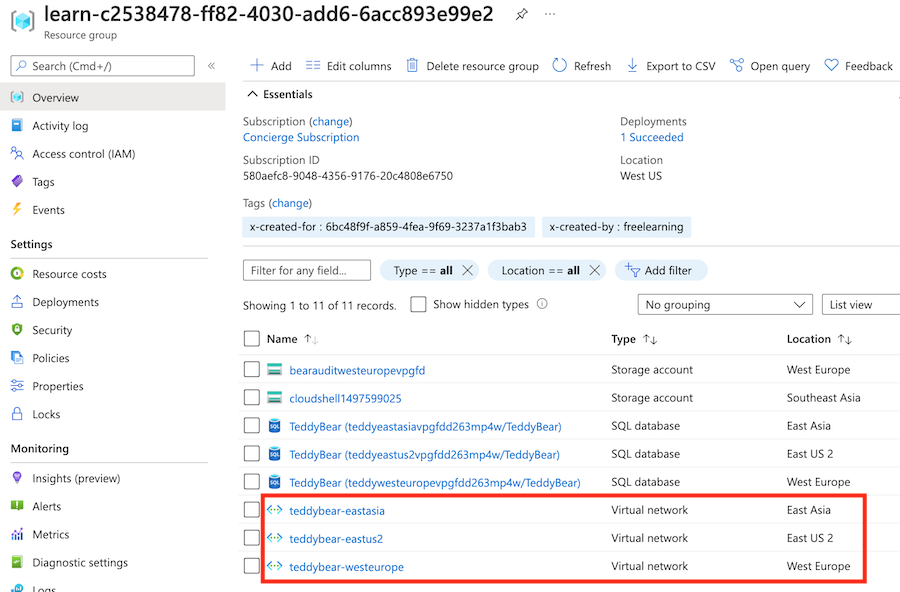
Nyissa meg az Azure Portalt , és győződjön meg arról, hogy a tesztkörnyezet-előfizetésben van.
Válassza a
[tesztkörnyezeti erőforráscsoport neve] nevű erőforráscsoportot.Ellenőrizze, hogy a virtuális hálózatok üzembe lettek-e helyezve a három Azure-helyen.
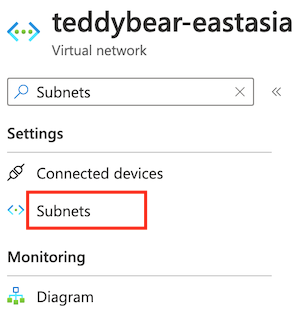
Válassza ki a névvel ellátott
teddybear-eastasiavirtuális hálózatot.A keresősávon adja meg az alhálózatokat. A Beállítások területen válassza az Alhálózatok lehetőséget.
Ellenőrizze, hogy az üzembe helyezett alhálózatok rendelkeznek-e a paraméter alapértelmezett értékében
subnetsmegadott névvel és IP-címmel.
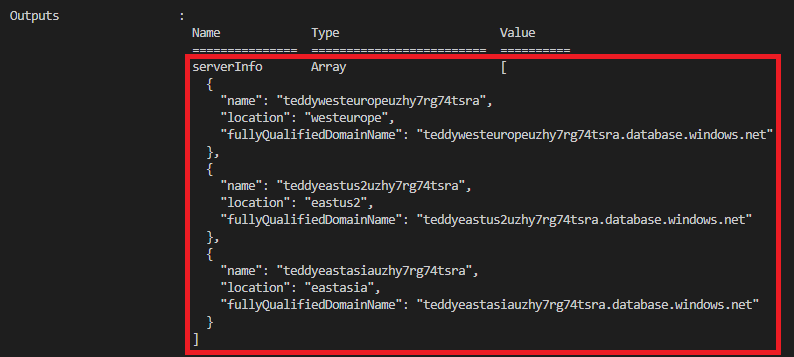
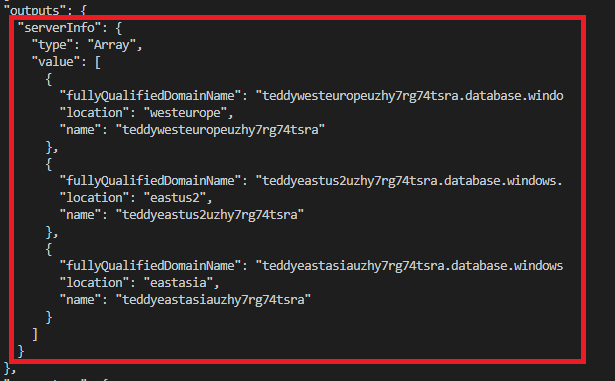
Ellenőrizze az üzembehelyezési parancs kimenetét. Tartalmaznia kell az üzembe helyezett logikai kiszolgálók mindháromának nevét és teljes tartománynevét, ahogy az itt látható:
Nyissa meg az Azure Portalt , és győződjön meg arról, hogy a tesztkörnyezet-előfizetésben van.
Válassza a
[tesztkörnyezeti erőforráscsoport neve] nevű erőforráscsoportot.Ellenőrizze, hogy a virtuális hálózatok üzembe lettek-e helyezve a három Azure-helyen.
Válassza ki a névvel ellátott
teddybear-eastasiavirtuális hálózatot.A keresősávon adja meg az alhálózatokat. A Beállítások területen válassza az Alhálózatok lehetőséget.
Ellenőrizze, hogy az üzembe helyezett alhálózatok rendelkeznek-e a paraméter alapértelmezett értékében
subnetsmegadott névvel és IP-címmel.
Ellenőrizze az üzembehelyezési parancs kimenetét. Tartalmaznia kell az üzembe helyezett logikai kiszolgálók mindháromának nevét és teljes tartománynevét, ahogy az itt látható: