Deploy Application Gateway Basic (Preview)
This article shows you how to use the Azure portal to create an Azure Application Gateway Basic (Preview) and test it to make sure it works correctly. You assign listeners to ports, create rules, and add resources to a backend pool. For the sake of simplicity, a simple setup is used with a public frontend IP address, a basic listener to host a single site on the application gateway, a basic request routing rule, and two virtual machines (VMs) in the backend pool.
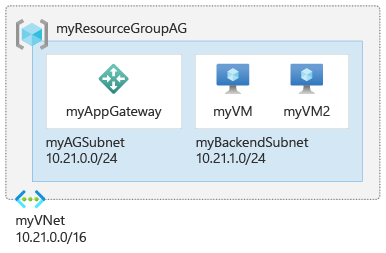
For more information about the components of an application gateway, see Application gateway components. For more information about features and capabilities in Application Gateway Basic, see SKU types.
Important
Application Gateway Basic SKU is currently in PREVIEW.
See the Supplemental Terms of Use for Microsoft Azure Previews for legal terms that apply to Azure features that are in beta, preview, or otherwise not yet released into general availability.
Prerequisites
An Azure account with an active subscription is required. If you don't already have an account, you can create an account for free.
Sign in to the Azure portal with your Azure account.
Register to the preview
Register for the preview using Azure PowerShell:
Set-AzContext -Subscription <subscription-id>
Get-AzProviderFeature -FeatureName AllowApplicationGatewayBasicSku -ProviderNamespace "Microsoft.Network"
Register-AzProviderFeature -FeatureName AllowApplicationGatewayBasicSku -ProviderNamespace Microsoft.Network
Note
When you join the preview, all new Application Gateways provision with the ability to deploy with a basic SKU. If you wish to opt out from the new functionality and return to the current generally available functionality of Application Gateway, you can unregister from the preview.
For more information about preview features, see Set up preview features in Azure subscription
Create an application gateway
You create the application gateway using the tabs on the Create application gateway page.
- On the Azure portal menu or from the Home page, select Create a resource.
- Under Categories, select Networking and then select Create under Application Gateway in the Popular Azure services list.
Basics tab
On the Basics tab, enter these values for the following application gateway settings:
Resource group: Select myResourceGroup for the resource group. If it doesn't exist, select Create new to create it.
Application gateway name: Enter myAppGatewayBasic for the name of the application gateway.
Region: Select a desired region. If your desired region is not displayed, see unsupported regions.
Tier: Select Basic.
HTTP2 and IP address type: Use default settings.

For Azure to communicate between the resources that you create, a virtual network is needed. You can either create a new virtual network or use an existing one. In this example, you create a new virtual network at the same time that you create the application gateway. Application Gateway instances are created in separate subnets. You create two subnets in this example: One for the application gateway, and another for the backend servers.
Note
Virtual network service endpoint policies are currently not supported in an Application Gateway subnet.
Under Configure virtual network, create a new virtual network by selecting Create new. In the Create virtual network window that opens, enter the following values to create the virtual network and two subnets:
Name: Enter myVNet for the name of the virtual network.
Subnet name (Application Gateway subnet): The Subnets grid shows a subnet named default. Change the name of this subnet to myAGSubnet.
The application gateway subnet can contain only application gateways. No other resources are allowed. The default IP address range provided is 10.0.0.0/24. After entering these details, select OK.
Select Next: Frontends.
Frontends tab
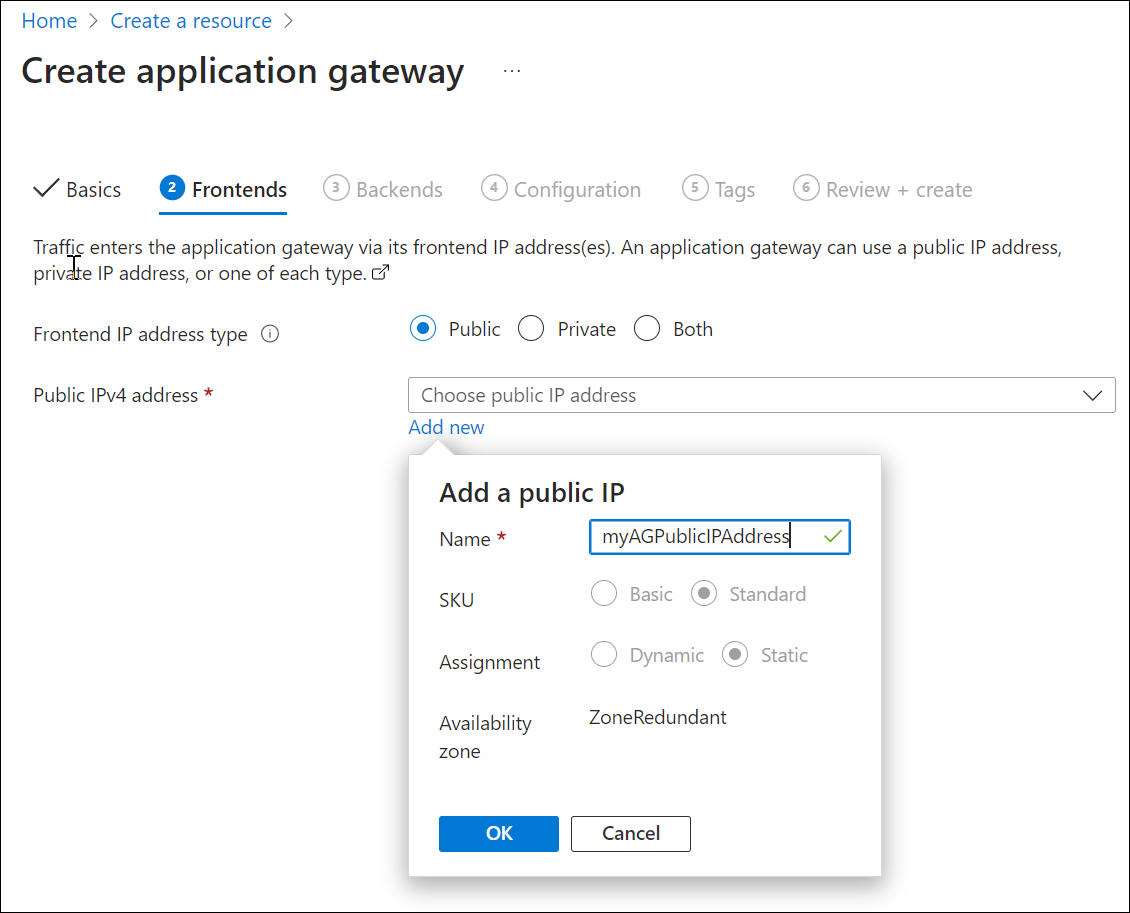
On the Frontends tab, verify Frontend IP address type is set to Public.
You can configure the Frontend IP to be Public or Private as per your use case. In this example, you choose a Public Frontend IP.Note
For the Application Gateway v2 SKU, there must be a Public frontend IP configuration. You can still have both a Public and a Private frontend IP configuration, but Private only frontend IP configuration (Only ILB mode) is currently not enabled for the v2 SKU.
Select Add new for the Public IP address and enter myAGPublicIPAddress for the public IP address name, and then select OK.
Note
Application Gateway frontend now supports dual-stack IP addresses (Public Preview). You can now create up to four frontend IP addresses: Two IPv4 addresses (public and private) and two IPv6 addresses (public and private).
- Select Next: Backends.
Backends tab
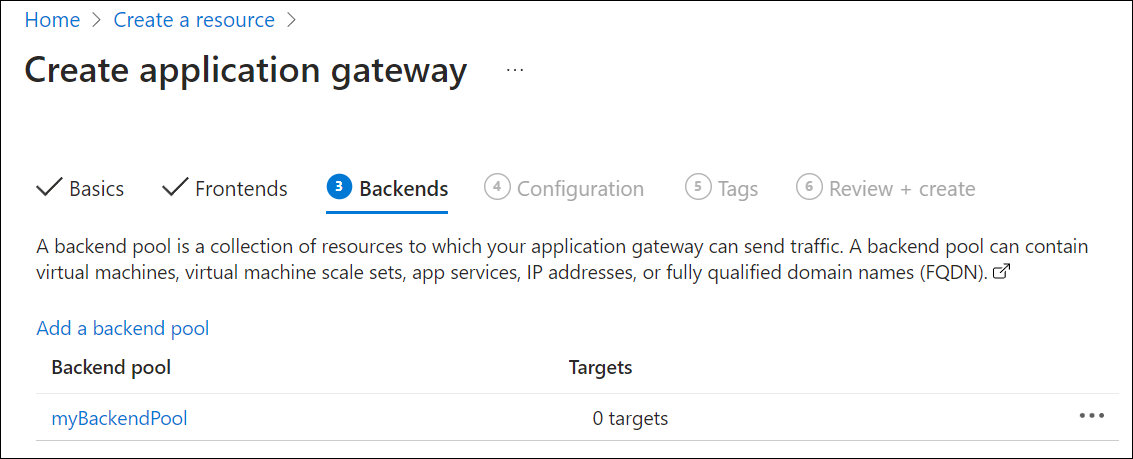
The backend pool is used to route requests to the backend servers that serve the request. Backend pools can be composed of NICs, Virtual Machine Scale Sets, public IP addresses, internal IP addresses, fully qualified domain names (FQDN), and multitenant backends like Azure App Service. In this example, you create an empty backend pool with your application gateway and then add backend targets to the backend pool.
On the Backends tab, select Add a backend pool.
In the Add a backend pool window that opens, enter the following values to create an empty backend pool:
- Name: Enter myBackendPool for the name of the backend pool.
- Add backend pool without targets: Select Yes to create a backend pool with no targets. You add backend targets after creating the application gateway.
In the Add a backend pool window, select Add to save the backend pool configuration and return to the Backends tab.
On the Backends tab, select Next: Configuration.
Configuration tab
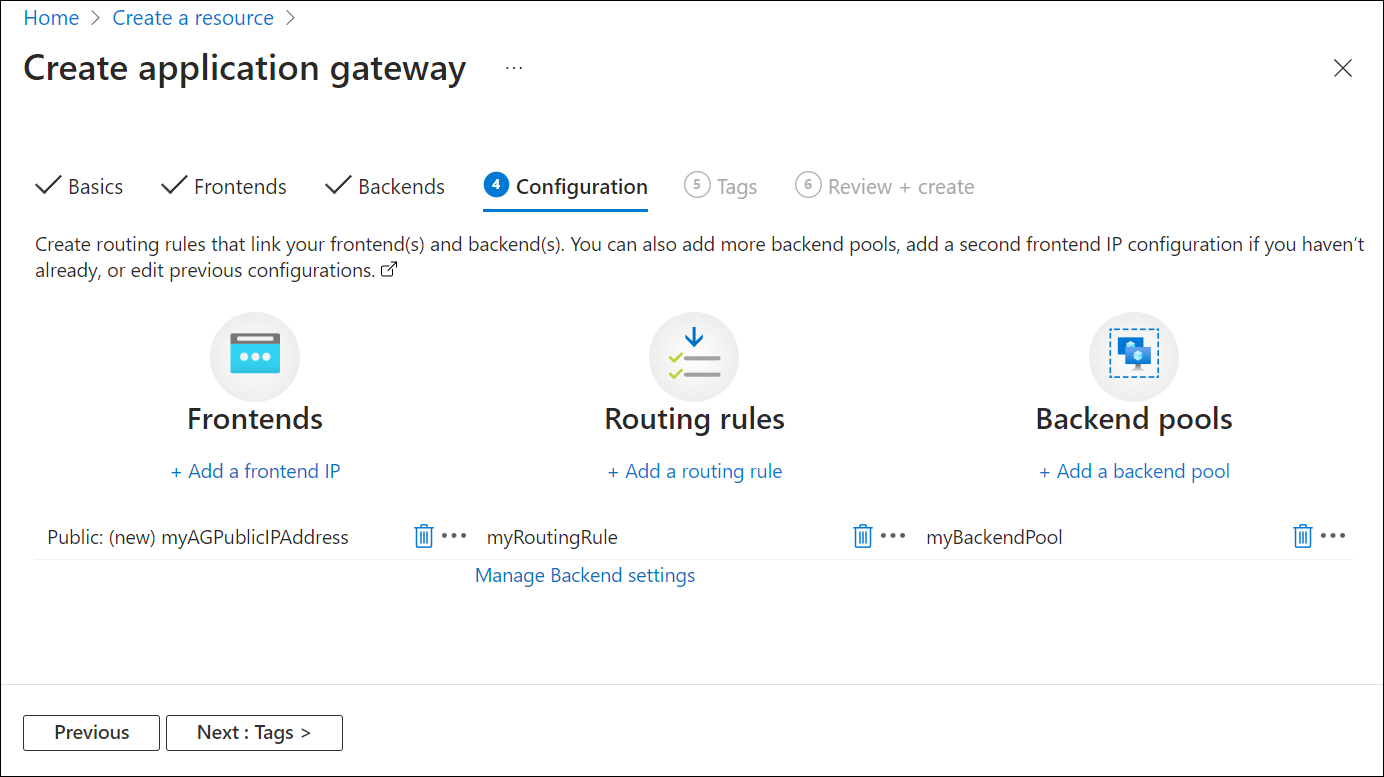
On the Configuration tab, you connect the frontend and backend pool you created using a routing rule.
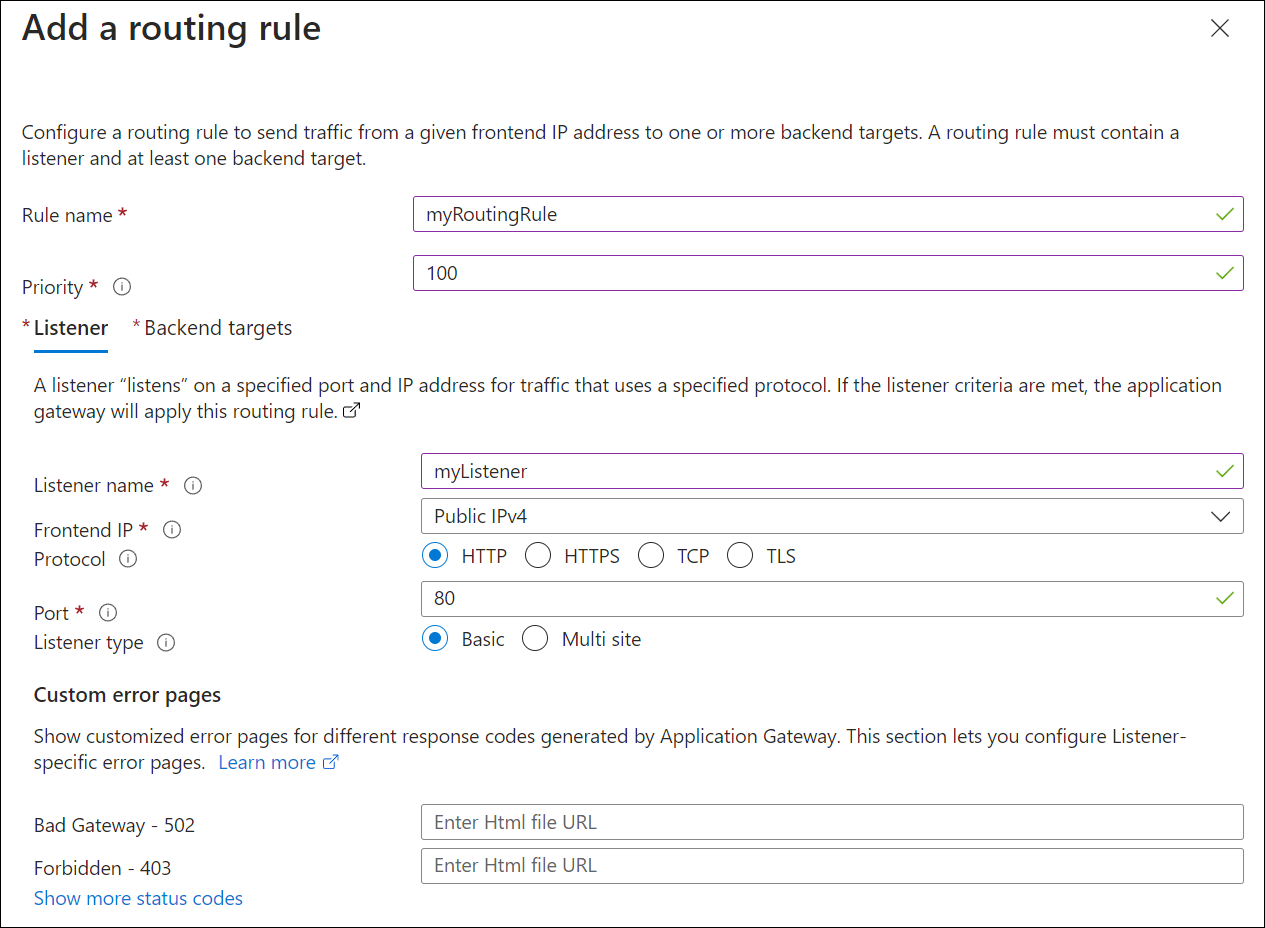
Select Add a routing rule in the Routing rules column.
In the Add a routing rule window that opens, enter the following values for Rule name and Priority:
- Rule name: Enter myRoutingRule for the name of the rule.
- Priority: The priority value should be between 1 and 20000 (where 1 represents highest priority and 20000 represents lowest) - for the purposes of this quickstart, enter 100 for the priority.
A routing rule requires a listener. On the Listener tab within the Add a routing rule window, enter the following values for the listener:
Listener name: Enter myListener for the name of the listener.
Frontend IP: Select Public to choose the public IP you created for the frontend.
Accept the default values for the other settings on the Listener tab, then select the Backend targets tab to configure the rest of the routing rule.
On the Backend targets tab, select myBackendPool for the Backend target.
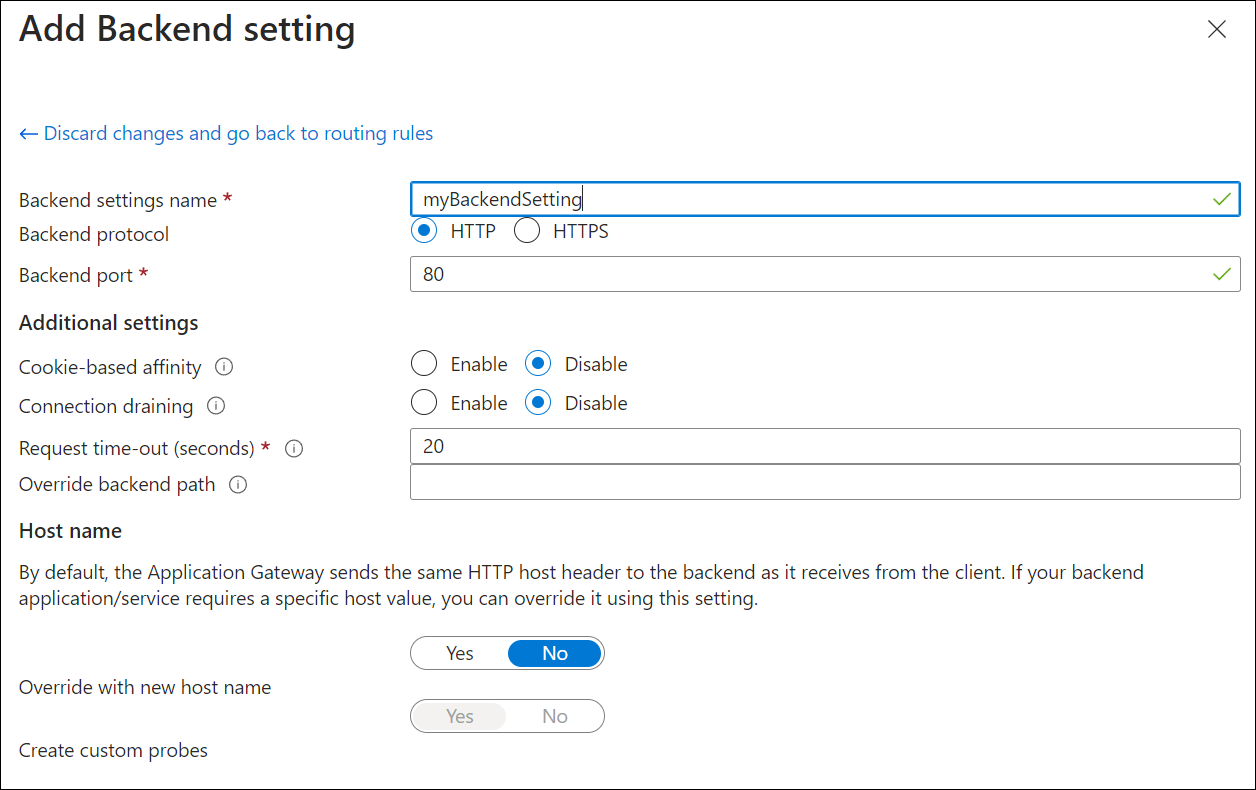
For the Backend setting, select Add new to add a new Backend setting. The Backend setting determines the behavior of the routing rule. In the Add Backend setting window that opens, enter myBackendSetting for the Backend settings name and 80 for the Backend port. Accept the default values for the other settings in the Add Backend setting window, then select Add to return to the Add a routing rule window.
On the Add a routing rule window, select Add to save the routing rule and return to the Configuration tab.
Select Next: Tags and then Next: Review + create.
Review + create tab
Review the settings on the Review + create tab, and then select Create to create the virtual network, the public IP address, and the application gateway. It can take several minutes for Azure to create the application gateway. Wait until the deployment finishes successfully before moving on to the next section.
Add backend targets
In this example, you use virtual machines as the target backend. You can either use existing virtual machines or create new ones. You create two virtual machines as backend servers for the application gateway.
To do this:
- Create two new VMs, myVM and myVM2, to be used as backend servers.
- Install IIS on the virtual machines to verify that the application gateway was created successfully.
- Add the backend servers to the backend pool.
Create a virtual machine
On the Azure portal menu or from the Home page, select Create a resource.
Select Create under Windows Server 2019 Datacenter in the Popular Marketplace products list. The Create a virtual machine page appears.
Application Gateway can route traffic to any type of virtual machine used in its backend pool. In this example, you use a Windows Server 2019 Datacenter virtual machine.Enter these values in the Basics tab for the following virtual machine settings:
- Resource group: Select myResourceGroup for the resource group name.
- Virtual machine name: Enter myVM for the name of the virtual machine.
- Region: Select the same region where you created the application gateway.
- Username: Type a name for the administrator user name.
- Password: Type a password.
- Public inbound ports: None.
Accept the other defaults and then select Next: Disks.
Accept the Disks tab defaults and then select Next: Networking.
On the Networking tab, verify that myVNet is selected for the Virtual network and the Subnet is set to myBackendSubnet. Accept the other defaults and then select Next: Management.
Application Gateway can communicate with instances outside of the virtual network that it's in, but you need to ensure there's IP connectivity.Select Next: Monitoring and set Boot diagnostics to Disable. Accept the other defaults and then select Review + create.
On the Review + create tab, review the settings, correct any validation errors, and then select Create.
Wait for the virtual machine creation to complete before continuing.
Install IIS for testing
In this example, you install IIS on the virtual machines to verify Azure created the application gateway successfully.
Open Azure PowerShell.
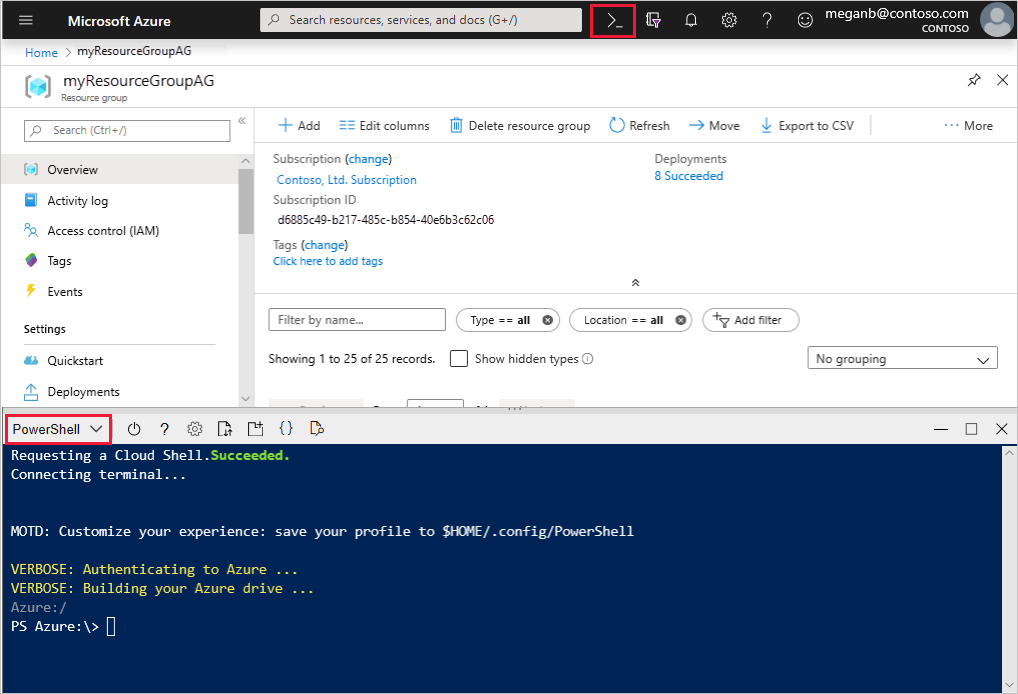
Select Cloud Shell from the top navigation bar of the Azure portal and then select PowerShell from the drop-down list.
Run the following command to install IIS on the virtual machine. Change the Location parameter if necessary:
Set-AzVMExtension `
  -ResourceGroupName myResourceGroupAG `
  -ExtensionName IIS `
  -VMName myVM `
  -Publisher Microsoft.Compute `
  -ExtensionType CustomScriptExtension `
  -TypeHandlerVersion 1.4 `
  -SettingString '{"commandToExecute":"powershell Add-WindowsFeature Web-Server; powershell Add-Content -Path \"C:\\inetpub\\wwwroot\\Default.htm\" -Value $($env:computername)"}' `
  -Location EastUS
Create a second virtual machine and install IIS by using the steps that you previously completed. Use myVM2 for the virtual machine name and for the VMName setting of the Set-AzVMExtension cmdlet.
Add backend servers to backend pool
On the Azure portal menu, select All resources or search for and select All resources. Then select myAppGateway.
Select Backend pools from the left menu.
Select myBackendPool.
Under Backend targets, Target type, select Virtual machine from the drop-down list.
Under Target, select the myVM and myVM2 virtual machines and their associated network interfaces from the drop-down lists.
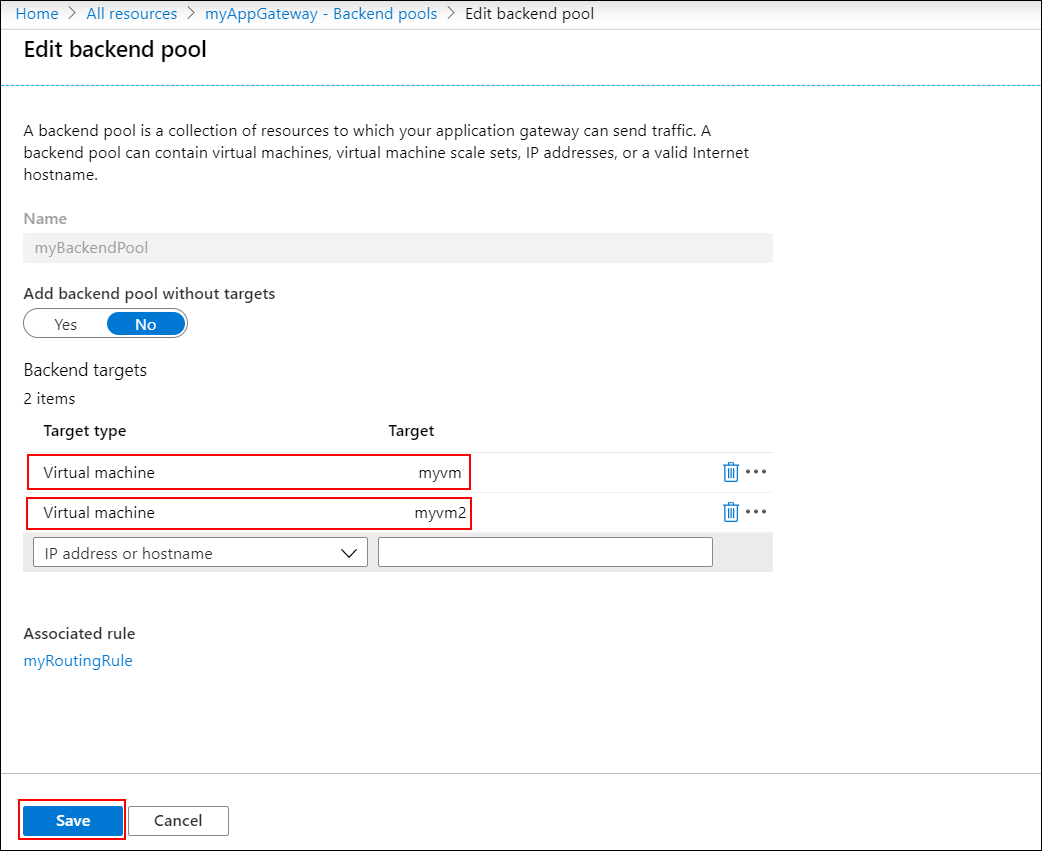
Select Save.
Wait for the deployment to complete before proceeding to the next step.
Test the application gateway
Although IIS isn't required to create the application gateway, you installed it in this quickstart to verify if Azure successfully created the application gateway.
Use IIS to test the application gateway:
Find the public IP address for the application gateway on its Overview page.
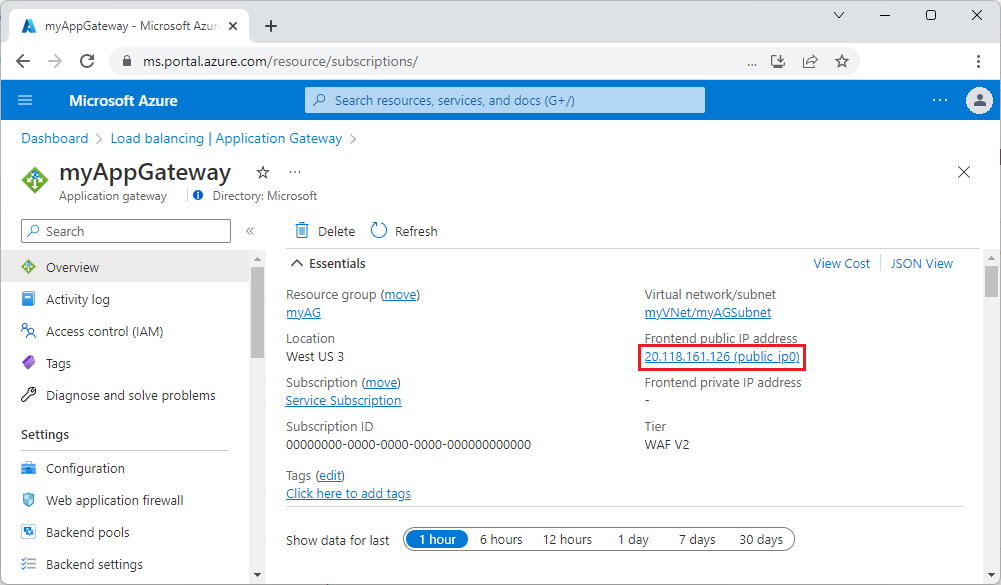 Or, you can select All resources, enter myAGPublicIPAddress in the search box, and then select it in the search results. Azure displays the public IP address on the Overview page.
Copy the public IP address, and then paste it into the address bar of your browser to browse that IP address.
Check the response. A valid response verifies that the application gateway was successfully created and can successfully connect with the backend.
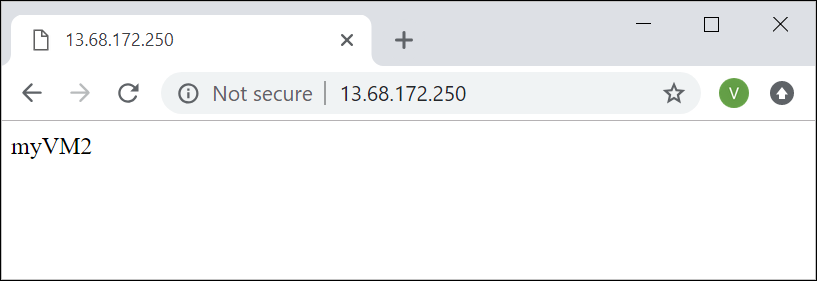
Refresh the browser multiple times and you should see connections to both myVM and myVM2.
Clean up resources
When you no longer need the resources that you created with the application gateway, delete the resource group. When you delete the resource group, you also remove the application gateway and all the related resources.
To delete the resource group:
- On the Azure portal menu, select Resource groups or search for and select Resource groups.
- On the Resource groups page, search for myResourceGroupAG in the list, then select it.
- On the Resource group page, select Delete resource group.
- Enter myResourceGroupAG under TYPE THE RESOURCE GROUP NAME and then select Delete
Unregister from the preview
Unregister for the preview using Azure PowerShell:
Set-AzContext -Subscription <subscription-id>
Get-AzProviderFeature -FeatureName AllowApplicationGatewayBasicSku -ProviderNamespace "Microsoft.Network"
Unregister-AzProviderFeature -FeatureName AllowApplicationGatewayBasicSku -ProviderNamespace Microsoft.Network
Next steps
Athugasemdir
Væntanlegt: Á árinu 2024 munum við hætta með GitHub-mál sem ábendingaleið fyrir efni og skipta því út fyrir nýtt ábendingakerfi. Frekari upplýsingar er að finna hér: https://aka.ms/ContentUserFeedback.
Senda inn og skoða endurgjöf fyrir
