Esercitazione: Creare un'app iOS che avvia il Strumento di lettura immersiva con contenuto da una foto (Swift)
Lo strumento di lettura immersiva è uno strumento incluso che implementa tecniche comprovate per migliorare la comprensione della lettura.
L'API di lettura di Visione artificiale di Azure rileva il contenuto di testo in un'immagine usando i modelli di riconoscimento più recenti di Microsoft e converte il testo identificato in un flusso di caratteri leggibile dal computer.
In questa esercitazione si creerà da zero un'app iOS in cui si integrerà l'API di lettura e lo strumento di lettura immersiva tramite Immersive Reader SDK. Un esempio pratico completo di questa esercitazione è disponibile qui.
Se non si ha una sottoscrizione di Azure, creare un account gratuito prima di iniziare.
Prerequisiti
- Xcode
- Una risorsa Strumento di lettura immersiva configurata per l'autenticazione di Microsoft Entra. Seguire queste istruzioni per configurare l'ambiente. Per la configurazione delle proprietà del progetto di esempio, saranno necessari alcuni dei valori creati qui. Salvare l'output della sessione in un file di testo per riferimento futuro.
- L'utilizzo di questo esempio richiede una sottoscrizione di Azure al servizio Visione artificiale di Azure. Creare una risorsa di Visione artificiale di Azure nell'portale di Azure.
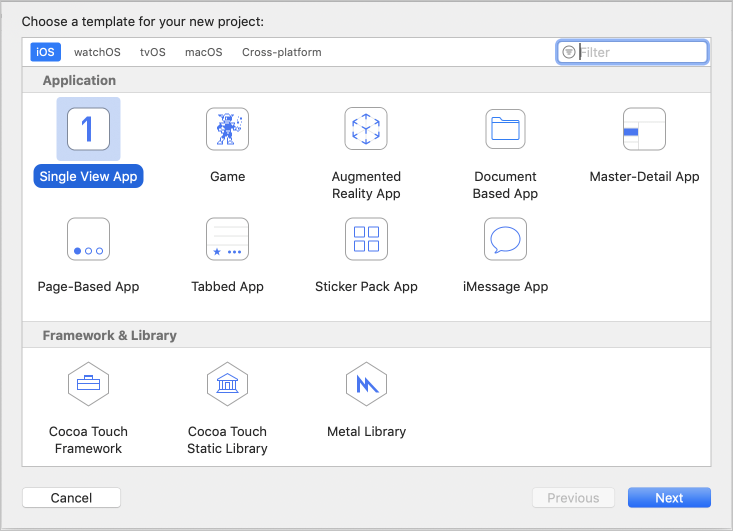
Creare un progetto Xcode
Creare un nuovo progetto in Xcode.

Scegliere App visualizzazione singola.
Ottenere il pod CocoaPods per l'SDK
Il modo più semplice per usare Immersive Reader SDK è tramite CocoaPods. Per eseguire l'installazione tramite CocoaPods:
Installare CocoaPods: seguire la guida introduttiva per installare CocoaPods.
Creare un podfile eseguendo
pod initnella directory radice del progetto Xcode.Aggiungere il pod CocoaPods al podfile aggiungendo
pod 'immersive-reader-sdk', :path => 'https://github.com/microsoft/immersive-reader-sdk/tree/master/iOS/immersive-reader-sdk'. Il podfile avrà un aspetto simile al seguente, con il nome della destinazione al posto di picture-to-immersive-reader-swift:platform :ios, '9.0' target 'picture-to-immersive-reader-swift' do use_frameworks! # Pods for picture-to-immersive-reader-swift pod 'immersive-reader-sdk', :git => 'https://github.com/microsoft/immersive-reader-sdk.git' endNel terminale eseguire il comando
pod installall'interno della directory del progetto Xcode per installare il pod Immersive Reader SDK.Aggiungere
import immersive_reader_sdka tutti i file che devono fare riferimento all'SDK.Assicurarsi di aprire il progetto tramite il file
.xcworkspacee non il file.xcodeproj.
Acquisire un token di autenticazione Di Microsoft Entra
Per questa parte sono necessari alcuni valori del passaggio precedente dei prerequisiti di configurazione dell'autenticazione di Microsoft Entra. Fare riferimento al file di testo salvato della sessione.
TenantId     => Azure subscription TenantId
ClientId     => Azure AD ApplicationId
ClientSecret => Azure AD Application Service Principal password
Subdomain    => Immersive Reader resource subdomain (resource 'Name' if the resource was created in the Azure portal, or 'CustomSubDomain' option if the resource was created with Azure CLI PowerShell. Check the Azure portal for the subdomain on the Endpoint in the resource Overview page, for example, 'https://[SUBDOMAIN].cognitiveservices.azure.com/')
Nella cartella principale del progetto, che contiene il file ViewController.swift, creare un file di classe Swift denominato Constants.swift. Sostituire la classe con il codice seguente, aggiungendo i valori, se applicabile. Mantenere questo file come file locale presente solo nel proprio computer e assicurarsi di non eseguirne il commit nel controllo del codice sorgente, in quanto contiene segreti che non devono essere resi pubblici. È consigliabile evitare di mantenere segreti nell'app. È invece consigliabile usare un servizio back-end per ottenere il token, in cui i segreti possono essere mantenuti esternamente all'app e al dispositivo. L'endpoint API back-end deve essere protetto tramite una qualche forma di autenticazione, ad esempio OAuth, per impedire a utenti non autorizzati di ottenere token da usare per il servizio e la fatturazione dello strumento di lettura immersiva. Tuttavia, questa parte esula dall'ambito di questa esercitazione.
Configurare l'app per l'esecuzione senza uno storyboard
Aprire AppDelegate.swift e sostituire il file con il codice seguente.
import UIKit

@UIApplicationMain
class AppDelegate: UIResponder, UIApplicationDelegate {

    var window: UIWindow?

    var navigationController: UINavigationController?

    func application(_ application: UIApplication, didFinishLaunchingWithOptions launchOptions: [UIApplication.LaunchOptionsKey: Any]?) -> Bool {
        // Override point for customization after application launch.

        window = UIWindow(frame: UIScreen.main.bounds)

        // Allow the app run without a storyboard
        if let window = window {
            let mainViewController = PictureLaunchViewController()
            navigationController = UINavigationController(rootViewController: mainViewController)
            window.rootViewController = navigationController
            window.makeKeyAndVisible()
        }
        return true
    }

    func applicationWillResignActive(_ application: UIApplication) {
        // Sent when the application is about to move from active to inactive state. This can occur for certain types of temporary interruptions (such as an incoming phone call or SMS message) or when the user quits the application and it begins the transition to the background state.
        // Use this method to pause ongoing tasks, disable timers, and invalidate graphics rendering callbacks. Games should use this method to pause the game.
    }

    func applicationDidEnterBackground(_ application: UIApplication) {
        // Use this method to release shared resources, save user data, invalidate timers, and store enough application state information to restore your application to its current state in case it is terminated later.
        // If your application supports background execution, this method is called instead of applicationWillTerminate: when the user quits.
    }

    func applicationWillEnterForeground(_ application: UIApplication) {
        // Called as part of the transition from the background to the active state; here you can undo many of the changes made on entering the background.
    }

    func applicationDidBecomeActive(_ application: UIApplication) {
        // Restart any tasks that were paused (or not yet started) while the application was inactive. If the application was previously in the background, optionally refresh the user interface.
    }

    func applicationWillTerminate(_ application: UIApplication) {
        // Called when the application is about to terminate. Save data if appropriate. See also applicationDidEnterBackground:.
    }

}
Aggiungere la funzionalità per l'acquisizione e il caricamento di foto
Rinominare ViewController.swift in PictureLaunchViewController.swift e sostituire il file con il codice seguente.
import UIKit
import immersive_reader_sdk

class PictureLaunchViewController: UIViewController, UINavigationControllerDelegate, UIImagePickerControllerDelegate {

    private var photoButton: UIButton!
    private var cameraButton: UIButton!
    private var titleText: UILabel!
    private var bodyText: UILabel!
    private var sampleContent: Content!
    private var sampleChunk: Chunk!
    private var sampleOptions: Options!
    private var imagePicker: UIImagePickerController!
    private var spinner: UIActivityIndicatorView!
    private var activityIndicatorBackground: UIView!
    private var textURL = "vision/v2.0/read/core/asyncBatchAnalyze";

    override func viewDidLoad() {
        super.viewDidLoad()

        view.backgroundColor = .white

        titleText = UILabel()
        titleText.text = "Picture to Immersive Reader with OCR"
        titleText.font = UIFont.boldSystemFont(ofSize: 32)
        titleText.textAlignment = .center
        titleText.lineBreakMode = .byWordWrapping
        titleText.numberOfLines = 0
        view.addSubview(titleText)

        bodyText = UILabel()
        bodyText.text = "Capture or upload a photo of handprinted text on a piece of paper, handwriting, typed text, text on a computer screen, writing on a white board and many more, and watch it be presented to you in the Immersive Reader!"
        bodyText.font = UIFont.systemFont(ofSize: 18)
        bodyText.lineBreakMode = .byWordWrapping
        bodyText.numberOfLines = 0
        let screenSize = self.view.frame.height
        if screenSize <= 667 {
            // Font size for smaller iPhones.
            bodyText.font = bodyText.font.withSize(16)

        } else if screenSize <= 812.0 {
            // Font size for medium iPhones.
            bodyText.font = bodyText.font.withSize(18)

        } else if screenSize <= 896  {
            // Font size for larger iPhones.
            bodyText.font = bodyText.font.withSize(20)

        } else {
            // Font size for iPads.
            bodyText.font = bodyText.font.withSize(26)
        }
        view.addSubview(bodyText)

        photoButton = UIButton()
        photoButton.backgroundColor = .darkGray
        photoButton.contentEdgeInsets = UIEdgeInsets(top: 10, left: 5, bottom: 10, right: 5)
        photoButton.layer.cornerRadius = 5
        photoButton.setTitleColor(.white, for: .normal)
        photoButton.setTitle("Choose Photo from Library", for: .normal)
        photoButton.titleLabel?.font = UIFont.systemFont(ofSize: 18, weight: .bold)
        photoButton.addTarget(self, action: #selector(selectPhotoButton(sender:)), for: .touchUpInside)
        view.addSubview(photoButton)

        cameraButton = UIButton()
        cameraButton.backgroundColor = .darkGray
        cameraButton.contentEdgeInsets = UIEdgeInsets(top: 10, left: 5, bottom: 10, right: 5)
        cameraButton.layer.cornerRadius = 5
        cameraButton.setTitleColor(.white, for: .normal)
        cameraButton.setTitle("Take Photo", for: .normal)
        cameraButton.titleLabel?.font = UIFont.systemFont(ofSize: 18, weight: .bold)
        cameraButton.addTarget(self, action: #selector(takePhotoButton(sender:)), for: .touchUpInside)
        view.addSubview(cameraButton)

        activityIndicatorBackground = UIView()
        activityIndicatorBackground.backgroundColor = UIColor.black
        activityIndicatorBackground.alpha = 0
        view.addSubview(activityIndicatorBackground)
        view.bringSubviewToFront(_: activityIndicatorBackground)

        spinner = UIActivityIndicatorView(style: .whiteLarge)
        view.addSubview(spinner)

        let layoutGuide = view.safeAreaLayoutGuide

        titleText.translatesAutoresizingMaskIntoConstraints = false
        titleText.topAnchor.constraint(equalTo: layoutGuide.topAnchor, constant: 25).isActive = true
        titleText.leadingAnchor.constraint(equalTo: layoutGuide.leadingAnchor, constant: 20).isActive = true
        titleText.trailingAnchor.constraint(equalTo: layoutGuide.trailingAnchor, constant: -20).isActive = true

        bodyText.translatesAutoresizingMaskIntoConstraints = false
        bodyText.topAnchor.constraint(equalTo: titleText.bottomAnchor, constant: 35).isActive = true
        bodyText.leadingAnchor.constraint(equalTo: layoutGuide.leadingAnchor, constant: 20).isActive = true
        bodyText.trailingAnchor.constraint(equalTo: layoutGuide.trailingAnchor, constant: -20).isActive = true

        cameraButton.translatesAutoresizingMaskIntoConstraints = false
        if screenSize > 896  {
            // Constraints for iPads.
            cameraButton.heightAnchor.constraint(equalToConstant: 150).isActive = true
            cameraButton.leadingAnchor.constraint(equalTo: layoutGuide.leadingAnchor, constant: 60).isActive = true
            cameraButton.trailingAnchor.constraint(equalTo: layoutGuide.trailingAnchor, constant: -60).isActive = true
            cameraButton.topAnchor.constraint(equalTo: bodyText.bottomAnchor, constant: 150).isActive = true
        } else {
            // Constraints for iPhones.
            cameraButton.heightAnchor.constraint(equalToConstant: 100).isActive = true
            cameraButton.leadingAnchor.constraint(equalTo: layoutGuide.leadingAnchor, constant: 30).isActive = true
            cameraButton.trailingAnchor.constraint(equalTo: layoutGuide.trailingAnchor, constant: -30).isActive = true
            cameraButton.topAnchor.constraint(equalTo: bodyText.bottomAnchor, constant: 100).isActive = true
        }
        cameraButton.bottomAnchor.constraint(equalTo: photoButton.topAnchor, constant: -40).isActive = true

        photoButton.translatesAutoresizingMaskIntoConstraints = false
        if screenSize > 896  {
            // Constraints for iPads.
            photoButton.heightAnchor.constraint(equalToConstant: 150).isActive = true
            photoButton.leadingAnchor.constraint(equalTo: layoutGuide.leadingAnchor, constant: 60).isActive = true
            photoButton.trailingAnchor.constraint(equalTo: layoutGuide.trailingAnchor, constant: -60).isActive = true
        } else {
            // Constraints for iPhones.
            photoButton.heightAnchor.constraint(equalToConstant: 100).isActive = true
            photoButton.leadingAnchor.constraint(equalTo: layoutGuide.leadingAnchor, constant: 30).isActive = true
            photoButton.trailingAnchor.constraint(equalTo: layoutGuide.trailingAnchor, constant: -30).isActive = true
        }

        spinner.translatesAutoresizingMaskIntoConstraints = false
        spinner.centerXAnchor.constraint(equalTo: view.centerXAnchor).isActive = true
        spinner.centerYAnchor.constraint(equalTo: view.centerYAnchor).isActive = true

        activityIndicatorBackground.translatesAutoresizingMaskIntoConstraints = false
        activityIndicatorBackground.topAnchor.constraint(equalTo: layoutGuide.topAnchor).isActive = true
        activityIndicatorBackground.bottomAnchor.constraint(equalTo: layoutGuide.bottomAnchor).isActive = true
        activityIndicatorBackground.leadingAnchor.constraint(equalTo: layoutGuide.leadingAnchor).isActive = true
        activityIndicatorBackground.trailingAnchor.constraint(equalTo: layoutGuide.trailingAnchor).isActive = true

        // Create content and options.
        sampleChunk = Chunk(content: bodyText.text!, lang: nil, mimeType: nil)
        sampleContent = Content(title: titleText.text!, chunks: [sampleChunk])
        sampleOptions = Options(uiLang: nil, timeout: nil, uiZIndex: nil)
    }

    @IBAction func selectPhotoButton(sender: AnyObject) {
            // Launch the photo picker.
            imagePicker =  UIImagePickerController()
            imagePicker.delegate = self
            self.imagePicker.sourceType = .photoLibrary
            self.imagePicker.allowsEditing = true
            self.present(self.imagePicker, animated: true, completion: nil)
            self.photoButton.isEnabled = true
    }

    @IBAction func takePhotoButton(sender: AnyObject) {
        if !UIImagePickerController.isSourceTypeAvailable(.camera) {
            // If there is no camera on the device, disable the button
            self.cameraButton.backgroundColor = .gray
            self.cameraButton.isEnabled = true

        } else {
            // Launch the camera.
            imagePicker =  UIImagePickerController()
            imagePicker.delegate = self
            self.imagePicker.sourceType = .camera
            self.present(self.imagePicker, animated: true, completion: nil)
            self.cameraButton.isEnabled = true
        }
    }

    func imagePickerController(_ picker: UIImagePickerController, didFinishPickingMediaWithInfo info: [UIImagePickerController.InfoKey : Any]) {
        imagePicker.dismiss(animated: true, completion: nil)
        photoButton.isEnabled = false
        cameraButton.isEnabled = false
        self.spinner.startAnimating()
        activityIndicatorBackground.alpha = 0.6

        // Retrieve the image.
        let image = (info[.originalImage] as? UIImage)!

        // Retrieve the byte array from image.
        let imageByteArray = image.jpegData(compressionQuality: 1.0)

        // Call the getTextFromImage function passing in the image the user takes or chooses.
        getTextFromImage(subscriptionKey: Constants.computerVisionSubscriptionKey, getTextUrl: Constants.computerVisionEndPoint + textURL, pngImage: imageByteArray!, onSuccess: { cognitiveText in
            print("cognitive text is: \(cognitiveText)")
            DispatchQueue.main.async {
                self.photoButton.isEnabled = true
                self.cameraButton.isEnabled = true
            }

            // Create content and options with the text from the image.
            let sampleImageChunk = Chunk(content: cognitiveText, lang: nil, mimeType: nil)
            let sampleImageContent = Content(title: "Text from image", chunks: [sampleImageChunk])
            let sampleImageOptions = Options(uiLang: nil, timeout: nil, uiZIndex: nil)

            // Callback to get token for Immersive Reader.
            self.getToken(onSuccess: {cognitiveToken in

                DispatchQueue.main.async {

                    launchImmersiveReader(navController: self.navigationController!, token: cognitiveToken, subdomain: Constants.subdomain, content: sampleImageContent, options: sampleImageOptions, onSuccess: {
                        self.spinner.stopAnimating()
                        self.activityIndicatorBackground.alpha = 0
                        self.photoButton.isEnabled = true
                        self.cameraButton.isEnabled = true

                    }, onFailure: { error in
                        print("An error occurred launching the Immersive Reader: \(error)")
                        self.spinner.stopAnimating()
                        self.activityIndicatorBackground.alpha = 0
                        self.photoButton.isEnabled = true
                        self.cameraButton.isEnabled = true

                    })
                }

            }, onFailure: { error in
                DispatchQueue.main.async {
                    self.photoButton.isEnabled = true
                    self.cameraButton.isEnabled = true

                }
                print("An error occurred retrieving the token: \(error)")
            })

        }, onFailure: { error in
            DispatchQueue.main.async {
                self.photoButton.isEnabled = true
                self.cameraButton.isEnabled = true
            }

        })
    }

    /// Retrieves the token for the Immersive Reader using Azure Active Directory authentication
    ///
    /// - Parameters:
    ///     -onSuccess: A closure that gets called when the token is successfully recieved using Azure Active Directory authentication.
    ///     -theToken: The token for the Immersive Reader recieved using Azure Active Directory authentication.
    ///     -onFailure: A closure that gets called when the token fails to be obtained from the Azure Active Directory Authentication.
    ///     -theError: The error that occurred when the token fails to be obtained from the Azure Active Directory Authentication.
    func getToken(onSuccess: @escaping (_ theToken: String) -> Void, onFailure: @escaping ( _ theError: String) -> Void) {

        let tokenForm = "grant_type=client_credentials&resource=https://cognitiveservices.azure.com/&client_id=" + Constants.clientId + "&client_secret=" + Constants.clientSecret
        let tokenUrl = "https://login.windows.net/" + Constants.tenantId + "/oauth2/token"

        var responseTokenString: String = "0"

        let url = URL(string: tokenUrl)!
        var request = URLRequest(url: url)
        request.httpBody = tokenForm.data(using: .utf8)
        request.httpMethod = "POST"

        let task = URLSession.shared.dataTask(with: request) { data, response, error in
            guard let data = data,
                let response = response as? HTTPURLResponse,
                // Check for networking errors.
                error == nil else {
                    print("error", error ?? "Unknown error")
                    onFailure("Error")
                    return
            }

            // Check for http errors.
            guard (200 ... 299) ~= response.statusCode else {
                print("statusCode should be 2xx, but is \(response.statusCode)")
                print("response = \(response)")
                onFailure(String(response.statusCode))
                return
            }

            let responseString = String(data: data, encoding: .utf8)
            print("responseString = \(String(describing: responseString!))")

            let jsonResponse = try? JSONSerialization.jsonObject(with: data, options: [])
            guard let jsonDictonary = jsonResponse as? [String: Any] else {
                onFailure("Error parsing JSON response.")
                return
            }
            guard let responseToken = jsonDictonary["access_token"] as? String else {
                onFailure("Error retrieving token from JSON response.")
                return
            }
            responseTokenString = responseToken
            onSuccess(responseTokenString)
        }

        task.resume()
    }

    /// Returns the text string after it has been extracted from an Image input.
    ///
    /// - Parameters:
    ///     -subscriptionKey: The Azure subscription key.
    ///     -pngImage: Image data in PNG format.
    /// - Returns: a string of text representing the
    func getTextFromImage(subscriptionKey: String, getTextUrl: String, pngImage: Data, onSuccess: @escaping (_ theToken: String) -> Void, onFailure: @escaping ( _ theError: String) -> Void) {

        let url = URL(string: getTextUrl)!
        var request = URLRequest(url: url)
        request.setValue(subscriptionKey, forHTTPHeaderField: "Ocp-Apim-Subscription-Key")
        request.setValue("application/octet-stream", forHTTPHeaderField: "Content-Type")

        // Two REST API calls are required to extract text. The first call is to submit the image for processing, and the next call is to retrieve the text found in the image.

        // Set the body to the image in byte array format.
        request.httpBody = pngImage

        request.httpMethod = "POST"

        let task = URLSession.shared.dataTask(with: request) { data, response, error in
            guard let data = data,
                let response = response as? HTTPURLResponse,
                // Check for networking errors.
                error == nil else {
                    print("error", error ?? "Unknown error")
                    onFailure("Error")
                    return
            }

            // Check for http errors.
            guard (200 ... 299) ~= response.statusCode else {
                print("statusCode should be 2xx, but is \(response.statusCode)")
                print("response = \(response)")
                onFailure(String(response.statusCode))
                return
            }

            let responseString = String(data: data, encoding: .utf8)
            print("responseString = \(String(describing: responseString!))")

            // Send the second call to the API. The first API call returns operationLocation which stores the URI for the second REST API call.
            let operationLocation = response.allHeaderFields["Operation-Location"] as? String

            if (operationLocation == nil) {
                print("Error retrieving operation location")
                return
            }

            // Wait 10 seconds for text recognition to be available as suggested by the Text API documentation.
            print("Text submitted. Waiting 10 seconds to retrieve the recognized text.")
            sleep(10)

            // HTTP GET request with the operationLocation url to retrieve the text.
            let getTextUrl = URL(string: operationLocation!)!
            var getTextRequest = URLRequest(url: getTextUrl)
            getTextRequest.setValue(subscriptionKey, forHTTPHeaderField: "Ocp-Apim-Subscription-Key")
            getTextRequest.httpMethod = "GET"

            // Send the GET request to retrieve the text.
            let taskGetText = URLSession.shared.dataTask(with: getTextRequest) { data, response, error in
                guard let data = data,
                    let response = response as? HTTPURLResponse,
                    // Check for networking errors.
                    error == nil else {
                        print("error", error ?? "Unknown error")
                        onFailure("Error")
                        return
                }

                // Check for http errors.
                guard (200 ... 299) ~= response.statusCode else {
                    print("statusCode should be 2xx, but is \(response.statusCode)")
                    print("response = \(response)")
                    onFailure(String(response.statusCode))
                    return
                }

                // Decode the JSON data into an object.
                let customDecoding = try! JSONDecoder().decode(TextApiResponse.self, from: data)

                // Loop through the lines to get all lines of text and concatenate them together.
                var textFromImage = ""
                for textLine in customDecoding.recognitionResults[0].lines {
                    textFromImage = textFromImage + textLine.text + " "
                }

                onSuccess(textFromImage)
            }
            taskGetText.resume()

        }

        task.resume()
    }

    // Structs used for decoding the Text API JSON response.
    struct TextApiResponse: Codable {
        let status: String
        let recognitionResults: [RecognitionResult]
    }

    struct RecognitionResult: Codable {
        let page: Int
        let clockwiseOrientation: Double
        let width, height: Int
        let unit: String
        let lines: [Line]
    }

    struct Line: Codable {
        let boundingBox: [Int]
        let text: String
        let words: [Word]
    }

    struct Word: Codable {
        let boundingBox: [Int]
        let text: String
        let confidence: String?
    }

}
Compilare ed eseguire l'app
Impostare lo schema di archiviazione in Xcode selezionando come destinazione un simulatore o un dispositivo.


In Xcode premere CTRL+R o selezionare il pulsante di riproduzione per eseguire il progetto e l'app deve essere avviata nel simulatore o nel dispositivo specificato.
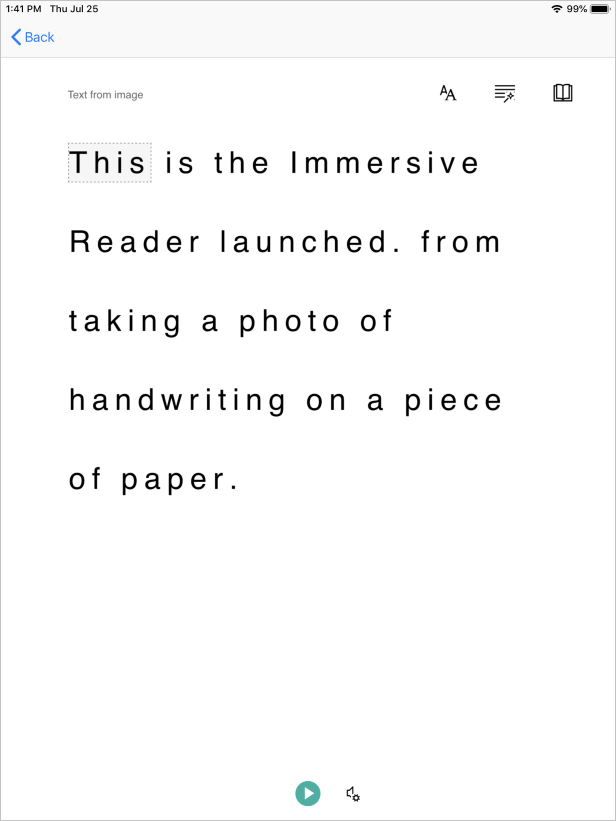
Nell'app verrà visualizzato il contenuto seguente:
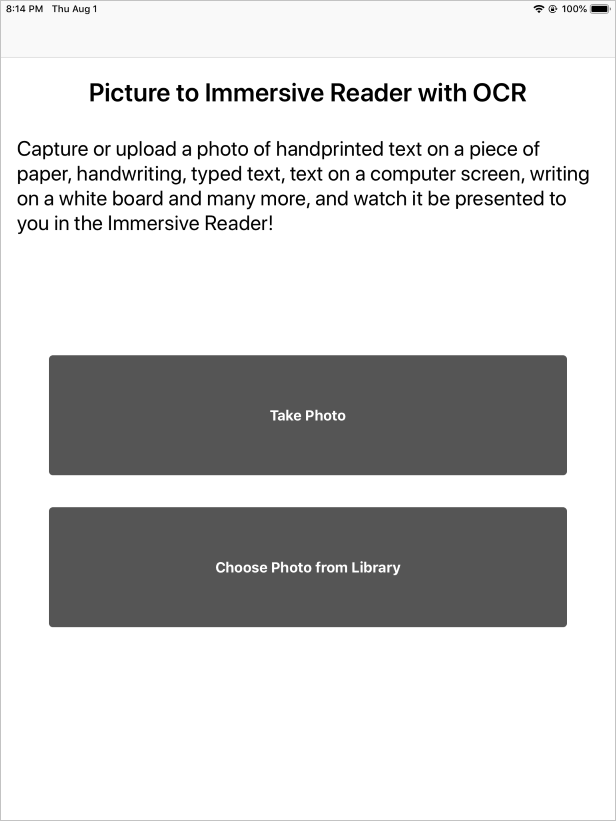
All'interno dell'app scattare o caricare una foto di testo premendo il pulsante "Scatta foto" o "Scegli foto dalla raccolta" perché lo strumento di lettura immersiva avvii la visualizzazione del testo dalla foto.