適用対象: SDK v4
ボットを作成する主な目的は、有意義な会話によってユーザー エンゲージメントを高めることです。 この目標を達成するための効果的な方法の 1 つは、ユーザーが最初にアクセスした瞬間から、ボットの主な目的と機能 (ボットが作られた理由) をユーザーがわかるようにすることです。 この記事では、ボットのユーザーを歓迎するのに役立つコード サンプルを紹介します。
このサンプル コードは、新しいユーザーを検出し、そのユーザーがボットに最初に接続されたときにウェルカム メッセージを表示する方法を示しています。 次の図は、このボットのロジック フローです。
ボットの 2 つの主要なイベントを次に示します。
OnMembersAddedAsync: 新しいユーザーがボットに接続したときに呼び出されます。OnMessageActivityAsync: ボットが新しいユーザー入力を受け取ったときに呼び出されます。

接続された新しいユーザーには必ず、WelcomeMessage、InfoMessage、および PatternMessage がボットから提供されます。
新しいユーザー入力を受信すると、WelcomeUserState で DidBotWelcomeUser が true に設定されているかどうかが確認されます。 設定されていない場合、最初のウェルカム メッセージがユーザーに返されます。
ボットの 2 つの主要なイベントを次に示します。
onMembersAdded: 新しいユーザーがボットに接続したときに呼び出されます。onMessage: ボットが新しいユーザー入力を受け取ったときに呼び出されます。
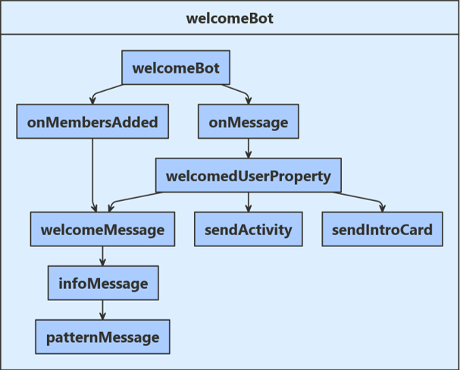
接続された新しいユーザーには必ず、welcomeMessage、infoMessage、および patternMessage がボットから提供されます。
新しいユーザー入力を受信すると、welcomedUserProperty で didBotWelcomeUser が true に設定されているかどうかが確認されます。 設定されていない場合、最初のウェルカム メッセージがユーザーに返されます。
DidBotWelcomeUser が true の場合は、ユーザーの入力が評価されます。 ユーザー入力のコンテンツに基づいて、このボットでは次のいずれかの処理が実行されます。
- ユーザーから受信したグリーティングをエコー バックします。
- ボットに関する追加情報を提供するヒーロー カードを表示します。
WelcomeMessage を再送信します。これには、このボットで想定される入力の説明が示されています。
ボットの 2 つの主要なイベントを次に示します。
onMembersAdded: 新しいユーザーがボットに接続したときに呼び出されます。onMessageActivity: ボットが新しいユーザー入力を受け取ったときに呼び出されます。
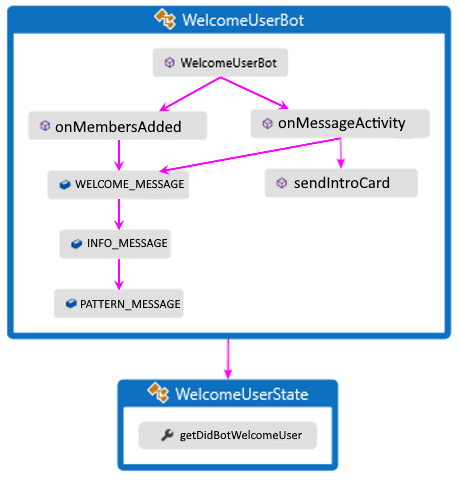
接続された新しいユーザーには必ず、WELCOME_MESSAGE、INFO_MESSAGE、および PATTERN_MESSAGE がボットから提供されます。
新しいユーザー入力を受信すると、WelcomeUserState で getDidBotWelcomeUser() が true に設定されているかどうかが確認されます。 設定されていない場合、最初のウェルカム メッセージがユーザーに返されます。
ボットの 2 つの主要なイベントを次に示します。
on_members_added_activity: 新しいユーザーがボットに接続したときに呼び出されます。on_message_activity: ボットが新しいユーザー入力を受け取ったときに呼び出されます。
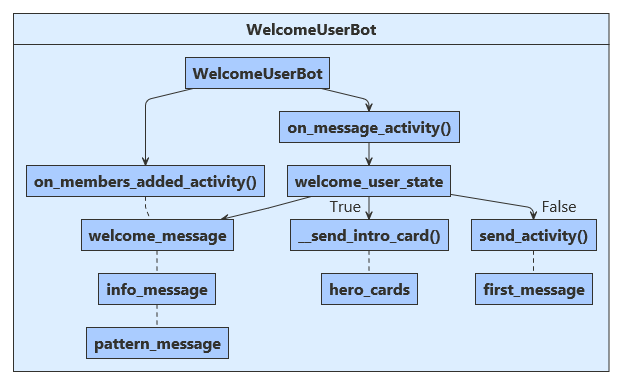
新しいユーザーが接続されるたびに、ボットによってウェルカム メッセージ、情報メッセージ、パターン メッセージが表示されます。
新しいユーザー入力を受信すると、welcome_user_state.did_welcome_user プロパティが確認されます。 true に設定されていない場合、最初のウェルカム ユーザー メッセージがユーザーに返されます。 true に設定されている場合、ユーザー入力のコンテンツに基づいて、このボットでは次のいずれかの処理が実行されます。
- ユーザーから受信したグリーティングをエコー バックします。
- ボットに関する追加情報を提供するヒーロー カードを表示します。
ユーザー状態オブジェクトはスタートアップ時に作成され、依存関係がボット コンストラクターに挿入されます。
Startup.cs
// Create the Bot Framework Authentication to be used with the Bot Adapter.
services.AddSingleton<BotFrameworkAuthentication, ConfigurationBotFrameworkAuthentication>();

// Create the Bot Adapter with error handling enabled.
Bots\WelcomeUserBot.cs
// Initializes a new instance of the "WelcomeUserBot" class.
public WelcomeUserBot(UserState userState)
{
    _userState = userState;
}
起動時に、ユーザーの状態が index.js で定義され、ボット コンストラクターによって使用されます。
index.js
// Create HTTP server
const server = restify.createServer();
server.use(restify.plugins.bodyParser());

server.listen(process.env.port || process.env.PORT || 3978, function() {
    console.log(`\n${ server.name } listening to ${ server.url }`);
    console.log('\nGet Bot Framework Emulator: https://aka.ms/botframework-emulator');
Spring コンテナーによってユーザー状態オブジェクトはスタートアップ時に作成され、依存関係がボット コンストラクターに挿入されます。
Application.java
警告
探しているサンプルが移動したようです。 私たちはこれを解決することに取り組んでいますのでご安心ください。
WelcomeUserBot.java
警告
探しているサンプルが移動したようです。 私たちはこれを解決することに取り組んでいますのでご安心ください。
起動時に、ユーザーの状態が app.py で定義され、ボット コンストラクターによって使用されます。
app.py
# Create the Bot
BOT = WelcomeUserBot(USER_STATE)


# Listen for incoming requests on /api/messages.
ここで、WelcomeUserState へのハンドルを返すプロパティ アクセサーを OnMessageActivityAsync メソッド内に作成します。
次に、GetAsync メソッドを呼び出して、適切に範囲指定されたキーを取得します。 その後、ユーザー入力イテレーションが終了するたびに、SaveChangesAsync メソッドを使用して、ユーザー状態データを保存します。
Bots\WelcomeUserState.cs
// Gets or sets whether the user has been welcomed in the conversation.
public bool DidBotWelcomeUser { get; set; } = false;
Bots\WelcomeUserBot.cs
var didBotWelcomeUser = await welcomeUserStateAccessor.GetAsync(turnContext, () => new WelcomeUserState(), cancellationToken);
    await _userState.SaveChangesAsync(turnContext, cancellationToken: cancellationToken);
}
ここでプロパティ アクセサーを作成します。このアクセサーにより、userState 内で保持されている welcomedUserProperty のハンドルが提供されます。
bots/welcomeBot.js
this.welcomedUserProperty = userState.createProperty(WELCOMED_USER);
this.onMessage(async (context, next) => {
    // Read UserState. If the 'DidBotWelcomedUser' does not exist (first time ever for a user)
    // set the default to false.
    const didBotWelcomedUser = await this.welcomedUserProperty.get(context, false);
/**
 * Override the ActivityHandler.run() method to save state changes after the bot logic completes.
 */
async run(context) {
    await super.run(context);

    // Save state changes
    await this.userState.saveChanges(context);
}
ここで、WelcomeUserState へのハンドルを返すプロパティ アクセサーを onMessageActivity メソッド内に作成します。
次に、get メソッドを呼び出して、適切に範囲指定されたキーを取得します。 その後、ユーザー入力イテレーションが終了するたびに、saveChanges メソッドを使用して、ユーザー状態データを保存します。
WelcomeUserBot.java
警告
探しているサンプルが移動したようです。 私たちはこれを解決することに取り組んでいますのでご安心ください。
警告
探しているサンプルが移動したようです。 私たちはこれを解決することに取り組んでいますのでご安心ください。
このサンプルでは、ボット コンストラクターで、会話状態のプロパティ アクセサー user_state_accessorが作成されます。
bots/welcome-user-bot.py
self.user_state_accessor = self._user_state.create_property("WelcomeUserState")
これは、on_message_activity ハンドラーでプロパティ アクセサーを使用し、on_turn ハンドラーをオーバーライドしてターン終了前に状態を保存します。
# Get the state properties from the turn context.
welcome_user_state = await self.user_state_accessor.get(
    turn_context, WelcomeUserState
)
async def on_turn(self, turn_context: TurnContext):
    await super().on_turn(turn_context)

    # save changes to WelcomeUserState after each turn
    await self._user_state.save_changes(turn_context)
WelcomeUserBot では、OnMembersAddedAsync() を使用してアクティビティ更新をチェックし、会話に新しいユーザーが追加されたかどうかを確認して、そのユーザーに最初の 3 つのウェルカム メッセージ WelcomeMessage、InfoMessage、および PatternMessage を送信します。 このインタラクションの完全なコードを以下に示します。
Bots\WelcomeUserBot.cs
public class WelcomeUserBot : ActivityHandler
{
    // Messages sent to the user.
    private const string WelcomeMessage = "This is a simple Welcome Bot sample. This bot will introduce you " +
                                            "to welcoming and greeting users. You can say 'intro' to see the " +
                                            "introduction card. If you are running this bot in the Bot Framework " +
                                            "Emulator, press the 'Start Over' button to simulate user joining " +
                                            "a bot or a channel";

    private const string InfoMessage = "You are seeing this message because the bot received at least one " +
                                        "'ConversationUpdate' event, indicating you (and possibly others) " +
                                        "joined the conversation. If you are using the emulator, pressing " +
                                        "the 'Start Over' button to trigger this event again. The specifics " +
                                        "of the 'ConversationUpdate' event depends on the channel. You can " +
                                        "read more information at: " +
                                        "https://aka.ms/about-botframework-welcome-user";

    private const string LocaleMessage = "You can use the activity's 'GetLocale()' method to welcome the user " +
                                         "using the locale received from the channel. " +
                                         "If you are using the Emulator, you can set this value in Settings.";
{
    foreach (var member in membersAdded)
    {
        if (member.Id != turnContext.Activity.Recipient.Id)
        {
            await turnContext.SendActivityAsync($"Hi there - {member.Name}. {WelcomeMessage}", cancellationToken: cancellationToken);
            await turnContext.SendActivityAsync(InfoMessage, cancellationToken: cancellationToken);
            await turnContext.SendActivityAsync($"{LocaleMessage} Current locale is '{turnContext.Activity.GetLocale()}'.", cancellationToken: cancellationToken);
            await turnContext.SendActivityAsync(PatternMessage, cancellationToken: cancellationToken);
        }
    }
}
この JavaScript コードは、ユーザーが追加されたときに最初のウェルカム メッセージを送信します。 これは、会話アクティビティをチェックし、会話に新しいメンバーが追加されたことを確認することで実行されます。
bots/welcomeBot.js
// Sends welcome messages to conversation members when they join the conversation.
// Messages are only sent to conversation members who aren't the bot.
this.onMembersAdded(async (context, next) => {
    // Iterate over all new members added to the conversation
    for (const idx in context.activity.membersAdded) {
        // Greet anyone that was not the target (recipient) of this message.
        // Since the bot is the recipient for events from the channel,
        // context.activity.membersAdded === context.activity.recipient.Id indicates the
        // bot was added to the conversation, and the opposite indicates this is a user.
        if (context.activity.membersAdded[idx].id !== context.activity.recipient.id) {
            await context.sendActivity(`Welcome to the 'Welcome User' Bot. This bot will introduce you to welcoming and greeting users.`);
            await context.sendActivity(`You are seeing this message because the bot received at least one 'ConversationUpdate' ` +
                `event, indicating you (and possibly others) joined the conversation. If you are using the emulator, ` +
                `pressing the 'Start Over' button to trigger this event again. The specifics of the 'ConversationUpdate' ` +
                `event depends on the channel. You can read more information at https://aka.ms/about-botframework-welcome-user`);
            await context.sendActivity(`You can use the activity's 'locale' property to welcome the user ` +
                `using the locale received from the channel. ` +
                `If you are using the Emulator, you can set this value in Settings. ` +
                `Current locale is '${ context.activity.locale }'`);
            await context.sendActivity(`It is a good pattern to use this event to send general greeting to user, explaining what your bot can do. ` +
                `In this example, the bot handles 'hello', 'hi', 'help' and 'intro'. ` +
                `Try it now, type 'hi'`);
        }
    }

    // By calling next() you ensure that the next BotHandler is run.
    await next();
});
WelcomeUserBot では、onMembersAdded() を使用してアクティビティ更新をチェックし、会話に新しいユーザーが追加されたかどうかを確認して、そのユーザーに最初の 3 つのウェルカム メッセージ WELCOME_MESSAGE、INFO_MESSAGE、および PATTERN_MESSAGE を送信します。 このインタラクションの完全なコードを以下に示します。
WelcomeUserBot.java
警告
探しているサンプルが移動したようです。 私たちはこれを解決することに取り組んでいますのでご安心ください。
警告
探しているサンプルが移動したようです。 私たちはこれを解決することに取り組んでいますのでご安心ください。
on_members_added_activity は、新しいユーザーが追加されたかどうかを確認してから、3 つのウェルカム メッセージ ("ウェルカム メッセージ"、"情報メッセージ"、および "パターン メッセージ") を送信します。
bots/welcome-user-bot.py
"""
Greet when users are added to the conversation.
Note that all channels do not send the conversation update activity.
If you find that this bot works in the emulator, but does not in
another channel the reason is most likely that the channel does not
send this activity.
"""
for member in members_added:
    if member.id != turn_context.activity.recipient.id:
        await turn_context.send_activity(
            f"Hi there { member.name }. " + self.WELCOME_MESSAGE
        )

        await turn_context.send_activity(self.INFO_MESSAGE)

        await turn_context.send_activity(
            f"{ self.LOCALE_MESSAGE } Current locale is { turn_context.activity.locale }."
        )

        await turn_context.send_activity(self.PATTERN_MESSAGE)
ユーザーの入力に有用な情報が実際に含まれている場合を考慮することも重要です。これはチャネルごとに異なる可能性があります。 ユーザーが使用可能なすべてのチャネルで良好なエクスペリエンスを得られるようにするために、状態フラグ didBotWelcomeUser を確認します。これが "false" の場合、最初のユーザー入力は処理されません。 代わりに、ユーザーに最初のウェルカム メッセージを表示します。 ブール値 welcomedUserProperty が "true" に設定され、UserState に格納されると、すべての追加メッセージ アクティビティからのこのユーザーの入力が、コードによって処理されます。
Bots\WelcomeUserBot.cs
{
    var welcomeUserStateAccessor = _userState.CreateProperty<WelcomeUserState>(nameof(WelcomeUserState));
    var didBotWelcomeUser = await welcomeUserStateAccessor.GetAsync(turnContext, () => new WelcomeUserState(), cancellationToken);

    if (didBotWelcomeUser.DidBotWelcomeUser == false)
    {
        didBotWelcomeUser.DidBotWelcomeUser = true;

        // the channel should sends the user name in the 'From' object
        var userName = turnContext.Activity.From.Name;

        await turnContext.SendActivityAsync("You are seeing this message because this was your first message ever to this bot.", cancellationToken: cancellationToken);
        await turnContext.SendActivityAsync($"It is a good practice to welcome the user and provide personal greeting. For example, welcome {userName}.", cancellationToken: cancellationToken);
    }
    else
    await _userState.SaveChangesAsync(turnContext, cancellationToken: cancellationToken);
}
ユーザーの入力に有用な情報が実際に含まれている場合を考慮することも重要です。これはチャネルごとに異なる可能性があります。 ユーザーが使用可能なすべてのチャネルで良好なエクスペリエンスを得られるようにするために、didBotWelcomedUser プロパティを確認します。これが存在しない場合は、値は "false" に設定され、最初のユーザー入力は処理されません。 代わりに、ユーザーに最初のウェルカム メッセージを表示します。 その後、ブール値 didBotWelcomeUser が "true" に設定され、すべての追加メッセージ アクティビティからのユーザー入力が、コードによって処理されます。
bots/welcomeBot.js
this.onMessage(async (context, next) => {
    // Read UserState. If the 'DidBotWelcomedUser' does not exist (first time ever for a user)
    // set the default to false.
    const didBotWelcomedUser = await this.welcomedUserProperty.get(context, false);

    // Your bot should proactively send a welcome message to a personal chat the first time
    // (and only the first time) a user initiates a personal chat with your bot.
    if (didBotWelcomedUser === false) {
        // The channel should send the user name in the 'From' object
        const userName = context.activity.from.name;
        await context.sendActivity('You are seeing this message because this was your first message ever sent to this bot.');
        await context.sendActivity(`It is a good practice to welcome the user and provide personal greeting. For example, welcome ${ userName }.`);

        // Set the flag indicating the bot handled the user's first message.
        await this.welcomedUserProperty.set(context, true);
    } else {
    }

    // By calling next() you ensure that the next BotHandler is run.
    await next();
});
ユーザーの入力に有用な情報が含まれている場合を考慮することが重要です。これはチャネルごとに異なる可能性があります。 ユーザーが使用可能なすべてのチャネルで良好なエクスペリエンスを得られるようにするために、状態フラグ getDidBotWelcomeUser を確認します。これが "false" の場合、最初のユーザー入力は処理されません。 代わりに、ユーザーに最初のウェルカム メッセージを表示します。 ブール値 setDidBotWelcomeUser が "true" に設定され、UserState に格納されると、すべての追加メッセージ アクティビティからのこのユーザーの入力が、コードによって処理されます。
WelcomeUserBot.java
警告
探しているサンプルが移動したようです。 私たちはこれを解決することに取り組んでいますのでご安心ください。
警告
探しているサンプルが移動したようです。 私たちはこれを解決することに取り組んでいますのでご安心ください。
ユーザーの入力に有用な情報が実際に含まれている場合を考慮することも重要です。これはチャネルごとに異なる可能性があります。 ユーザーが使用可能なすべてのチャネルで良好なエクスペリエンスを得られるようにするために、on_message_activity は did_welcome_user プロパティを確認します。 初回は、false に設定し、ユーザー入力を処理しません。 代わりに、ユーザーに最初のウェルカム メッセージを表示します。 次に、did_welcome_user を true に設定し、すべての追加メッセージ アクティビティからのユーザー入力を処理します。
bots/welcome-user-bot.py
if not welcome_user_state.did_welcome_user:
    welcome_user_state.did_welcome_user = True

    await turn_context.send_activity(
        "You are seeing this message because this was your first message ever to this bot."
    )

    name = turn_context.activity.from_property.name
    await turn_context.send_activity(
        f"It is a good practice to welcome the user and provide personal greeting. For example: Welcome {name}"
    )
新しいユーザーにウェルカム メッセージが表示されると、メッセージ ターンごとにユーザー入力情報が評価され、そのユーザー入力のコンテキストに基づいてボットが応答します。 次のコードは、その応答の生成に使用する意思決定ロジックを示しています。
"Intro" または "help" の入力により関数 SendIntroCardAsync が呼び出され、情報ヒーロー カードがユーザーに示されます。 そのコードについては、この記事の次のセクションで説明します。
Bots\WelcomeUserBot.cs
    switch (text)
    {
        case "hello":
        case "hi":
            await turnContext.SendActivityAsync($"You said {text}.", cancellationToken: cancellationToken);
            break;
        case "intro":
        case "help":
            await SendIntroCardAsync(turnContext, cancellationToken);
            break;
        default:
            await turnContext.SendActivityAsync(WelcomeMessage, cancellationToken: cancellationToken);
            break;
    }
}
"intro" または "help" の入力では、CardFactory によってユーザーに Intro アダプティブ カードが提示されます。 そのコードについては、この記事の次のセクションで説明します。
bots/welcomeBot.js
// This example uses an exact match on user's input utterance.
// Consider using LUIS or QnA for Natural Language Processing.
const text = context.activity.text.toLowerCase();
switch (text) {
case 'hello':
case 'hi':
    await context.sendActivity(`You said "${ context.activity.text }"`);
    break;
case 'intro':
case 'help':
    await this.sendIntroCard(context);
    break;
default:
    await context.sendActivity(`This is a simple Welcome Bot sample. You can say 'intro' to
                                    see the introduction card. If you are running this bot in the Bot
                                    Framework Emulator, press the 'Start Over' button to simulate user joining a bot or a channel`);
}
"Intro" または "help" の入力により関数 sendIntroCard が呼び出され、情報ヒーロー カードがユーザーに示されます。 そのコードについては、この記事の次のセクションで説明します。
WelcomeUserBot.java
警告
探しているサンプルが移動したようです。 私たちはこれを解決することに取り組んでいますのでご安心ください。
ユーザーが intro または help を入力すると、ボットが __send_intro_card を呼び出して、概要アダプティブ カードがユーザーに示されます。
bots/welcome-user-bot.py
if text in ("hello", "hi"):
    await turn_context.send_activity(f"You said { text }")
elif text in ("intro", "help"):
    await self.__send_intro_card(turn_context)
else:
    await turn_context.send_activity(self.WELCOME_MESSAGE)
既に説明したように、一部のユーザー入力では、要求の応答として "ヒーロー カード" が生成されます。 ヒーロー カード グリーティングの詳細については、概要カードの送信に関するページをご覧ください。 このボットのヒーロー カード応答の作成に必要なコードを次に示します。
Bots\WelcomeUserBot.cs
    {
        var card = new HeroCard
        {
            Title = "Welcome to Bot Framework!",
            Text = @"Welcome to Welcome Users bot sample! This Introduction card
                     is a great way to introduce your Bot to the user and suggest
                     some things to get them started. We use this opportunity to
                     recommend a few next steps for learning more creating and deploying bots.",
            Images = new List<CardImage>() { new CardImage("https://aka.ms/bf-welcome-card-image") },
            Buttons = new List<CardAction>()
            {
                new CardAction(ActionTypes.OpenUrl, "Get an overview", null, "Get an overview", "Get an overview", "https://docs.microsoft.com/en-us/azure/bot-service/?view=azure-bot-service-4.0"),
                new CardAction(ActionTypes.OpenUrl, "Ask a question", null, "Ask a question", "Ask a question", "https://stackoverflow.com/questions/tagged/botframework"),
                new CardAction(ActionTypes.OpenUrl, "Learn how to deploy", null, "Learn how to deploy", "Learn how to deploy", "https://docs.microsoft.com/en-us/azure/bot-service/bot-builder-howto-deploy-azure?view=azure-bot-service-4.0"),
            }
        };

        var response = MessageFactory.Attachment(card.ToAttachment());
        await turnContext.SendActivityAsync(response, cancellationToken);
    }
}
bots/welcomeBot.js
async sendIntroCard(context) {
    const card = CardFactory.heroCard(
        'Welcome to Bot Framework!',
        'Welcome to Welcome Users bot sample! This Introduction card is a great way to introduce your Bot to the user and suggest some things to get them started. We use this opportunity to recommend a few next steps for learning more creating and deploying bots.',
        ['https://aka.ms/bf-welcome-card-image'],
        [
            {
                type: ActionTypes.OpenUrl,
                title: 'Get an overview',
                value: 'https://docs.microsoft.com/en-us/azure/bot-service/?view=azure-bot-service-4.0'
            },
            {
                type: ActionTypes.OpenUrl,
                title: 'Ask a question',
                value: 'https://stackoverflow.com/questions/tagged/botframework'
            },
            {
                type: ActionTypes.OpenUrl,
                title: 'Learn how to deploy',
                value: 'https://docs.microsoft.com/en-us/azure/bot-service/bot-builder-howto-deploy-azure?view=azure-bot-service-4.0'
            }
        ]
    );

    await context.sendActivity({ attachments: [card] });
}
WelcomeUserBot.java
警告
探しているサンプルが移動したようです。 私たちはこれを解決することに取り組んでいますのでご安心ください。
bots/welcome-user-bot.py
async def __send_intro_card(self, turn_context: TurnContext):
    card = HeroCard(
        title="Welcome to Bot Framework!",
        text="Welcome to Welcome Users bot sample! This Introduction card "
        "is a great way to introduce your Bot to the user and suggest "
        "some things to get them started. We use this opportunity to "
        "recommend a few next steps for learning more creating and deploying bots.",
        images=[CardImage(url="https://aka.ms/bf-welcome-card-image")],
        buttons=[
            CardAction(
                type=ActionTypes.open_url,
                title="Get an overview",
                text="Get an overview",
                display_text="Get an overview",
                value="https://docs.microsoft.com/en-us/azure/bot-service/?view=azure-bot-service-4.0",
            ),
            CardAction(
                type=ActionTypes.open_url,
                title="Ask a question",
                text="Ask a question",
                display_text="Ask a question",
                value="https://stackoverflow.com/questions/tagged/botframework",
            ),
            CardAction(
                type=ActionTypes.open_url,
                title="Learn how to deploy",
                text="Learn how to deploy",
                display_text="Learn how to deploy",
                value="https://docs.microsoft.com/en-us/azure/bot-service/bot-builder-howto-deploy-azure?view=azure-bot-service-4.0",
            ),
        ],
    )

    return await turn_context.send_activity(
        MessageFactory.attachment(CardFactory.hero_card(card))
    )
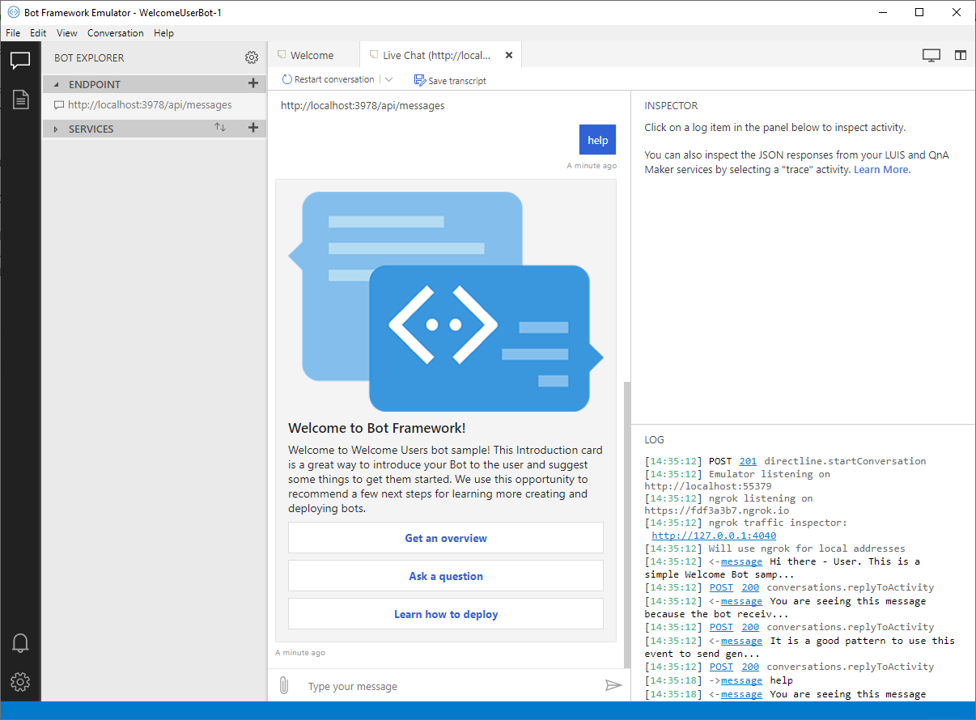
最新の Bot Framework Emulator をダウンロードしてインストールします
- ご自身のマシンを使ってローカルでサンプルを実行します。 手順が必要な場合は、
README ファイル内の C# サンプルまたは JavaScript サンプルを参照してください。
- エミュレーターを開いてボットをテストします。
ボットとの会話を開始すると、一連のウェルカム メッセージが送信されます。
"hello" メッセージを初めて送信すると、ボットは何らかのアドバイスで応答します。
再度「hello」メッセージを送信すると、ボットは「こんにちはと言いましたね」と応答します。
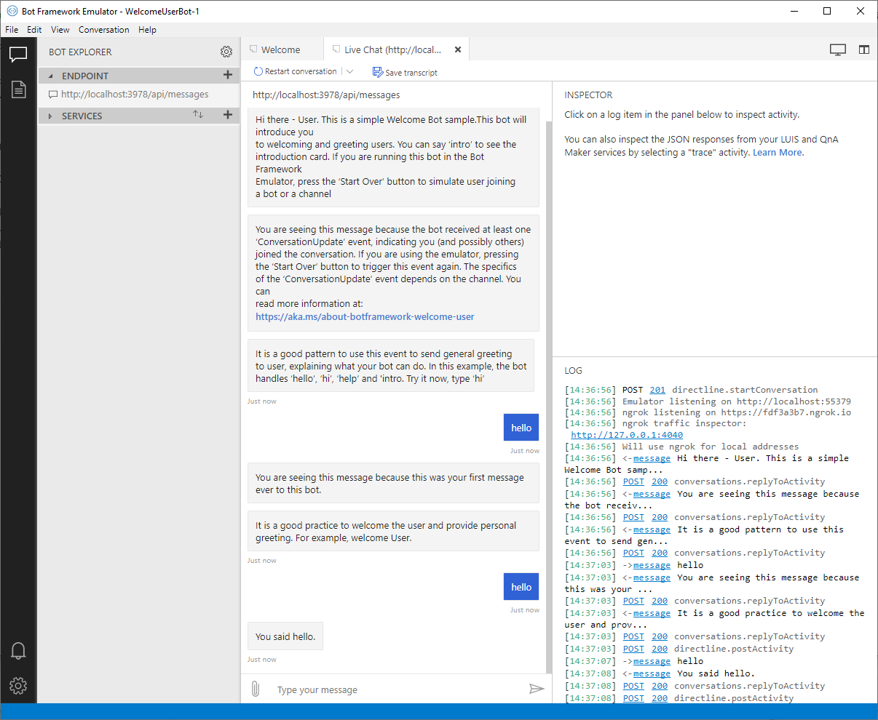
"help" メッセージをボットに送信します。 ヒーロー カードを送信して応答します。
さまざまなメディアの応答の詳細については、「メッセージにメディアを追加する」を参照してください。