クイック スタート: Speech SDK のインストール
[アーティクル] 03/25/2024
4 人の共同作成者
フィードバック
この記事の内容
リファレンス ドキュメント | パッケージ (NuGet) | GitHub のその他のサンプル
このクイックスタートでは、Speech SDK for C# をインストールします。
ドキュメントのコード サンプルは C# 8 で記述されており、.NET Standard 2.0 で実行されます。
Speech SDK for C# は、Windows、Linux、macOS との互換性があります。
注意事項
この記事では、間もなくサポート終了 (EOL) 状態になる Linux ディストリビューションである CentOS について説明します。 適宜、使用と計画を検討してください。 詳細については、「CentOS のサポート終了に関するガイダンス 」を参照してください。
Speech SDK for C# では、x64、ARM32 (Debian/Ubuntu)、ARM64 (Debian/Ubuntu) アーキテクチャでのみ次のディストリビューションがサポートされています。
Ubuntu 18.04/20.04
Debian 10/11
Red Hat Enterprise Linux (RHEL) 7/8
CentOS 7
重要
Linux ディストリビューションの最新の LTS リリースを使用してください。 たとえば、Ubuntu 20.04 LTS を使用している場合は、Ubuntu 20.04.X の最新リリースを使用してください。
Azure Cognitive Service for Speech SDK は、次の Linux システム ライブラリに依存します:
GNU C ライブラリの共有ライブラリ (POSIX Threads Programming ライブラリ libpthreads など)。
OpenSSL ライブラリ (libssl) バージョン 1.x と証明書 (ca-certificates)。
ALSA アプリケーションの共有ライブラリ (libasound)。
また、セキュリティで保護された Websocket を確立し、WS_OPEN_ERROR_UNDERLYING_IO_OPEN_FAILED エラーを回避するために、ca-certificates もインストールする必要があります。
重要
Speech SDK では、Ubuntu 22.04 と Debian 12のデフォルトである OpenSSL 3.0 はまだサポートされていません。
次の コマンドを実行します。
sudo apt-get update
sudo apt-get install build-essential libssl-dev ca-certificates libasound2 wget
Alpine Linux で Speech SDK を使用するには、glibc プログラムの実行 に関する Alpine Linux Wiki で説明されているように、Debian chroot 環境を作成します。 その後、こちらの Debian の手順に従います。
sudo apt-get update
sudo apt-get install build-essential libssl-dev ca-certificates libasound2 wget
注意事項
この記事では、間もなくサポート終了 (EOL) 状態になる Linux ディストリビューションである CentOS について説明します。 適宜、使用と計画を検討してください。 詳細については、「CentOS のサポート終了に関するガイダンス 」を参照してください。
次のように開発ツールとライブラリをインストールします。
sudo yum update
sudo yum groupinstall "Development tools"
sudo yum install alsa-lib openssl wget
macOS バージョン 10.14 以降が必要です。
Speech SDK for C# をインストールする
Speech SDK for C# は NuGet パッケージとして提供されていて、.NET Standard 2.0 が実装されています。 詳細については、「Microsoft.CognitiveServices.Speech 」を参照してください。
Speech SDK for C# は、次の dotnet add コマンドを使用して .NET CLI からインストールできます。
dotnet add package Microsoft.CognitiveServices.Speech
Speech SDK for C# は、次の Install-Package コマンドを使用してインストールできます。
Install-Package Microsoft.CognitiveServices.Speech
その他のオプションについては、次のガイドに従うことができます。
このガイドでは、.NET Framework (Windows) コンソール アプリ用の Speech SDK をインストールする方法について説明します。
このガイドでは、次のものが必要です。
Visual Studio プロジェクトを作成して Speech SDK をインストールする
Speech SDK NuGet パッケージ をインストールして、コード内で参照できるようにする必要があります。 そのためには、必要に応じて最初に helloworld プロジェクトを作成します。 .NET デスクトップ開発 ワークロードを使用できるプロジェクトが既にある場合は、そのプロジェクトを使用し、「NuGet パッケージ マネージャーを使用して Speech SDK をインストールする 」に進んでください。
helloworld プロジェクトを作成する
Visual Studio を開きます。
[開始する] の下で [新しいプロジェクトの作成] を選択します。
[新しいプロジェクトの作成] で、 [コンソール アプリ (.NET Framework)] を選択してから、 [次へ] を選択します。
[新しいプロジェクトの構成] で、[プロジェクト名] に「helloworld 」と入力し、[場所] でディレクトリのパスを選択するか作成して、[作成] を選択します。
Visual Studio のメニュー バーから、[ツール] >[ツールと機能を取得] を選択します。 この手順を実行すると、Visual Studio インストーラーが開き、[変更] ダイアログ ボックスが表示されます。
[.NET デスクトップ開発] ワークロードが利用できるかどうかを確認します。 このワークロードがまだインストールされていない場合は、ワークロードを選択し、[変更] を選択してインストールを開始します。 ダウンロードとインストールに数分かかる場合があります。
[.NET デスクトップ開発] が既にオンになっている場合は、[閉じる] を選択してダイアログ ボックスを閉じます。
Visual Studio インストーラーを閉じます。
NuGet パッケージ マネージャーを使用して Speech SDK をインストールする
ソリューション エクスプローラーで helloworld プロジェクトを右クリックし、[NuGet パッケージの管理] を選択して NuGet パッケージ マネージャーを表示します。
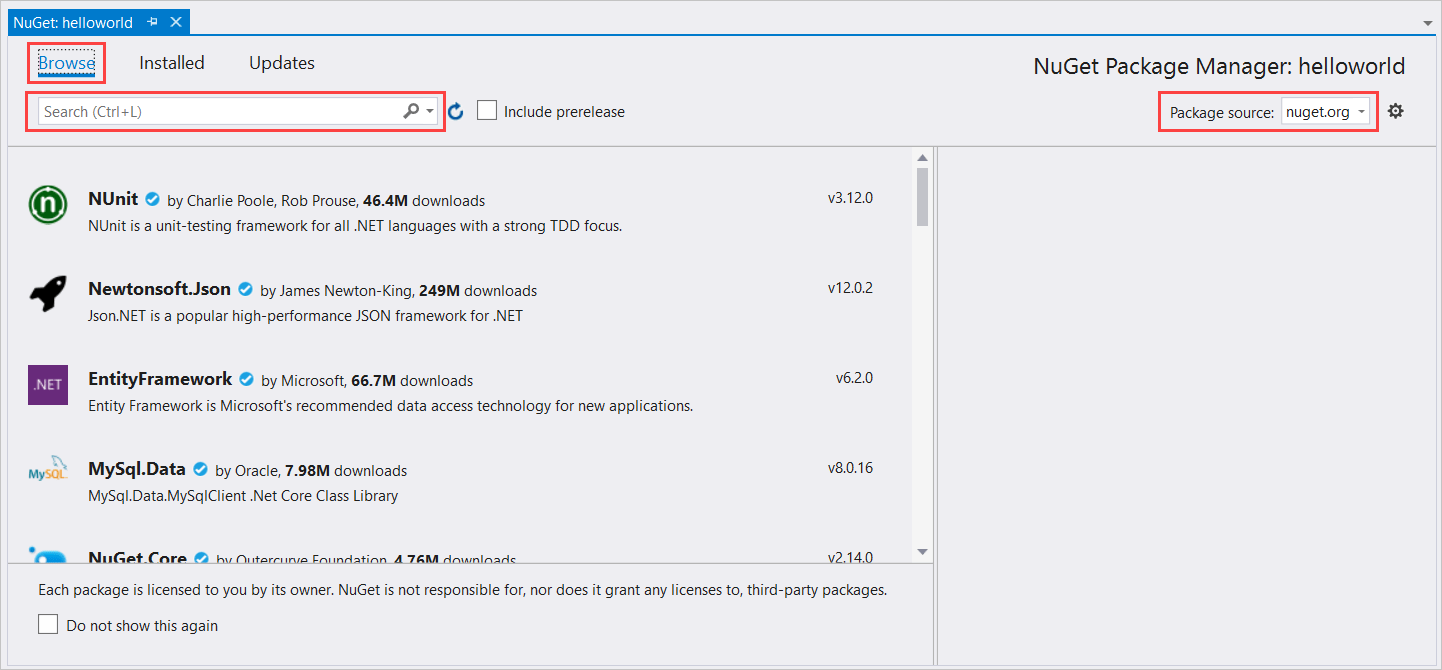
右上隅で [パッケージ ソース] ドロップダウン ボックスを探し、[nuget.org] が選択されていることを確認します。
左上隅で [参照] を選択します。
検索ボックスに「Microsoft.CognitiveServices.Speech 」と入力し、Enter キーを押します。
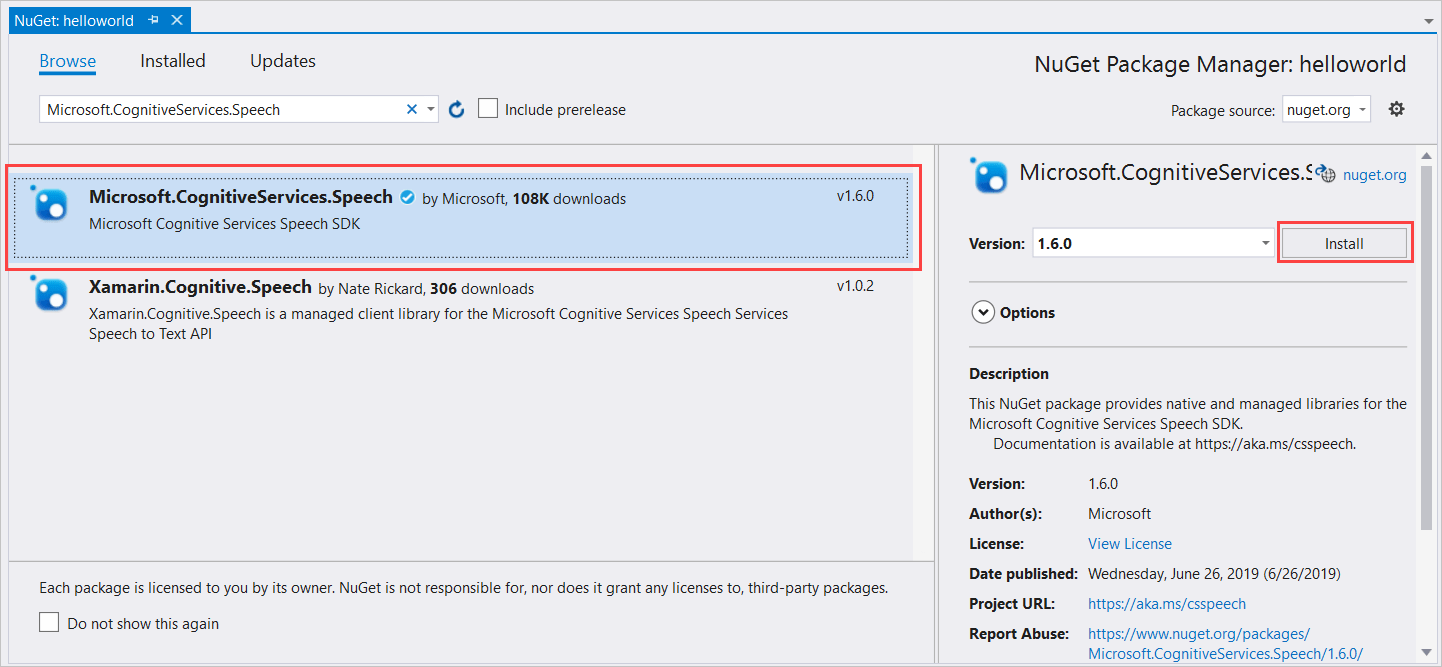
検索結果から [Microsoft.CognitiveServices.Speech] パッケージを選択し、[インストール] を選択して最新の安定バージョンをインストールします。
すべての契約とライセンスに同意して、インストールを開始します。
パッケージがインストールされると、 [パッケージマネージャー コンソール] ウィンドウに確認が表示されます。
ターゲット アーキテクチャを選択する
コンソール アプリケーションをビルドして実行するには、お使いのコンピューターのアーキテクチャに合ったプラットフォーム構成を作成します。
メニューから、[ビルド] >[構成マネージャー] の順に選択します。 [構成マネージャー] ダイアログ ボックスが表示されます。
[アクティブ ソリューション プラットフォーム] ドロップダウン ボックスで [新規] を選択します。 [新しいソリューション プラットフォーム] ダイアログ ボックスが表示されます。
[新しいプラットフォームを入力または選択してください] ドロップダウン ボックスで:
64 ビット Windows を実行している場合、x64 を選択します。
32 ビット Windows を実行している場合、x86 を選択します。
[OK] 、[閉じる] の順に選択します。
このガイドでは、C# .NET Core コンソール アプリ用の Speech SDK をインストールする方法について説明します。 .NET Core は、.NET Standard 仕様を実装した、オープン ソース、クロスプラットフォームの .NET プラットフォームです。
このガイドでは、次のものが必要です。
Visual Studio プロジェクトを作成して Speech SDK をインストールする
Visual Studio 2017 を起動します。
.NET クロスプラットフォーム開発 ワークロードが使用できることを確認してください。 Visual Studio のメニュー バーから [ツール] >[ツールと機能の入手] を選択し、Visual Studio インストーラーを開きます。 このワークロードが既に有効になっている場合は、ダイアログ ボックスを閉じます。
それ以外の場合、[.NET Core クロスプラットフォームの開発] 、[変更] の順に選択します。 新しい機能のインストールにはしばらく時間がかかります。
[新しいプロジェクト] ダイアログ ボックスで、新しい Visual C# .NET Core コンソール アプリを作成します。 左側のウィンドウから、[インストール済み] >[Visual C#] >[.NET Core] を展開します。 [コンソール アプリ (.NET Core)] を選択します。 プロジェクト名として「helloworld 」と入力します。
Speech SDK NuGet パッケージ をインストールして参照します。 ソリューション エクスプローラーで、ソリューションを右クリックし、 [ソリューションの NuGet パッケージの管理] を選択します。
[参照] を選択して、右上隅の [パッケージ ソース] で [nuget.org] を選択します。
[Microsoft.CognitiveServices.Speech] パッケージを検索し、それを helloworld プロジェクトにインストールします。
表示されるライセンスに同意し、NuGet パッケージのインストールを開始します。
パッケージがインストールされると、パッケージ マネージャー コンソールに確認メッセージが表示されます。
このガイドでは、Unity 用 Speech SDK をインストールする方法について説明します。
Unity 開発の場合、Speech SDK では、Windows Desktop (x86 および x64) またはユニバーサル Windows プラットフォーム (x86、x64、ARM または ARM64)、Android (x86、ARM32 または 64)、iOS (x64 シミュレーターおよび ARM64)、Mac (x64) がサポートされています。
前提条件
このガイドでは、次のものが必要です。
Speech SDK for Unity をインストールする
Unity 用 Speech SDK をインストールするには、次の手順を実行します。
Unity 用 Speech SDK をダウンロードして開きます。 SDK は Unity アセット パッケージ (.unitypackage ) としてパッケージ化され、既に Unity に関連付けられているはずです。 アセット パッケージを開くと、[Import Unity Package]\(Unity パッケージのインポート\) ダイアログ ボックスが表示されます。 この手順を実行するには、必要に応じて空のプロジェクトを作成して開く必要があります。
すべてのファイルが選択されていることを確認したら、次に [Import](インポート) を選択します。 しばらくすると、Unity アセット パッケージがプロジェクトにインポートされます。
Unity にアセット パッケージをインポートする方法の詳細については、Unity のドキュメント を参照してください。
このガイドでは、ユニバーサル Windows プラットフォーム (UWP) プロジェクトを作成し、C# 用の Speech SDK をインストールする方法について説明します。 ユニバーサル Windows プラットフォームを使用すると、PC、Xbox、Surface Hub、その他のデバイスなど、Windows 10 をサポートする任意のデバイスで動作するアプリを開発できます。
このガイドでは、次のものが必要です。
Visual Studio プロジェクトを作成して Speech SDK をインストールする
UWP 開発向けに Visual Studio プロジェクトを作成するには、次のことを行う必要があります。
Visual Studio の開発オプションを設定する。
プロジェクトを作成してターゲット アーキテクチャを選択する。
オーディオ キャプチャを設定する。
Speech SDK をインストールする。
Visual Studio の開発オプションを設定する
UWP 開発向けに Visual Studio を正しく設定します。
Visual Studio を開いてスタート ウィンドウを表示します。
[コードなしで続行] を選択して Visual Studio IDE に移動します。
Visual Studio のメニュー バーから、[ツール] >[ツールと機能を取得] の順に選択して Visual Studio インストーラーを開き、[変更中] ダイアログ ボックスを表示します。
[ワークロード] タブで、[ユニバーサル Windows プラットフォーム開発] ワークロードを見つけます。 そのワークロードの横のチェック ボックスが既にオンになっている場合は、[変更中] ダイアログ ボックスを閉じて、Visual Studio インストーラーを閉じます。 この手順の残りの部分をスキップします。
[ユニバーサル Windows プラットフォーム開発] をオンにし、[変更] を選択します。
[開始する前] ダイアログで [続行] を選択し、UWP 開発ワークロードをインストールします。 新しい機能のインストールにはしばらく時間がかかります。
Visual Studio インストーラーを閉じます。
プロジェクトを作成する
次に、以下のようにプロジェクトを作成してターゲット アーキテクチャを選択します。
Visual Studio メニュー バーで、 [ファイル] >[新規] >[プロジェクト] の順に選択して [新しいプロジェクトの作成] ウィンドウを表示します。
[空白のアプリ (ユニバーサル Windows)] を探して選択します。 このプロジェクト タイプの C# バージョンを必ず選択してください。Visual Basic ではありません。
[次へ ] を選択します。
[新しいプロジェクトの構成] ダイアログ ボックスの [プロジェクト名] に「helloworld 」と入力します。
[場所] で、ご自分のプロジェクトの保存先フォルダーに移動して選択するか、フォルダーを作成します。
[作成] を選択します
[新しいユニバーサル Windows プラットフォーム プロジェクト] ウィンドウの [最小バージョン] (2 番目のドロップダウン ボックス) で、[Windows 10 Fall Creators Update (10.0; Build 16299)] を選択します。 この要件は、Speech SDK の最小の要件です。
[ターゲットのバージョン] (1 番目のドロップダウン ボックス) で、[最小バージョン] の値と同じかそれより大きい値を選択します。
[OK] を選択します。 Visual Studio IDE に戻ります。このとき、新しいプロジェクトが作成されて [ソリューション エクスプローラー] ペインに表示された状態になっています。
ターゲット プラットフォーム アーキテクチャを選択します。 Visual Studio ツール バーの [ソリューション プラットフォーム] ドロップダウン ボックスを見つけます。 見つからない場合は、[表示] >[ツール バー] >[標準] を選択すると、[ソリューション プラットフォーム] を含むツール バーが表示されます。
64 ビット Windows を実行している場合は、ドロップダウン ボックスで [x64] を選択します。 64 ビット Windows でも 32 ビット アプリケーションを実行できるため、必要に応じて [x86] を選択してもかまいません。
Note
Speech SDK は、すべての Intel 互換プロセッサをサポートしていますが、ARM プロセッサの場合は x64 バージョンのみ です。
オーディオ キャプチャを設定する
プロジェクトでオーディオ入力をキャプチャできるようにします。
ソリューション エクスプローラー で [Package.appxmanifest] を選択してパッケージ アプリケーション マニフェストを開きます。
[機能] タブを選択し、[マイク] 機能を選択します。
メニュー バーで [ファイル] >[Package.appxmanifest の保存] を選択して変更内容を保存します。
Speech SDK for UWP をインストールする
最後に、Speech SDK NuGet パッケージ をインストールし、自分のプロジェクト内の Speech SDK を参照します。
ソリューション エクスプローラーでソリューションを右クリックし、[ソリューションの NuGet パッケージの管理] を選択して [NuGet - ソリューション] ウィンドウに移動します。
[参照] を選択します。 [パッケージ ソース] で nuget.org を選択します。
検索 ボックスに「Microsoft.CognitiveServices.Speech 」と入力します。 このパッケージが検索結果に表示されたら、それを選択します。
検索結果の横のパッケージ状態ウィンドウで、自分の helloworld プロジェクトを選択します。
[インストール] を選択します。
[変更のプレビュー] ダイアログ ボックスで [適用] を選択します。
[ライセンスへの同意] ダイアログ ボックスでライセンスを確認し、[同意する] を選択します。 パッケージのインストールが開始されます。
インストールが完了すると、Successfully installed 'Microsoft.CognitiveServices.Speech 1.15.0' to helloworld と同様のメッセージが [出力] ペインに表示されます。
このガイドでは、Xamarin Forms プロジェクトを作成し、Speech SDK をインストールする方法について説明します。 Xamarin は、.NET を使用して iOS、Android、および Windows 用の最新の高パフォーマンス アプリケーションを構築するオープン ソース プラットフォームです。
Xamarin 開発の場合、Speech SDK では、次がサポートされています。
Windows Desktop x86 および x64
ユニバーサル Windows プラットフォーム x86、x64、ARM/ARM64
Android x86、ARM32/64
iOS x64 シミュレーターおよび ARM64
このガイドでは、次のものが必要です。
Visual Studio プロジェクトを作成して Speech SDK をインストールする
.NET および Xamarin を使用したクロスプラットフォーム モバイル アプリ開発用の Visual Studio プロジェクトを作成するには、次のことを行う必要があります。
Visual Studio の開発オプションを設定する。
プロジェクトを作成してターゲット アーキテクチャを選択する。
Speech SDK をインストールする。
Visual Studio の開発オプションを設定する
.NET を使用したクロスプラットフォーム モバイル開発向けに Visual Studio が正しく設定されていることを確認します。
Visual Studio 2019 を開きます。 次に、[コードなしで続行] を選択します。
Visual Studio のメニューから、[ツール] >[ツールと機能を取得] の順に選択して Visual Studio インストーラーを開き、[変更中] ダイアログ ボックスを表示します。
[ワークロード] タブで、[.NET によるモバイル開発] ワークロードを見つけます。 そのワークロードの横のチェック ボックスが既にオンになっている場合は、[変更中] ダイアログ ボックスを閉じて、Visual Studio インストーラーを閉じます。 この手順の残りの部分をスキップします。
[.NET によるモバイル開発] をオンにしてから、[変更] を選択します。
[開始する前] ダイアログ ボックスで [続行] を選択し、.NET によるモバイル開発用ワークロードをインストールします。 新しい機能のインストールにはしばらく時間がかかります。
Visual Studio インストーラーを閉じます。
プロジェクトを作成する
次に、以下のようにプロジェクトを作成してターゲット アーキテクチャを選択します。
Visual Studio メニュー バーで、 [ファイル] >[新規] >[プロジェクト] の順に選択して [新しいプロジェクトの作成] ウィンドウを表示します。
[モバイル アプリ (Xamarin Forms)] を見つけて選択します。
[次へ] を選択します。
[新しいプロジェクトの構成] ダイアログ ボックスの [プロジェクト名] に「helloworld 」と入力します。
[場所] で、ご自分のプロジェクトの保存先フォルダーに移動して選択するか、フォルダーを作成します。
[作成] を選択します
[新しいクロス プラットフォーム アプリ] ウィンドウで、空の テンプレートを選択した後、[Android] 、[iOS] 、および [Windows (UWP)] を選択します。 [作成] を選択します
[OK] を選択します。 Visual Studio IDE に戻ります。このとき、新しいプロジェクトが作成され、[ソリューション エクスプローラー] ウィンドウに表示された状態になっています。
ターゲット プラットフォーム アーキテクチャとスタートアップ プロジェクトを選択します。 Visual Studio ツール バーの [ソリューション プラットフォーム] ドロップダウン ボックスを見つけます。 見つからない場合は、[表示] >[ツール バー] >[標準] を選択すると、[ソリューション プラットフォーム] を含むツール バーが表示されます。
64 ビット Windows を実行している場合は、ドロップダウン ボックスで [x64] を選択します。 64 ビット Windows では 32 ビット アプリケーションも実行できるため、必要に応じて [x86] を選択してもかまいません。
[スタートアップ プロジェクト] ドロップダウン ボックスで、helloworld.UWP (ユニバーサル Windows) を選択します。
Speech SDK for Xamarin をインストールする
Speech SDK NuGet パッケージ をインストールし、自分のプロジェクト内で Speech SDK を参照します。
ソリューション エクスプローラー で、対象のソリューションを右クリックします。 [ソリューションの NuGet パッケージの管理] を選択して、 [NuGet - ソリューション] ウィンドウに移動します。
[参照] を選択します。
[パッケージ ソース] で nuget.org を選択します。
検索 ボックスに「Microsoft.CognitiveServices.Speech 」と入力します。 このパッケージが検索結果に表示されたらそれを選択します。
注意
Microsoft.CognitiveServices.Speech NuGet 内の iOS ライブラリでは、ビットコードが有効になっていません。 ビットコードが有効になっているライブラリがアプリケーションで必要な場合は、特に iOS プロジェクト用に Microsoft.CognitiveServices.Speech.Xamarin.iOS NuGet を使用してください。
検索結果の横のパッケージ状態ウィンドウで、すべてのプロジェクトを選択します。
インストール を選択します。
[変更のプレビュー] ダイアログ ボックスで [OK] を選択します。
[ライセンスへの同意] ダイアログ ボックスでライセンスを確認し、[同意する] を選択します。 すべてのプロジェクトに Speech SDK パッケージ参照をインストールします。
インストールが正常に完了すると、helloworld.iOS に対して次の警告が表示される場合があります。 この警告は既知の問題であり、アプリの機能に影響を与えることはありません。
Could not resolve reference "C:\Users\Default\.nuget\packages\microsoft.cognitiveservices.speech\1.7.0\build\Xamarin.iOS\libMicrosoft.CognitiveServices.Speech.core.a". If this reference is required by your code, you may get compilation errors.
これで Speech SDK がインストールされました。 前のステップで作成した helloworld プロジェクトを削除または再利用できるようになりました。
リファレンス ドキュメント | パッケージ (NuGet) | GitHub のその他のサンプル
このクイックスタートでは、Speech SDK for C++ をインストールします。
Speech SDK for C++ は、Windows、Linux、macOS との互換性があります。
注意
この記事では、間もなくサポート終了 (EOL) 状態になる Linux ディストリビューションである CentOS について説明します。 適宜、使用と計画を検討してください。 詳細については、「CentOS のサポート終了に関するガイダンス 」を参照してください。
Speech SDK for C++ では、x86 (Debian/Ubuntu)、x64、ARM32 (Debian/Ubuntu)、ARM64 (Debian/Ubuntu) アーキテクチャでのみ次のディストリビューションがサポートされています。
Ubuntu 18.04/20.04
Debian 10/11
Red Hat Enterprise Linux (RHEL) 7/8
CentOS 7
重要
Linux ディストリビューションの最新の LTS リリースを使用してください。 たとえば、Ubuntu 20.04 LTS を使用している場合は、Ubuntu 20.04.X の最新リリースを使用してください。
Azure Cognitive Service for Speech SDK は、次の Linux システム ライブラリに依存します:
GNU C ライブラリの共有ライブラリ (POSIX Threads Programming ライブラリ libpthreads など)。
OpenSSL ライブラリ (libssl) バージョン 1.x と証明書 (ca-certificates)。
ALSA アプリケーションの共有ライブラリ (libasound)。
また、セキュリティで保護された Websocket を確立し、WS_OPEN_ERROR_UNDERLYING_IO_OPEN_FAILED エラーを回避するために、ca-certificates もインストールする必要があります。
重要
Speech SDK では、Ubuntu 22.04 と Debian 12のデフォルトである OpenSSL 3.0 はまだサポートされていません。
次の コマンドを実行します。
sudo apt-get update
sudo apt-get install build-essential libssl-dev ca-certificates libasound2 wget
Alpine Linux で Speech SDK を使用するには、glibc プログラムの実行 に関する Alpine Linux Wiki で説明されているように、Debian chroot 環境を作成します。 その後、こちらの Debian の手順に従います。
sudo apt-get update
sudo apt-get install build-essential libssl-dev ca-certificates libasound2 wget
注意事項
この記事では、間もなくサポート終了 (EOL) 状態になる Linux ディストリビューションである CentOS について説明します。 適宜、使用と計画を検討してください。 詳細については、「CentOS のサポート終了に関するガイダンス 」を参照してください。
次のように開発ツールとライブラリをインストールします。
sudo yum update
sudo yum groupinstall "Development tools"
sudo yum install alsa-lib openssl wget
macOS バージョン 10.14 以降が必要です。
Speech SDK for C++ をインストールする
Speech SDK for C++ は NuGet パッケージとして提供されています。 詳細については、「Microsoft.CognitiveServices.Speech 」を参照してください。
Speech SDK for C++ は、次の dotnet add コマンドを使用して .NET CLI からインストールできます。
dotnet add package Microsoft.CognitiveServices.Speech
Speech SDK for C++ は、次の Install-Package コマンドを使用してインストールできます。
Install-Package Microsoft.CognitiveServices.Speech
その他のオプションについては、次のガイドに従うことができます。
このガイドでは、Linux 用 Speech SDK をインストールする方法について説明します。
次の手順に従って、SDK をダウンロードしてインストールします。 これらのステップでは、必須のライブラリとヘッダー ファイルを .tar ファイルとしてダウンロードします 。
Speech SDK ファイルのディレクトリを選択します。 そのディレクトリを指すように SPEECHSDK_ROOT 環境変数を設定します。 この変数によって、後のコマンドでこのディレクトリを参照することが容易になります。
ホーム ディレクトリで speechsdk ディレクトリを使用する場合は、次のコマンドを実行します。
export SPEECHSDK_ROOT="$HOME/speechsdk"
存在しない場合はディレクトリを作成します。
mkdir -p "$SPEECHSDK_ROOT"
Speech SDK バイナリを含む .tar.gz アーカイブをダウンロードして抽出します。
wget -O SpeechSDK-Linux.tar.gz https://aka.ms/csspeech/linuxbinary
tar --strip 1 -xzf SpeechSDK-Linux.tar.gz -C "$SPEECHSDK_ROOT"
展開されたパッケージの最上位ディレクトリの内容を検証します。
ls -l "$SPEECHSDK_ROOT"
ディレクトリの一覧にパートナー通知やライセンス ファイルが含まれているはずです。 また、この一覧には、ヘッダー (.h ) ファイルが入っている include ディレクトリと、arm32、arm64、x64、および x86 用のライブラリが入っている lib ディレクトリも含まれている必要があります。
パス
説明
license.md ライセンス
ThirdPartyNotices.md パートナー通知
REDIST.txt 再配布に関する通知
include C++ に必要なヘッダー ファイル
lib/arm32 アプリケーションをリンクするために必要な ARM32 のネイティブ ライブラリ
lib/arm64 アプリケーションをリンクするために必要な ARM64 のネイティブ ライブラリ
lib/x64 アプリケーションをリンクするために必要な x64 のネイティブ ライブラリ
lib/x86 アプリケーションをリンクするために必要な x86 のネイティブ ライブラリ
このガイドでは、macOS 10.14 以降に C++ 用の Speech SDK をインストールする方法について説明します。 これらのステップでは、必須のライブラリとヘッダー ファイル を .zip ファイルとしてダウンロードします。
Speech SDK ファイルのディレクトリを選択します。 そのディレクトリを指すように SPEECHSDK_ROOT 環境変数を設定します。 この変数によって、後のコマンドでこのディレクトリを参照することが容易になります。
ホーム ディレクトリで speechsdk ディレクトリを使用する場合は、次のコマンドを実行します。
export SPEECHSDK_ROOT="$HOME/speechsdk"
存在しない場合はディレクトリを作成します。
mkdir -p "$SPEECHSDK_ROOT"
Speech SDK XCFramework を含む .zip アーカイブをダウンロードして抽出します。
wget -O SpeechSDK-macOS.zip https://aka.ms/csspeech/macosbinary
unzip SpeechSDK-macOS.zip -d "$SPEECHSDK_ROOT"
展開されたパッケージの最上位ディレクトリの内容を検証します。
ls -l "$SPEECHSDK_ROOT"
ディレクトリの一覧にパートナー通知やライセンス ファイル、および MicrosoftCognitiveServicesSpeech.xcframework ディレクトリが含まれているはずです。
このガイドでは、Windows デスクトップ オペレーティング システムに C++ 用の Speech SDK をインストールする方法について説明します。
このセットアップ ガイドには、次のものが必要です。
Visual Studio でプロジェクトを作成して Speech SDK をインストールする
C++ デスクトップ開発向けの Visual Studio プロジェクトを作成するには、次の作業が必要です。
Visual Studio の開発オプションを設定する。
プロジェクトを作成します。
ターゲット アーキテクチャを選択する。
Speech SDK をインストールする。
Visual Studio の開発オプションを設定する
最初に、C++ デスクトップ開発向けに Visual Studio を正しく設定します。
Visual Studio 2019 を開いてスタート ウィンドウを表示します。
[コードなしで続行] を選択して Visual Studio IDE に移動します。
Visual Studio のメニュー バーから、[ツール] >[ツールと機能を取得] の順に選択して Visual Studio インストーラーを開き、[変更中] ダイアログ ボックスを表示します。
[ワークロード] タブの [Windows] で [C++ によるデスクトップ開発] ワークロードを見つけます。 そのワークロードがまだオンになっていない場合は、オンにします。
[個別のコンポーネント] タブで [NuGet パッケージ マネージャー] を見つけます。 既に選択されていない場合は、選択します。
[閉じる] または [変更] のいずれかを選択します。 インストールする機能を選択したかどうかによってボタン名が異なります。
[変更] を選択すると、インストールが開始されます。 このプロセスには、しばらく時間がかかることがあります。
Visual Studio インストーラーを閉じます。
プロジェクトを作成する
次に、以下のようにプロジェクトを作成してターゲット アーキテクチャを選択します。
Visual Studio メニューから、[ファイル] >[新規] >[プロジェクト] の順に選択して [新しいプロジェクトの作成] ウィンドウを表示します。
[コンソール アプリ] を見つけて選択します。 このプロジェクト タイプの、C# や Visual Basic ではなく、C++ バージョンを必ず選択します。
[次へ] を選択します。
[新しいプロジェクトの構成] ダイアログ ボックスの [プロジェクト名] に「helloworld 」と入力します。
[場所] で、プロジェクトの保存先フォルダーに移動して選択するか、保存先フォルダーを作成します。次に [作成] を選択します。
ターゲット プラットフォーム アーキテクチャを選択します。 Visual Studio ツール バーの [ソリューション プラットフォーム] ドロップダウン ボックスを見つけます。 見つからない場合は、[表示] >[ツール バー] >[標準] を選択すると、[ソリューション プラットフォーム] を含むツール バーが表示されます。
64 ビット Windows を実行している場合は、ドロップダウン ボックスで [x64] を選択します。 64 ビット Windows でも 32 ビット アプリケーションを実行できるため、必要に応じて [x86] を選択してもかまいません。
Visual Studio を使用して Speech SDK をインストールする
最後に、Speech SDK NuGet パッケージ をインストールし、自分のプロジェクト内の Speech SDK を参照します。
ソリューション エクスプローラーでソリューションを右クリックしてから、[ソリューションの NuGet パッケージの管理] を選択して [NuGet - ソリューション] ウィンドウに移動します。
[参照] を選択します。
[パッケージ ソース] で nuget.org を選択します。
検索 ボックスに「Microsoft.CognitiveServices.Speech 」と入力します。 このパッケージが検索結果に表示されたら、それを選択します。
検索結果の横のパッケージ状態ウィンドウで、自分の helloworld プロジェクトを選択します。
[インストール] を選択します。
[変更のプレビュー] ダイアログ ボックスで [OK] を選択します。
[ライセンスへの同意] ダイアログ ボックスでライセンスを確認し、[同意する] を選択します。 パッケージのインストールが開始されます。 インストールが完了すると、Successfully installed 'Microsoft.CognitiveServices.Speech 1.15.0' to helloworld と同様のメッセージが [出力] ペインに表示されます。
リファレンス ドキュメント | パッケージ (Go) | GitHub のその他のサンプル
このクイックスタートでは、Speech SDK for Go をインストールします。
注意事項
この記事では、間もなくサポート終了 (EOL) 状態になる Linux ディストリビューションである CentOS について説明します。 適宜、使用と計画を検討してください。 詳細については、「CentOS のサポート終了に関するガイダンス 」を参照してください。
Speech SDK for Go では、x64 アーキテクチャの次のディストリビューションがサポートされています。
Ubuntu 18.04/20.04
Debian 9/10/11
Red Hat Enterprise Linux (RHEL) 8
CentOS 7
重要
Linux ディストリビューションの最新の LTS リリースを使用してください。 たとえば、Ubuntu 20.04 LTS を使用している場合は、Ubuntu 20.04.X の最新リリースを使用してください。
Azure Cognitive Service for Speech SDK は、次の Linux システム ライブラリに依存します:
GNU C ライブラリの共有ライブラリ (POSIX Threads Programming ライブラリ libpthreads など)。
OpenSSL ライブラリ (libssl) バージョン 1.x と証明書 (ca-certificates)。
ALSA アプリケーションの共有ライブラリ (libasound)。
また、セキュリティで保護された Websocket を確立し、WS_OPEN_ERROR_UNDERLYING_IO_OPEN_FAILED エラーを回避するために、ca-certificates もインストールする必要があります。
重要
Speech SDK では、Ubuntu 22.04 と Debian 12のデフォルトである OpenSSL 3.0 はまだサポートされていません。
次の コマンドを実行します。
sudo apt-get update
sudo apt-get install build-essential libssl-dev ca-certificates libasound2 wget
Alpine Linux で Speech SDK を使用するには、glibc プログラムの実行 に関する Alpine Linux Wiki で説明されているように、Debian chroot 環境を作成します。 その後、こちらの Debian の手順に従います。
sudo apt-get update
sudo apt-get install build-essential libssl-dev ca-certificates libasound2 wget
注意事項
この記事では、間もなくサポート終了 (EOL) 状態になる Linux ディストリビューションである CentOS について説明します。 適宜、使用と計画を検討してください。 詳細については、「CentOS のサポート終了に関するガイダンス 」を参照してください。
次のように開発ツールとライブラリをインストールします。
sudo yum update
sudo yum groupinstall "Development tools"
sudo yum install alsa-lib openssl wget
Go バイナリ バージョン 1.13 以降 をインストールします。
Speech SDK for Go をインストールする
次の手順に従って、SDK をダウンロードしてインストールします。 これらのステップでは、必須のライブラリとヘッダー ファイルを .tar ファイルとしてダウンロードします 。
Speech SDK ファイルのディレクトリを選択します。 そのディレクトリを指すように SPEECHSDK_ROOT 環境変数を設定します。 この変数によって、後のコマンドでこのディレクトリを参照することが容易になります。
ホーム ディレクトリで speechsdk ディレクトリを使用する場合は、次のコマンドを実行します。
export SPEECHSDK_ROOT="$HOME/speechsdk"
存在しない場合はディレクトリを作成します。
mkdir -p "$SPEECHSDK_ROOT"
Speech SDK バイナリを含む .tar.gz アーカイブをダウンロードして抽出します。
wget -O SpeechSDK-Linux.tar.gz https://aka.ms/csspeech/linuxbinary
tar --strip 1 -xzf SpeechSDK-Linux.tar.gz -C "$SPEECHSDK_ROOT"
展開されたパッケージの最上位ディレクトリの内容を検証します。
ls -l "$SPEECHSDK_ROOT"
ディレクトリの一覧にパートナー通知やライセンス ファイルが含まれているはずです。 また、この一覧には、ヘッダー (.h ) ファイルが入っている include ディレクトリと、arm32、arm64、x64、および x86 用のライブラリが入っている lib ディレクトリも含まれている必要があります。
パス
説明
license.md ライセンス
ThirdPartyNotices.md パートナー通知
REDIST.txt 再配布に関する通知
include C++ に必要なヘッダー ファイル
lib/arm32 アプリケーションをリンクするために必要な ARM32 のネイティブ ライブラリ
lib/arm64 アプリケーションをリンクするために必要な ARM64 のネイティブ ライブラリ
lib/x64 アプリケーションをリンクするために必要な x64 のネイティブ ライブラリ
lib/x86 アプリケーションをリンクするために必要な x86 のネイティブ ライブラリ
次の手順を実行して、Speech SDK を検索するための Go 環境を有効にします。
バインドは cgo に依存するため、Go によって SDK が検出されるように環境変数を設定する必要があります。
export CGO_CFLAGS="-I$SPEECHSDK_ROOT/include/c_api"
export CGO_LDFLAGS="-L$SPEECHSDK_ROOT/lib/<architecture> -lMicrosoft.CognitiveServices.Speech.core"
重要
<architecture> を CPU のプロセッサ アーキテクチャ x86、x64、arm32、または arm64 に置き換えます。
アプリケーションと SDK を実行するには、ライブラリがある場所をオペレーティング システムに示す必要があります。
export LD_LIBRARY_PATH="$SPEECHSDK_ROOT/lib/<architecture>:$LD_LIBRARY_PATH"
重要
<architecture> を CPU のプロセッサ アーキテクチャ x86、x64、arm32、または arm64 に置き換えます。
リファレンス ドキュメント | GitHub のその他のサンプル
このクイックスタートでは、Speech SDK for Java をインストールします。
ターゲット環境を選択してください。
Speech SDK for Java は、Windows、Linux、macOS との互換性があります。
注意事項
この記事では、間もなくサポート終了 (EOL) 状態になる Linux ディストリビューションである CentOS について説明します。 適宜、使用と計画を検討してください。 詳細については、「CentOS のサポート終了に関するガイダンス 」を参照してください。
Speech SDK for Java では、x64、ARM32 (Debian/Ubuntu)、ARM64 (Debian/Ubuntu) アーキテクチャの次のディストリビューションがサポートされています。
Ubuntu 18.04/20.04
Debian 10/11
Red Hat Enterprise Linux (RHEL) 7/8
CentOS 7
重要
Linux ディストリビューションの最新の LTS リリースを使用してください。 たとえば、Ubuntu 20.04 LTS を使用している場合は、Ubuntu 20.04.X の最新リリースを使用してください。
Azure Cognitive Service for Speech SDK は、次の Linux システム ライブラリに依存します:
GNU C ライブラリの共有ライブラリ (POSIX Threads Programming ライブラリ libpthreads など)。
OpenSSL ライブラリ (libssl) バージョン 1.x と証明書 (ca-certificates)。
ALSA アプリケーションの共有ライブラリ (libasound)。
また、セキュリティで保護された Websocket を確立し、WS_OPEN_ERROR_UNDERLYING_IO_OPEN_FAILED エラーを回避するために、ca-certificates もインストールする必要があります。
重要
Speech SDK では、Ubuntu 22.04 と Debian 12のデフォルトである OpenSSL 3.0 はまだサポートされていません。
次の コマンドを実行します。
sudo apt-get update
sudo apt-get install build-essential libssl-dev ca-certificates libasound2 wget
Alpine Linux で Speech SDK を使用するには、glibc プログラムの実行 に関する Alpine Linux Wiki で説明されているように、Debian chroot 環境を作成します。 その後、こちらの Debian の手順に従います。
sudo apt-get update
sudo apt-get install build-essential libssl-dev ca-certificates libasound2 wget
注意事項
この記事では、間もなくサポート終了 (EOL) 状態になる Linux ディストリビューションである CentOS について説明します。 適宜、使用と計画を検討してください。 詳細については、「CentOS のサポート終了に関するガイダンス 」を参照してください。
次のように開発ツールとライブラリをインストールします。
sudo yum update
sudo yum groupinstall "Development tools"
sudo yum install alsa-lib openssl wget
macOS バージョン 10.14 以降が必要です。
Speech SDK は、32/64 ビットの ARM プロセッサを搭載した Android デバイスおよび Intel x86/x64 互換のプロセッサを搭載した Android デバイスと互換性があります。
Azul Zulu OpenJDK などの Java Development Kit をインストールします。 Microsoft Build of OpenJDK またはお好みの JDK も機能する必要があります。
Speech SDK for Java をインストールする
一部の手順では、1.24.2 などの特定の SDK バージョンを使用します。 最新バージョンを確認するには、GitHub リポジトリを検索 します。
ターゲット環境を選択してください。
このガイドでは、Java Runtime で Java 用の Speech SDK をインストールする方法について説明します。
サポートされるオペレーティング システム
以下のオペレーティング システム用の Speech SDK for Java パッケージを入手できます。
Apache Maven を使用して Speech SDK for Java をインストールするには、次の手順に従います。
Apache Maven をインストールします。
新しいプロジェクトの配置場所のコマンド プロンプトを開き、新しい pom.xml ファイルを作成します。
次の XML の内容を pom.xml にコピーします。
<project xmlns="http://maven.apache.org/POM/4.0.0" xmlns:xsi="http://www.w3.org/2001/XMLSchema-instance" xsi:schemaLocation="http://maven.apache.org/POM/4.0.0 http://maven.apache.org/xsd/maven-4.0.0.xsd">
    <modelVersion>4.0.0</modelVersion>
    <groupId>com.microsoft.cognitiveservices.speech.samples</groupId>
    <artifactId>quickstart-eclipse</artifactId>
    <version>1.0.0-SNAPSHOT</version>
    <build>
        <sourceDirectory>src</sourceDirectory>
        <plugins>
        <plugin>
            <artifactId>maven-compiler-plugin</artifactId>
            <version>3.7.0</version>
            <configuration>
            <source>1.8</source>
            <target>1.8</target>
            </configuration>
        </plugin>
        </plugins>
    </build>
    <dependencies>
        <dependency>
        <groupId>com.microsoft.cognitiveservices.speech</groupId>
        <artifactId>client-sdk</artifactId>
        <version>1.37.0</version>
        </dependency>
    </dependencies>
</project>
次の Maven コマンドを実行して、Speech SDK と依存関係をインストールします。
mvn clean dependency:copy-dependencies
Eclipse プロジェクトを作成して Speech SDK をインストールする
Eclipse Java IDE をインストールします。 この IDE を使用するには、Java が既にインストールされている必要があります。
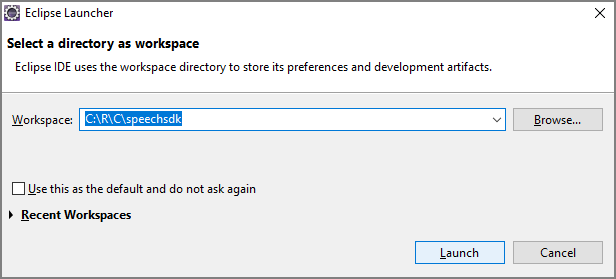
Eclipse を起動します。
Eclipse Launcher の[ワークスペース] ボックスに、新しいワークスペース ディレクトリの名前を入力します。 次に [Launch] を選択します。
しばらくすると、Eclipse IDE のメイン ウィンドウが表示されます。 ウェルカム 画面が表示される場合は画面を閉じます。
Eclipse メニューから [ファイル] >[新規] >[プロジェクト] を選択します。
[新しいプロジェクト] ダイアログ ボックスが表示されます。 [Java プロジェクト] を選択し、[次へ] を選択します。
新規 Java プロジェクト ウィザードが開始されます。 [プロジェクト名] フィールドに「quickstart 」と入力します。 実行環境として [JavaSE-1.8] を選択します。 [完了] を選択します。
[Open Associated Perspective?]\(パースペクティブを開きますか?) というウィンドウが表示される場合は、 [Open Perspective]\(パースペクティブを開く) を選択します。
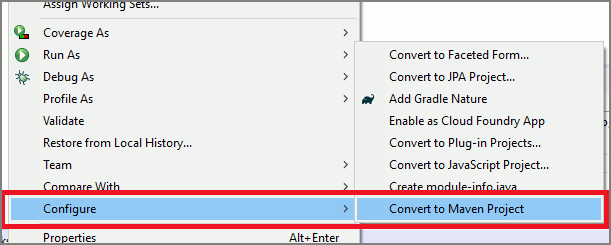
パッケージ エクスプローラー で quickstart プロジェクトを右クリックします。 コンテキスト メニューから、[構成] 、[Maven プロジェクトへ変換] の順に選択します。
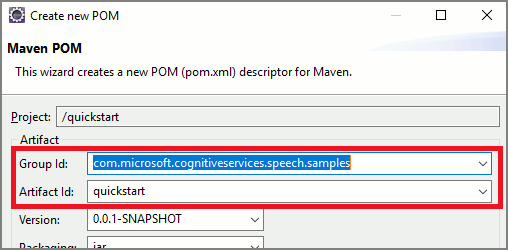
[Create new POM] ウィンドウが表示されます。 [グループ ID] フィールドに「com.microsoft.cognitiveservices.speech.samples 」と入力します。 [アーティファクト ID] フィールドに「quickstart 」と入力します。 [完了] を選択します。
pom.xml ファイルを開き、編集します。
ファイルの末尾、閉じタグ </project> の前に、Speech SDK を依存関係として dependencies 要素を追加します。
<dependencies>
  <dependency>
    <groupId>com.microsoft.cognitiveservices.speech</groupId>
    <artifactId>client-sdk</artifactId>
    <version>1.37.0</version>
  </dependency>
</dependencies>
変更を保存します。
Gradle の構成
Gradle の構成では、依存関係の拡張子である .jar を明示的に参照する必要があります。
// build.gradle

dependencies {
    implementation group: 'com.microsoft.cognitiveservices.speech', name: 'client-sdk', version: "1.37.0", ext: "jar"
}
このガイドでは、Android 上の Java 用 Speech SDK をインストールする方法について説明します。
Android 用 Speech SDK は、Android Archive (AAR) ファイル としてパッケージ化されており、必要なライブラリと必要な Android アクセス許可を含んでいます。
Android Studio を使用して Speech SDK をインストールする
Android Studio で新しいプロジェクトを作成し、ライブラリの依存関係として Speech SDK for Java を追加します。 この設定は、Speech SDK Maven パッケージと Android Studio Chipmunk 2021.2.1 に基づいています。
空のプロジェクトを作成する
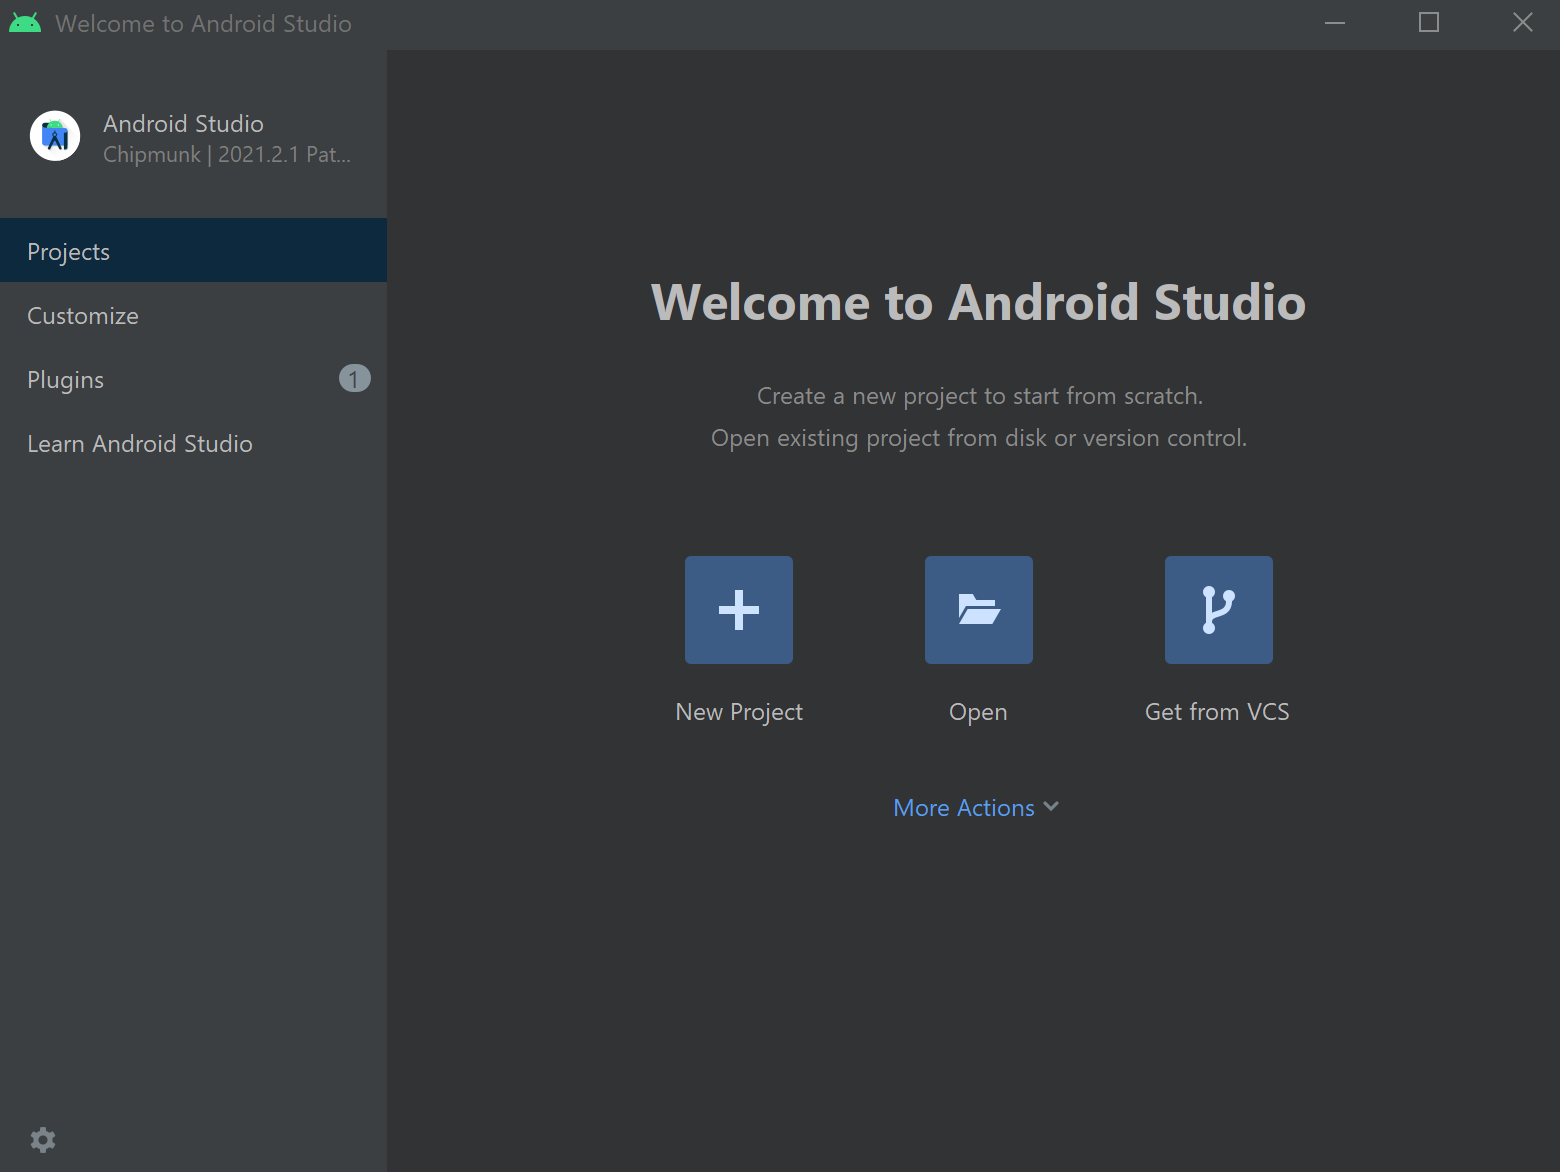
Android Studio を開き、[New project](新しいプロジェクト) を選択します。
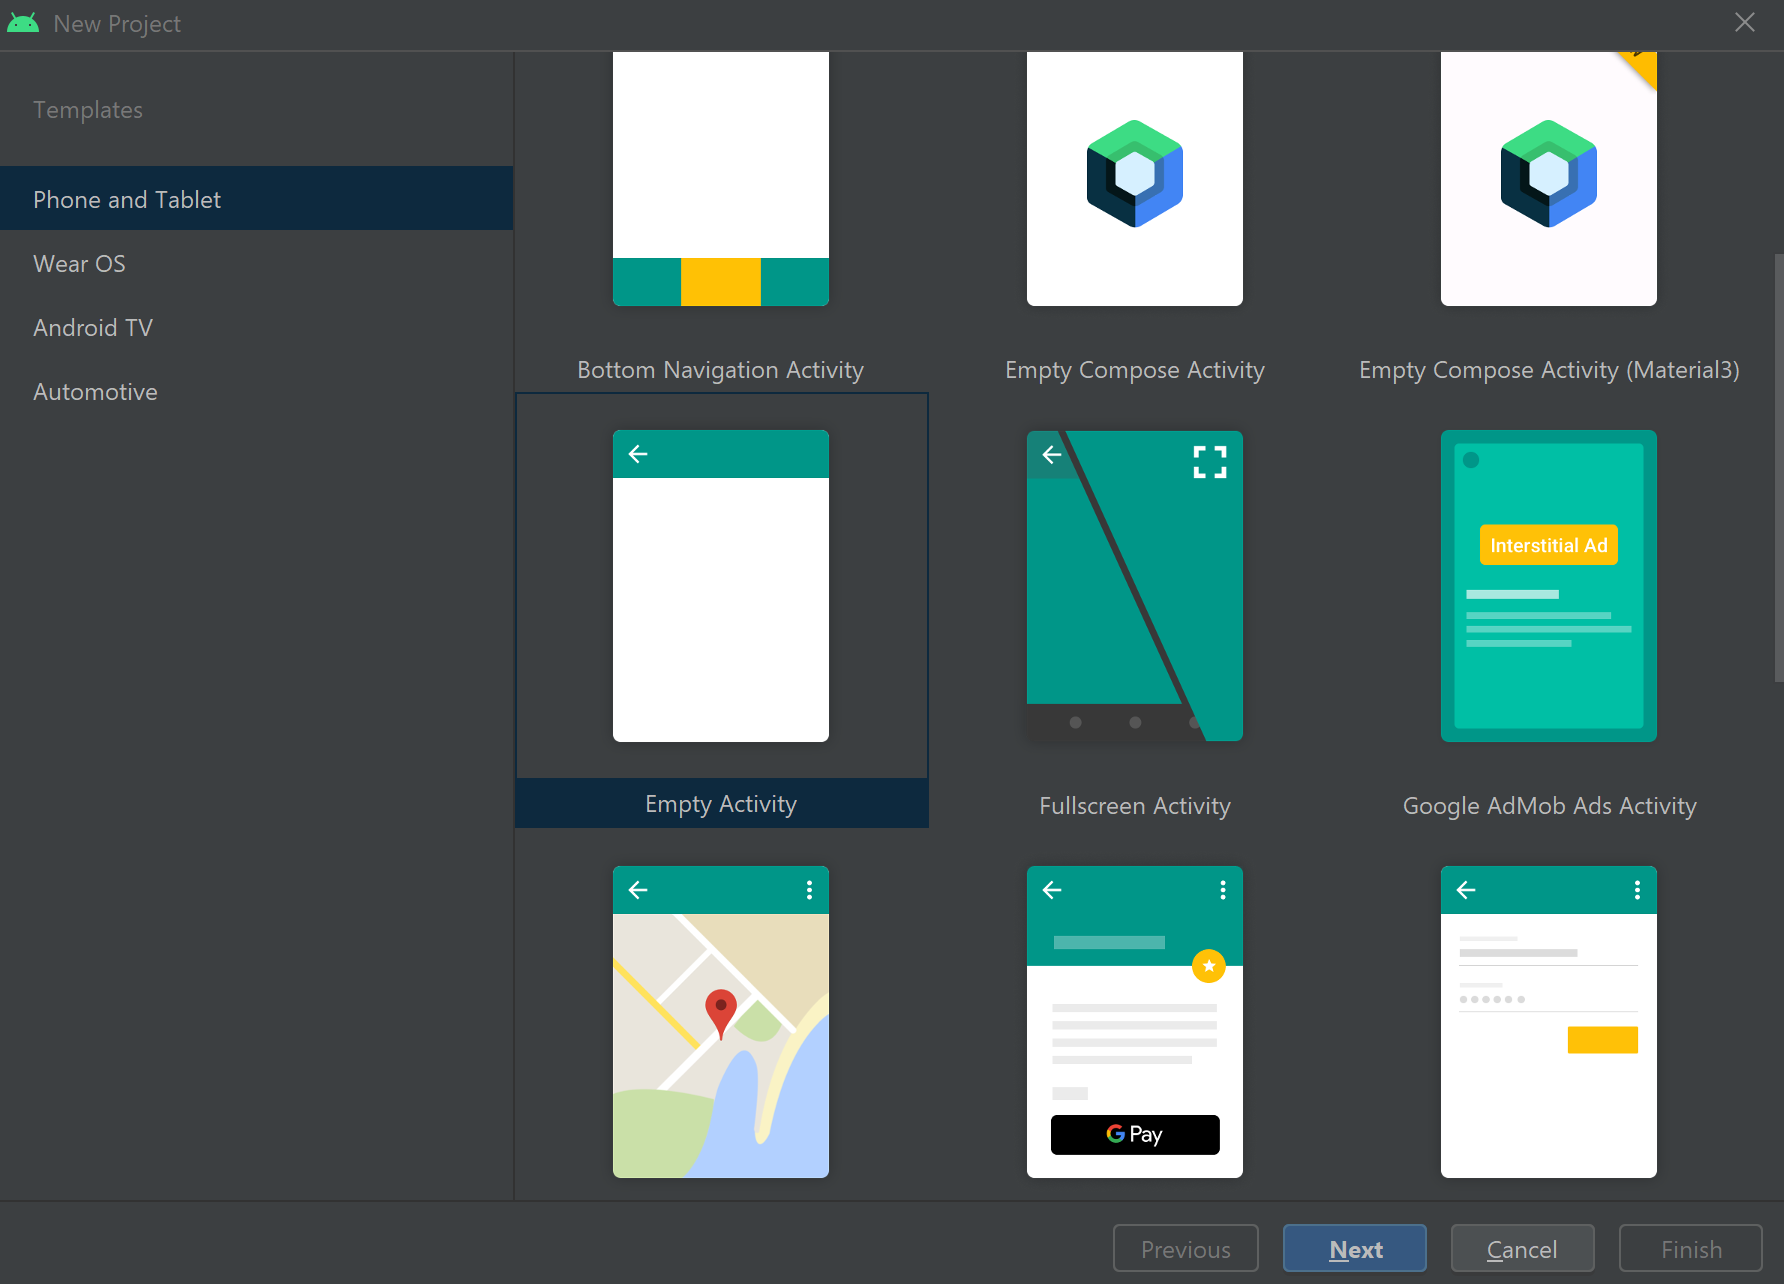
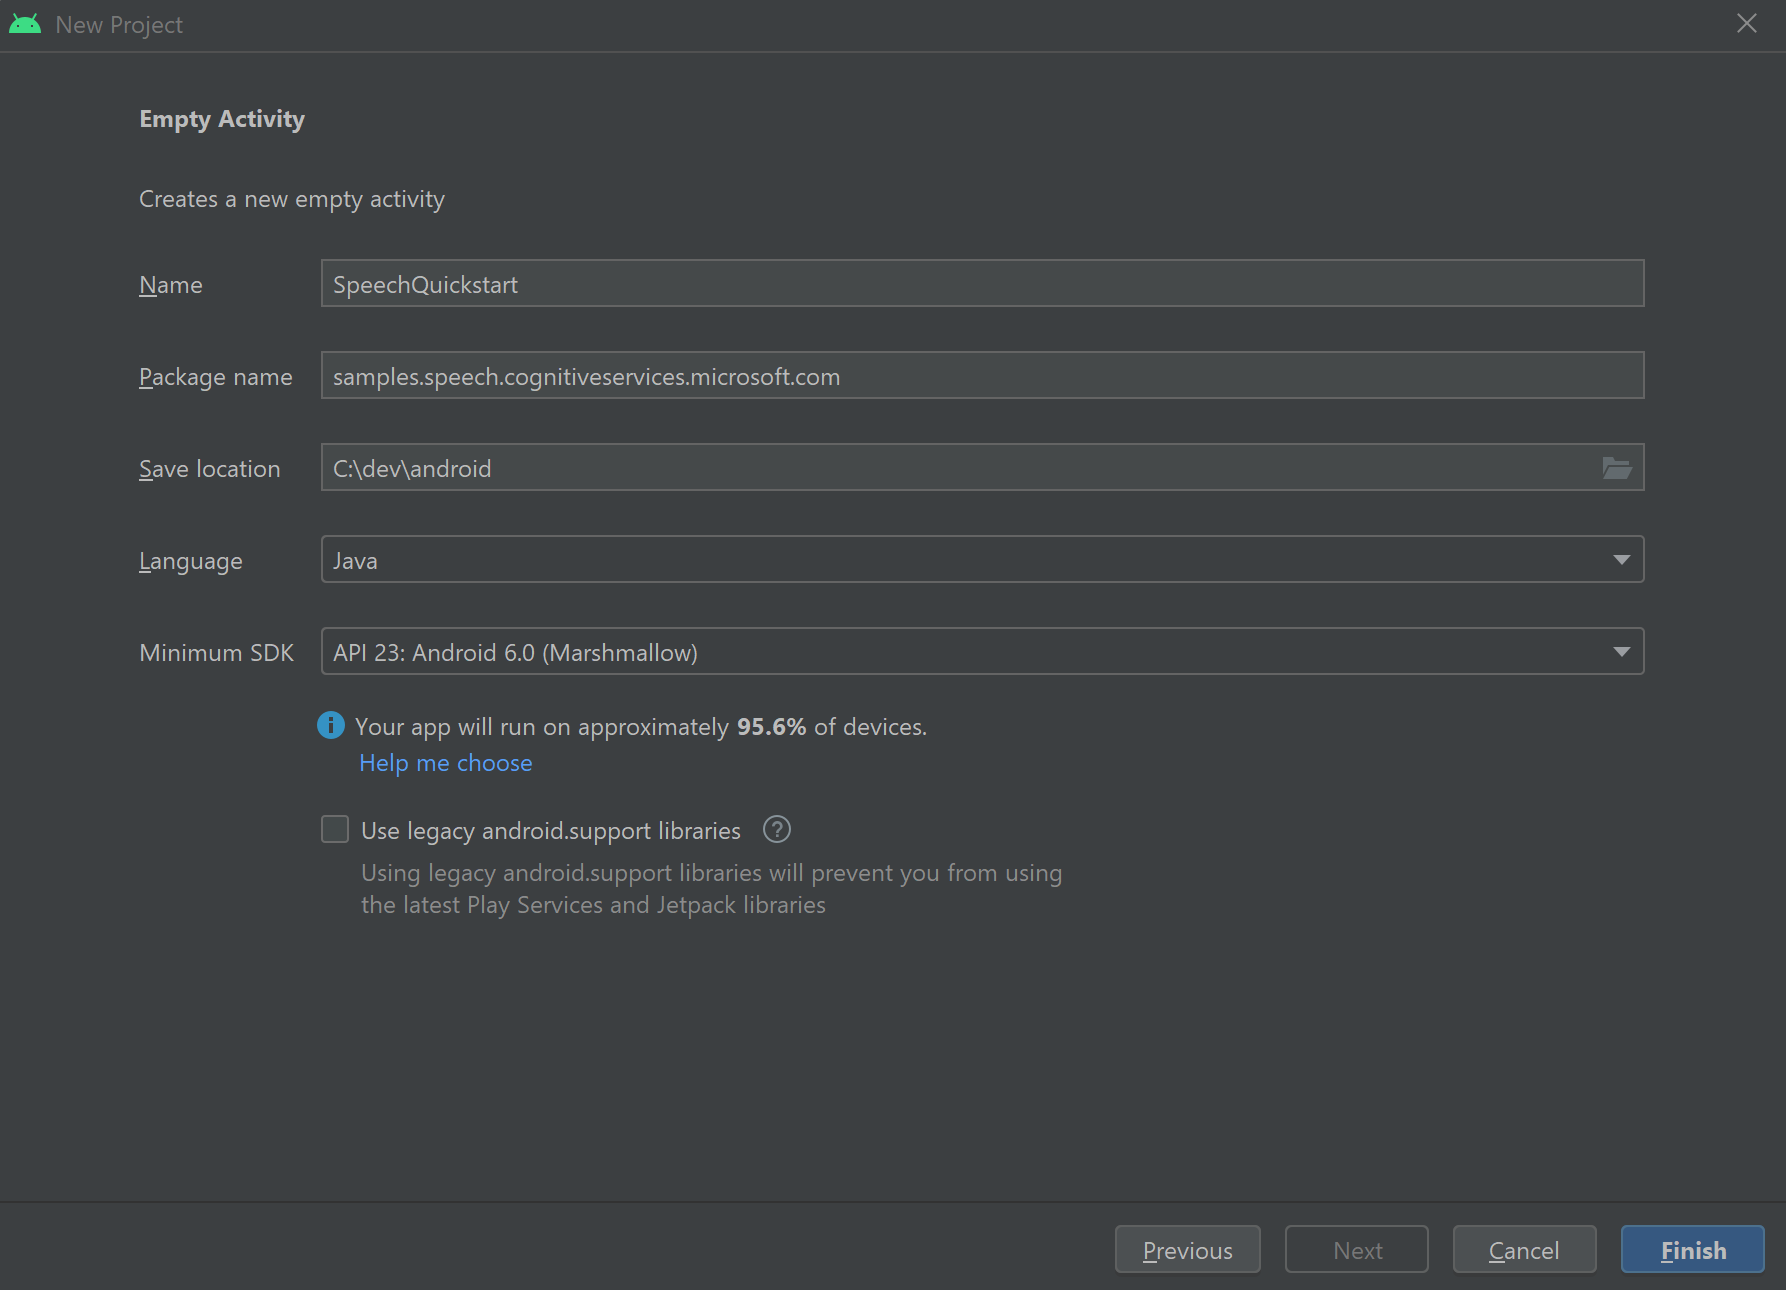
表示された [New project](新しいプロジェクト) ウィンドウで [Phone and Tablet](電話とタブレット) >[Empty Activity](空のアクティビティ) を選択してから、[Next](次へ) を選択します。
[Name](名前) テキスト ボックスに「SpeechQuickstart 」と入力します。
[Package name](パッケージ名) テキスト ボックスに「samples.speech.cognitiveservices.microsoft.com 」と入力します。
[Save location](保存場所) 選択ボックスでプロジェクト ディレクトリを選択します。
[Language](言語) 選択ボックスで [Java] を選択します。
[Minimum API level](最小 API レベル) 選択ボックスで [API 23: Android 6.0 (Marshmallow)] を選択します。
[完了] を選択します。
Android Studio が新しいプロジェクトを準備するまでしばらく時間がかかります。 Android Studio を初めて使用している場合は、設定、ライセンスの受け入れ、ウィザードの完了に数分かかることがあります。
Speech SDK for Java を Android にインストールする
Speech SDK を依存関係としてプロジェクトに追加します。
[File](ファイル) >[Project structure](プロジェクト構造) >[Dependencies](依存関係) >[app](アプリ) を選択します。
プラス記号 (+ ) を選択して、[Declared Dependencies](宣言された依存関係) の下に依存関係を追加します。 次に、ドロップダウン メニューから [ライブラリの依存関係] を選択します。
表示された [ライブラリの依存関係を追加] ウィンドウで、Speech SDK for Java の名前とバージョン (com.microsoft.cognitiveservices.speech:client-sdk:1.37.0 ) を入力します。 次に [検索] を選択します。
選択されているグループ ID が com.microsoft.cognitiveservices.speech であることを確認し、[OK] を選択します。
[OK] を選択して [Project Structure](プロジェクトの構造) ウィンドウを閉じ、プロジェクトに変更を適用します。
リファレンスドキュメント | パッケージ (npm) | GitHub のその他のサンプル | ライブラリのソース コード
このクイックスタートでは、Speech SDK for JavaScript をインストールします。
JavaScript 用 Speech SDK は、npm パッケージとして使用できます。 microsoft-cognitiveservices-speech-sdk とそれに付随する GitHub リポジトリ cognitive-services-speech-sdk-js を参照してください。
Node.js とクライアント Web ブラウザー間のアーキテクチャ上の影響について理解します。 たとえば、ドキュメント オブジェクト モデル (DOM) はサーバー側アプリケーションでは使用できません。 Node.js ファイル システム はクライアント側アプリケーションでは使用できません。
Speech SDK for JavaScript をインストールする
ターゲット環境に応じて、次のガイドのいずれかを使用します。
このガイドでは、Node.js で使用する JavaScript 用の Speech SDK をインストールする方法について説明します。
Node.js をインストールします。
新しいディレクトリを作成して npm init を実行し、そのプロンプトに従います。
JavaScript 用 Speech SDK をインストールするには、次の npm install コマンドを実行します。
npm install microsoft-cognitiveservices-speech-sdk
詳細については、Node.js サンプル を参照してください。
このガイドでは、Web ページで使用する JavaScript 用の Speech SDK をインストールする方法について説明します。
フォルダーに解凍する
新しい空のフォルダーを作成します。 Web サーバーでサンプルをホストする場合は、Web サーバーがフォルダーにアクセスできることを確認します。
Speech SDK を .zip パッケージ としてダウンロードし、新しく作成したフォルダーに解凍します。 次のファイルが解凍されます。
microsoft.cognitiveservices.speech.sdk.bundle.js : 人間が判読できるバージョンの Speech SDK。microsoft.cognitiveservices.speech.sdk.bundle.js.map : SDK コードのデバッグに使用するマップ ファイル。microsoft.cognitiveservices.speech.sdk.bundle.d.ts : TypeScript で使用するオブジェクト定義。microsoft.cognitiveservices.speech.sdk.bundle-min.js : 縮小バージョンの Speech SDK。speech-processor.js : 一部のブラウザーにおけるパフォーマンスを向上するコード。
フォルダーに index.html という名前の新しいファイルを作成し、テキスト エディターでこのファイルを開きます。
HTML スクリプトタグ
Speech SDK for JavaScript から microsoft.cognitiveservices.speech.sdk.bundle.js ファイルをダウンロードして抽出します。 それを、HTML ファイルがアクセスできるフォルダーに配置します。
<script src="microsoft.cognitiveservices.speech.sdk.bundle.js"></script>;
ヒント
Web ブラウザーを対象としていて、<script> タグを使用する場合は、sdk プレフィックスは必要ありません。 sdk プレフィックスは、require モジュールに名前を付けるために使用される別名です。
または、HTML <head> 要素に <script> タグを直接含めることもできます。この場合、JSDeliv に依存します。
<script src="https://cdn.jsdelivr.net/npm/microsoft-cognitiveservices-speech-sdk@latest/distrib/browser/microsoft.cognitiveservices.speech.sdk.bundle-min.js">
</script>
詳細については、ブラウザー ベースのサンプル を参照してください。
Speech SDK を使用する
import の詳細については、JavaScript Web サイトの「エクスポートとインポート 」を参照してください。
または、次のように require ステートメントを使用することもできます。
const sdk = require("microsoft-cognitiveservices-speech-sdk");
リファレンス ドキュメント | パッケージ (ダウンロード) | GitHub のその他のサンプル
このクイックスタートでは、Speech SDK for Objective-C をインストールします。
Speech SDK for Objective-C をインストールする
Speech SDK for Objective-C は、Mac x64 および ARM ベース システム用の CocoaPod パッケージとしてネイティブに利用できます。
Mac のシステム要件:
macOS CocoaPod パッケージは、Xcode 9.4.1 以降の統合開発環境 (IDE) と共にダウンロードして使用することができます。
.xcodeproj プロジェクト ファイルがある Xcode ディレクトリに移動します。
pod init を実行して、Podfile という名前のポッド ファイルを作成します。
Podfile の内容を次の内容に置き換えます。 target の名前を AppName からアプリの名前に更新します。 必要に応じて、プラットフォームまたはポッドのバージョンを更新します。
platform :osx, 10.14
use_frameworks!

target 'AppName' do
  pod 'MicrosoftCognitiveServicesSpeech-macOS', '~> 1.37.0'
end
pod install を実行して Speech SDK をインストールします。
または、バイナリ CocoaPod をダウンロードして、その内容を抽出します。 Xcode プロジェクトで、抽出した MicrosoftCognitiveServicesSpeech.xcframework フォルダーおよびその内容への参照を追加します。
Note
.NET 開発者は、Xamarin.Mac アプリケーション フレームワークを使用してネイティブ macOS アプリケーションをビルドできます。 詳細については、Xamarin.Mac に関するページを参照してください。
Speech SDK for Objective-C は、CocoaPod パッケージとしてネイティブに使用できます。
iOS のシステム要件:
macOS version 10.14以降
対象 iOS 9.3以降
macOS CocoaPod パッケージは、Xcode 9.4.1 以降の統合開発環境 (IDE) と共にダウンロードして使用することができます。
.xcodeproj プロジェクト ファイルがある Xcode ディレクトリに移動します。
pod init を実行して、Podfile という名前のポッド ファイルを作成します。
Podfile の内容を次の内容に置き換えます。 target の名前を AppName からアプリの名前に更新します。 必要に応じて、プラットフォームまたはポッドのバージョンを更新します。
platform :ios, '9.3'
use_frameworks!

target 'AppName' do
  pod 'MicrosoftCognitiveServicesSpeech-iOS', '~> 1.37.0'
end
pod install を実行して Speech SDK をインストールします。
または、バイナリ CocoaPod をダウンロードして、その内容を抽出します。 Xcode プロジェクトで、抽出した MicrosoftCognitiveServicesSpeech.xcframework フォルダーおよびその内容への参照を追加します。
Note
.NET 開発者は、Xamarin.iOS アプリケーション フレームワークを使用してネイティブの iOS アプリケーションをビルドできます。 詳細については、Xamarin.iOS に関するページを参照してください。
リファレンス ドキュメント | パッケージ (ダウンロード) | GitHub のその他のサンプル
このクイックスタートでは、Speech SDK for Swift をインストールします。
Speech SDK for Swift をインストールする
Speech SDK for Swift は、Mac x64 および ARM ベースのシステム用の CocoaPod パッケージとしてネイティブに利用できます。
Mac のシステム要件:
macOS CocoaPod パッケージは、Xcode 9.4.1 以降の統合開発環境 (IDE) と共にダウンロードして使用することができます。
.xcodeproj プロジェクト ファイルがある Xcode ディレクトリに移動します。
pod init を実行して、Podfile という名前のポッド ファイルを作成します。
Podfile の内容を次の内容に置き換えます。 target の名前を AppName からアプリの名前に更新します。 必要に応じて、プラットフォームまたはポッドのバージョンを更新します。
platform :osx, 10.14
use_frameworks!

target 'AppName' do
  pod 'MicrosoftCognitiveServicesSpeech-macOS', '~> 1.37.0'
end
pod install を実行して Speech SDK をインストールします。
または、バイナリ CocoaPod をダウンロードして、その内容を抽出します。 Xcode プロジェクトで、抽出した MicrosoftCognitiveServicesSpeech.xcframework フォルダーおよびその内容への参照を追加します。
Note
.NET 開発者は、Xamarin.Mac アプリケーション フレームワークを使用してネイティブ macOS アプリケーションをビルドできます。 詳細については、Xamarin.Mac に関するページを参照してください。
Speech SDK for Swift は、CocoaPod パッケージとしてネイティブに使用できます。
iOS のシステム要件:
macOS version 10.14以降
対象 iOS 9.3以降
macOS CocoaPod パッケージは、Xcode 9.4.1 以降の統合開発環境 (IDE) と共にダウンロードして使用することができます。
.xcodeproj プロジェクト ファイルがある Xcode ディレクトリに移動します。
pod init を実行して、Podfile という名前のポッド ファイルを作成します。
Podfile の内容を次に置き換えます。 target の名前を AppName からアプリの名前に更新します。 必要に応じて、プラットフォームまたはポッドのバージョンを更新します。
platform :ios, '9.3'
use_frameworks!

target 'AppName' do
  pod 'MicrosoftCognitiveServicesSpeech-iOS', '~> 1.37.0'
end
pod install を実行して Speech SDK をインストールします。
または、バイナリ CocoaPod をダウンロードして、その内容を抽出します。 Xcode プロジェクトで、抽出した MicrosoftCognitiveServicesSpeech.xcframework フォルダーおよびその内容への参照を追加します。
Note
.NET 開発者は、Xamarin.iOS アプリケーション フレームワークを使用してネイティブの iOS アプリケーションをビルドできます。 詳細については、Xamarin.iOS に関するページを参照してください。
リファレンス ドキュメント | パッケージ (PyPi) | GitHub のその他のサンプル
このクイックスタートでは、Speech SDK for Python をインストールします。
Speech SDK for Python は、Windows、Linux、macOS との互換性があります。
注意事項
この記事では、間もなくサポート終了 (EOL) 状態になる Linux ディストリビューションである CentOS について説明します。 適宜、使用と計画を検討してください。 詳細については、「CentOS のサポート終了に関するガイダンス 」を参照してください。
Speech SDK for Python では、x64 および ARM64 アーキテクチャの次のディストリビューションがサポートされています。
Ubuntu 18.04/20.04
Debian 10/11
Red Hat Enterprise Linux (RHEL) 8
CentOS 7
重要
Linux ディストリビューションの最新の LTS リリースを使用してください。 たとえば、Ubuntu 20.04 LTS を使用している場合は、Ubuntu 20.04.X の最新リリースを使用してください。
Azure Cognitive Service for Speech SDK は、次の Linux システム ライブラリに依存します:
GNU C ライブラリの共有ライブラリ (POSIX Threads Programming ライブラリ libpthreads など)。
OpenSSL ライブラリ (libssl) バージョン 1.x と証明書 (ca-certificates)。
ALSA アプリケーションの共有ライブラリ (libasound)。
また、セキュリティで保護された Websocket を確立し、WS_OPEN_ERROR_UNDERLYING_IO_OPEN_FAILED エラーを回避するために、ca-certificates もインストールする必要があります。
重要
Speech SDK では、Ubuntu 22.04 と Debian 12のデフォルトである OpenSSL 3.0 はまだサポートされていません。
次の コマンドを実行します。
sudo apt-get update
sudo apt-get install build-essential libssl-dev ca-certificates libasound2 wget
Alpine Linux で Speech SDK を使用するには、glibc プログラムの実行 に関する Alpine Linux Wiki で説明されているように、Debian chroot 環境を作成します。 その後、こちらの Debian の手順に従います。
sudo apt-get update
sudo apt-get install build-essential libssl-dev ca-certificates libasound2 wget
注意事項
この記事では、間もなくサポート終了 (EOL) 状態になる Linux ディストリビューションである CentOS について説明します。 適宜、使用と計画を検討してください。 詳細については、「CentOS のサポート終了に関するガイダンス 」を参照してください。
次のように開発ツールとライブラリをインストールします。
sudo yum update
sudo yum groupinstall "Development tools"
sudo yum install alsa-lib openssl wget
macOS バージョン 10.14 以降が必要です。
Python の 3.7 以降 のバージョンをインストールします。
インストールを確認するには、ターミナルを開いてコマンド python --version を実行します。 Python が正しくインストールされた場合、次のような応答が返されます: Python 3.8.10
macOS または Linux を使用している場合は、代わりにコマンド python3 --version を実行する必要があります。
python3の代わりにpythonを使用できるようにするには、実行alias python='python3'して別名を設定します。 Azure Cognitive Service for Speech SDK のクイックスタート サンプルでは、pythonの使用法を指定 します。
Speech SDK for Python をインストールする
Speech SDK for Python をインストールする前に、プラットフォーム要件 を満たしていることを確認してください。
PyPI からインストールする
Speech SDK for Python をインストールするには、コンソール ウィンドウで次のコマンドを実行します。
pip install azure-cognitiveservices-speech
最新の Speech SDK にアップグレードする
最新の Speech SDK にアップグレードするには、コンソール ウィンドウで次のコマンドを実行します。
pip install --upgrade azure-cognitiveservices-speech
azure.cognitiveservices.speech.__version__ 変数を調べることで、現在インストールされている Speech SDK for Python のバージョンを確認できます。 たとえば、コンソール ウィンドウで次のコマンドを実行します。
pip list
Visual Studio Code を使用して Speech SDK をインストールする
Speech SDK for Python をインストールするには:
Visual Studio Code をダウンロードして、インストールします。
Visual Studio Code を実行して、次のように Python 拡張機能をインストールします。
[ファイル] >[基本設定] >[拡張機能] の順に選択します。「Python 」を検索し、Microsoft が公開している [Python extension for Visual Studio Code](Visual Studio Code 用の Python 拡張機能) を見つけて [Install](インストール) を選択します。
[Terminal](ターミナル) >[New terminal](新しいターミナル) を選択して、Visual Studio Code 内でターミナルを開きます。
ターミナル プロンプトで次のコマンドを実行して、Speech SDK for Python パッケージをインストールします。
python -m pip install azure-cognitiveservices-speech
Visual Studio Code および Python の詳細については、「Visual Studio Code 」および「VS Code の Python の概要 」をご覧ください。
Speech SDK を使用する
Python プロジェクトで Speech SDK を使用するための次の import ステートメントを追加します。
import azure.cognitiveservices.speech as speechsdk
関連するコンテンツ


![[構成マネージャー] ダイアログ ボックスを示すスクリーンショット。](../media/sdk/vs-configuration-manager-dialog-box.png)
![[ワークロード] タブが強調表示された Visual Studio インストーラーのスクリーンショット。](../media/sdk/vs-enable-net-core-workload.png)
![[新しいプロジェクト] ダイアログ ボックスのスクリーン ショット。](../media/sdk/qs-csharp-dotnetcore-windows-01-new-console-app.png#lightbox)
![[ソリューションの NuGet パッケージの管理] が強調表示されたソリューション エクスプローラーのスクリーンショット。](../media/sdk/qs-csharp-dotnetcore-windows-02-manage-nuget-packages.png)
![[ソリューションのパッケージの管理] ダイアログ ボックスを示すスクリーンショット。](../media/sdk/qs-csharp-dotnetcore-windows-03-nuget-install-1.0.0.png#lightbox)
![[ライセンスへの同意] ダイアログ ボックスのスクリーンショット。](../media/sdk/qs-csharp-dotnetcore-windows-04-nuget-license.png)
![[コードなしで続行] 操作が強調表示された [スタート] ウィンドウを示すスクリーンショット。](../media/sdk/vs-enable-uwp-start-window.png#lightbox)
![[ユニバーサル Windows プラットフォーム開発] のワークロードが強調表示された [変更中] ダイアログ ボックスの [ワークロード] タブを示すスクリーンショット。](../media/sdk/vs-enable-uwp-workload.png#lightbox)
![[空白のアプリ (ユニバーサル Windows)] が選択され、[次へ] ボタンが強調表示された [新しいプロジェクトの作成] のウィンドウを示すスクリーンショット。](../media/sdk/vs-enable-uwp-create-new-project.png#lightbox)
![プロジェクト名と場所のボックスと [作成] ボタンが強調表示された、新しいプロジェクトを構成するためのダイアログ ボックスを示すスクリーンショット。](../media/sdk/vs-enable-uwp-configure-your-new-project.png#lightbox)
![最小バージョンとターゲット バージョンが選択された [新しいユニバーサル Windows プラットフォーム プロジェクト] ダイアログ ボックスを示すスクリーンショット。](../media/sdk/qs-csharp-uwp-02-new-uwp-project.png)

![パッケージ アプリケーション マニフェストの [機能] タブを示す Visual Studio のスクリーンショット。](../media/sdk/qs-csharp-uwp-07-capabilities.png#lightbox)
![[ソリューションのパッケージの管理] ダイアログ ボックスを示すスクリーンショット。[参照] タブ、[検索] ボックス、[パッケージ ソース] が強調表示されています。](../media/sdk/vs-enable-uwp-nuget-solution-browse.png#lightbox)
![プロジェクトと [インストール] ボタンが強調表示され、[Microsoft.CognitiveServices.Speech] パッケージが選択されていることを示すスクリーンショット。](../media/sdk/qs-csharp-uwp-05-nuget-install-1.0.0.png#lightbox)
![[ワークロード] タブ、[変更中] ダイアログ ボックス、および Visual Studio インストーラーを示すスクリーンショット。](../media/sdk/vs-enable-xamarin-workload.png#lightbox)


![Visual Studio の [新しいモバイル アプリ Xamarin Forms プロジェクト] ダイアログ ボックスを示すスクリーンショット。](../media/sdk/qs-csharp-xamarin-new-xamarin-project.png#lightbox)


![Visual Studio インストーラー の [変更中] ダイアログ ボックスの [ワークロード] タブを示すスクリーンショット。](../media/sdk/vs-enable-cpp-workload.png#lightbox)


![[参照] タブ、[検索] ボックス、[パッケージ ソース] が強調表示された [ソリューションの NuGet パッケージの管理] ダイアログ ボックスを示すスクリーンショット。](../media/sdk/qs-cpp-windows-03-manage-nuget-packages.png#lightbox)
![プロジェクトと [インストール] ボタンが強調表示され、[Microsoft.CognitiveServices.Speech] パッケージが選択されていることを示すスクリーンショット。](../media/sdk/qs-cpp-windows-04-nuget-install-1.0.0.png#lightbox)
![Java プロジェクトが強調表示されている [新しいプロジェクト] ダイアログ ボックスのスクリーンショット。](../media/sdk/qs-java-jre-02-select-wizard.png)
![Java プロジェクトを作成するための選択を示す、[新規 Java プロジェクト] ウィザードのスクリーンショット。](../media/sdk/qs-java-jre-03-create-java-project.png)