Get OneDrive data using Microsoft Graph and MSAL.NET in an Office Add-in
Learn how to build a Microsoft Office Add-in that connects to Microsoft Graph, finds the first three workbooks stored in OneDrive for Business, fetches their filenames, and inserts the names into an Office document using Office.js.
Features
Integrating data from online service providers increases the value and adoption of your add-ins. This code sample shows you how to connect your add-in to Microsoft Graph. Use this code sample to:
- Connect to Microsoft Graph from an Office Add-in.
- Use the MSAL.NET Library to implement the OAuth 2.0 authorization framework in an add-in.
- Use the OneDrive REST APIs from Microsoft Graph.
- Show a dialog using the Office UI namespace.
- Build an Add-in using ASP.NET MVC, MSAL 3.x.x for .NET, and Office.js.
- Use add-in commands in an add-in.
Applies to
- Excel on Windows (one-time purchase and subscription)
- PowerPoint on Windows (one-time purchase and subscription)
- Word on Windows (one-time purchase and subscription)
Prerequisites
To run this code sample, the following are required.
Visual Studio 2019 or later.
SQL Server Express (No longer automatically installed with recent versions of Visual Studio.)
A Microsoft 365 account. You can get one if you qualify for a Microsoft 365 E5 developer subscription through the Microsoft 365 Developer Program; for details, see the FAQ. Alternatively, you can sign up for a 1-month free trial or purchase a Microsoft 365 plan.
At least three Excel workbooks stored on OneDrive for Business in your Office 365 subscription.
Office on Windows, Version 16.0.6769.2001 or higher.
A Microsoft Azure Tenant. This add-in requires Azure Active Directory (AD). Azure AD provides identity services that applications use for authentication and authorization. A trial subscription can be acquired here: Microsoft Azure.
Solution
| Solution | Author(s) |
|---|---|
| Office Add-in Microsoft Graph ASP.NET | Microsoft |
Version history
| Version | Date | Comments |
|---|---|---|
| 1.0 | July 8th, 2019 | Initial release |
Disclaimer
THIS CODE IS PROVIDED AS IS WITHOUT WARRANTY OF ANY KIND, EITHER EXPRESS OR IMPLIED, INCLUDING ANY IMPLIED WARRANTIES OF FITNESS FOR A PARTICULAR PURPOSE, MERCHANTABILITY, OR NON-INFRINGEMENT.
Build and run the solution
Configure the solution
In Visual Studio, choose the Office-Add-in-Microsoft-Graph-ASPNETWeb project. In Properties, ensure SSL Enabled is True. Verify that the SSL URL uses the same domain name and port number as those listed in the next step.
Register your application using the Azure Management Portal. Log in with the identity of an administrator of your Office 365 tenancy to ensure that you are working in an Azure Active Directory that is associated with that tenancy. To learn how to register your application, see Register an application with the Microsoft Identity Platform. Use the following settings:
- REDIRECT URI: https://localhost:44301/AzureADAuth/Authorize
- SUPPORTED ACCOUNT TYPES: "Accounts in this organizational directory only"
- IMPLICIT GRANT: Do not enable any Implicit Grant options
- API PERMISSIONS (Delegated permissions, not Application permissions): Files.Read.All and User.Read
Note: After you register your application, copy the Application (client) ID and the Directory (tenant) ID on the Overview blade of the App Registration in the Azure Management Portal. When you create the client secret on the Certificates & secrets blade, copy it too.
In web.config, use the values that you copied in the previous step. Set AAD:ClientID to your client id, set AAD:ClientSecret to your client secret, and set "AAD:O365TenantID" to your tenant ID.
Run the solution
Open the Visual Studio solution file.
Right-click Office-Add-in-Microsoft-Graph-ASPNET solution in Solution Explorer (not the project nodes), and then choose Set startup projects. Select the Multiple startup projects radio button. Make sure the project that ends with "Web" is listed first.
On the Build menu, select Clean Solution. When it finishes, open the Build menu again and select Build Solution.
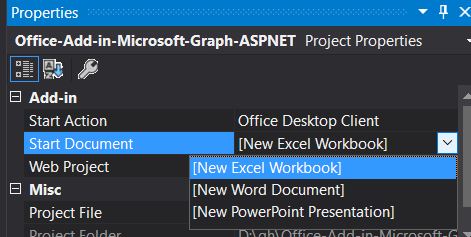
In Solution Explorer, select the Office-Add-in-Microsoft-Graph-ASPNET project node (not the top solution node and not the project whose name ends in "Web").
In the Properties pane, open the Start Document drop down and choose one of the three options (Excel, Word, or PowerPoint).
Press F5.
In the Office application, choose Insert > Open Add-in in the OneDrive Files group to open the task pane add-in.
The pages and buttons in the add-in are self-explanatory.
Known issues
- The Fabric spinner control appears only briefly or not at all.
Questions and feedback
- Did you experience any problems with the sample? Create an issue and we'll help you out.
- We'd love to get your feedback about this sample. Go to our Office samples survey to give feedback and suggest improvements.
- For general questions about developing Office Add-ins, go to Microsoft Q&A using the office-js-dev tag.
Additional resources
Copyright
Copyright (c) 2019 Microsoft Corporation. All rights reserved.
This project has adopted the Microsoft Open Source Code of Conduct. For more information, see the Code of Conduct FAQ or contact opencode@microsoft.com with any additional questions or comments.
Note: The Index.cshtml file contains an image URL that tracks diagnostic data for this sample add-in. Please remove the image tag if you reuse this sample in your own code project.