자습서: 백 엔드 서비스를 통해 Azure Notification Hubs를 사용하여 React Native 앱에 푸시 알림 보내기
 샘플 다운로드
이 자습서에서는 Azure Notification Hubs를 사용하여 Android 및 iOS를 대상으로 하는 React Native 애플리케이션에 알림을 푸시합니다.
ASP.NET Core Web API 백 엔드는 최신 설치 방법을 사용하여 클라이언트에 대한 디바이스 등록을 처리하는 데 사용됩니다. 또한 서비스는 플랫폼 간 방식으로 푸시 알림을 보냅니다.
이러한 작업은 백 엔드 작업에 Notification Hubs SDK를 사용하여 처리됩니다. 전체 접근 방식에 대한 자세한 내용은 앱 백 엔드에서 등록 설명서에 나와 있습니다.
이 자습서에서는 다음 단계를 안내합니다.
사전 요구 사항
따라가려면 다음이 필요합니다.
- 리소스를 만들고 관리할 수 있는 Azure 구독 입니다.
- Mac용 Visual Studio 설치된 Mac(또는 .NET을 사용한 모바일 개발 워크로드가 있는 Visual Studio 2019를 실행하는 PC).
- Android(물리적 또는 에뮬레이터 디바이스) 또는 iOS(물리적 디바이스만 해당)에서 앱을 실행하는 기능입니다.
Android의 경우 다음이 있어야 합니다.
- 개발자가 물리적 디바이스 또는 에뮬레이터 잠금을 해제했습니다 (Google Play 서비스가 설치된 API 26 이상 실행).
iOS의 경우 다음이 있어야 합니다.
- 활성 Apple 개발자 계정.
- 개발자 계정에 등록된 물리적 iOS 디바이스(iOS 13.0 이상 실행).
- 물리적 디바이스에서 앱을 실행할 수 있도록 키체인 설치된 .p12개발 인증서입니다.
참고
iOS 시뮬레이터는 원격 알림을 지원하지 않으므로 iOS에서 이 샘플을 탐색할 때 물리적 디바이스가 필요합니다. 그러나 이 자습서를 완료하기 위해 Android 및 iOS 모두에서 앱을 실행할 필요는 없습니다.
이전 경험 없이 이 첫 번째 원칙 예제의 단계를 따를 수 있습니다. 그러나 다음과 같은 측면을 잘 알고 있으면 도움이 됩니다.
- Apple 개발자 포털
- ASP.NET Core
- Google Firebase 콘솔
- Microsoft Azure 및 Azure Notification Hubs를 사용하여 iOS 앱에 푸시 알림 보내기
- React Native.
제공된 단계는 Mac용 Visual Studio 및 Visual Studio Code 위한 것이지만 Visual Studio 2019를 사용하여 따라갈 수 있습니다.
푸시 알림 서비스 및 Azure Notification Hub 설정
이 섹션에서는 FCM(Firebase Cloud Messaging) 및 APNS(Apple Push Notification Services)를 설정합니다. 그런 다음, 해당 서비스와 함께 작동하도록 알림 허브를 만들고 구성합니다.
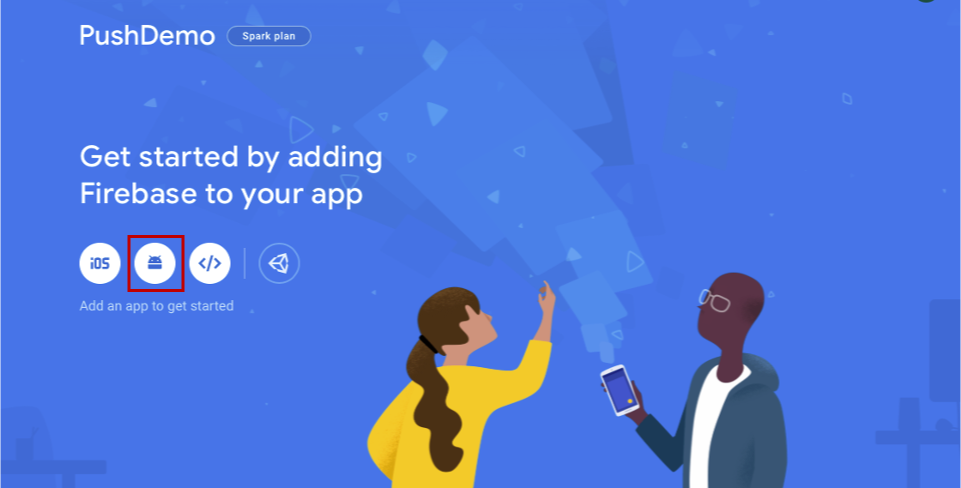
Firebase 프로젝트 만들기 및 Android용 Firebase 클라우드 메시징 사용
Firebase 콘솔에 로그인합니다. 프로젝트 이름으로 PushDemo를 입력하는 새 Firebase 프로젝트를 만듭니다.
참고
고유한 이름이 생성됩니다. 기본적으로 제공된 이름의 소문자 변형과 대시로 구분된 생성된 숫자로 구성됩니다. 여전히 전역적으로 고유하다는 것을 제공하려는 경우 이를 변경할 수 있습니다.
프로젝트를 만든 후 Android 앱에 Firebase 추가를 선택합니다.
Android 앱에 Firebase 추가 페이지에서 다음 단계를 수행합니다.
Android 패키지 이름에 패키지 이름을 입력합니다. 예:
com.<organization_identifier>.<package_name>.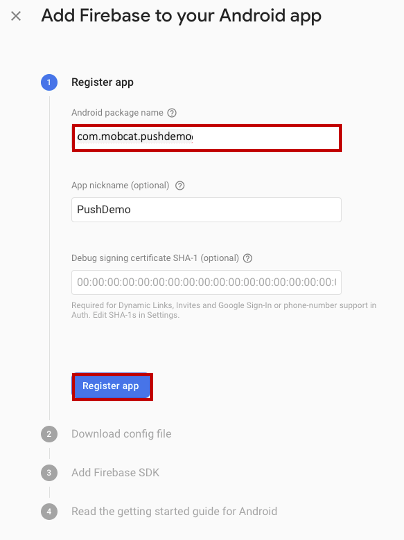
앱 등록을 선택합니다.
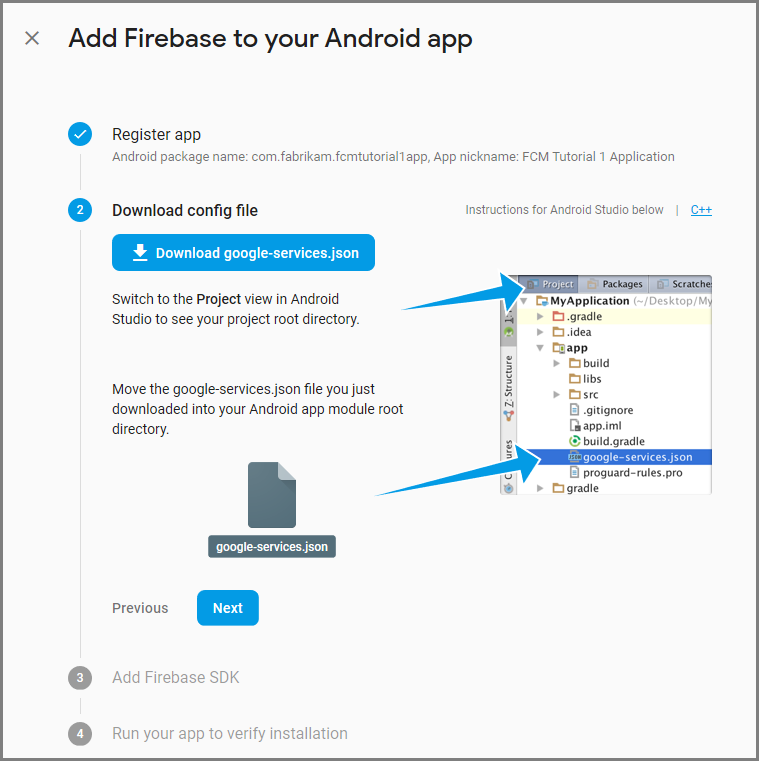
다운로드 google-services.json 선택합니다. 그런 다음 나중에 사용할 수 있는 로컬 폴더에 파일을 저장하고 다음을 선택합니다.
다음을 선택합니다.
콘솔로 계속을 선택합니다.
참고
설치 확인 검사 인해 콘솔로 계속 단추를 사용할 수 없는 경우 이 단계 건너뛰기를 선택합니다.
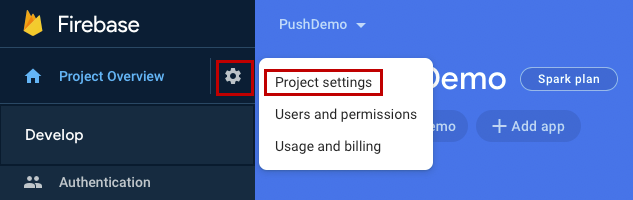
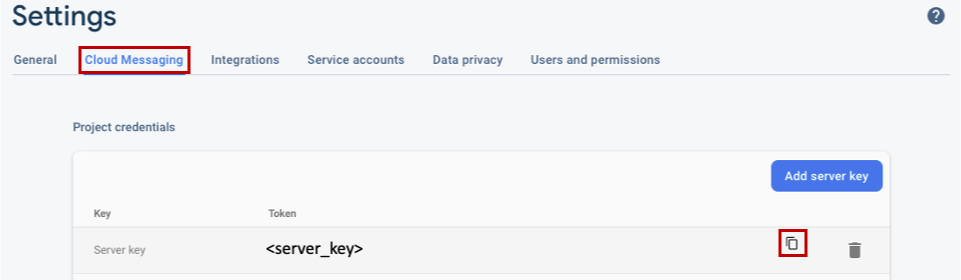
Firebase 콘솔에서 프로젝트의 톱을 선택합니다. 그런 다음 프로젝트 설정을 선택합니다.
참고
google-services.json 파일을 다운로드하지 않은 경우 이 페이지에서 다운로드할 수 있습니다.
위쪽의 클라우드 메시징 탭으로 전환합니다. 나중에 사용할 수 있는 서버 키를 복사하고 저장합니다. 이 값을 사용하여 알림 허브를 구성합니다.
푸시 알림에 대한 iOS 앱 등록
iOS 앱에 푸시 알림을 보내려면 Apple에 애플리케이션을 등록하고 푸시 알림에 등록합니다.
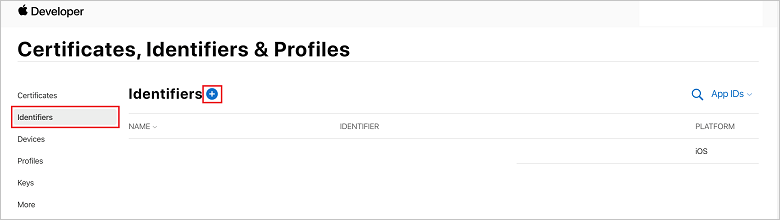
앱을 아직 등록하지 않은 경우 Apple 개발자 센터에서 iOS 프로비저닝 포털 로 이동합니다. Apple ID를 사용하여 포털에 로그인하고 인증서, 식별자 & 프로필로 이동한 다음 식별자를 선택합니다. 새 앱을 등록하려면 클릭합니다 + .
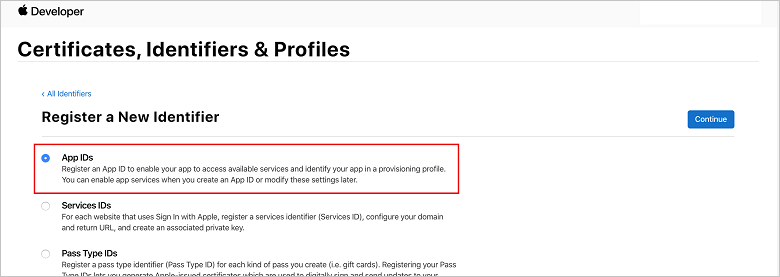
새 식별자 등록 화면에서 앱 ID 라디오 단추를 선택합니다. 그런 다음 , 계속을 선택합니다.
새 앱에 대해 다음 세 가지 값을 업데이트한 다음 계속을 선택합니다.
설명: 앱의 설명이 포함된 이름을 입력합니다.
번들 ID: com.organization_identifier<> 양식의 번들 ID를 입력합니다.<>앱배포 가이드에 설명된 대로 product_name. 다음 스크린샷
mobcat에서 값은 organization 식별자로 사용되고 PushDemo 값은 제품 이름으로 사용됩니다.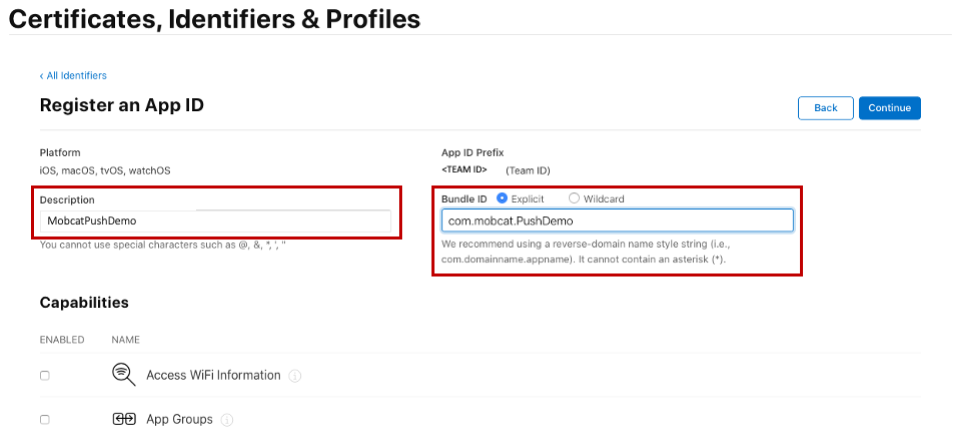
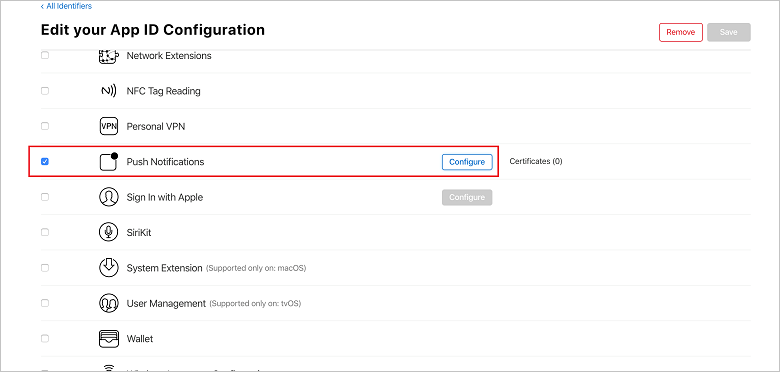
푸시 알림: 기능 섹션에서 푸시 알림 옵션을 확인 합니다 .
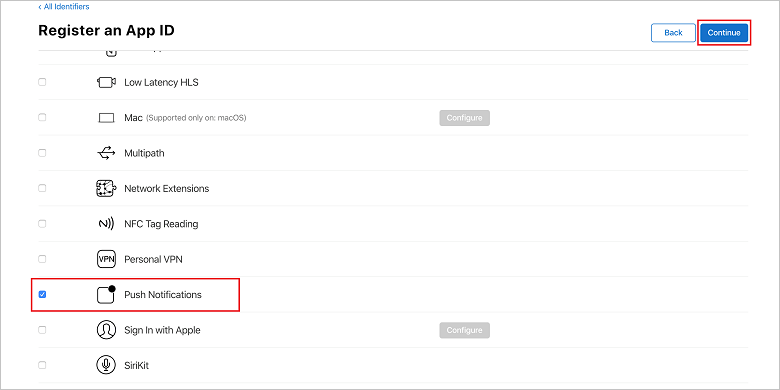
이 작업은 앱 ID를 생성하고 정보를 확인하는 요청을 생성합니다. 계속을 선택한 다음 등록을 선택하여 새 앱 ID를 확인합니다.
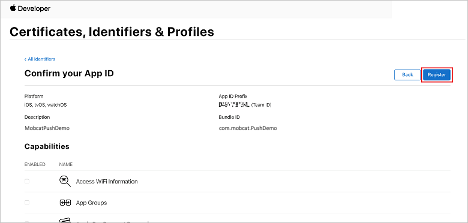
등록을 선택하면 인증서, 식별자 & 프로필 페이지에 새 앱 ID가 줄 항목으로 표시됩니다.
인증서, 식별자 & 프로필 페이지의 식별자 아래에서 만든 앱 ID 줄 항목을 찾습니다. 그런 다음 해당 행을 선택하여 앱 ID 구성 편집 화면을 표시합니다.
Notification Hubs에 대한 인증서 만들기
알림 허브가 APNS(Apple Push Notification Services) 와 함께 작동하도록 하려면 인증서가 필요하며 다음 두 가지 방법 중 하나로 제공할 수 있습니다.
토큰 기반 인증에 사용할 수 있는 p8 인증서 만들기 (최신 권장 방식)
최신 방법은 APNS에 대한 토큰 기반(HTTP/2) 인증에 설명된 대로 여러 가지 이점이 있습니다. 더 적은 단계가 필요하지만 특정 시나리오에도 필수입니다. 그러나 이 자습서의 목적을 위해 둘 중 하나가 작동하므로 두 방법 모두에 대한 단계가 제공되었습니다.
옵션 1: Notification Hub에 직접 업로드할 수 있는 p12 푸시 인증서 만들기
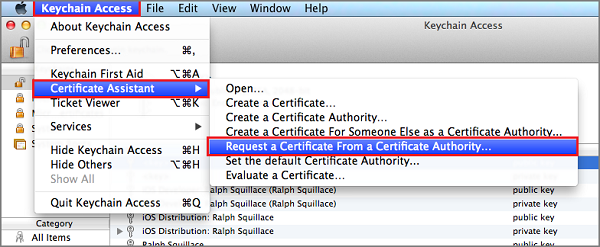
Mac에서 키 집합 액세스 도구를 실행합니다. 유틸리티 폴더 또는 실행 패드의 기타 폴더에서 열 수 있습니다.
키 집합 액세스를 선택하고 인증서 도우미를 확장한 다음 인증 기관에서 인증서 요청을 선택합니다.
참고
기본적으로 키 집합 액세스는 목록에서 첫 번째 항목을 선택합니다. 인증서 범주에 있고 Apple Worldwide 개발자 관계 인증 기관이 목록의 첫 번째 항목이 아닌 경우 문제가 될 수 있습니다. CSR(인증서 서명 요청)을 생성하기 전에 키가 아닌 항목이 있거나 Apple Worldwide 개발자 관계 인증 기관 키가 선택되어 있는지 확인합니다.
사용자 Email 주소를 선택하고, 일반 이름 값을 입력하고, 디스크에 저장을 지정했는지 확인한 다음, 계속을 선택합니다. CA Email 주소는 필요하지 않으므로 비워 둡니다.
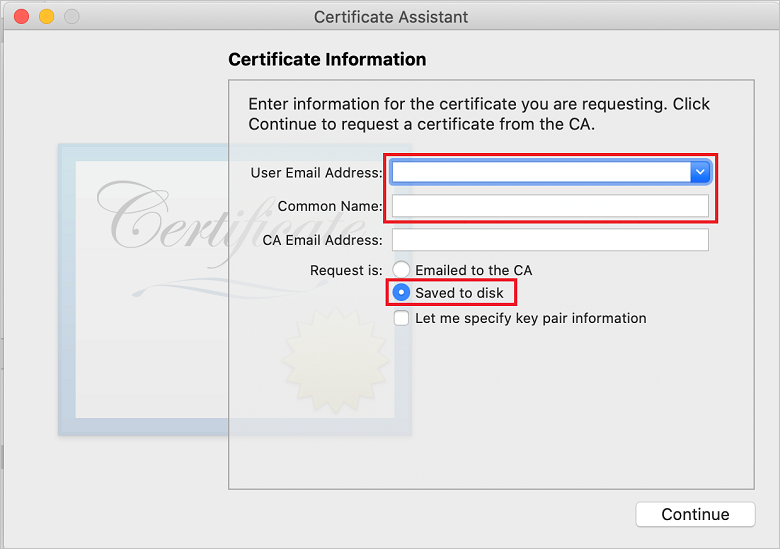
다른 이름으로 저장에 CSR(인증서 서명 요청) 파일의 이름을 입력하고 위치에서 위치를 선택한 다음 저장을 선택합니다.
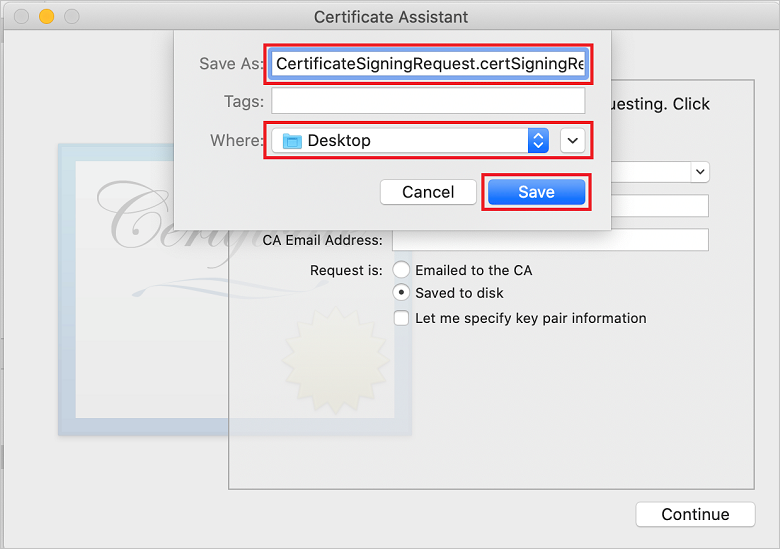
이 작업은 선택한 위치에 CSR 파일을 저장합니다. 기본 위치는 Desktop입니다. 파일에 대해 선택한 위치를 기억합니다.
iOS 프로비저닝 포털의 인증서, 식별자 & 프로필 페이지로 돌아가서 선택한 푸시 알림 옵션까지 아래로 스크롤한 다음 구성을 선택하여 인증서를 만듭니다.
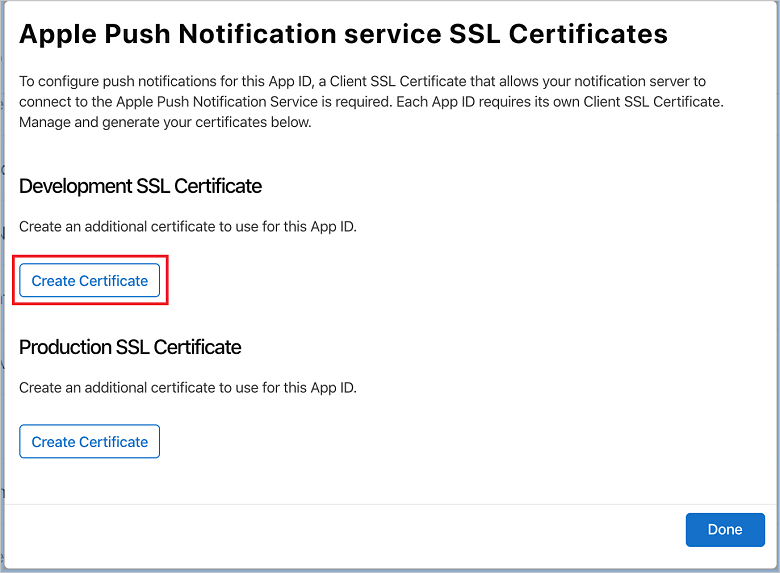
Apple 푸시 알림 서비스 TLS/SSL 인증서 창이 나타납니다. 개발 TLS/SSL 인증서 섹션에서 인증서 만들기 단추를 선택합니다.
새 인증서 만들기 화면이 표시됩니다.
참고
이 자습서에서는 개발 인증서를 사용합니다. 프로덕션 인증서를 등록할 때도 동일한 프로세스가 사용됩니다. 알림을 보낼 때 동일한 인증서 유형을 사용해야 합니다.
파일 선택을 선택하고CSR 파일을 저장한 위치로 이동한 다음 인증서 이름을 두 번 클릭하여 로드합니다. 그런 다음 , 계속을 선택합니다.
포털에서 인증서를 만든 후 다운로드 단추를 선택합니다. 인증서를 저장하고 인증서가 저장된 위치를 기억합니다.
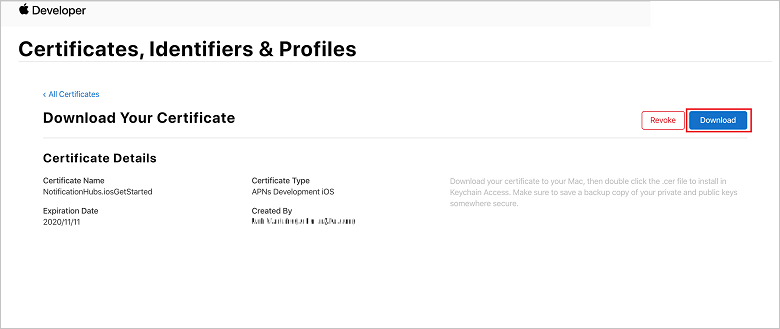
인증서가 다운로드되어 다운로드 폴더의 컴퓨터에 저장 됩니다 .
참고
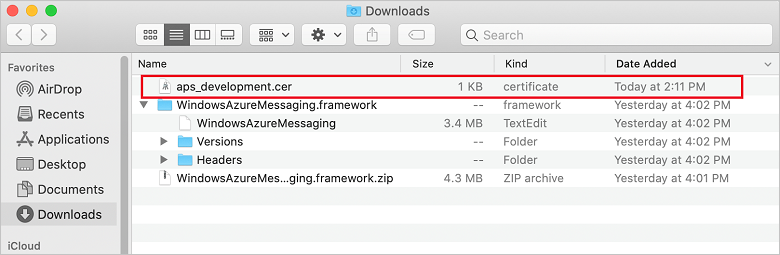
기본적으로 다운로드한 개발 인증서의 이름은 aps_development.cer.
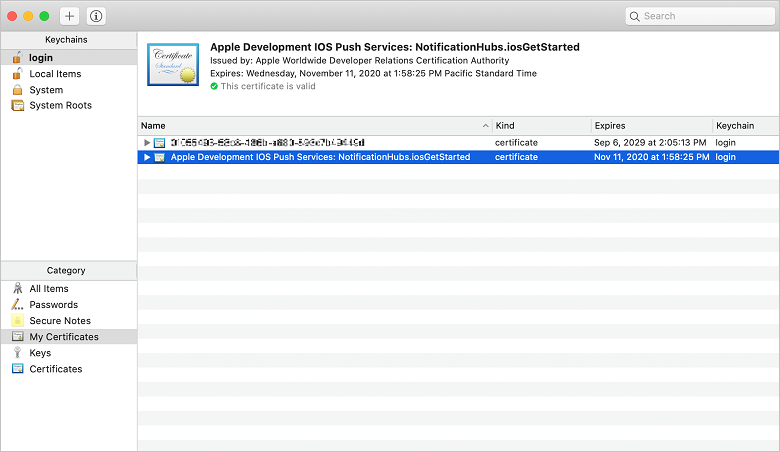
다운로드한 푸시 인증서 aps_development.cer 두 번 클릭합니다. 이 작업은 다음 이미지와 같이 키 집합에 새 인증서를 설치합니다.
참고
인증서의 이름은 다를 수 있지만 이름은 Apple Development iOS Push Services 접두사로 지정되고 적절한 번들 식별자가 연결됩니다.
키 집합 액세스에서 제어 + 인증서 범주에서 만든 새 푸시 인증서를클릭합니다. 내보내기를 선택하고, 파일 이름을 지정하고, p12 형식을 선택한 다음, 저장을 선택합니다.
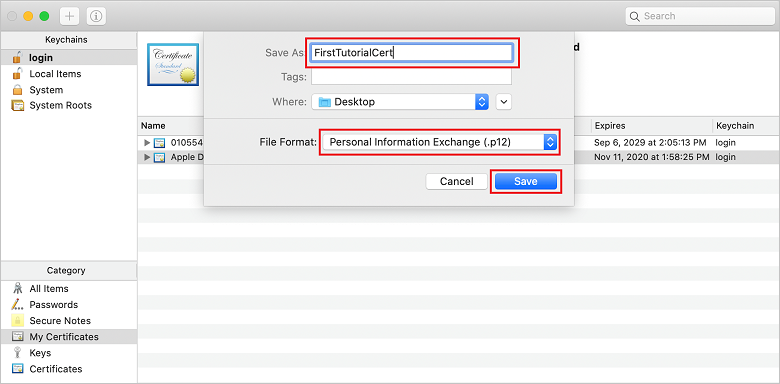
암호를 사용하여 인증서를 보호하도록 선택할 수 있지만 암호는 선택 사항입니다. 암호 만들기를 무시하려면 확인을 클릭합니다. 내보낸 p12 인증서의 파일 이름과 위치를 기록해 둡다. APN으로 인증을 사용하도록 설정하는 데 사용됩니다.
참고
p12 파일 이름과 위치는 이 자습서의 그림과 다를 수 있습니다.
옵션 2: 토큰 기반 인증에 사용할 수 있는 p8 인증서 만들기
다음 세부 정보를 기록해 둡다.
- 앱 ID 접두사 (팀 ID)
- 번들 ID
인증서로 돌아가서 식별자가 프로필에 &키를 클릭합니다.
참고
APNS에 대해 구성된 키가 이미 있는 경우 만든 직후 다운로드한 p8 인증서를 다시 사용할 수 있습니다. 그렇다면 3 ~ 5단계를 무시할 수 있습니다.
단추 + (또는 키 만들기 단추)를 클릭하여 새 키를 만듭니다.
적절한 키 이름 값을 입력한 다음 APNS(Apple Push Notifications Service) 옵션을 검사 다음 계속을 클릭한 다음, 다음 화면에서 등록을 클릭합니다.
다운로드를 클릭한 다음 p8 파일(AuthKey_ 접두사)을 보안 로컬 디렉터리로 이동한 다음 완료를 클릭합니다.
참고
p8 파일을 안전한 위치에 유지하고 백업을 저장해야 합니다. 키를 다운로드한 후에는 서버 복사본이 제거되므로 키를 다시 다운로드할 수 없습니다.
키에서 만든 키(또는 대신 사용하도록 선택한 경우 기존 키)를 클릭합니다.
키 ID 값을 기록해 둡니다.
p8 인증서를 원하는 애플리케이션(예: Visual Studio Code)에서 엽니다. 키 값( -----BEGIN PRIVATE KEY----- 및----- PRIVATE KEY----- 간)을 기록해 둡니다.
-----베긴 프라이빗 키-----
<key_value>
----- 프라이빗 키 보내기-----참고
나중에 Notification Hub를 구성하는 데 사용할 토큰 값입니다.
이러한 단계가 끝나면 APNS 정보를 사용하여 알림 허브 구성의 뒷부분에서 사용할 수 있는 다음 정보가 있어야 합니다.
- 팀 ID (1단계 참조)
- 번들 ID (1단계 참조)
- 키 ID (7단계 참조)
- 토큰 값 (8단계에서 가져온 p8 키 값)
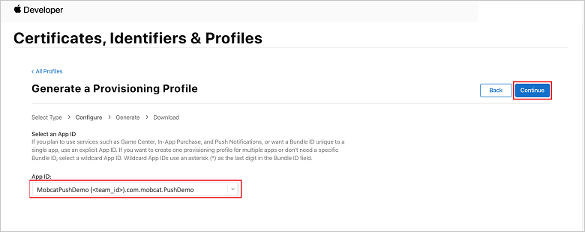
앱에 대한 프로비저닝 프로필 만들기
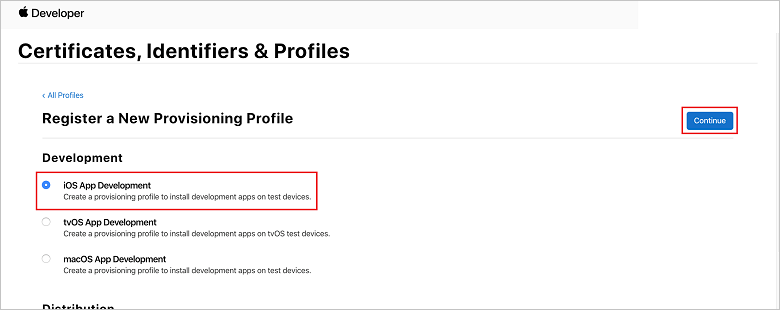
iOS 프로비저닝 포털로 돌아가서 인증서, 식별자 & 프로필을 선택하고, 왼쪽 메뉴에서 프로필을 선택한 다음, 를 선택하여 + 새 프로필을 만듭니다. 새 프로비저닝 프로필 등록 화면이 나타납니다.
개발에서 프로비저닝 프로필 유형으로 iOS 앱 개발을 선택한 다음, 계속을 선택합니다.
다음으로 앱 ID 드롭다운 목록에서 만든 앱 ID 를 선택하고 계속을 선택합니다.
인증서 선택 창에서 코드 서명에 사용하는 개발 인증서를 선택하고 계속을 선택합니다.
참고
이 인증서는 이전 단계에서 만든 푸시 인증서가 아닙니다. 개발 인증서입니다. 없는 경우 이 자습서의 필수 구성 요소 이므로 만들어야 합니다. 개발자 인증서는 Apple 개발자 포털, Xcode 또는 Visual Studio에서 만들 수 있습니다.
인증서, 식별자 & 프로필 페이지로 돌아가서 왼쪽 메뉴에서 프로필을 선택한 다음 을 선택하여 + 새 프로필을 만듭니다. 새 프로비저닝 프로필 등록 화면이 나타납니다.
인증서 선택 창에서 만든 개발 인증서를 선택합니다. 그런 다음 , 계속을 선택합니다.
다음으로 테스트에 사용할 디바이스를 선택하고 계속을 선택합니다.
마지막으로 프로비저닝 프로필 이름에서 프로필 이름을 선택하고 생성을 선택합니다.
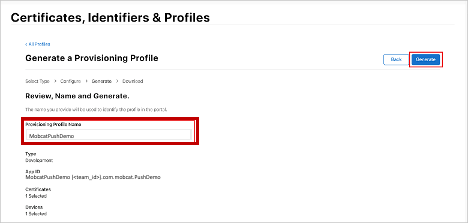
새 프로비전 프로필이 만들어지면 다운로드를 선택합니다. 저장된 위치를 기억합니다.
프로비전 프로필의 위치를 찾은 다음 두 번 클릭하여 개발 컴퓨터에 설치합니다.
알림 허브 만들기
이 섹션에서는 알림 허브를 만들고 APNS를 사용하여 인증을 구성합니다. p12 푸시 인증서 또는 토큰 기반 인증을 사용할 수 있습니다. 이미 만든 알림 허브를 사용하려는 경우 5단계로 건너뛸 수 있습니다.
Azure에 로그인합니다.
리소스 만들기를 클릭한 다음 알림 허브를 검색하여 선택한 다음 만들기를 클릭합니다.
다음 필드를 업데이트한 다음 만들기를 클릭합니다.
기본 세부 정보
구독: 드롭다운 목록에서 대상 구독 선택
리소스 그룹: 새 리소스 그룹을 만들거나 기존 리소스 그룹을 선택합니다.네임스페이스 세부 정보
알림 허브 네임스페이스:Notification Hub 네임스페이스의 전역적으로 고유한 이름을 입력합니다.
참고
이 필드에 대해 새로 만들기 옵션이 선택되어 있는지 확인합니다.
알림 허브 세부 정보
알림 허브:알림 허브의 이름을 입력합니다.
위치: 드롭다운 목록에서 적합한 위치 선택
가격 책정 계층: 기본 무료 옵션 유지참고
무료 계층의 최대 허브 수에 도달하지 않는 한.
알림 허브가 프로비전되면 해당 리소스로 이동합니다.
새 알림 허브로 이동합니다.
목록에서 액세스 정책을 선택합니다( 관리 아래).
해당 연결 문자열 값과 함께 정책 이름 값을 기록해 둡다.
APNS 정보를 사용하여 알림 허브 구성
Notification Services에서 Apple을 선택한 다음 이전에 Notification Hubs용 인증서 만들기 섹션에서 선택한 접근 방식에 따라 적절한 단계를 수행합니다.
참고
스토어에서 앱을 구매한 사용자에게 푸시 알림을 보내려는 경우에만 애플리케이션 모드용 프로덕션을 사용합니다.
옵션 1: .p12 푸시 인증서 사용
인증서를 선택합니다.
파일 아이콘을 선택합니다.
이전에 내보낸 .p12 파일을 선택한 다음 열기를 선택합니다.
필요한 경우 올바른 암호를 지정합니다.
샌드박스 모드를 선택합니다.
저장을 선택합니다.
옵션 2: 토큰 기반 인증 사용
토큰을 선택합니다.
이전에 획득한 다음 값을 입력합니다.
- 키 ID
- 번들 ID
- 팀 ID
- 토큰
샌드박스를 선택합니다.
저장을 선택합니다.
FCM 정보를 사용하여 알림 허브 구성
- 왼쪽 메뉴의 설정 섹션에서 Google(GCM/FCM)을 선택합니다.
- Google Firebase 콘솔에서 적어 두는 서버 키를 입력합니다.
- 도구 모음에서 저장 을 선택합니다.
ASP.NET Core Web API 백 엔드 애플리케이션 만들기
이 섹션에서는 ASP.NET Core Web API 백 엔드를 만들어 디바이스 등록 및 React Native 모바일 앱에 알림 보내기를 처리합니다.
웹 프로젝트 만들기
Visual Studio에서 파일>새 솔루션을 선택합니다.
.NET Core>앱>ASP.NET Core>API>다음을 선택합니다.
새 ASP.NET Core Web API 구성 대화 상자에서 .NET Core 3.1의 대상 프레임워크를 선택합니다.
프로젝트 이름에 PushDemoApi를 입력한 다음, 만들기를 선택합니다.
템플릿 기반 앱을 테스트하려면 디버깅을 시작합니다(명령 + 입력).
참고
템플릿이 적용된 앱은 WeatherForecastController 를 launchUrl로 사용하도록 구성됩니다. 속성>launchSettings.json 설정됩니다.
잘못된 개발 인증서를 찾은 메시지가 표시되면 다음을 수행합니다.
이 문제를 해결하려면 'dotnet dev-certs https' 도구를 실행하는 데 동의하려면 예를 클릭합니다. 'dotnet dev-certs https' 도구는 인증서의 암호와 키 집합의 암호를 입력하라는 메시지를 표시합니다.
새 인증서를 설치하고 신뢰하라는 메시지가 표시되면 예를 클릭한 다음 키 집합의 암호를 입력합니다.
Controllers 폴더를 확장한 다음 WeatherForecastController.cs 삭제합니다.
WeatherForecast.cs 삭제합니다.
Secret Manager 도구를 사용하여 로컬 구성 값을 설정합니다. 솔루션에서 비밀을 분리하면 소스 제어로 끝나지 않습니다. 터미널을 열고 프로젝트 파일의 디렉터리로 이동하여 다음 명령을 실행합니다.
dotnet user-secrets init
dotnet user-secrets set "NotificationHub:Name" <value>
dotnet user-secrets set "NotificationHub:ConnectionString" <value>
자리 표시자 값을 고유한 알림 허브 이름 및 연결 문자열 값으로 바꿉니다. 알림 허브 만들기 섹션에서 해당 항목을 기록해 둡니다. 그렇지 않으면 Azure에서 조회할 수 있습니다.
NotificationHub:Name:
개요 맨 위에 있는 Essentials 요약의 이름을 참조하세요.NotificationHub:ConnectionString:
액세스 정책의 DefaultFullSharedAccessSignature를 참조하세요.참고
프로덕션 시나리오의 경우 Azure KeyVault와 같은 옵션을 확인하여 연결 문자열 안전하게 저장할 수 있습니다. 간단히 하기 위해 비밀이 Azure App Service 애플리케이션 설정에 추가됩니다.
API 키를 사용하여 클라이언트 인증(선택 사항)
API 키는 토큰만큼 안전하지는 않지만 이 자습서의 용도로 충분합니다. API 키는 ASP.NET 미들웨어를 통해 쉽게 구성할 수 있습니다.
로컬 구성 값에 API 키를 추가합니다.
dotnet user-secrets set "Authentication:ApiKey" <value>참고
자리 표시자 값을 사용자 고유의 값으로 바꾸고 기록해 두어야 합니다.
컨트롤 + PushDemoApi 프로젝트를 클릭하고추가 메뉴에서 새 폴더를 선택한 다음, 인증을 사용하여 추가를 폴더 이름으로 클릭합니다.
컨트롤 + 인증 폴더를 클릭한 다음 추가 메뉴에서 새 파일...을 선택합니다.
일반>빈 클래스를 선택하고 이름에 ApiKeyAuthOptions.cs 입력한 다음 새로 만들기를 클릭하여 다음 구현을 추가합니다.
using Microsoft.AspNetCore.Authentication;

namespace PushDemoApi.Authentication
{
    public class ApiKeyAuthOptions : AuthenticationSchemeOptions
    {
        public const string DefaultScheme = "ApiKey";
        public string Scheme => DefaultScheme;
        public string ApiKey { get; set; }
    }
}
ApiKeyAuthHandler.cs 라는 인증 폴더에 다른 빈 클래스를 추가한 다음, 다음 구현을 추가합니다.
using System;
using System.Collections.Generic;
using System.Linq;
using System.Security.Claims;
using System.Text.Encodings.Web;
using System.Threading.Tasks;
using Microsoft.AspNetCore.Authentication;
using Microsoft.Extensions.Logging;
using Microsoft.Extensions.Options;

namespace PushDemoApi.Authentication
{
    public class ApiKeyAuthHandler : AuthenticationHandler<ApiKeyAuthOptions>
    {
        const string ApiKeyIdentifier = "apikey";

        public ApiKeyAuthHandler(
            IOptionsMonitor<ApiKeyAuthOptions> options,
            ILoggerFactory logger,
            UrlEncoder encoder,
            ISystemClock clock)
            : base(options, logger, encoder, clock) {}

        protected override Task<AuthenticateResult> HandleAuthenticateAsync()
        {
            string key = string.Empty;

            if (Request.Headers[ApiKeyIdentifier].Any())
            {
                key = Request.Headers[ApiKeyIdentifier].FirstOrDefault();
            }
            else if (Request.Query.ContainsKey(ApiKeyIdentifier))
            {
                if (Request.Query.TryGetValue(ApiKeyIdentifier, out var queryKey))
                    key = queryKey;
            }

            if (string.IsNullOrWhiteSpace(key))
                return Task.FromResult(AuthenticateResult.Fail("No api key provided"));

            if (!string.Equals(key, Options.ApiKey, StringComparison.Ordinal))
                return Task.FromResult(AuthenticateResult.Fail("Invalid api key."));

            var identities = new List<ClaimsIdentity> {
                new ClaimsIdentity("ApiKeyIdentity")
            };

            var ticket = new AuthenticationTicket(
                new ClaimsPrincipal(identities), Options.Scheme);

            return Task.FromResult(AuthenticateResult.Success(ticket));
        }
    }
}
참고
인증 처리기는 구성표의 동작(이 경우 사용자 지정 API 키 체계)을 구현하는 형식입니다.
ApiKeyAuthenticationBuilderExtensions.cs 라는 인증 폴더에 다른 빈 클래스를 추가한 다음, 다음 구현을 추가합니다.
using System;
using Microsoft.AspNetCore.Authentication;

namespace PushDemoApi.Authentication
{
    public static class AuthenticationBuilderExtensions
    {
        public static AuthenticationBuilder AddApiKeyAuth(
            this AuthenticationBuilder builder,
            Action<ApiKeyAuthOptions> configureOptions)
        {
            return builder
                .AddScheme<ApiKeyAuthOptions, ApiKeyAuthHandler>(
                    ApiKeyAuthOptions.DefaultScheme,
                    configureOptions);
        }
    }
}
참고
이 확장 메서드는 Startup.cs 미들웨어 구성 코드를 간소화하여 더 읽기 쉽고 일반적으로 따라하기 쉽습니다.
Startup.cs 서비스 호출 아래에 API 키 인증을 구성하도록 ConfigureServices 메서드를 업데이트합니다. AddControllers 메서드.
using PushDemoApi.Authentication;
using PushDemoApi.Models;
using PushDemoApi.Services;

public void ConfigureServices(IServiceCollection services)
{
    services.AddControllers();

    services.AddAuthentication(options =>
    {
        options.DefaultAuthenticateScheme = ApiKeyAuthOptions.DefaultScheme;
        options.DefaultChallengeScheme = ApiKeyAuthOptions.DefaultScheme;
    }).AddApiKeyAuth(Configuration.GetSection("Authentication").Bind);
}
여전히 Startup.cs 앱의 IApplicationBuilder에서 UseAuthentication 및 UseAuthorization 확장 메서드를 호출하도록 Configure 메서드를 업데이트합니다. 이러한 메서드가 UseRouting 이후 및 앱 전에 호출되는지 확인합니다. UseEndpoints.
public void Configure(IApplicationBuilder app, IWebHostEnvironment env)
{
    if (env.IsDevelopment())
    {
        app.UseDeveloperExceptionPage();
    }

    app.UseHttpsRedirection();

    app.UseRouting();

    app.UseAuthentication();

    app.UseAuthorization();

    app.UseEndpoints(endpoints =>
    {
        endpoints.MapControllers();
    });
}
참고
UseAuthentication을 호출하면 이전에 등록된 인증 체계(ConfigureServices)를 사용하는 미들웨어가 등록됩니다. 인증되는 사용자에 따라 달라지는 미들웨어 전에 호출해야 합니다.
종속성 추가 및 서비스 구성
ASP.NET Core 클래스와 해당 종속성 간에 IoC(Inversion of Control)를 달성하기 위한 기술인 DI(종속성 주입) 소프트웨어 디자인 패턴을 지원합니다.
백 엔드 작업에 알림 허브 및 Notification Hubs SDK의 사용은 서비스 내에 캡슐화됩니다. 서비스가 등록되고 적절한 추상화로 제공됩니다.
컨트롤 + 종속성 폴더를 클릭한 다음 NuGet 패키지 관리...를 선택합니다.
Microsoft.Azure.NotificationHubs를 검색하고 확인합니다.
패키지 추가를 클릭한 다음 사용 조건에 동의하라는 메시지가 표시되면 동의를 클릭합니다.
컨트롤 + PushDemoApi 프로젝트를 클릭하고추가 메뉴에서 새 폴더를 선택한 다음 모델을 사용하여추가를 폴더 이름으로 클릭합니다.
컨트롤 + Models 폴더를 클릭한 다음 추가 메뉴에서 새 파일...을 선택합니다.
일반>빈 클래스를 선택하고 이름에 PushTemplates.cs 입력한 다음 새로 만들기를 클릭하여 다음 구현을 추가합니다.
namespace PushDemoApi.Models
{
    public class PushTemplates
    {
        public class Generic
        {
            public const string Android = "{ \"notification\": { \"title\" : \"PushDemo\", \"body\" : \"$(alertMessage)\"}, \"data\" : { \"action\" : \"$(alertAction)\" } }";
            public const string iOS = "{ \"aps\" : {\"alert\" : \"$(alertMessage)\"}, \"action\" : \"$(alertAction)\" }";
        }

        public class Silent
        {
            public const string Android = "{ \"data\" : {\"message\" : \"$(alertMessage)\", \"action\" : \"$(alertAction)\"} }";
            public const string iOS = "{ \"aps\" : {\"content-available\" : 1, \"apns-priority\": 5, \"sound\" : \"\", \"badge\" : 0}, \"message\" : \"$(alertMessage)\", \"action\" : \"$(alertAction)\" }";
        }
    }
}
참고
이 클래스에는 이 시나리오에 필요한 일반 및 자동 알림에 대한 토큰화된 알림 페이로드가 포함되어 있습니다. 페이로드는 서비스를 통해 기존 설치 를 업데이트하지 않고도 실험을 허용하도록 설치 외부에서 정의됩니다. 이러한 방식으로 설치 변경 내용을 처리하는 것은 이 자습서에서 scope 않습니다. 프로덕션의 경우 사용자 지정 템플릿을 고려합니다.
DeviceInstallation.cs 라는 Models 폴더에 또 다른 빈 클래스를 추가한 다음, 다음 구현을 추가합니다.
using System.Collections.Generic;
using System.ComponentModel.DataAnnotations;

namespace PushDemoApi.Models
{
    public class DeviceInstallation
    {
        [Required]
        public string InstallationId { get; set; }

        [Required]
        public string Platform { get; set; }

        [Required]
        public string PushChannel { get; set; }

        public IList<string> Tags { get; set; } = Array.Empty<string>();
    }
}
NotificationRequest.cs 라는 Models 폴더에 또 다른 빈 클래스를 추가한 다음, 다음 구현을 추가합니다.
using System;

namespace PushDemoApi.Models
{
    public class NotificationRequest
    {
        public string Text { get; set; }
        public string Action { get; set; }
        public string[] Tags { get; set; } = Array.Empty<string>();
        public bool Silent { get; set; }
    }
}
NotificationHubOptions.cs 라는 Models 폴더에 또 다른 빈 클래스를 추가한 다음, 다음 구현을 추가합니다.
using System.ComponentModel.DataAnnotations;

namespace PushDemoApi.Models
{
    public class NotificationHubOptions
    {
        [Required]
        public string Name { get; set; }

        [Required]
        public string ConnectionString { get; set; }
    }
}
Services라는 PushDemoApi 프로젝트에 새 폴더를 추가합니다.
INotificationService.cs 라는 Services 폴더에빈 인터페이스를 추가한 다음, 다음 구현을 추가합니다.
using System.Threading;
using System.Threading.Tasks;
using PushDemoApi.Models;

namespace PushDemoApi.Services
{
    public interface INotificationService
    {
        Task<bool> CreateOrUpdateInstallationAsync(DeviceInstallation deviceInstallation, CancellationToken token);
        Task<bool> DeleteInstallationByIdAsync(string installationId, CancellationToken token);
        Task<bool> RequestNotificationAsync(NotificationRequest notificationRequest, CancellationToken token);
    }
}
NotificationHubsService.cs 라는 Services 폴더에 빈 클래스를 추가한 다음, 다음 코드를 추가하여 INotificationService 인터페이스를 구현합니다.
using System;
using System.Collections.Generic;
using System.Linq;
using System.Threading;
using System.Threading.Tasks;
using Microsoft.Azure.NotificationHubs;
using Microsoft.Extensions.Logging;
using Microsoft.Extensions.Options;
using PushDemoApi.Models;

namespace PushDemoApi.Services
{
    public class NotificationHubService : INotificationService
    {
        readonly NotificationHubClient _hub;
        readonly Dictionary<string, NotificationPlatform> _installationPlatform;
        readonly ILogger<NotificationHubService> _logger;

        public NotificationHubService(IOptions<NotificationHubOptions> options, ILogger<NotificationHubService> logger)
        {
            _logger = logger;
            _hub = NotificationHubClient.CreateClientFromConnectionString(
                options.Value.ConnectionString,
                options.Value.Name);

            _installationPlatform = new Dictionary<string, NotificationPlatform>
            {
                { nameof(NotificationPlatform.Apns).ToLower(), NotificationPlatform.Apns },
                { nameof(NotificationPlatform.Fcm).ToLower(), NotificationPlatform.Fcm }
            };
        }

        public async Task<bool> CreateOrUpdateInstallationAsync(DeviceInstallation deviceInstallation, CancellationToken token)
        {
            if (string.IsNullOrWhiteSpace(deviceInstallation?.InstallationId) ||
                string.IsNullOrWhiteSpace(deviceInstallation?.Platform) ||
                string.IsNullOrWhiteSpace(deviceInstallation?.PushChannel))
                return false;

            var installation = new Installation()
            {
                InstallationId = deviceInstallation.InstallationId,
                PushChannel = deviceInstallation.PushChannel,
                Tags = deviceInstallation.Tags
            };

            if (_installationPlatform.TryGetValue(deviceInstallation.Platform, out var platform))
                installation.Platform = platform;
            else
                return false;

            try
            {
                await _hub.CreateOrUpdateInstallationAsync(installation, token);
            }
            catch
            {
                return false;
            }

            return true;
        }

        public async Task<bool> DeleteInstallationByIdAsync(string installationId, CancellationToken token)
        {
            if (string.IsNullOrWhiteSpace(installationId))
                return false;

            try
            {
                await _hub.DeleteInstallationAsync(installationId, token);
            }
            catch
            {
                return false;
            }

            return true;
        }

        public async Task<bool> RequestNotificationAsync(NotificationRequest notificationRequest, CancellationToken token)
        {
            if ((notificationRequest.Silent &&
                string.IsNullOrWhiteSpace(notificationRequest?.Action)) ||
                (!notificationRequest.Silent &&
                (string.IsNullOrWhiteSpace(notificationRequest?.Text)) ||
                string.IsNullOrWhiteSpace(notificationRequest?.Action)))
                return false;

            var androidPushTemplate = notificationRequest.Silent ?
                PushTemplates.Silent.Android :
                PushTemplates.Generic.Android;

            var iOSPushTemplate = notificationRequest.Silent ?
                PushTemplates.Silent.iOS :
                PushTemplates.Generic.iOS;

            var androidPayload = PrepareNotificationPayload(
                androidPushTemplate,
                notificationRequest.Text,
                notificationRequest.Action);

            var iOSPayload = PrepareNotificationPayload(
                iOSPushTemplate,
                notificationRequest.Text,
                notificationRequest.Action);

            try
            {
                if (notificationRequest.Tags.Length == 0)
                {
                    // This will broadcast to all users registered in the notification hub
                    await SendPlatformNotificationsAsync(androidPayload, iOSPayload, token);
                }
                else if (notificationRequest.Tags.Length <= 20)
                {
                    await SendPlatformNotificationsAsync(androidPayload, iOSPayload, notificationRequest.Tags, token);
                }
                else
                {
                    var notificationTasks = notificationRequest.Tags
                        .Select((value, index) => (value, index))
                        .GroupBy(g => g.index / 20, i => i.value)
                        .Select(tags => SendPlatformNotificationsAsync(androidPayload, iOSPayload, tags, token));

                    await Task.WhenAll(notificationTasks);
                }

                return true;
            }
            catch (Exception e)
            {
                _logger.LogError(e, "Unexpected error sending notification");
                return false;
            }
        }

        string PrepareNotificationPayload(string template, string text, string action) => template
            .Replace("$(alertMessage)", text, StringComparison.InvariantCulture)
            .Replace("$(alertAction)", action, StringComparison.InvariantCulture);

        Task SendPlatformNotificationsAsync(string androidPayload, string iOSPayload, CancellationToken token)
        {
            var sendTasks = new Task[]
            {
                _hub.SendFcmNativeNotificationAsync(androidPayload, token),
                _hub.SendAppleNativeNotificationAsync(iOSPayload, token)
            };

            return Task.WhenAll(sendTasks);
        }

        Task SendPlatformNotificationsAsync(string androidPayload, string iOSPayload, IEnumerable<string> tags, CancellationToken token)
        {
            var sendTasks = new Task[]
            {
                _hub.SendFcmNativeNotificationAsync(androidPayload, tags, token),
                _hub.SendAppleNativeNotificationAsync(iOSPayload, tags, token)
            };

            return Task.WhenAll(sendTasks);
        }
    }
}
참고
SendTemplateNotificationAsync에 제공된 태그 식은 20개의 태그로 제한됩니다. 대부분의 연산자에 대해 6으로 제한되지만 식에는 이 경우 OU(||)만 포함됩니다. 요청에 20개 이상의 태그가 있는 경우 여러 요청으로 분할되어야 합니다. 자세한 내용은 라우팅 및 태그 식 설명서를 참조하세요.
Startup.csConfigureServices 메서드를 업데이트하여 NotificationHubsService를INotificationService의 싱글톤 구현으로 추가합니다.
using PushDemoApi.Models;
using PushDemoApi.Services;

public void ConfigureServices(IServiceCollection services)
{
    ...

    services.AddSingleton<INotificationService, NotificationHubService>();

    services.AddOptions<NotificationHubOptions>()
        .Configure(Configuration.GetSection("NotificationHub").Bind)
        .ValidateDataAnnotations();
}
알림 API 만들기
컨트롤 + 컨트롤러 폴더를클릭한 다음 추가 메뉴에서 새 파일...을 선택합니다.
ASP.NET Core>웹 API 컨트롤러 클래스를 선택하고 이름에 NotificationsController를 입력한 다음 새로 만들기를 클릭합니다.
참고
Visual Studio 2019를 팔로우하는 경우 읽기/쓰기 작업 템플릿이 있는 API 컨트롤러를 선택합니다.
파일 맨 위에 다음 네임스페이스를 추가합니다.
using System.ComponentModel.DataAnnotations;
using System.Net;
using System.Threading;
using System.Threading.Tasks;
using Microsoft.AspNetCore.Authorization;
using Microsoft.AspNetCore.Mvc;
using PushDemoApi.Models;
using PushDemoApi.Services;
템플릿 기반 컨트롤러가 ControllerBase 에서 파생되고 ApiController 특성으로 데코레이트되도록 업데이트합니다.
[ApiController]
[Route("api/[controller]")]
public class NotificationsController : ControllerBase
{
    // Templated methods here
}
참고
컨트롤러 기본 클래스는 뷰를 지원하지만 이 경우에는 필요하지 않으므로 ControllerBase를 대신 사용할 수 있습니다. Visual Studio 2019를 팔로우하는 경우 이 단계를 건너뛸 수 있습니다.
API 키를 사용하여 클라이언트 인증 섹션을 완료하도록 선택한 경우 Authorize 특성으로 NotificationsController를 데코레이트해야 합니다.
[Authorize]INotificationService의 등록된 instance 인수로 수락하고 읽기 전용 멤버에 할당하도록 생성자를 업데이트합니다.
readonly INotificationService _notificationService;

public NotificationsController(INotificationService notificationService)
{
    _notificationService = notificationService;
}
속성 폴더 내의 launchSettings.jsonregistrationsController경로 특성에 지정된 URL과 일치하도록 launchUrl을 에서
weatherforecastapi/notifications로 변경합니다.디버깅 + 을 시작하여 앱이 새 NotificationsController에서 작동하는지 확인하고 401 권한 없는 상태 반환합니다.
참고
Visual Studio는 브라우저에서 앱을 자동으로 시작하지 않을 수 있습니다. Postman을 사용하여 이 시점부터 API를 테스트합니다.
새 Postman 탭에서 요청을 GET으로 설정합니다. 자리 표시자 <applicationUrl>을 속성>launchSettings.json 있는 https applicationUrl로 바꿔서 아래 주소를 입력합니다.
<applicationUrl>/api/notifications참고
applicationUrl은 기본 프로필에 대해 'https://localhost:5001'이어야 합니다. IIS(Windows의 Visual Studio 2019에서 기본값)를 사용하는 경우 iisSettings 항목에 지정된 applicationUrl을 대신 사용해야 합니다. 주소가 올바르지 않으면 404 응답을 받게 됩니다.
API 키를 사용하여 클라이언트 인증 섹션을 완료하도록 선택한 경우 apikey 값을 포함하도록 요청 헤더를 구성해야 합니다.
키 값 apikey <your_api_key> 보내기 단추를 클릭합니다.
참고
일부 JSON 콘텐츠가 포함된 200 OK 상태 받아야 합니다.
SSL 인증서 확인 경고가 표시되면 설정에서 요청 SSL 인증서 확인 Postman 설정을 전환할 수 있습니다.
NotificationsController.cs 템플릿 클래스 메서드를 다음 코드로 바꿉 있습니다.
[HttpPut]
[Route("installations")]
[ProducesResponseType((int)HttpStatusCode.OK)]
[ProducesResponseType((int)HttpStatusCode.BadRequest)]
[ProducesResponseType((int)HttpStatusCode.UnprocessableEntity)]
public async Task<IActionResult> UpdateInstallation(
    [Required]DeviceInstallation deviceInstallation)
{
    var success = await _notificationService
        .CreateOrUpdateInstallationAsync(deviceInstallation, HttpContext.RequestAborted);

    if (!success)
        return new UnprocessableEntityResult();

    return new OkResult();
}

[HttpDelete()]
[Route("installations/{installationId}")]
[ProducesResponseType((int)HttpStatusCode.OK)]
[ProducesResponseType((int)HttpStatusCode.BadRequest)]
[ProducesResponseType((int)HttpStatusCode.UnprocessableEntity)]
public async Task<ActionResult> DeleteInstallation(
    [Required][FromRoute]string installationId)
{
    var success = await _notificationService
        .DeleteInstallationByIdAsync(installationId, CancellationToken.None);

    if (!success)
        return new UnprocessableEntityResult();

    return new OkResult();
}

[HttpPost]
[Route("requests")]
[ProducesResponseType((int)HttpStatusCode.OK)]
[ProducesResponseType((int)HttpStatusCode.BadRequest)]
[ProducesResponseType((int)HttpStatusCode.UnprocessableEntity)]
public async Task<IActionResult> RequestPush(
    [Required]NotificationRequest notificationRequest)
{
    if ((notificationRequest.Silent &&
        string.IsNullOrWhiteSpace(notificationRequest?.Action)) ||
        (!notificationRequest.Silent &&
        string.IsNullOrWhiteSpace(notificationRequest?.Text)))
        return new BadRequestResult();

    var success = await _notificationService
        .RequestNotificationAsync(notificationRequest, HttpContext.RequestAborted);

    if (!success)
        return new UnprocessableEntityResult();

    return new OkResult();
}
API 앱 만들기
이제 Azure App Service 백 엔드 서비스를 호스팅하기 위한 API 앱을 만듭니다.
Azure Portal에 로그인합니다.
리소스 만들기를 클릭한 다음 API 앱을 검색하여 선택한 다음 만들기를 클릭합니다.
다음 필드를 업데이트한 다음 만들기를 클릭합니다.
앱 이름:
API 앱의 전역적으로 고유한 이름을 입력합니다.구독:
알림 허브를 만든 것과 동일한 대상 구독 을 선택합니다.리소스 그룹:
알림 허브를 만든 것과 동일한 리소스 그룹을 선택합니다.App Service 계획/위치:
새 App Service 계획 만들기참고
기본 옵션에서 SSL 지원을 포함하는 계획으로 변경합니다. 그렇지 않으면 http 요청이 차단되지 않도록 모바일 앱으로 작업할 때 적절한 단계를 수행해야 합니다.
Application Insights:
제안된 옵션(해당 이름을 사용하여 새 리소스가 생성됨)을 유지하거나 기존 리소스를 선택합니다.API 앱이 프로비전되면 해당 리소스로 이동합니다.
개요 맨 위에 있는 Essentials 요약에서 URL 속성을 기록해 둡니다. 이 URL은 이 자습서의 뒷부분에서 사용할 백 엔드 엔드포인트 입니다.
참고
URL은 앞에서 지정한 API 앱 이름을 형식
https://<app_name>.azurewebsites.net으로 사용합니다.목록에서 구성 을 선택합니다( 설정 아래).
아래 각 설정에 대해 새 애플리케이션 설정을 클릭하여 이름 및 값을 입력한 다음 확인을 클릭합니다.
Name 값 Authentication:ApiKey<api_key_value> NotificationHub:Name<hub_name_value> NotificationHub:ConnectionString<hub_connection_string_value> 참고
이러한 설정은 이전에 사용자 설정에서 정의한 것과 동일한 설정입니다. 이러한 항목을 복사할 수 있어야 합니다. Authentication:ApiKey 설정은 API 키를 사용하여 클라이언트 인증 섹션을 완료하도록 선택한 경우에만 필요합니다. 프로덕션 시나리오의 경우 Azure KeyVault와 같은 옵션을 확인할 수 있습니다. 이러한 설정은 이 경우 편의를 위해 애플리케이션 설정으로 추가되었습니다.
모든 애플리케이션 설정이 추가되면 저장, 계속을 차례로 클릭합니다.
백 엔드 서비스 게시
다음으로, 모든 디바이스에서 액세스할 수 있도록 API 앱에 앱을 배포합니다.
참고
다음 단계는 Mac용 Visual Studio 관련되어 있습니다. Windows에서 Visual Studio 2019 를 팔로우하는 경우 게시 흐름이 달라집니다. Windows에서 Azure App Service 게시를 참조하세요.
구성을 아직 수행하지 않은 경우 디버그 에서 릴리스 로 변경합니다.
컨트롤 + PushDemoApi 프로젝트를 클릭한 다음 게시 메뉴에서Azure에 게시...를 선택합니다.
이렇게 하라는 메시지가 표시되면 인증 흐름을 따릅니다. 이전 API 앱 만들기 섹션에서 사용한 계정을 사용합니다.
이전에 목록에서 만든 Azure App Service API 앱을 게시 대상으로 선택한 다음 게시를 클릭합니다.
마법사를 완료한 후 Azure에 앱을 게시한 다음, 앱을 엽니다. 아직 URL을 기록 하지 않은 경우 기록해 둡니다. 이 URL은 이 자습서의 뒷부분에서 사용되는 백 엔드 엔드포인트 입니다.
게시된 API 유효성 검사
Postman에서 새 탭을 열고 요청을 PUT으로 설정하고 아래 주소를 입력합니다. 자리 표시자를 이전 백 엔드 서비스 게시 섹션에서 기록한 기본 주소로 바꿉니다.
https://<app_name>.azurewebsites.net/api/notifications/installations참고
기본 주소는 형식이어야 합니다.
https://<app_name>.azurewebsites.net/API 키 섹션을 사용하여 클라이언트 인증을 완료하도록 선택한 경우 apikey 값을 포함하도록 요청 헤더를 구성해야 합니다.
키 값 apikey <your_api_key> 본문에 대한 원시 옵션을 선택한 다음 서식 옵션 목록에서 JSON을 선택한 다음 일부 자리 표시자 JSON 콘텐츠를 포함합니다.
{}보내기를 클릭합니다.
참고
서비스에서 422 UnprocessableEntity 상태 받아야 합니다.
1~4단계를 다시 수행하지만 이번에는 요청 엔드포인트를 지정하여 400 잘못된 요청 응답을 받는지 확인합니다.
https://<app_name>.azurewebsites.net/api/notifications/requests
참고
클라이언트 모바일 앱의 플랫폼별 정보가 필요하므로 유효한 요청 데이터를 사용하여 API를 테스트할 수 없습니다.
플랫폼 간 React Native 애플리케이션 만들기
이 섹션에서는 플랫폼 간 방식으로 푸시 알림을 구현하는 React Native 모바일 애플리케이션을 빌드합니다.
이를 통해 만든 백 엔드 서비스를 통해 알림 허브에서 등록 및 등록을 취소할 수 있습니다.
작업이 지정되고 앱이 포그라운드에 있을 때 경고가 표시됩니다. 그렇지 않으면 알림 센터에 알림이 표시됩니다.
참고
일반적으로 명시적 사용자 등록/등록 취소 입력 없이 애플리케이션 수명 주기의 적절한 시점(또는 첫 실행 환경의 일부로)에 등록(및 등록 취소) 작업을 수행합니다. 그러나 이 예제에서는 이 기능을 보다 쉽게 탐색하고 테스트할 수 있도록 명시적 사용자 입력이 필요합니다.
React Native 솔루션 만들기
에서
Terminal다음 명령을 사용하여 React Native 작업하는 데 필요한 환경 도구를 업데이트합니다.# install node brew install node # or update brew update node # install watchman brew install watchman # or update brew upgrade watchman # install cocoapods sudo gem install cocoapods에서
TerminalCLI를 설치하여 제거한 경우React Native다음 명령을 실행합니다. 사용 가능한 최신 React Native CLI 버전에 자동으로 액세스하려면 다음을 사용합니다npx.npm uninstall -g react-native-cli참고
React Native 기본 제공 명령줄 인터페이스가 있습니다. 전역적으로 특정 버전의 CLI를 설치하고 관리하는 대신 Node.js 함께 제공되는 를 사용하여 런타임에 현재 버전에
npx액세스하는 것이 좋습니다. 를 사용하면npx react-native <command>명령이 실행될 때 현재 안정적인 버전의 CLI가 다운로드되고 실행됩니다.새 애플리케이션을 만들려는 프로젝트 폴더로 이동합니다. 매개 변수를 지정하여 Typescript 기반 템플릿을
--template사용합니다.# init new project with npx npx react-native init PushDemo --template react-native-template-typescriptJavaScript 번들을 빌드하고 코드 업데이트를 모니터링하여 번들을 실시간으로 새로 고치는 메트로 서버를 실행합니다.
cd PushDemo
npx react-native start
iOS 앱을 실행하여 설정을 확인합니다. 다음 명령을 실행하기 전에 iOS 시뮬레이터를 시작했거나 iOS 디바이스를 연결했는지 확인합니다.
npx react-native run-iosAndroid 앱을 실행하여 설정을 확인합니다. React Native 메트로 서버에 액세스할 수 있도록 Android 에뮬레이터 또는 디바이스를 구성하려면 몇 가지 추가 단계가 필요합니다. 다음 명령은 Android용 초기 JavaScript 번들을 생성하여 assets 폴더에 넣습니다.
# create assets folder for the bundle
mkdir android/app/scr/main/assets
# build the bundle
npx react-native bundle --platform android --dev true --entry-file index.js --bundle-output android/app/src/main/assets/index.android.bundle --assets-dest android/app/src/main/res
# enable ability for sim to access the localhost
adb reverse tcp:8081 tcp:8081
이 스크립트는 앱의 초기 버전으로 미리 배포됩니다. 배포되면 서버 IP 주소를 지정하여 메트로 서버에 액세스하도록 에뮬레이터 또는 디바이스를 구성합니다. 다음 명령을 실행하여 Android 애플리케이션을 빌드하고 실행합니다.
npx react-native run-android앱에서 (에뮬레이터)를 누르
CMD+M거나 디바이스를 흔들어 개발자 설정을 채우고, 로Change Bundle LocationSettings> 이동하고, 기본 포트<metro-server-ip-address>:8081를 사용하여 메트로 서버 IP 주소를 지정합니다.파일에서
App.tsx페이지 레이아웃에 변경 내용을 적용하고 저장한 다음 변경 내용이 iOS 및 Android 앱 모두에 자동으로 반영되도록 합니다.참고
자세한 개발 환경 설정 가이드는 공식 설명서에서 확인할 수 있습니다.
필수 패키지 설치
이 샘플이 작동하려면 다음 세 가지 패키지가 필요합니다.
푸시 알림 iOS - 프로젝트 GitHub React Native
이 패키지는 PushNotificationIOS가 React Native 핵심에서 분할될 때 만들어졌습니다. 패키지는 기본적으로 iOS에 대한 푸시 알림을 구현하고 액세스하기 위한 React Native 인터페이스를 제공합니다. 다음 명령을 실행하여 패키지를 설치합니다.
yarn add @react-native-community/push-notification-ios-
이 패키지는 플랫폼 간 방식으로 iOS 및 Android에서 로컬 및 원격 알림을 구현합니다. 다음 명령을 실행하여 패키지를 설치합니다.
yarn add react-native-push-notification 디바이스 정보 패키지 패키지는 런타임에 디바이스에 대한 정보를 제공합니다. 푸시 알림을 등록하는 데 사용되는 디바이스 식별자를 정의하는 데 사용합니다. 다음 명령을 실행하여 패키지를 설치합니다.
yarn add react-native-device-info
플랫폼 간 구성 요소 구현
를 만들고 구현
DemoNotificationHandler합니다.import PushNotification from 'react-native-push-notification'; class DemoNotificationHandler { private _onRegister: any; private _onNotification: any; onNotification(notification: any) { console.log('NotificationHandler:', notification); if (typeof this._onNotification === 'function') { this._onNotification(notification); } } onRegister(token: any) { console.log('NotificationHandler:', token); if (typeof this._onRegister === 'function') { this._onRegister(token); } } attachTokenReceived(handler: any) { this._onRegister = handler; } attachNotificationReceived(handler: any) { this._onNotification = handler; } } const handler = new DemoNotificationHandler(); PushNotification.configure({ onRegister: handler.onRegister.bind(handler), onNotification: handler.onNotification.bind(handler), permissions: { alert: true, badge: true, sound: true, }, popInitialNotification: true, requestPermissions: true, }); export default handler;를 만들고 구현
DemoNotificationService합니다.import PushNotification from 'react-native-push-notification'; import DemoNotificationHandler from './DemoNotificationHandler'; export default class DemoNotificationService { constructor(onTokenReceived: any, onNotificationReceived: any) { DemoNotificationHandler.attachTokenReceived(onTokenReceived); DemoNotificationHandler.attachNotificationReceived(onNotificationReceived); PushNotification.getApplicationIconBadgeNumber(function(number: number) { if(number > 0) { PushNotification.setApplicationIconBadgeNumber(0); } }); } checkPermissions(cbk: any) { return PushNotification.checkPermissions(cbk); } requestPermissions() { return PushNotification.requestPermissions(); } cancelNotifications() { PushNotification.cancelLocalNotifications(); } cancelAll() { PushNotification.cancelAllLocalNotifications(); } abandonPermissions() { PushNotification.abandonPermissions(); } }를 만들고 구현
DemoNotificationRegistrationService합니다.export default class DemoNotificationService { constructor( readonly apiUrl: string, readonly apiKey: string) { } async registerAsync(request: any): Promise<Response> { const method = 'PUT'; const registerApiUrl = `${this.apiUrl}/notifications/installations`; const result = await fetch(registerApiUrl, { method: method, headers: { Accept: 'application/json', 'Content-Type': 'application/json', 'apiKey': this.apiKey }, body: JSON.stringify(request) }); this.validateResponse(registerApiUrl, method, request, result); return result; } async deregisterAsync(deviceId: string): Promise<Response> { const method = 'DELETE'; const deregisterApiUrl = `${this.apiUrl}/notifications/installations/${deviceId}`; const result = await fetch(deregisterApiUrl, { method: method, headers: { Accept: 'application/json', 'Content-Type': 'application/json', 'apiKey': this.apiKey } }); this.validateResponse(deregisterApiUrl, method, null, result); return result; } private validateResponse(requestUrl: string, method: string, requestPayload: any, response: Response) { console.log(`Request: ${method} ${requestUrl} => ${JSON.stringify(requestPayload)}\nResponse: ${response.status}`); if (!response || response.status != 200) { throw `HTTP error ${response.status}: ${response.statusText}`; } } }앱을 구성합니다.
package.json다음 스크립트 정의를 열고 추가합니다."configure": "cp .app.config.tsx src/config/AppConfig.tsx"그런 다음 기본 구성을 폴더에 복사하는 이 스크립트를
config실행합니다.yarn configure마지막 단계는 이전 단계에서 복사한 구성 파일을 API 액세스 정보로 업데이트하는 것입니다. 및
apiUrl매개 변수 지정apiKey:module.exports = { appName: "PushDemo", env: "production", apiUrl: "https://<azure-push-notifications-api-url>/api/", apiKey: "<api-auth-key>", };
플랫폼 간 UI 구현
페이지 레이아웃 정의
<View style={styles.container}>
  {this.state.isBusy &&
    <ActivityIndicator></ActivityIndicator>
  }
  <View style={styles.button}>
    <Button title="Register" onPress={this.onRegisterButtonPress.bind(this)} disabled={this.state.isBusy} />
  </View>
  <View style={styles.button}>
    <Button title="Deregister" onPress={this.onDeregisterButtonPress.bind(this)} disabled={this.state.isBusy} />
  </View>
</View>
스타일 적용
const styles = StyleSheet.create({
  container: {
    flex: 1,
    alignItems: "center",
    justifyContent: 'flex-end',
    margin: 50,
  },
  button: {
    margin: 5,
    width: "100%",
  }
});
페이지 구성 요소 초기화
  state: IState;
  notificationService: DemoNotificationService;
  notificationRegistrationService: DemoNotificationRegistrationService;
  deviceId: string;

  constructor(props: any) {
    super(props);
    this.deviceId = DeviceInfo.getUniqueId();
    this.state = {
      status: "Push notifications registration status is unknown",
      registeredOS: "",
      registeredToken: "",
      isRegistered: false,
      isBusy: false,
    };

    this.notificationService = new DemoNotificationService(
      this.onTokenReceived.bind(this),
      this.onNotificationReceived.bind(this),
    );

    this.notificationRegistrationService = new DemoNotificationRegistrationService(
      Config.apiUrl,
      Config.apiKey,
    );
  }
단추 클릭 처리기 정의
  async onRegisterButtonPress() {
    if (!this.state.registeredToken || !this.state.registeredOS) {
      Alert.alert("The push notifications token wasn't received.");
      return;
    }

    let status: string = "Registering...";
    let isRegistered = this.state.isRegistered;
    try {
      this.setState({ isBusy: true, status });
      const pnPlatform = this.state.registeredOS == "ios" ? "apns" : "fcm";
      const pnToken = this.state.registeredToken;
      const request = {
        installationId: this.deviceId,
        platform: pnPlatform,
        pushChannel: pnToken,
        tags: []
      };
      const response = await this.notificationRegistrationService.registerAsync(request);
      status = `Registered for ${this.state.registeredOS} push notifications`;
      isRegistered = true;
    } catch (e) {
      status = `Registration failed: ${e}`;
    }
    finally {
      this.setState({ isBusy: false, status, isRegistered });
    }
  }

  async onDeregisterButtonPress() {
    if (!this.notificationService)
      return;

    let status: string = "Deregistering...";
    let isRegistered = this.state.isRegistered;
    try {
      this.setState({ isBusy: true, status });
      await this.notificationRegistrationService.deregisterAsync(this.deviceId);
      status = "Deregistered from push notifications";
      isRegistered = false;
    } catch (e) {
      status = `Deregistration failed: ${e}`;
    }
    finally {
      this.setState({ isBusy: false, status, isRegistered });
    }
  }
받은 토큰 등록 및 푸시 알림 처리
  onTokenReceived(token: any) {
    console.log(`Received a notification token on ${token.os}`);
    this.setState({ registeredToken: token.token, registeredOS: token.os, status: `The push notifications token has been received.` });

    if (this.state.isRegistered && this.state.registeredToken && this.state.registeredOS) {
      this.onRegisterButtonPress();
    }
  }

  onNotificationReceived(notification: any) {
    console.log(`Received a push notification on ${this.state.registeredOS}`);
    this.setState({ status: `Received a push notification...` });

    if (notification.data.message) {
      Alert.alert(AppConfig.appName, `${notification.data.action} action received`);
    }
  }
};
푸시 알림에 대한 네이티브 Android 프로젝트 구성
필요한 Android 패키지 구성
패키지는 앱을 빌드할 때 자동으로 연결 됩니다. 구성 프로세스를 완료하기 위한 몇 가지 추가 단계가 아래에 있습니다.
Android 매니페스트 구성
"android/app/src/기본/AndroidManifest.xml"에서 패키지 이름, 권한 및 필수 서비스를 확인합니다. 및 수신기를 RNPushNotificationPublisher 등록하고 RNPushNotificationBootEventReceiver 서비스를 등록했는지 확인합니다 RNPushNotificationListenerService . 알림 메타데이터를 사용하여 푸시 알림 모양을 사용자 지정할 수 있습니다.
<manifest xmlns:android="http://schemas.android.com/apk/res/android"
    package="YOUR_PACKAGE_NAME">

      <uses-permission android:name="android.permission.INTERNET" />
      <uses-permission android:name="android.permission.WAKE_LOCK" />
      <uses-permission android:name="android.permission.VIBRATE" />
      <uses-permission android:name="android.permission.RECEIVE_BOOT_COMPLETED"/>

      <application
        android:name=".MainApplication"
        android:label="@string/app_name"
        android:usesCleartextTraffic="true"
        android:icon="@mipmap/ic_launcher"
        android:roundIcon="@mipmap/ic_launcher_round"
        android:allowBackup="false"
        android:theme="@style/AppTheme">

        <meta-data  android:name="com.dieam.reactnativepushnotification.notification_channel_name"
                    android:value="PushDemo Channel"/>
        <meta-data  android:name="com.dieam.reactnativepushnotification.notification_channel_description"
                    android:value="PushDemo Channel Description"/>
        <meta-data  android:name="com.dieam.reactnativepushnotification.notification_foreground"
                    android:value="true"/>
        <meta-data  android:name="com.dieam.reactnativepushnotification.notification_color"
                    android:resource="@android:color/white"/>

        <receiver android:name="com.dieam.reactnativepushnotification.modules.RNPushNotificationPublisher" />
        <receiver android:name="com.dieam.reactnativepushnotification.modules.RNPushNotificationBootEventReceiver">
            <intent-filter>
                <action android:name="android.intent.action.BOOT_COMPLETED" />
            </intent-filter>
        </receiver>

        <service
            android:name="com.dieam.reactnativepushnotification.modules.RNPushNotificationListenerService"
            android:exported="false" >
            <intent-filter>
                <action android:name="com.google.firebase.MESSAGING_EVENT" />
            </intent-filter>
        </service>

        <activity
          android:name=".MainActivity"
          android:label="@string/app_name"
          android:configChanges="keyboard|keyboardHidden|orientation|screenSize|uiMode"
          android:launchMode="singleTask"
          android:windowSoftInputMode="adjustResize">
          <intent-filter>
              <action android:name="android.intent.action.MAIN" />
              <category android:name="android.intent.category.LAUNCHER" />
          </intent-filter>
        </activity>
        <activity android:name="com.facebook.react.devsupport.DevSettingsActivity" />
      </application>

</manifest>
Google 서비스 구성
"android/app/build.gradle"에서 Google Services를 등록합니다.
dependencies {
  ...
  implementation 'com.google.firebase:firebase-analytics:17.3.0'
  ...
}

apply plugin: 'com.google.gms.google-services'
FCM 설치 중에 다운로드한 "google-services.json" 파일을 프로젝트 폴더 "android/app/"에 복사합니다.
Android에 대한 푸시 알림 처리
들어오는 Android 푸시 알림을 처리하도록 기존 RNPushNotificationListenerService 서비스를 구성했습니다. 이 서비스는 애플리케이션 매니페스트의 앞부분에서 등록되었습니다. 들어오는 알림을 처리하고 플랫폼 간 React Native 부분에 프록시합니다. 추가 단계가 필요하지 않습니다.
푸시 알림에 대한 네이티브 iOS 프로젝트 구성
필요한 iOS 패키지 구성
앱을 빌드할 때 패키지가 자동으로 연결 됩니다. 네이티브 Pod를 설치하기만 하면 됩니다.
npx pod-install
Info.plist 및 Entitlements.plist 구성
"PushDemo/ios" 폴더로 이동하여 "PushDemo.xcworkspace" 작업 영역을 열고 상위 프로젝트 "PushDemo"를 선택하고 "서명 & 기능" 탭을 선택합니다.
프로비저닝 프로필에 사용된 값과 일치하도록 번들 식별자를 업데이트합니다.
-"+" 단추를 사용하여 두 개의 새 기능을 추가합니다.
- 백그라운드 모드 기능 및 틱 원격 알림.
- 푸시 알림 기능
iOS에 대한 푸시 알림 처리
"AppDelegate.h"를 열고 다음 가져오기를 추가합니다.
#import <UserNotifications/UNUserNotificationCenter.h>를 추가하여
UNUserNotificationCenterDelegate"AppDelegate"에서 지원하는 프로토콜 목록을 업데이트합니다.@interface AppDelegate : UIResponder <UIApplicationDelegate, RCTBridgeDelegate, UNUserNotificationCenterDelegate>"AppDelegate.m"을 열고 필요한 모든 iOS 콜백을 구성합니다.
#import <UserNotifications/UserNotifications.h>
#import <RNCPushNotificationIOS.h>

...

// Required to register for notifications
- (void)application:(UIApplication *)application didRegisterUserNotificationSettings:(UIUserNotificationSettings *)notificationSettings
{
 [RNCPushNotificationIOS didRegisterUserNotificationSettings:notificationSettings];
}

// Required for the register event.
- (void)application:(UIApplication *)application didRegisterForRemoteNotificationsWithDeviceToken:(NSData *)deviceToken
{
 [RNCPushNotificationIOS didRegisterForRemoteNotificationsWithDeviceToken:deviceToken];
}

// Required for the notification event. You must call the completion handler after handling the remote notification.
- (void)application:(UIApplication *)application didReceiveRemoteNotification:(NSDictionary *)userInfo
fetchCompletionHandler:(void (^)(UIBackgroundFetchResult))completionHandler
{
  [RNCPushNotificationIOS didReceiveRemoteNotification:userInfo fetchCompletionHandler:completionHandler];
}

// Required for the registrationError event.
- (void)application:(UIApplication *)application didFailToRegisterForRemoteNotificationsWithError:(NSError *)error
{
 [RNCPushNotificationIOS didFailToRegisterForRemoteNotificationsWithError:error];
}

// IOS 10+ Required for localNotification event
- (void)userNotificationCenter:(UNUserNotificationCenter *)center
didReceiveNotificationResponse:(UNNotificationResponse *)response
         withCompletionHandler:(void (^)(void))completionHandler
{
  [RNCPushNotificationIOS didReceiveNotificationResponse:response];
  completionHandler();
}

// IOS 4-10 Required for the localNotification event.
- (void)application:(UIApplication *)application didReceiveLocalNotification:(UILocalNotification *)notification
{
 [RNCPushNotificationIOS didReceiveLocalNotification:notification];
}

//Called when a notification is delivered to a foreground app.
-(void)userNotificationCenter:(UNUserNotificationCenter *)center willPresentNotification:(UNNotification *)notification withCompletionHandler:(void (^)(UNNotificationPresentationOptions options))completionHandler
{
  completionHandler(UNAuthorizationOptionSound | UNAuthorizationOptionAlert | UNAuthorizationOptionBadge);
}
솔루션 테스트
이제 백 엔드 서비스를 통해 알림 보내기를 테스트할 수 있습니다.
테스트 알림 보내기
Postman에서 새 탭을 엽니다.
요청을 POST로 설정하고 다음 주소를 입력합니다.
https://<app_name>.azurewebsites.net/api/notifications/requestsAPI 키를 사용하여 클라이언트 인증 섹션을 완료하도록 선택한 경우 apikey 값을 포함하도록 요청 헤더를 구성해야 합니다.
키 값 apikey <your_api_key> 본문에 대한 원시 옵션을 선택한 다음 서식 옵션 목록에서 JSON을 선택한 다음 일부 자리 표시자 JSON 콘텐츠를 포함합니다.
{
    "text": "Message from Postman!",
    "action": "action_a"
}
창 오른쪽 위에 있는 저장 단추 아래에 있는 코드 단추를 선택합니다. 요청은 HTML 에 대해 표시될 때( apikey 헤더를 포함했는지 여부에 따라) 다음 예제와 유사해야 합니다.
POST /api/notifications/requests HTTP/1.1
Host: https://<app_name>.azurewebsites.net
apikey: <your_api_key>
Content-Type: application/json

{
    "text": "Message from backend service",
    "action": "action_a"
}
대상 플랫폼 중 하나 또는 둘 다(Android 및 iOS)에서 PushDemo 애플리케이션을 실행합니다.
참고
Android에서 테스트하는 경우 디버그에서 실행되고 있지 않은지 확인하거나 애플리케이션을 실행하여 앱을 배포한 경우 앱을 강제로 닫고 시작 관리자에서 다시 시작합니다.
PushDemo 앱에서 등록 단추를 탭합니다.
Postman으로 돌아가서 코드 조각 생성 창을 닫은 다음(아직 수행하지 않은 경우) 보내기 단추를 클릭합니다.
Postman에서 200 OK 응답을 받고 받은 ActionA 작업을 보여 주는 경고가 앱에 표시되는지 확인합니다.
PushDemo 앱을 닫은 다음 Postman에서 보내기 단추를 다시 클릭합니다.
Postman에서 200 OK 응답을 다시 받는지 확인합니다. 올바른 메시지와 함께 PushDemo 앱의 알림 영역에 알림이 표시되는지 확인합니다.
알림을 탭하여 앱을 열고 알림이 수신된 ActionA 작업을 표시했는지 확인합니다.
Postman으로 돌아가서 작업 값에 대한 action_a 대신 action_b 지정하는 자동 알림을 보내도록 이전 요청 본문을 수정합니다.
{
    "action": "action_b",
    "silent": true
}
앱이 계속 열려 있는 상태에서 Postman에서 보내기 단추를 클릭합니다.
Postman에서 200 OK 응답을 받고 ActionA작업이 수신된 대신 받은 ActionB 작업을 보여 주는 경고가 앱에 표시되는지 확인합니다.
PushDemo 앱을 닫은 다음 Postman에서 보내기 단추를 다시 클릭합니다.
Postman에서 200 OK 응답을 받고 알림 영역에 자동 알림이 표시되지 않는지 확인합니다.
문제 해결
백 엔드 서비스의 응답 없음
로컬로 테스트할 때 백 엔드 서비스가 실행 중이고 올바른 포트를 사용하고 있는지 확인합니다.
Azure API 앱에 대해 테스트하는 경우 서비스가 실행 중이고 배포되었으며 오류 없이 시작된 검사.
클라이언트를 통해 테스트할 때 Postman 또는 모바일 앱 구성에서 기본 주소를 올바르게 지정했는지 검사 합니다. 기본 주소는 로컬에서 테스트할 https://<api_name>.azurewebsites.net/ 때 또는 https://localhost:5001/ 여야 합니다.
디버그 세션을 시작하거나 중지한 후 Android에서 알림을 수신하지 않음
디버그 세션을 시작하거나 중지한 후 다시 등록해야 합니다. 디버거로 인해 새 Firebase 토큰이 생성됩니다. 알림 허브 설치도 업데이트해야 합니다.
백 엔드 서비스에서 401 상태 코드 수신
apikey 요청 헤더를 설정하고 있으며 이 값이 백 엔드 서비스에 대해 구성한 것과 일치하는지 확인합니다.
로컬로 테스트할 때 이 오류가 발생하는 경우 클라이언트 구성에서 정의한 키 값이 API에서 사용하는 Authentication:ApiKey 사용자 설정 값과 일치하는지 확인합니다.
API 앱을 사용하여 테스트하는 경우 클라이언트 구성 파일의 키 값이 API 앱에서 사용 중인 Authentication:ApiKey 애플리케이션 설정과 일치하는지 확인합니다.
참고
백 엔드 서비스를 배포한 후 이 설정을 만들거나 변경한 경우 서비스를 적용하려면 서비스를 다시 시작해야 합니다.
API 키를 사용하여 클라이언트 인증 섹션을 완료하지 않도록 선택한 경우 NotificationsController 클래스에 Authorize 특성을 적용하지 않았는지 확인합니다.
백 엔드 서비스에서 404 상태 코드 수신
엔드포인트 및 HTTP 요청 메서드가 올바른지 확인합니다. 예를 들어 엔드포인트는 다음을 나타내야 합니다.
- [PUT]
https://<api_name>.azurewebsites.net/api/notifications/installations - [DELETE]
https://<api_name>.azurewebsites.net/api/notifications/installations/<installation_id> - [POST]
https://<api_name>.azurewebsites.net/api/notifications/requests
또는 로컬로 테스트할 때 다음을 수행합니다.
- [PUT]
https://localhost:5001/api/notifications/installations - [DELETE]
https://localhost:5001/api/notifications/installations/<installation_id> - [POST]
https://localhost:5001/api/notifications/requests
클라이언트 앱에서 기본 주소를 지정할 때 로 끝나는 /지 확인합니다. 기본 주소는 로컬에서 테스트할 https://<api_name>.azurewebsites.net/ 때 또는 https://localhost:5001/ 여야 합니다.
등록할 수 없고 알림 허브 오류 메시지가 표시됩니다.
테스트 디바이스에 네트워크 연결이 있는지 확인합니다. 그런 다음, HttpResponse에서 StatusCode 속성 값을 검사하도록 중단점을 설정하여 http 응답 상태 코드를 확인합니다.
상태 코드에 따라 적용 가능한 이전 문제 해결 제안을 검토합니다.
해당 API에 대한 이러한 특정 상태 코드를 반환하는 줄에 중단점을 설정합니다. 그런 다음 로컬로 디버깅할 때 백 엔드 서비스를 호출해 봅니다.
적절한 페이로드를 사용하여 Postman 을 통해 백 엔드 서비스가 예상대로 작동하는지 확인합니다. 해당 플랫폼에 대한 클라이언트 코드에서 만든 실제 페이로드를 사용합니다.
플랫폼별 구성 섹션을 검토하여 누락된 단계가 없는지 확인합니다. 적절한 플랫폼의 및 token 변수에 적합한 installation id 값이 확인되고 있는지 확인합니다.
디바이스 오류 메시지의 ID를 resolve 수 없음이 표시됩니다.
플랫폼별 구성 섹션을 검토하여 누락된 단계가 없는지 확인합니다.
관련 링크
- Azure Notification Hubs 개요
- Mac용 Visual Studio 설치
- Visual Studio Code 설치
- React Native 개발 환경 설정
- 백 엔드 작업을 위한 Notification Hubs SDK
- GitHub의 Notification Hubs SDK
- 애플리케이션 백 엔드에 등록
- 등록 관리
- 태그 작업
- 사용자 지정 템플릿 작업
다음 단계
이제 백 엔드 서비스를 통해 알림 허브에 연결된 기본 React Native 앱이 있어야 하며 알림을 보내고 받을 수 있습니다.
이 자습서에 사용된 예제를 사용자 고유의 시나리오에 맞게 조정해야 할 수 있습니다. 보다 강력한 오류 처리, 재시도 논리 및 로깅을 구현하는 것도 좋습니다.
Visual Studio App Center를 모바일 앱에 신속하게 통합하여 문제 해결에 도움이 되는 분석 및 진단 제공할 수 있습니다.